In this article, we look closer at the techincal details behind how digital sellable items are managed in the Commerce Engine, which in turn drives storefront functionality.
For an introduction to digital sellable items and how to configure them, see Working with Digital Sellable Items – Part 1.
Technical Implementation Details
See the Terminology Definitions for further explanation of tag types and Digital Item Tag Types for the default tags available, which are used throughout this article.
Inventory
Digital sellable items are always available for purchase, which I think of as having perpetual inventory. This functionality is driven by the AvailabilityAlwaysPolicy.
During the IGetSellableItemPipeline, the EnsureSellableItemAvailabilityPoliciesBlock replaces the sellable item’s AvailabilityPolicy with the AvailabilityAlwaysPolicy where one or more of the sellable item’s tags match the digital item tags.
See Digital Item Tags for the full list of default tags.
Plugin.Catalog.IGetSellableItemPipeline
  Plugin.Catalog.PrepGetSellableItemBlock
  Core.IFindEntityPipeline
  Plugin.Catalog.FilterSellableItemVariantsBlock
  Plugin.Catalog.FormatComposerViewPropertyBlock
  Plugin.Catalog.IPostGetSellableItemPipeline
    Plugin.Catalog.GetSellableItemCatalogBlock
    Plugin.Catalog.ICalculateSellableItemPricesPipeline
    Plugin.Catalog.AddSellableItemToContextBlock
    Plugin.Availability.EnsureSellableItemAvailabilityPoliciesBlock
    Plugin.Availability.IPopulateItemAvailabilityPipeline
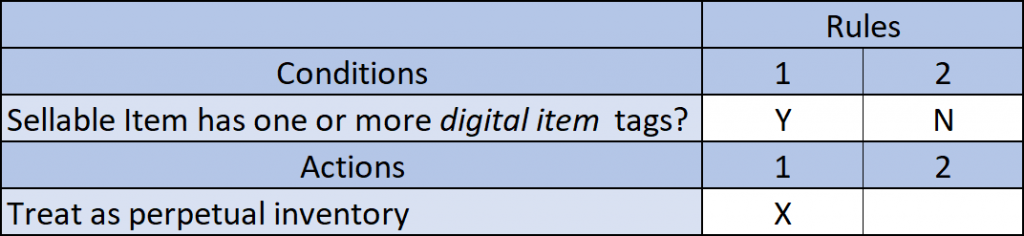
Inventory Rules – Standalone Sellable Item
Summary: The AvailabilityAlwaysPolicy (perpetual inventory) is dependent on digital item tags being configured on the sellable item.
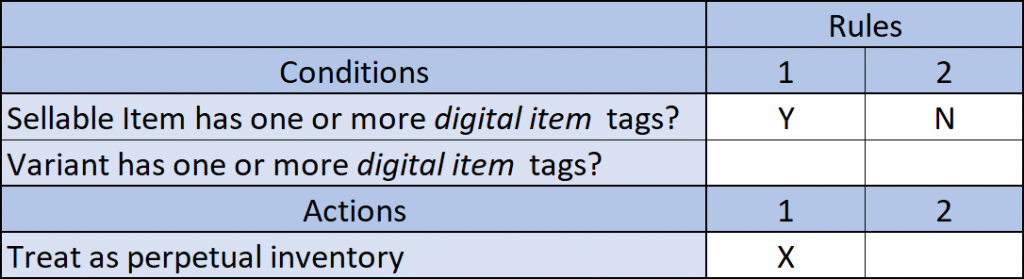
Inventory Rules – Sellable Items with Variants
Summary: The AvailabilityAlwaysPolicy (perpetual inventory) is dependent on the digital item tags being configured on the sellable item, which propagates to all variants. Configuring digital item tags on the variants will not have any effect, therefore perpetual inventory will either apply to all variants or no variants.
Cart Lines
When adding an item to the cart, the IAddCartLinePipeline runs, with the notable registered pipeline block or pipeline is IPopulateValidateCartPipeline, which syncs cart lines with the data from the sellable item entities. In part this is achieved with by calling the IGetSellableItemPipeline (more detail above in Inventory) for each cart line, which is important as the subsequent blocks that utilise the presence of AvailabilityAlwaysPolicy.
Plugin.Carts.IAddCartLinePipeline
  Plugin.Catalog.ValidateSellableItemBlock
  Plugin.Carts.AddCartLineBlock
  Plugin.Carts.AddContactBlock
  Plugin.Carts.IPopulateValidateCartPipeline
  Plugin.GiftCards.AddCartLineGiftCardBlock
  Plugin.DigitalItems.AddCartLineDigitalProductBlock
  Plugin.DigitalItems.AddCartLineWarrantyBlock
  Plugin.DigitalItems.AddCartLineInstallationBlock
  Plugin.Carts.ICalculateCartLinesPipeline
  Plugin.Carts.ICalculateCartPipeline
  Plugin.Carts.PersistCartBlock
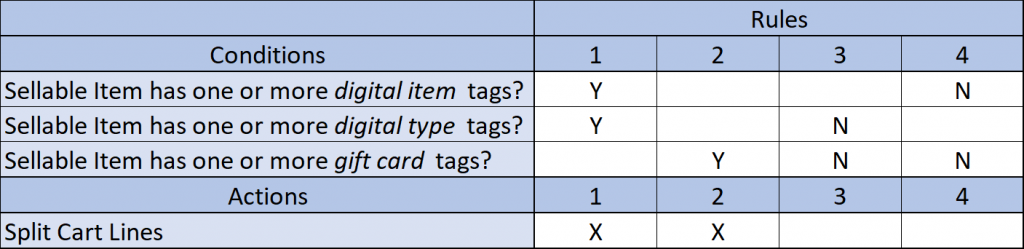
These subsequent pipeline blocks, AddCartLineDigitalProductBlock, AddCartLineWarrantyBlock, and AddCartLineInstallationBlock, determine if the newly added cart line is a digital item type by comparing the cart line tags against its respective set of digital item type tag lists in conjunction with the AvailabilityAlwaysPolicy. Similarly, the AddCartLineGiftCardBlock also compares cart line tags against gift card tags, but ignores the presence of the AvailabilityAlwaysPolicy.
If the cart line has been identified as a digital sellable item, it will be split the cart line out into single quantity lines, so that each digital sellable item can have unique fulfillment details, coming up in the checkout’s delivery step.
Plugin.Carts.IAddCartLinePipeline
  Plugin.Catalog.ValidateSellableItemBlock
  Plugin.Carts.AddCartLineBlock
  Plugin.Carts.AddContactBlock
  Plugin.Carts.IPopulateValidateCartPipeline
  Plugin.GiftCards.AddCartLineGiftCardBlock
  Plugin.DigitalItems.AddCartLineDigitalProductBlock
  Plugin.DigitalItems.AddCartLineWarrantyBlock
  Plugin.DigitalItems.AddCartLineInstallationBlock
  Plugin.Carts.ICalculateCartLinesPipeline
  Plugin.Carts.ICalculateCartPipeline
  Plugin.Carts.PersistCartBlock
Cart Line Rules – Standalone Sellable Item
Summary: Configuring a sellable item with one or more digital item type tags and one or more digital item tags (triggering perpetual inventory) will split cart lines into single quantity lines. Where one or more gift card tags are configured to a sellable item, this will also split cart lines and does not require a digital item tag configured.
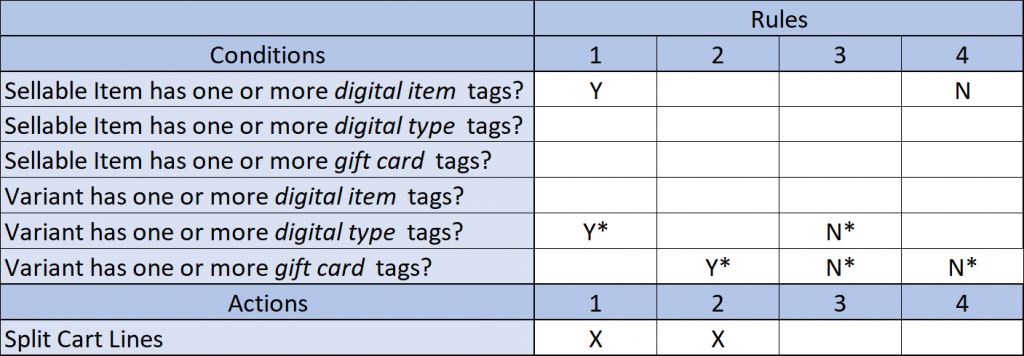
Cart Line Rules – Sellable Items with Variants
Summary: Similar to sellable item configurations, the only difference for configuring sellable items with variants is that the digital item tags or gift card tags need to apply to the variants themselves.
Consideration: Variants inherit its parent sellable item’s tags if not configured, however if a tag is configured on a variant it will not inherit the tags from the parent sellable item.
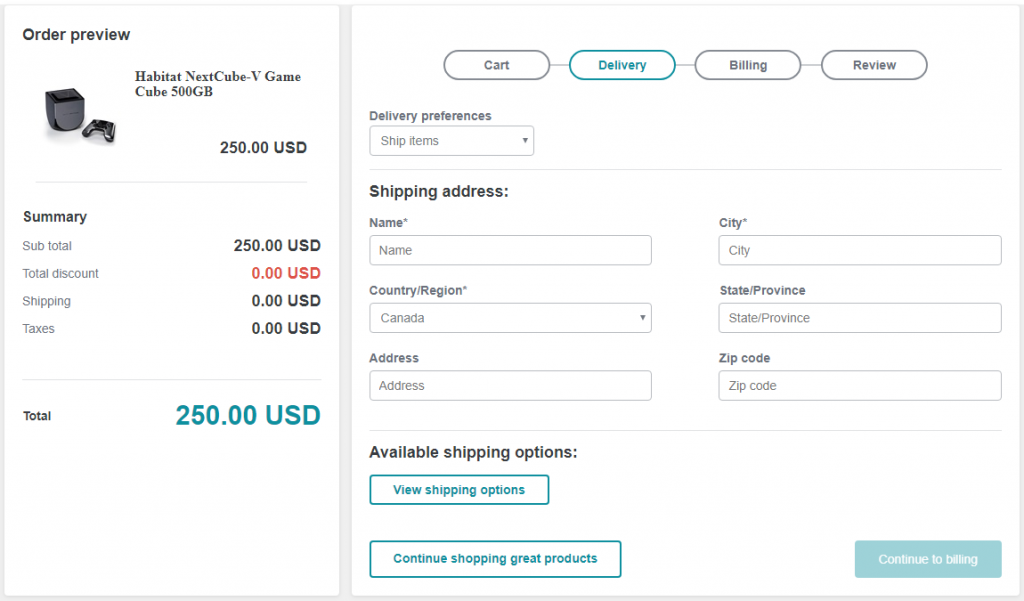
Cart Fulfillment Option Types
For the checkout’s delivery step, the IGetCartFulfillmentOptionsPipeline is executed within the GetCartFulfillmentOptions API, returning the available fulfillment option types for the storefront.
Plugin.Fulfillment.IGetCartFulfillmentOptionsPipeline
  Plugin.Fulfillment.FilterCartFulfillmentOptionsBlock
The key pipeline block is the FilterCartFulfillmentOptionsBlock, which roughly provides the following logic.
- Retrieves all fulfillment option types associated to the storefront.
- Removes the “SplitShipping” (Deliver Items Individually – split shipment) type if there is only one cart line.
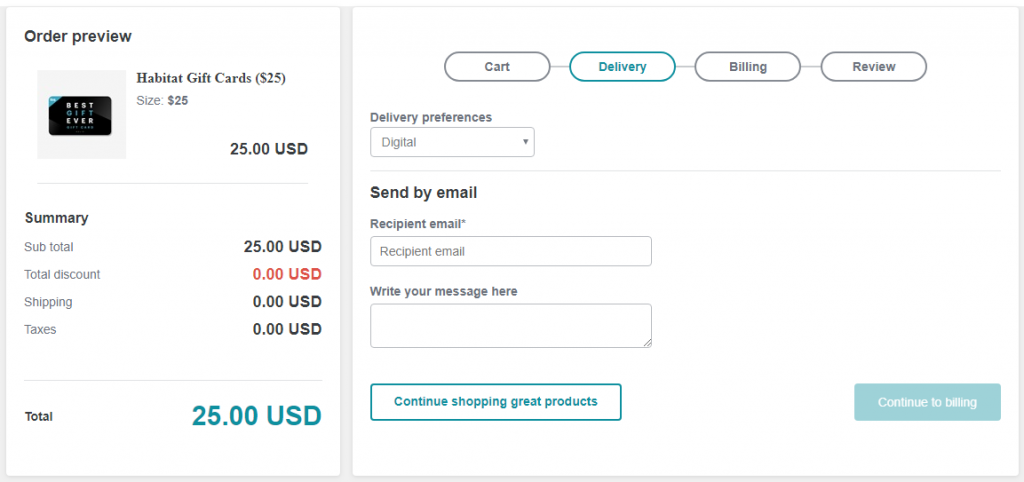
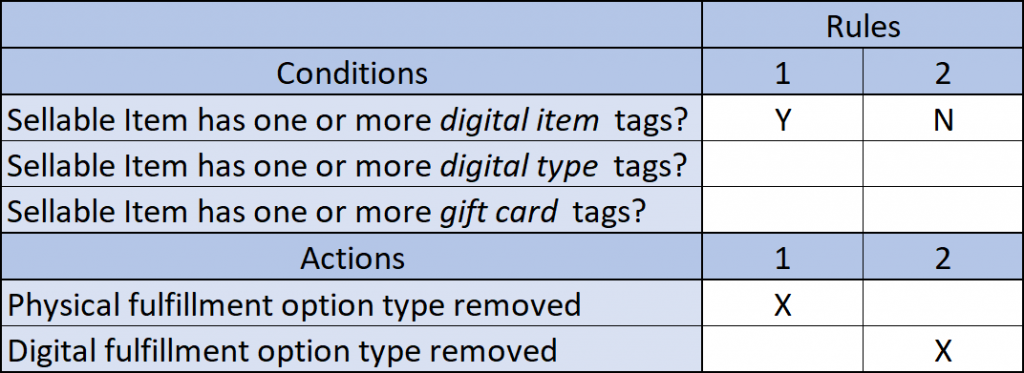
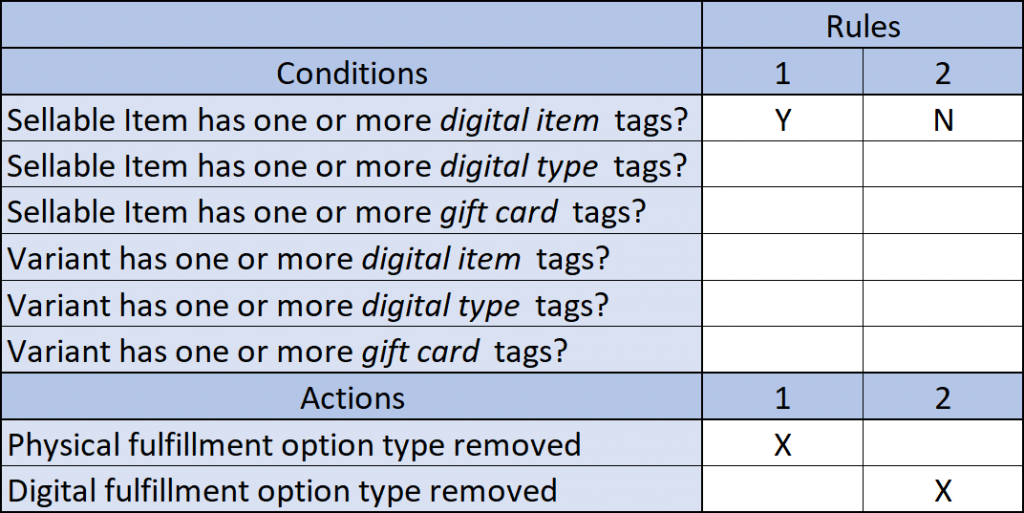
- Removes the physical fulfillment option type, “ShipToMe” (Ship To Address), where a cart contains digital sellable items, identified by the AvailabilityAlwaysPolicy.
- Removes the digital fulfillment option type, “Digital” (Digital Delivery), where a cart contains physical sellable items.
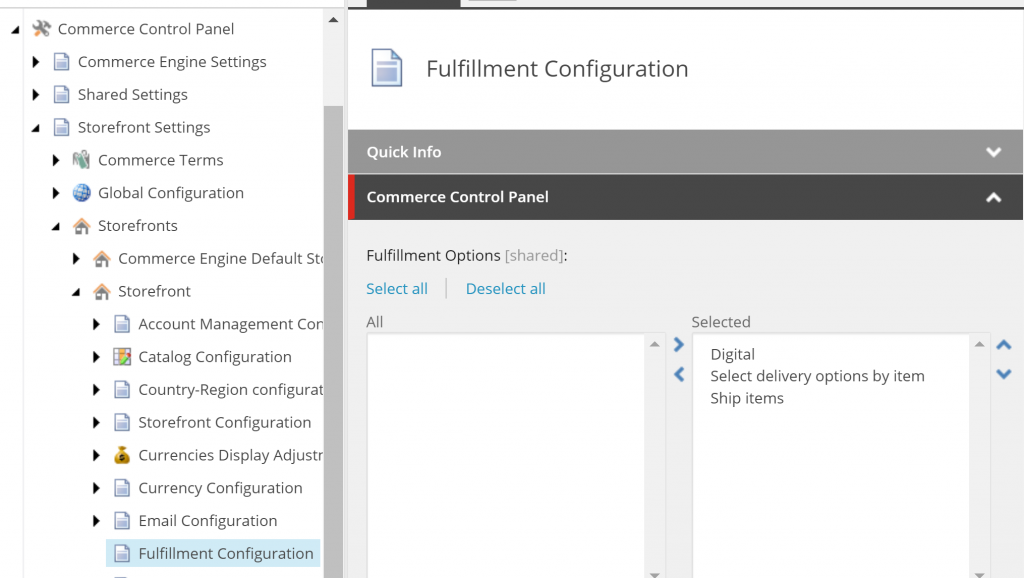
The storefront’s fulfillment options are located in the Sitecore Content Editor at /sitecore/Commerce/Commerce Control Panel/Storefront Settings/Storefronts/<storefront>/Fulfillment Configuration.
Cart Fulfillment Rules – Standalone Sellable Item
Summary: The digital fulfillment option types are dependent on the presence of the AvailabilityAlwaysPolicy (perpetual inventory) on the sellable item, rather than comparing the digital item type or gift card tags as one would expect.
Cart Fulfillment Rules – Sellable Items with Variants
Summary: The digital fulfillment option types are dependent on the presence of the AvailabilityAlwaysPolicy (perpetual inventory) on the sellable item, rather than comparing the digital item type or gift card tags on the variants as one would expect.
Consideration: This is also another instance where the parent sellable item drives the behaviour of all of its variants, so if you selling books, for example, and wanted to sell the digital PDF version, there is a customisation here to think about.
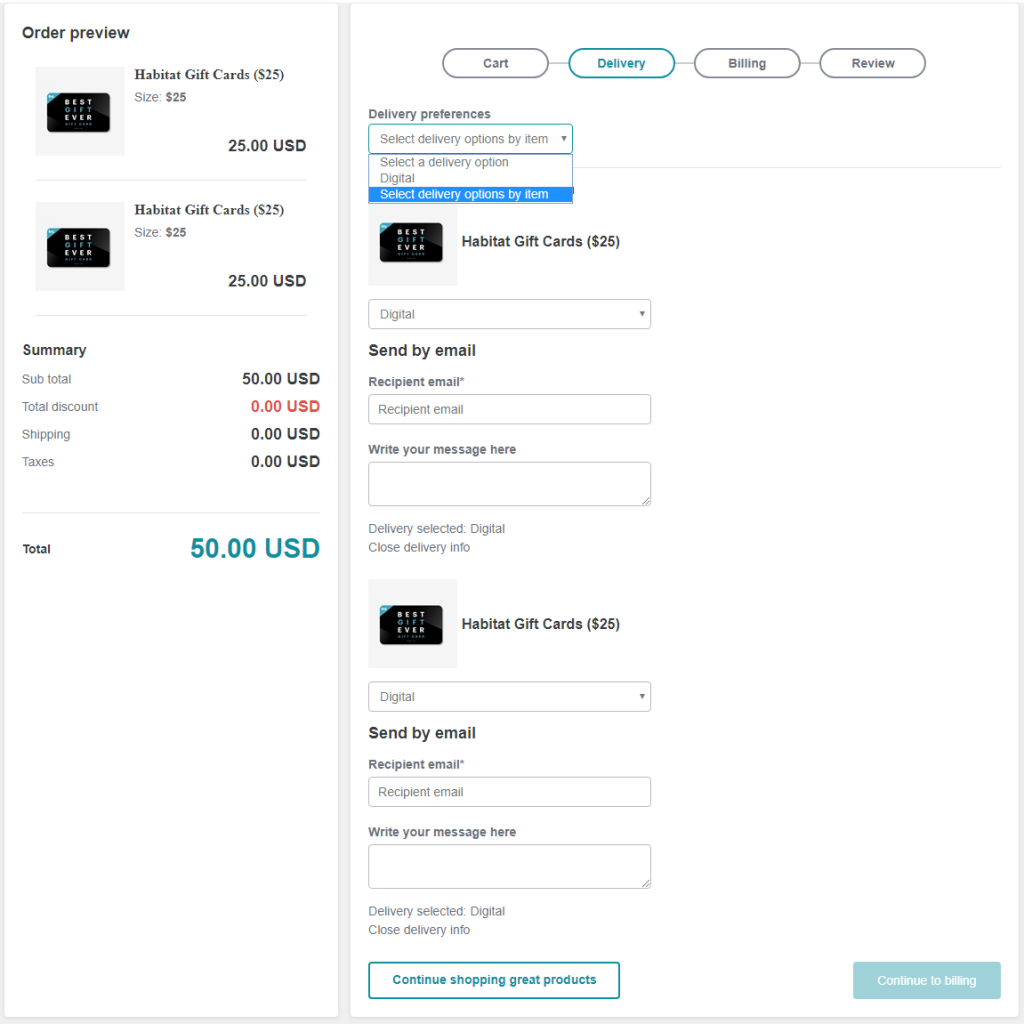
Cart Line Fulfillment Option Types
Where the split shipping option type is selected during the checkout’s delivery step, each cart line will require their own fulfillment option type, of which the available types per cart line are determined via the GetCartLineFulfillmentOptions API.
Plugin.Fulfillment.IGetCartLineFulfillmentOptionsPipeline
  Plugin.Fulfillment.FilterCartLineFulfillmentOptionsBlock
The key pipeline block in this pipeline is the FilterCartLineFulfillmentOptionsBlock, which has similar logic to the FilterCartFulfillmentOptionsBlock, but focuses on each cart line in isolation.
- Retrieves all fulfillment option types associated to the storefront.
- Removes the “SplitShipping” / (Deliver Items Individually – split shipment) type as this option is not applicable for individual line items.
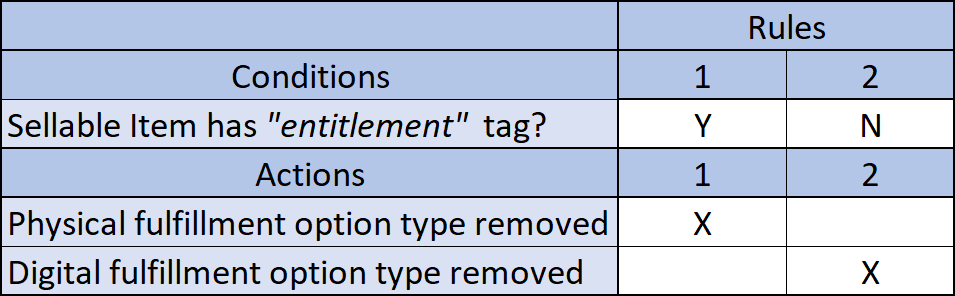
- Removes the physical fulfillment option type, “ShipToMe” (Ship To Address), where the cart line is a digital sellable item, identified by the “entitlement” tag.
- Removes the digital fulfillment option type, “Digital” (Digital Delivery), where the cart line is a physical sellable item.
You may have noticed that the “entitlement” tag is being utilised instead of the AvailabilityAlwaysPolicy as per the FilterCartFulfillmentOptionsBlock. Although the “entitlement” tag does exist in the Digital Item Tags, effectually meaning that the sellable item will still contain the AvailablityAlwaysPolicy, it’s important note to take for identifying how digital sellable items need to be configured, so we don’t run into any surprises in the storefront.
Cart Line Fulfillment Rules – Standalone Sellable Item
Summary: The digital fulfillment option types for cart lines are dependent on the presence of the “entitlement” tag on the sellable item, which by default is equivalent to the AvailabilityAlwaysPolicy, rather than comparing the digital item type or gift card tags as one would expect.
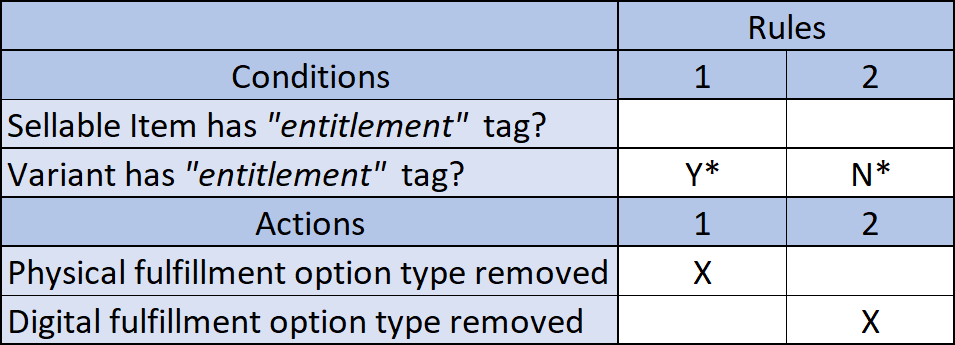
Cart Line Fulfillment Rules – Sellable Items with Variants
Summary: The digital fulfillment option types for cart lines are dependent on the presence of the “entitlement” tag on the variant, which by default is equivalent to the AvailabilityAlwaysPolicy, rather than comparing the digital item type or gift card tags as one would expect.
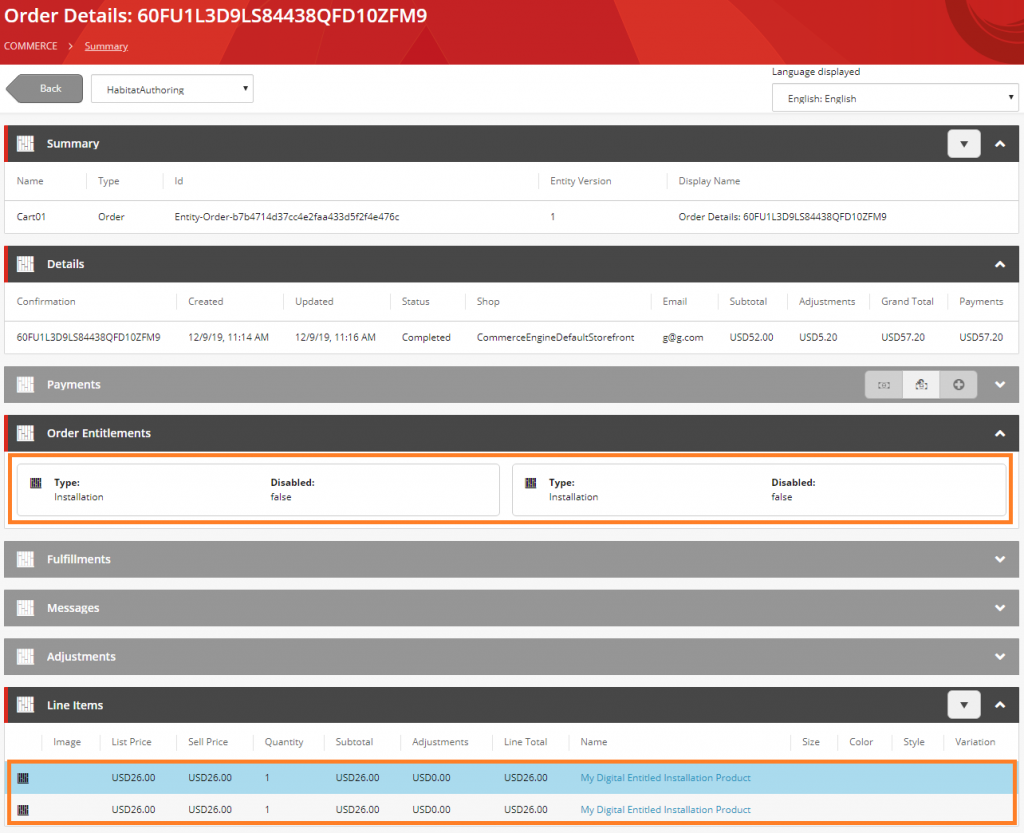
Entitlements
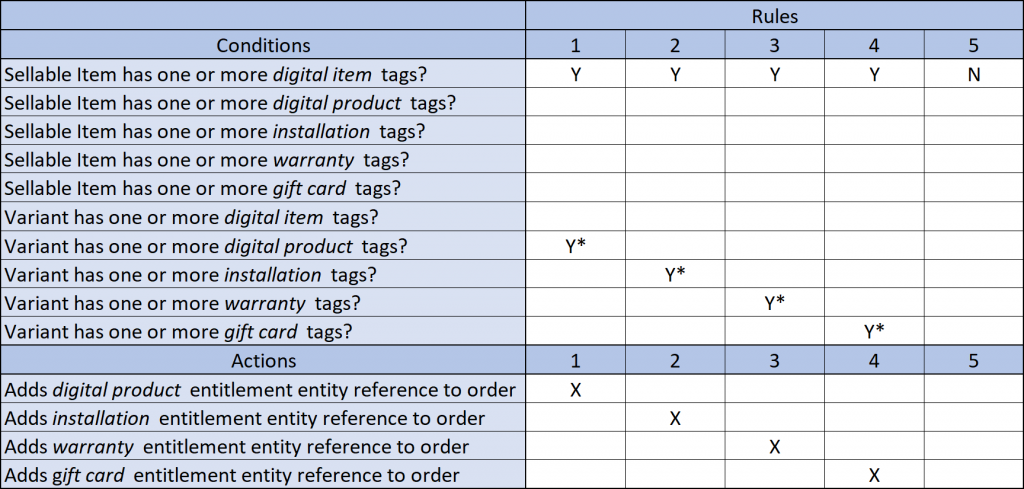
Entitlements are provisioned during the released order minion. The GenerateOrderEntitlementsBlock is the central point for creating the entitlements, calling the IProvisionEntitlementsPipeline to handle each digital item type.
Plugin.Orders.IReleasedOrdersMinionPipeline
  Plugin.Fulfillment.GenerateOrderShipmentBlock
  Plugin.Fulfillment.GenerateOrderLinesShipmentBlock
  Plugin.Entitlements.GenerateOrderEntitlementsBlock
  Plugin.FaultInjection.MinionFaultBlock
  Plugin.FaultInjection.SettlePaymentFaultBlock
  Plugin.Sample.Payments.Braintree.SettleOrderSalesActivitiesBlock
  Plugin.Orders.MoveReleasedOrderBlock
Plugin.Entitlements.IProvisionEntitlementsPipeline
  Plugin.Entitlements.ProvisionEntitlementsBlock
  Plugin.GiftCards.ProvisionGiftCardEntitlementsBlock
  Plugin.DigitalItems.ProvisionInstallationEntitlementsBlock
  Plugin.DigitalItems.ProvisionDigitalProductEntitlementsBlock
  Plugin.DigitalItems.ProvisionWarrantyEntitlementsBlock
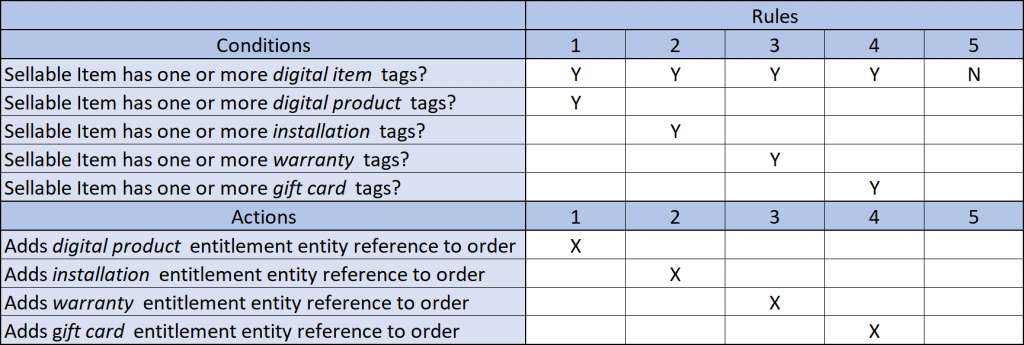
For orders to receive entitlements, both the AvailabilityAlwaysPolicy and a tag from their respective digital item type must be present, this includes the gift card entitlements, which in previous areas didn’t validate against the AvailabilityAlwaysPolicy.
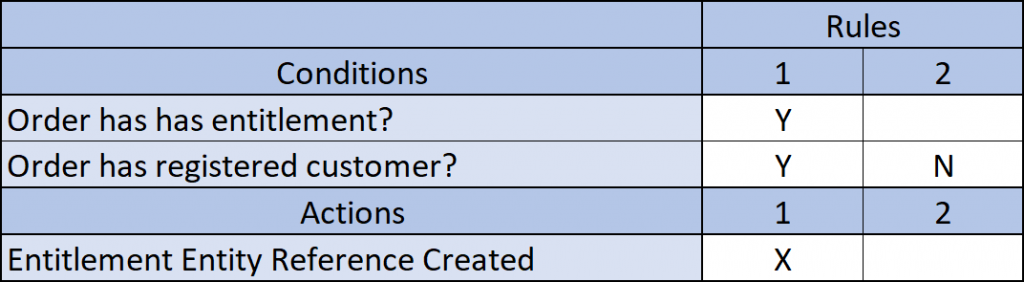
Once the Entitlement entity has been created it is then associated to the order as an Entity Reference.
If the order was placed by a registered customer, the entitlement will also be associated to the order as an Entity Reference.
Entitlement Rules – Standalone Sellable Item
Summary: Both the AvailabilityAlwaysPolicy and a digital item type tag will need to be associated to the sellable item to generate the respective entitlement and create an entity reference to it on the order.
Entitlement Rules – Sellable Items with Variants
Summary: The AvailabilityAlwaysPolicy must be present on the parent sellable item, while a digital item type tag will need to be associated to the variant to generate the respective entitlement and create an entity reference to it on the order.
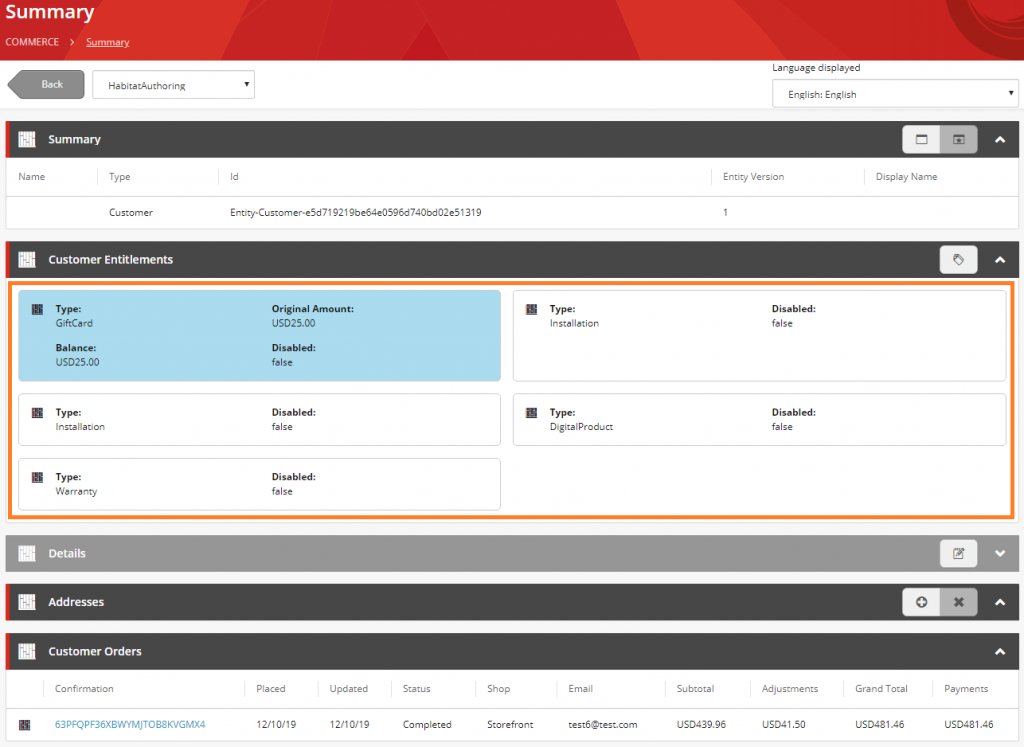
Entitlement Rules – Customer Entitlements
Summary: Piggybacking off of the base entitlement rules above, if an entitlement has been created for an order and the customer was registered at the time the order was placed, the respective digital item type entitlement will be added to the Customer commerce entity.
Appendix
Terminology Definitions
- Digital item tags: Tags configured in DigitalItemTagsPolicy.TagList.
- Digital type tags: Any of the digital product tags, installation tags, or warranty tags.
- Gift card tags: Tags configured in GiftCardTagsPolicy.TagList.
- Digital product tags: Tags configured in KnownEntitlementsTags.DigitalProductTags.
- Installation tags: Tags configured in KnownEntitlementsTags.InstallationTags.
- Warranty tags: Tags configured in KnownEntitlementsTags.WarrantyTags.
Summary
We have covered how digital sellable items are treated throughout the Sitecore Commerce Engine. These are not limitations of the platform, as you are free to customise the functionality to your specific business requirements, but should be taken into consideration when evaluating business requirements and performing a gap analysis against platform functionality.