Sitecore Experience Commerce: Preparing a Clean Install of XC 9.1

Reading Time: 3 minutes

In this article, we will look at preparing for the installation Sitecore Experience Commerce, by making the minimal amount of necessary changes for a baseline installation and avoiding the pitfalls with the default configuration. From this point, modifying the configurations for project-specific should be simpler.

This article is intended to supplement the Sitecore XC 9.1 Installation Guide for the download package version Sitecore.Commerce.2019.04-3.0.163.zip.

Pre-Installation

Before running the deployment script, we will correct the configuration and apply some workarounds in order to successfully install Sitecore Commerce.

Workarounds

  1. The <Identity Server web root>\Config\production\Sitecore.IdentityServer.Host.xml needs to be updated to include the new commerce site bindings from the $SiteHostHeaderName. (“sxa.storefront.com” from the deployment script).
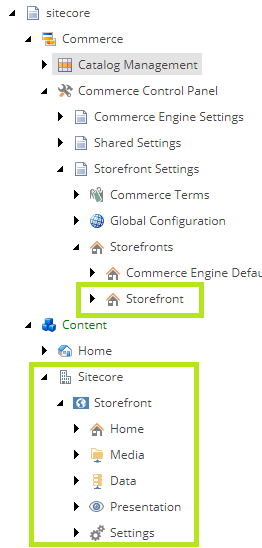
    <Clients>
      <DefaultClient>
        <AllowedCorsOrigins>
      	  <AllowedCorsOriginsGroup1>http://SC911.sc</AllowedCorsOriginsGroup1>
      	  <AllowedCorsOriginsGroup2>http://sxa.storefront.com</AllowedCorsOriginsGroup2>
      	  <AllowedCorsOriginsGroup3>https://sxa.storefront.com</AllowedCorsOriginsGroup3>
        </AllowedCorsOrigins>
      </DefaultClient>
      ...
    </Clients>
    
  2. Follow Installing Sitecore Experience Commerce 9.1 with Default Storefront Tenant and Site.

Configuration

For the installation step, we assume that Sitecore XP 9.1.1 has been installed already from XP Single packages (XP0). The only change to the configuration that is made is to reset the password $SitecoreAdminPassword to “b”.

Now, we need to reset the Deploy-Sitecore-Commerce.ps1 configurations to reasonable defaults.

To simplify the installation process, I place the Sitecore PowerShell Extensions zip file, Sitecore Experience Accelerator zip file, and Microsoft.Web.XmlTransform.dll file directly in the deployment folder.

The following parameters are reset back to XP 9.1.1 Single packages (XP0) configuration:

  • $Sitename
  • $SqlDbPrefix
  • $IdentityServerSiteName
param(
	[string]$SiteName = "XP0",
	[string]$SiteHostHeaderName = "sxa.storefront.com",
	[string]$SqlDbPrefix = "$SiteName",
	[string]$CommerceSearchProvider = "SOLR",
	[string]$IdentityServerSiteName = "$SiteName.IdentityServer"
)

The following parameters are reset back to XP 9.1.1 Single packages (XP0) configuration:

  • SiteName
  • InstallDir
  • XConnectInstallDir

The following parameters are updated so that the evaluations return a single (and correct) string response, as opposed to an array of strings:

  • SitecoreCommerceEnginePath
  • SitecoreBizFxServicesContentPath

The following parameters are configured to point back to the deployment directory:

  • PowerShellExtensionsModuleFullPath
  • SXAModuleFullPath
  • MergeToolFullPath

The following parameters are modified to point to the correct release zip files, provided in the Commerce package:

  • SXACommerceModuleFullPath
  • SXAStorefrontModuleFullPath
$params = @{
		Path                                        = Resolve-Path '.\Configuration\Commerce\Master_SingleServer.json'
		BaseConfigurationFolder                     = Resolve-Path '.\Configuration'
		SiteName                                    = "$SiteName.sc"
		SiteHostHeaderName                          = $SiteHostHeaderName
		InstallDir                                  = "c:\inetpub\wwwroot\$SiteName.sc"
		XConnectInstallDir                          = "c:\inetpub\wwwroot\$SiteName.xconnect"
		CommerceInstallRoot                         = "c:\inetpub\wwwroot\"        
		CommerceServicesDbServer                    = $($Env:COMPUTERNAME)    #OR "SQLServerName\SQLInstanceName"
		CommerceServicesDbName                      = "SitecoreCommerce9_SharedEnvironments"
		CommerceServicesGlobalDbName                = "SitecoreCommerce9_Global"
		SitecoreDbServer                            = $($Env:COMPUTERNAME)            #OR "SQLServerName\SQLInstanceName"
		SitecoreCoreDbName                          = "$($SqlDbPrefix)_Core"
		SitecoreUsername                            = "sitecore\admin"
		SitecoreUserPassword                        = "b"
		CommerceSearchProvider                      = $CommerceSearchProvider
		SolrUrl                                     = "https://solr:8992/solr"
		SolrRoot                                    = "c:\\solr-7.2.1"
		SolrService                                 = "solr-7.2.1"
		SolrSchemas                                 = ( Join-Path -Path $DEPLOYMENT_DIRECTORY -ChildPath "SolrSchemas" )
		CommerceServicesPostfix                     = "Sc9"
		CommerceServicesHostPostfix                 = "Sc9.qa"
		SearchIndexPrefix                           = "sitecore"
		EnvironmentsPrefix                          = "Habitat"
		Environments                                = @('AdventureWorksAuthoring', 'HabitatAuthoring')
		AzureSearchServiceName                      = ""
		AzureSearchAdminKey                         = ""
		AzureSearchQueryKey                         = ""
		CommerceEngineDacPac                        = Resolve-Path -Path "..\Sitecore.Commerce.Engine.SDK.*\Sitecore.Commerce.Engine.DB.dacpac"
		CommerceOpsServicesPort                     = "5015"
		CommerceShopsServicesPort                   = "5005"
		CommerceAuthoringServicesPort               = "5000"
		CommerceMinionsServicesPort                 = "5010"
		SitecoreBizFxPort                           = "4200"
		SitecoreCommerceEnginePath                  = Resolve-Path -Path "..\Sitecore.Commerce.Engine.3.0.163.zip"
		SitecoreBizFxServicesContentPath            = Resolve-Path -Path "..\Sitecore.BizFX.2.0.3"
		CommerceEngineCertificateName               = "storefront.engine"
		SiteUtilitiesSrc                            = ( Join-Path -Path $DEPLOYMENT_DIRECTORY -ChildPath "SiteUtilityPages" )
		HabitatImagesModuleFullPath                 = Resolve-Path -Path "..\Sitecore.Commerce.Habitat.Images-*.zip"
		AdvImagesModuleFullPath                     = Resolve-Path -Path "..\Adventure Works Images.zip"
		CommerceConnectModuleFullPath               = Resolve-Path -Path "..\Sitecore Commerce Connect*.zip"
		CommercexProfilesModuleFullPath             = Resolve-Path -Path "..\Sitecore Commerce ExperienceProfile Core *.zip"
		CommercexAnalyticsModuleFullPath            = Resolve-Path -Path "..\Sitecore Commerce ExperienceAnalytics Core *.zip"
		CommerceMAModuleFullPath                    = Resolve-Path -Path "..\Sitecore Commerce Marketing Automation Core *.zip"
		CommerceMAForAutomationEngineModuleFullPath = Resolve-Path -Path "..\Sitecore Commerce Marketing Automation for AutomationEngine *.zip"
		CEConnectModuleFullPath                     = Resolve-Path -Path "..\Sitecore Commerce Engine Connect*.zip"
		PowerShellExtensionsModuleFullPath          = Resolve-Path -Path "..\Sitecore PowerShell Extensions*.zip"
		SXAModuleFullPath                           = Resolve-Path -Path "..\Sitecore Experience Accelerator*.zip"
		SXACommerceModuleFullPath                   = Resolve-Path -Path "..\Sitecore Commerce Experience Accelerator 2.*.zip"
		SXAStorefrontModuleFullPath                 = Resolve-Path -Path "..\Sitecore Commerce Experience Accelerator Storefront 2.*.zip"
		SXAStorefrontThemeModuleFullPath            = Resolve-Path -Path "..\Sitecore Commerce Experience Accelerator Storefront Themes*.zip"
		SXAStorefrontCatalogModuleFullPath          = Resolve-Path -Path "..\Sitecore Commerce Experience Accelerator Habitat Catalog*.zip"
		MergeToolFullPath                           = Resolve-Path -Path "..\Microsoft.Web.XmlTransform.dll"
		UserDomain                                  = $Env:COMPUTERNAME
		UserName                                    = 'CSFndRuntimeUser'
		UserPassword                                = 'Pu8azaCr'                          

		BraintreeAccount                            = @{
			MerchantId = ''
			PublicKey = ''
			PrivateKey = ''
		}
		SitecoreBizFxServerName                     = "SitecoreBizFx"
		SitecoreIdentityServerApplicationName       = $IdentityServerSiteName
		SitecoreIdentityServerHostName              = $IdentityServerSiteName
	}

Post Installation

  • During the installation the original bindings for the Sitecore website, e.g. ‘XP0.sc’, are removed. Add these bindings back in IIS.
  • If you add the Postman collections/environments to Postman, the
    SitecoreIdServerHost will need to be updated to point to ‘XP0.identityserver’.

Installing Sitecore Experience Commerce 9.1 with Default Storefront Tenant and Site

Reading Time: < 1 minute

In this article, we will look at applying a workaround in order to install the default storefront tenant and site during the Sitecore Commerce 9.1 installation as unfortunately there’s a bug that prevents these from being created during the installation.

Workaround Steps

Note: This has been tested and verified against the On Premise packages.


  1. Following on from the installation guide’s step, 2.2. Download the Sitecore XC release package and prerequisites, navigate and extract the file named xml from Sitecore Commerce Experience Accelerator Storefront 2.0.181.zip\package.zip\items\master\sitecore\system\Modules\PowerShell\Script Library\CXA – Internal\Web API\CreateDefaultStorefrontTenantAndSite\{6FEC77C8-00DC-4B7B-9597-82588616A1F2}\en\1.
  2. Open the file and add the following snippet before Function CreateCXATenant.
    #Override Write-Progress to avoid errors which happen because of impossibility to write-progress in non-interactive sessions
    Function Write-Progress {
        [CmdletBinding()]
        param(
            [Parameter(Mandatory = $false)]
            $Activity,
            [Parameter(Mandatory = $false)]
            $CurrentOperation,
            [Parameter(Mandatory = $false)]
            $Status,
            [Parameter(Mandatory = $false)]
            $PercentComplete,
            [Parameter(Mandatory = $false)]
            [switch]$Completed
        )
        process {
            # do nothing
        }
    }
    
  3. Replace the file in the archive with the updated file.
  4. Continue to follow the installation guide.

When the deployment script run in step 3.2. Run the deployment script, the default tenant and site will now be created.

Sitecore Experience Commerce: Pricing Calculation Logic – Part 2

Reading Time: 2 minutes

In this article, we highlight the expected pricing outcomes through decision tables.

For a high-level look at the important aspects of the business logic that determine list and sell prices, see Pricing Calculation Logic – Part 1.

Pricing Transparency (Advanced)

The following decision tables can be utilised to help understand and troubleshoot pricing outcomes.

Important notes:

  • The business logic applies to the OOTB Sitecore Commerce solution.
  • Price cards are resolved by the price book associated to the catalog.
  • These findings do not take into consideration promotions, specifically those that affect sellable item/variant sell price.

Sellable Item Price Calculation

These messages will be applied to the MessagesComponent of a  SellableItem entity.

In simplying the table, I took a few shortcuts to note:

  • ‘Valid snapshot’ conditions assume a price card has been resolved by name or tag. Refer to the previous flow diagrams in Pricing Calculation Logic – Part 1 to understand the more complex conditions.
  • For ‘Has variants?’, ‘Calculate item list price in depth?’, and ‘Has list price for currency?’ conditions, the Rules that state a group ‘N’. However, I actually mean that some, but not all, of these conditions can be true.

Variant Price Calculation

These messages will be applied to the MessagesComponent of a  ItemVariationComponent within the SellableItem entity.

In simplying the table, I took a few shortcuts to note:

  • ‘Valid snapshot’ conditions assume a price card has been resolved by name or tag. Refer to the previous flow diagrams in Pricing Calculation Logic – Part 1 to understand the more complex conditions.

Cart Item Calculation (Sellable Item)

These messages will be applied to the MessagesComponent of a sellable item CartLineComponent.

Messages will be applied in the following order:

  1. Sellable Item Price Calculation
  2. Cart Item Calculation (Sellable Item)

Cart Item Calculation (Variant)

These messages will be applied to the MessagesComponent of a variant CartLineComponent.

Messages will be applied in the following order:

  1. Sellable Item Price Calculation
  2. Variant Price Calculation
  3. Cart Item Calculation (Variant)

References

Sitecore Experience Commerce: Pricing Calculation Logic – Part 1

Reading Time: 5 minutes

In this multi-part article, we will review the Sellable Item/Variant price calculation processes that determines and differentiates the list pricing from the sell pricing.

As this is one of the more complex areas of Sitecore Commerce, Part 1 will cover the business logic used to apply the pricing, while Pricing Calculation Logic – Part 2 will highlight the expected pricing outcomes through decision tables.

This article is intended to suplement the official Pricing transparency documentation.

Introduction

The  MessagesComponent on the SellableItem entity, ItemVariationComponent, and CartProductComponent provides the audit trail for how the sellable item/variant pricing was calculated. The ‘<=‘ in the Text property is not a logic operator, but instead represents the assignment of the source to the price type.

{
	"@odata.type": "#Sitecore.Commerce.Core.MessagesComponent",
	"Id": "47edb873fe754c89ae4bc41d7c309811",
	"Name": "",
	"Comments": "",
	"Policies": [],
	"Messages": [
		{
			"Code": "Pricing",
			"Text": "SellPrice<=PriceCard.Snapshot: Price=$10.00|Qty=1.0|PriceCard=Habitat_PriceCard"
		},
		{
			"Code": "Pricing",
			"Text": "ListPrice<=PricingPolicy: Price=$1,919.69"
		}
	],
	"ChildComponents": []
}
{
	"@odata.type": "#Sitecore.Commerce.Core.MessagesComponent",
	"Id": "ed77a9de5db941ffbfcf0b217e3affda",
	"Name": "",
	"Comments": "",
	"Policies": [],
	"Messages": [
		{
			"Code": "Pricing",
			"Text": "Variation.SellPrice<=Variation.PriceCard.Snapshot: Price=$9.00|Qty=1.0|Variation=56042567|PriceCard=Habitat_VariantsPriceCard"
		},
		{
			"Code": "Pricing",
			"Text": "Variation.ListPrice<=Variation.PricePolicy: Variation=56042567|Price=$2,429.99"
		}
	],
	"ChildComponents": []
}
{
	"@odata.type": "#Sitecore.Commerce.Core.MessagesComponent",
	"Id": "7e6bc27965ef4f3a954e6fcdadb96fa5",
	"Name": "",
	"Comments": "",
	"Policies": [],
	"Messages": [
		{
			"Code": "Pricing",
			"Text": "SellPrice<=PriceCard.Snapshot: Price=$10.00|Qty=1.0|PriceCard=Habitat_PriceCard"
		},
		{
			"Code": "Pricing",
			"Text": "ListPrice<=PricingPolicy: Price=$1,919.69"
		},
		{
			"Code": "Pricing",
			"Text": "Variation.SellPrice<=Variation.PriceCard.Snapshot: Price=$9.00|Qty=1.0|Variation=56042567|PriceCard=Habitat_VariantsPriceCard"
		},
		{
			"Code": "Pricing",
			"Text": "Variation.ListPrice<=Variation.PricePolicy: Variation=56042567|Price=$2,429.99"
		},
		{
			"Code": "Pricing",
			"Text": "CartItem.SellPrice<=PriceCard.ActiveSnapshot: Price=$6.00|Qty=5.0"
		},
		{
			"Code": "Pricing",
			"Text": "CartItem.ListPrice<=SellableItem.Variation.ListPrice: Price=$2,429.99"
		}
	],
	"ChildComponents": []
}

The 2 primary pricing scenarios we see in Sitecore Commerce are:

  • The pricing of a sellable item/variant as is (per single unit)
  • The pricing of a sellable item/variant once added to the cart. Pricing calculations here may also affected by quantity, via price tiers of associated price cards, and specific promotions that affect the sell price.

Sellable Item/Variant Pricing Calculations

The first scenario, where we are retrieving a sellable item/variant, to display on the Product Listing or Product Details pages for example, calculates the pricing through the following steps:

  1. Calculate Sellable Item Sell Price
  2. Calculate Variations Sell Price
  3. Calculate Sellable Item List Price
  4. Calculate Variations List Price
  5. Reconcile Sellable Item Prices

Important notes:

  • The business logic applies to the OOTB Sitecore Commerce solution.
  • Price cards are resolved by the price book associated to the catalog.
  • These findings do not take into consideration promotions, specifically those that affect sellable item/variant sell price.

Calculate Sellable Item Sell Price

The CalculateSellableItemSellPriceBlock will attempt to determine the sell price for the sellable item, adding it to the PurchaseOptionMoneyPolicy.

Notable flow aspects

  • Only the first attempt at resolving a price card will be utilised. i.e. if the price card name associated to the sellable item cannot be resolved to a price card or valid snapshot, the price card by tags logic is not used as a fall back.

Calculate Variations Sell Price

The CalculateVariationsSellPriceBlock will attempt to determine the sell price for each variant of the sellable item.

Notable flow aspects

  • The flow diagram represents a single variant. The pipeline block will utilise this flow for each variant.
  • Only the first attempt at resolving a price card will be utilised.
  • If the price card is resolved from the sellable item, the message will not reflect that the price card was retrieved from the sellable item.

Calculate Sellable Item List Price

The CalculateSellableItemListPriceBlock will attempt to determine the list price for sellable item.

Notable flow aspects

  • The GlobalPricingPolicy‘s CalculateItemListPriceInDepth property is set to false by default.
  • When iterating over variants for a valid ListPricingPolicy, the first variant to have a valid ListPricingPolicy will be used. The logic does not look for the lowest or highest price amongst all variants.

Calculate Variations List Price

The CalculateVariationsListPriceBlock will attempt to determine the list price for each variant of the sellable item.

Reconcile Sellable Item Prices

The ReconcileSellableItemPricesBlock will attempt to resolve missing List Prices and Sell Prices from the sellable item and variants. A flow diagram has been created for the Sellable Item and Variants separately.

Notable flow aspects

  • Setting the list price to 0 will ensure a price has been assigned.

Notable flow aspects

  • Setting the list price to 0 will ensure a price has been assigned.

Cart Line Calculations

The second scenario mentioned was that where the pricing calculation of sellable items/variants that have been added to the cart. The following step is performed after the standard pricing calculations to take into consideration the price tiers from price cards:

  1. Calculate Cart Line Price

Calculate Cart Line Price

The CalculateCartLinePricesBlock will determine and apply the appropriate list and sell prices for each cart line.

Notable flow aspects

  • There is an expectation that the list price and sell prices would have been resolved in Reconcile Sellable Item Prices.
  • Where a snapshot exists on a sellable item/variant the cart line’s quantity value will determine the price tier that will be utilised to retrieve the sell price from.
  • The messages from the Sellable Item and, if applicable, Variant are copied into the cart line MessagesComponent to document the pricing stacks, which assist in auditing pricing overrides in determining the final pricing.

Glossary

Navigating the pricing logic can be time-consuming due to similar and varied terms being used for similar or varying components, so here is a short glossary for better clarification.

  • Sellable Item/Variant List Pricing (Policy): The list pricing policy represents an array of prices (only one price per currency) that are associated to a sellable item/variant is specified under the Pricing entity view of the sellable item/variant in the Merchanding manager.
  • Price Card (Name): The price card or price card name associated to the sellable item/variant is specified under the Pricing entity view of the sellable item/variant in the Merchanding manager.
  • Sellable Item/Variant list price: This is the ListPrice property of a Sellable Item/Variant, not to be confused with the ListPricingPolicy.
    "Policies": [
    	{
    		"@odata.type": "#Sitecore.Commerce.Plugin.Pricing.ListPricingPolicy",
    		"PolicyId": "0d4cee51dffd44aa8a019394dd5ad1b1",
    		"Prices": [
    			{
    				"CurrencyCode": "USD",
    				"Amount": 1919.69
    			},
    			{
    				"CurrencyCode": "CAD",
    				"Amount": 2078.26
    			}
    		]
    	}
    ],
    "ListPrice": {
    	"CurrencyCode": "USD",
    	"Amount": 1919.69
    }
    
  • Sell Price: The sell price is associated to a Sellable Item/Variant or Cart Line via the PurchaseOptionMoneyPolicy.
    "Policies": [
    	{
    		"@odata.type": "#Sitecore.Commerce.Plugin.Pricing.PurchaseOptionMoneyPolicy",
    		"PolicyId": "12b963fe3b2b47618555c8783c877002",
    		"Models": [],
    		"Expires": "2019-04-22T12:30:46.5380974Z",
    		"SellPrice": {
    			"CurrencyCode": "USD",
    			"Amount": 10
    		},
    		"FixedSellPrice": false
    	}
    ]
    
  • (Cart Line) Unit List Price: This is the determined list price of the cart line.
    "Policies": [
    	{
    		"@odata.type": "#Sitecore.Commerce.Plugin.Pricing.PurchaseOptionMoneyPolicy",
    		"PolicyId": "5e6c1f42c7c94bc4b79696e716b6cda5",
    		"Models": [],
    		"Expires": "2019-04-22T13:13:18.8117816Z",
    		"SellPrice": {
    			"CurrencyCode": "USD",
    			"Amount": 6
    		},
    		"FixedSellPrice": false
    	}
    ],
    "UnitListPrice": {
    	"CurrencyCode": "USD",
    	"Amount": 2429.99
    }
    

References

Sitecore Experience Commerce: Promotion Evaluation and Application Logic

Reading Time: 4 minutes

In this article, we will review the default business logic that the Commerce Engine utilises to evaluate and apply promotions.

Note: References to date will indicate both date and time throughout this article.

Introduction

Before we get into the details around promotions, there are a few things we need to understand.

    • Promotions are separated into cart line level and cart level promotions, determined by the promotion benefits configured to each promotion. While multiple benefits can be added to promotions, additional benefits after the first can only be of the same benefit type.
    • Cart line calculations (subtotals, fulfillment fees, promotion discounts, taxes, totals) are evaluated and applied prior to the and cart calculations.
      Sitecore.Commerce.Plugin.Carts
      ICalculateCartLinesPipeline (Sitecore.Commerce.Plugin.Carts.Cart => Sitecore.Commerce.Plugin.Carts.Cart)
           ------------------------------------------------------------
           Plugin.Carts.ClearCartLinesBlock (Sitecore.Commerce.Plugin.Carts.Cart => Sitecore.Commerce.Plugin.Carts.Cart)
           ------------------------------------------------------------
           Plugin.Carts.ClearCartBlock (Sitecore.Commerce.Plugin.Carts.Cart => Sitecore.Commerce.Plugin.Carts.Cart)
           ------------------------------------------------------------
           Plugin.Carts.CalculateCartLinesSubTotalsBlock (Sitecore.Commerce.Plugin.Carts.Cart => Sitecore.Commerce.Plugin.Carts.Cart)
           ------------------------------------------------------------
           Plugin.Fulfillment.CalculateCartLinesFulfillmentBlock (Sitecore.Commerce.Plugin.Carts.Cart => Sitecore.Commerce.Plugin.Carts.Cart)
           ------------------------------------------------------------
           Plugin.Promotions.CalculateCartLinesPromotionsBlock (Sitecore.Commerce.Plugin.Carts.Cart => Sitecore.Commerce.Plugin.Carts.Cart)
           ------------------------------------------------------------
           Plugin.Tax.CalculateCartLinesTaxBlock (Sitecore.Commerce.Plugin.Carts.Cart => Sitecore.Commerce.Plugin.Carts.Cart)
           ------------------------------------------------------------
           Plugin.Carts.CalculateCartLinesTotalsBlock (Sitecore.Commerce.Plugin.Carts.Cart => Sitecore.Commerce.Plugin.Carts.Cart)
      -----------------------------------------------------------------
      Sitecore.Commerce.Plugin.Carts
      ICalculateCartPipeline (Sitecore.Commerce.Plugin.Carts.Cart => Sitecore.Commerce.Plugin.Carts.Cart)
           ------------------------------------------------------------
           Plugin.Carts.CalculateCartSubTotalsBlock (Sitecore.Commerce.Plugin.Carts.Cart => Sitecore.Commerce.Plugin.Carts.Cart)
           ------------------------------------------------------------
           Plugin.Fulfillment.CalculateCartFulfillmentBlock (Sitecore.Commerce.Plugin.Carts.Cart => Sitecore.Commerce.Plugin.Carts.Cart)
           ------------------------------------------------------------
           Plugin.Promotions.CalculateCartPromotionsBlock (Sitecore.Commerce.Plugin.Carts.Cart => Sitecore.Commerce.Plugin.Carts.Cart)
           ------------------------------------------------------------
           Plugin.Tax.CalculateCartTaxBlock (Sitecore.Commerce.Plugin.Carts.Cart => Sitecore.Commerce.Plugin.Carts.Cart)
           ------------------------------------------------------------
           Plugin.Carts.CalculateCartTotalsBlock (Sitecore.Commerce.Plugin.Carts.Cart => Sitecore.Commerce.Plugin.Carts.Cart)
           ------------------------------------------------------------
           Plugin.Payments.CalculateCartPaymentsBlock (Sitecore.Commerce.Plugin.Carts.Cart => Sitecore.Commerce.Plugin.Carts.Cart)
           ------------------------------------------------------------
           Plugin.Carts.WriteCartTotalsToContextBlock (Sitecore.Commerce.Plugin.Carts.Cart => Sitecore.Commerce.Plugin.Carts.Cart)
      
    • Exclusive promotions apply against the benefit type only, therefore it is possible to apply a cart line level exclusive promotion and a cart level exclusive promotion at the same time.

Evaluating Promotions

The following diagram shows the pipelines and pipeline blocks that are called during the process of evaluating the applicable promotions and additional filtering for exclusive promotion evaluation.

There are essentially 10 steps that make up the evaluation process:

  1. Search For Promotions: Retrieves all promotions.
  2. Filter Promotions By Valid Date: Removes promotions that do not fall within the Valid From/To dates based on effective date.
  3. Filter Not Approved Promotions: Removes promotions that are not approved and, if the promotion is disabled, where the effective date is prior to the updated date (the date the promotion was disabled). The latter rule is to allow the promotion to be active when reviewed the storefront at a previous point in time.
    Note: From 9.0.1, the GlobalPromotionsPolicy was introduced to allow promotions to be previewed in the storefront prior to submitting a promotion for approval.
  4. Filter Promotions By Items: Removes promotions where the cart contains no sellable items marked as included in the ItemsCollection qualification or where the cart contains any of the sellable items marked as excluded in the ItemsCollection qualification.
  5. Filter Promotions By Book Associated Catalogs: Removes promotions where the catalog, associated to its promotion book, does not match any of the catalogs associated to the sellable items of the cart lines.
  6. Filter Promotions By Benefit Type: Removes promotions where the type of benefits configured to the promotion does not match the benefit type being evaluated. i.e. Cart line level benefits (CartLineActions) and cart level benefits (CartActions) for CalculateCartLinesPipeline and CalculateCartLinesPipeline respectively.
  7. Filter Promotions By Coupon: Removes promotions that require a coupon that has not been applied to the cart.
  8. Evaluate Promotions: Filters out promotions where promotion qualifications and benefit rules do are not applicable to the current cart.
  9. Filter Promotions With Coupons By Exclusivity: If exclusive coupon promotions are present in the promotions list, the list will be filtered down to a single exclusive coupon promotion. The promotion will be determined by the Added date that their corresponding coupons were applied to the cart.
  10. Filter Promotions By Exclusivity: If exclusive automatic promotions are present in the promotions list, the list will be filtered down to a single exclusive automatic promotion. The promotion will be determined by the earliest (oldest) Valid From date, and in the event of multiple promotions sharing the same earliest Valid From date the promotion that was created earliest will take win.

Promotion Priorisation Rules

While the previous section covered how promotions are evaluated, and also provided some insight into promotion priorisation, we will now cover the prioritisation rules.

The following diagram shows the logic used to determine which promotion(s) to apply to the cart.

There are essentially 3 steps that make up the application process:

  1. Apply a single exclusive automatic promotion.
    • The promotion will be determined by the earliest (oldest) Valid From date, and in the event of multiple promotions sharing the same earliest Valid From date the promotion that was created earliest will take win.
    • If a promotion is applied here no further promotions are applied.
  2. Apply a single exclusive coupon promotion.
    • The promotion will be determined by the Added date that their corresponding coupons were applied to the cart.
    • If a promotion is applied here no further promotions are applied.
  3. Apply all non-exclusive promotions.
    • The promotion order will be determined by:
      1. Automatic promotions ordered by earliest (oldest) Valid From date, and in the event of multiple promotions sharing the same earliest Valid From date the promotion that was created earliest will take win.
      2. Coupon Promotions ordered by earliest Added date that their corresponding coupons were applied to the cart.

References

Sitecore Experience Commerce: Configuring Debug Logging

Reading Time: < 1 minute

In this article, we will look into the steps necessary in order to reduce the log level to Debug in the Retail Demo for Sitecore Commerce 8.2.1.

In LoggingExtentions.cs, the MinimumLevel is set to Information, therefore regardless what the Logging.LogLevel.Default and Serilog.MinimumLevel configurations in config.json are set to Debug log requests will not be logged.

var loggingConfig = new LoggerConfiguration()
		.Enrich.With(new ScLogEnricher())
		.MinimumLevel.Information();

By updating this line to MinimumLevel.Debug() , we are now able to drop the log level configurations to Debug and see the output in the log file.

"Logging": {
	"LogLevel": {
		"Default": "Debug"
	},
},
"Serilog": {
	"MinimumLevel": "Debug"
}
1 14:01:53 INFO Registering Pipeline Block 'Project.Commerce.Engine.Pipelines.Blocks.ValidateSitecoreConnectionBlock'
3 14:01:53 DEBUG [PipelineStarted]
3 14:01:53 DEBUG Block execution started for '"pipelines:blocks:StartNodeBlock"'
15 14:01:53 INFO [NodeStartup] ContactId='Deployment01_a1adc4875f9a4ef6b9513d9379373d2c',Environment='GlobalEnvironment'
15 14:01:53 DEBUG Block execution completed for '"pipelines:blocks:StartNodeBlock"'
15 14:01:53 DEBUG Block execution started for '"pipelines:blocks:StartNodeLogConfigurationBlock"'
15 14:01:56 WARN Performance Counter Category 'SitecoreCommerceCommands-1.0.2' not found
15 14:01:56 WARN Performance Counter Category 'SitecoreCommerceMetrics-1.0.2' not found
15 14:01:56 DEBUG Block execution completed for '"pipelines:blocks:StartNodeLogConfigurationBlock"'
15 14:01:56 DEBUG [PipelineCompleted]

Note: It is not recommended that Debug log levels and set in the production environment and when using Debug log levels in any environment, it is recommended to only utilise this log level for the smallest window necessary to avoid excessive logging as this will eat away at the storage space quite quickly.

Sitecore Experience Commerce: Exposing Variation Properties in the Variants Entity View

Reading Time: 2 minutes

In this article, we review another small plugin created, which exposes the variation properties in the Variants entity view within the Merchandising Manager.

The Habitat catalog data has been created in such a way in which the variation properties are exposed via adding the variation property value to the variant display name, e.g. Habitat Dwell Bagless Upright Vacuum (Red). While this approach works to an extent, it will get more ugly as the variation properties grow, e.g. My Test Jeans (Blue, 32, slim).

The custom plugin will traverse over the variation’s components to find the the properties that match the names provided in the VariationPropertiesPolicy and render them to the Variants entity view.

In the example above, I have specified the following property names, Color, Size, Style, and Length, which works well when all properties have been specified (see below).

A couple of things to note about the platform implementation:

  • Variation Properties apply to all Sellable Items globally. If a product contains a value against a property that is specified in the Variation Properties Policy it will render as a variant selection in the Storefront.
  • There is no validation to ensure that variation properties are mandatory for variants. This is because not all products will utilise these variation properties. I didn’t think it was necessary to add more overhead to remove columns that contained no values.
  • You’ll notice above that the first 2 variants of my Test Pants have matching variation properties. This is again due to having no validation in place, which I believe will break the storefront. So whether you have implemented a catalog import or are entering product data manually be careful not to double up.

Source Code: Ajsuth.Feature.Catalog.VariantProperties.Engine

Sitecore Experience Commerce: Configuring Variation Properties for the Storefront

Reading Time: 2 minutes

In this article, we will review the process of configuring product variations properties so that the Product Variants SXA component will render them as dropdown selection controls. This controls allows the user to select the variant property combinations, where each combination represents individual product variants of a product family.

Configure the Variation Properties

In the Commerce Engine solution:

  1. Define all variation property names in the VariationPropertyPolicy of the environment configuration files.
    1. In this sample, we will add the Style property to the VariationPropertyPolicy.
      Note: The property names are the names of properties that exist on child components of the ItemVariationComponent. The fully qualified namespace for the property is not required as the SXA Storefront logic will use a property name match against the field names produced by the Catalog Generated templates.

      {
        "$type": "Sitecore.Commerce.Plugin.Catalog.VariationPropertyPolicy, Sitecore.Commerce.Plugin.Catalog",
        "PropertyNames": {
          "$type": "System.Collections.Generic.List`1[[System.String, mscorlib]], mscorlib",
          "$values": [
            "Color",
            "Size",
            "Style"
          ]
        }
      }
      
  2. Publish the solution and Bootstrap the Commerce Engine.
  3. Verify the variation property in the Storefront.
    Note: In the sample below I updated the sellable item’s Style property with the value “Modern” for demo purposes.

Add Variant Specification Label

If you create add new properties that does not have corresponding label configured the variation property label will display as “[YourProperty]“.

To resolve this, go to the Sitecore Content Editor:

  1. Add user friendly label value to /sitecore/Commerce/Commerce Control Panel/Storefront Settings/Commerce Terms/Variant Specification Labels.
  2. Publish the Sitecore Item and Reindex.

Sitecore Experience Commerce: Reordering Images on Sellable Items

Reading Time: 2 minutes

In this article, we introduce a small custom plugin for Sitecore Commerce Business Tools that enables the reordering of images for sellable items and variants.

In its current release (XC 9.0.3), the only way to reorder images is to remove existing images and re-adding them in the desired order. It’s not the best user experience and can take a considerable length of time to relocate the original images.

The custom catalog plugin adds 2 new actions to the Images actions – Move Image Up and Move Image Down.

The functionality is still a little clunky. The confirmation dialog shows each time an image is moved, the selected image will always reset to the first image after each action, and while the move buttons are not disabled for its outer limits, the code logic prevents out of boundary exceptions from being thrown. Overall, it is definitely an upgraded approach to reordering images.

Publishing the sellable item through workflow is still required in order to have the changes show in the storefront.

Source Code: Extended Sitecore Commerce Catalog project repository

Sitecore Experience Commerce: Managing Catalog Images

Reading Time: 5 minutes

In this article, we will look at how to manage catalog images that are associated to sellable items in the Business ToolsMerchandising Manager.

With the Habitat Master catalog and SXA Storefront site that is setup during the installation of Sitecore Experience Commerce, we have a great reference point for implementing custom sites. However, one of the not so obvious configurations is how to configure catalog images for new catalogs.

Commerce Media Items OData API Key

In Sitecore’s Core database (pre XC 9.1) or Master database (from XC 9.1), the Commerce Media Items OData API Key contains the Search Filter property, which is responsible for applying the filter of media items that are restricted in the search results.

(Fields/any(f: (f/Name eq 'Extension' and (f/Value eq 'png' or f/Value eq 'jpg'))) and Language eq 'en' and (contains(Path, '/images/adventure') or contains(Path, '/images/habitat')))

The Search Filter value itself is performing 3 levels of filtering:-

  1. Extension Type: The supported media extension types.
  2. Language: The language is utilised to prevent duplicate media items from being returned, i.e. per language version.
  3. Location: The media library folder where the catalog images are stored.

Note: This is a global configuration that will apply to all media search controls in Sitecore Commerce. This means that although we can segregate catalog images to different Media Library folders in Sitecore, the Image search results in the Business Tools will return results for all configured catalog image folder locations and extension types.  This makes sense considering sellable items can be associated across catalogs.

Configuring Image Extension Types

The default configured image types include jpg and png formats. To modify the extension types, we look at the extension part of the filter where we can add or remove the Value comparisons as desired.

(f: (f/Name eq 'Extension' and (f/Value eq 'png' or f/Value eq 'jpg')))

Configure the Value comparison in the format f/Value eq ‘<extension type>’. Don’t modify the wrapping logic. When specifying multiple extensions use the ‘or’ clause as per the initial configuration.

Adding Extension Type Example

In this example, I will add the gif extension type and sample image to validate the change.

Configure the Extension Type

In the Sitecore Content Editor using the Core database (pre XC 9.1) or Master database (from XC 9.1) :-

  1. Go to /sitecore/system/Settings/Services/API Keys/CommerceMediaItemsODataAPIKey
  2. Update the extension part of the Search Filter value to include the ‘gif’ comparison.
(f: (f/Name eq 'Extension' and (f/Value eq 'png' or f/Value eq 'jpg' or f/Value eq 'gif')))

Add Images of the New Extension Type

In the Sitecore Content Editor using the Master database:-

  1. Go to /sitecore/media library/Images/<catalog image folder>
  2. Upload the media file to the folder.

    e.g. sunglasses.gif
  3. Publish the item.
  4. Re-index the master/web databases.

Add the Image to a Sellable Item

In the Business Tools’ Merchandising Manager:-

  1. Navigation to the desired Sellable Item or create a new Sellable Item.
    1. Ensure the Sellable Item‘s Entity Version has not been published, otherwise a new version will need to be created.
  2. Under the Images section, click the Add an Image button.
  3. Search for the image name.
  4. Select the image name and click the tick (accept) button.
  5. Promote the sellable item through the workflow states until it’s published.

View the Image on the Sellable Item in the Storefront

In the Storefront’s website:-

  1. Either navigate to the Category or Search Results Page, containing the product, navigate to any page that contains any component that displays the Sellable Item, e.g. Promoted Products component, or navigate directly to the Product Details Page.

Configuring Image Source Location

For media image location, we need to configure the location part of the filter where we can add or remove the Path comparisons as desired.

By default, we see that the locations have been configured for the folders that have been utilised for the Adventure Works and Habitat catalogs.

(contains(Path, '/images/adventure') or contains(Path, '/images/habitat'))

Configure the Path to the location of the catalog images folder in the format contains(Path, ‘/<catalog image folder location>’)  where <catalog image folder location> is under the Media Library Sitecore item tree. When using multiple folder locations (usually one folder per catalog), use the ‘or’ clause as per the initial configuration.

Update: I found that the contains function had some issues with parsing the Path value where spaces are used in the item names, hence ‘/images/adventure’ rather than ‘/images/adventure works’. Another issue I found was that using the contains function also meant that any folder structure, outside the Media Library item, in the Sitecore tree that matched the path would also be included for the media search results causing undesired entries.

To resolve this, I found a more performant an accurate solution using the startswith function, which appears to resolve the Path value relative to the Media Library item and accepts spaces in the item names.

(startswith(Path, '/images/adventure works/')

Please note that I haven’t updated the remainder of this article with this change, but keep it in mind when making updating the filter yourself.

Adding Catalog Image Folder Example

In this example, I will add the HelloWorld catalog image folder type and sample image to validate the change.

Configure the Location Folders

In the Sitecore Content Editor using the Core database (pre XC 9.1) or Master database (from XC 9.1) :-

  1. Go to /sitecore/system/Settings/Services/API Keys/CommerceMediaItemsODataAPIKey
  2. Update the location part of the Search Filter value to include the ‘helloworld’ comparison.
(contains(Path, '/images/adventure') or contains(Path, '/images/habitat') or contains(Path, '/images/helloworld'))

Add Images of the Catalog Image Folder

In the Sitecore Content Editor using the Master database:-

  1. Go to /sitecore/media library/Images/HelloWorld
  2. Upload the media file to the folder.

    e.g. sunglasses.jpg
  3. Publish the item.
  4. Re-index the master/web databases.

Search for the Image in the Merchandising Manager

In the Business Tools’ Merchandising Manager:-

  1. Navigation to the desired Sellable Item or create a new Sellable Item.
    1. Ensure the Sellable Item‘s Entity Version has not been published, otherwise a new version will need to be created.
  2. Under the Images section, click the Add an Image button.
  3. Search for the image name.
  4. Ensure the image shows in the search results

Summary

We learnt that the configurations of image folder location and filtered media extension types for catalog images are set in the Search Filter field of the Commerce Media Items OData API Key Sitecore item in the Core database (pre XC 9.1) or Master database (from XC 9.1) . We also learnt that the configurations are global and will apply to all media search controls in the Business Tools.