An Introduction to Sharding and Custom Sharding in Sitecore Experience Commerce 9

Reading Time: 3 minutes

In this article, we will look at list and entity sharding that has been introduced in Sitecore Experience Commerce 9 (XC9), when we would create a custom shard, and how we can implement our own custom shard.

Sharding – What is it?

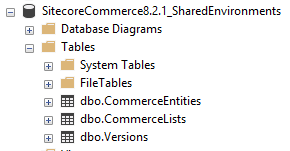
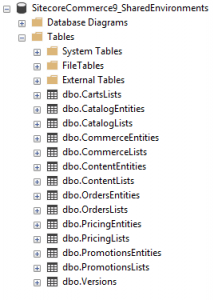
Let’s take a quick step back and review the Shared Environment database from Sitecore Commerce 8.2.1. All commerce entities and lists were found under tables named CommerceEntities and CommerceLists respectively. These tables consisted of data pertaining to carts, orders, pricing and promotions.

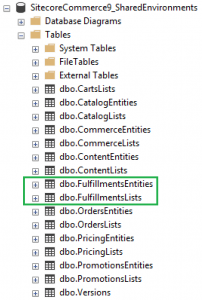
With the introduction of XC9, additional entities and lists have been added to cater for the catalog and customer data, as part of the final phase out process of the Commerce Server.

Now it’s a known fact that with any database that continues to accumulate data that inevitably there will be increasing performance degradation. This isn’t the end of the world as databases can be tuned for performance, but there is a simple and logical way of managing data for optimal performance. This is where sharding comes into play.

Sharding, in XC9, is the logical partitioning of entities and lists into separate tables, to isolate and manage data growth for improved performance and data maintenance.

Sharding is managed via the ListShardingPolicy and EntityShardingPolicy policies in the Plugin.SQL.Sharding.PolicySet-x.y.z.json.
Each policy specifies the properties, RegularExpression and (database) TableName, which the Commerce Engine utilises to identify where the entity/list should be read from and stored to. When a list/entity is not matched to one of these policies regular expressions, it defaults to the CommerceEntities/CommerceLists tables.

When is Sharding  Required?

Just because a new entity is introduced in your project, this doesn’t automatically mean that a new shard has to be implemented. Instead consider how this new entity will be utilised over time. If there is an expectation that over time this data will grow considerably where it should be housed separately, then sharding would be a good idea. However, if the data stored for this new entity is expected to be kept to a low volume, leaving the data in the default tables would be fine.

What is the Purpose of Sharding in the Commerce Global Database?

Simple answer. There is no purpose at this time. The script to create the databases was reusable and created the same structure. Only the CommerceEntities and CommerceLists tables are utilised for the Global database and I suspect this may be cleaned up in a future release.

How to Implement Custom Sharding

Creating Policies in the Commerce Engine

The following code snippet is a sample of a shard I am creating for a side-project for fulfillments.

{
    "$type": "Sitecore.Commerce.Plugin.SQL.ListShardingPolicy, Sitecore.Commerce.Plugin.SQL",
    "RegularExpression": "^List-Fulfillment.*?$",
    "TableName": "FulfillmentsLists"
},
{
    "$type": "Sitecore.Commerce.Plugin.SQL.ListShardingPolicy, Sitecore.Commerce.Plugin.SQL",
    "RegularExpression": "^List-DeletedFulfillmentsIndex-.*?$",
    "TableName": "FulfillmentsLists"
},
{
    "$type": "Sitecore.Commerce.Plugin.SQL.EntityShardingPolicy, Sitecore.Commerce.Plugin.SQL",
    "RegularExpression": "Entity-Fulfillment.*?$",
    "TableName": "FulfillmentsEntities"
},
{
    "$type": "Sitecore.Commerce.Plugin.SQL.EntityShardingPolicy, Sitecore.Commerce.Plugin.SQL",
    "RegularExpression": "Fulfillment-.*?$",
    "TableName": "FulfillmentsEntities"
}

Important note: Where sharding will be altered for a project, it is best to identify and implement it prior to development to avoid having to migrate data from its existing database table.

Creating a Database Table Shard

Database tables are based on either the entity table, or the list table definition. To create a new table shard, follow the process below for both table types.

In SQL Server Management Studio:-

  1. Right-clicking an existing table
  2. Selecting Script Table as > CREATE To > New Query Editor Window
  3. Updating the table name as appropriate, e.g.  [dbo].[<MyEntityType>Entities]
  4. For entity tables, update the constraint name as well, e.g. [PK_<MyEntityType>Entities]
  5. Execute the script


Decoupling the Sample Plugins from the Sitecore Commerce 9 SDK

Reading Time: 2 minutes

The Sitecore Commerce SDK comes with a number of sample plugins which serve varying purposes, including upgrading/migrating data from Sitecore Commerce 8.2.1, providing Habitat and AdventureWorks sample data for testing and getting familiar with the Commerce Engine’s services, and a working Braintree payment integration.

Customer.Sample.Solution

In this article, we will look at the steps required to decouple the sample projects from the solution and resolve the dependencies that the Commerce Engine project has on them, to provide a clean starting point for customising and extending your project’s instance of the Commerce Engine.

Note: We will leave the Braintree plugin in the solution so we can still checkout in the storefront. We will also leave the habitat environment configuration files, which can be updated to the custom environment names for your solution.

We will go into detail below, but let’s take a quick look at what’s required at a high level:-

  1. Add dependency references to the Commerce Engine
  2. Add necessary pipeline configurations to the Commerce Engine
  3. Remove policies for sample projects from the environment configuration files and policy sets
  4. Remove sample environment configurations and policies from the Commerce Engine
  5. Remove sample projects from the solution
  6. Test the Commerce Engine

Add Dependency References to the Commerce Engine

The following dependencies will need to be added to the Commerce Engine for the project to build once the sample projects have been removed:-

  • Sitecore.Commerce.Plugin.Coupons
  • Sitecore.Commerce.Plugin.Journaling
  • Sitecore.Commerce.Plugin.SQL
  • Sitecore.Commerce.Plugin.Tax

Note: For versioning, confirm with the other plugin references.

Add Necessary Pipeline Configurations to the Commerce Engine

The Commerce Engine is missing a few pipeline configurations that hook up some of the cart functionality. To resolve this, perform the following steps:

  1. Copy the ServiceCollectionExtensions class from the Plugin.Sample.AdventureWorks project into the Commerce Engine project at Pipelines > Blocks.
  2. Rename the namespace to Sitecore.Commerce.Engine.
  3. Copy the ConfigureSitecore class from the Plugin.Sample.AdventureWorks project into the Commerce Engine project.
  4. Rename the namespace to Sitecore.Commerce.Engine.
  5. Replace the ConfigureServices method with the following:
    public void ConfigureServices(IServiceCollection services)
    {
        var assembly = Assembly.GetExecutingAssembly();
        services.RegisterAllPipelineBlocks(assembly);
        services.ConfigureCartPipelines();
    }
  6. Resolve ConfigureCartPipelines by adding in the following to the class:
    using Sitecore.Commerce.Engine.Pipelines.Blocks;

Remove Sample Environment Configurations and Policies from the Commerce Engine

Highlighted in red are the properties, policies, and environment configuration files to be removed from the solution.

  • Global.json
    • EnvironmentList
      • “AdventureWorksShops”
      • “AdventureWorksAuthoring”
    • Plugin.Sample.Upgrade.MigrationPolicy
    • Plugin.Sample.Upgrade.MigrationSqlPolicy
  • PlugIn.AdventureWorks.CommerceAuthoring-1.0.0.json
  • PlugIn.AdventureWorks.CommerceMinions-1.0.0.json
  • PlugIn.AdventureWorks.CommerceShops-1.0.0.json
  • PlugIn.Habitat.CommerceAuthoring-1.0.0.json
    • Sitecore.Commerce.Core.EnvironmentInitializationPolicy
      • “Environment.Habitat.DefaultRelationships-1.0”
      • “Environment.Habitat.SellableItems-1.0”
      • “Environment.Habitat.Pricing-1.0”
      • “Environment.Habitat.Promotions-1.0”
      • “Environment.Habitat.Catalog-1.0”
    • Plugin.Sample.Customers.CsMigration.ProfilesSqlPolicy
    • Plugin.Sample.Customers.CsMigration.ProfilePropertiesMappingPolicy

Remove Sample Projects from the Solution

We can now remove the following projects from the solution:-

  • Plugin.Sample.AdventureWorks
  • Plugin.Sample.Customers.CsMigration
  • Plugin.Sample.Habitat
  • Plugin.Sample.Upgrade

The solution should now resemble the image below.

Test the Commerce Engine

To verify the solution:-

  1. Run the Commerce Engine project locally.
  2. Run the Bootstrap request, either via postman or browser.
  3. Run the CleanEnvironment request.
  4. Run the InitializeEnvironment request.