Sitecore Experience Commerce: Implementing Multi-Step Actions in the Business Tools

Reading Time: 6 minutes

In this article, we will look at multi-step actions and how we can implement them for customising the Sitecore Commerce Business Tools.

What is a Multi-Step Action?

The multi-step action is the approach to building out entity view modals to act as a kind of wizard, where inputs from each step can affect the subsequent steps.
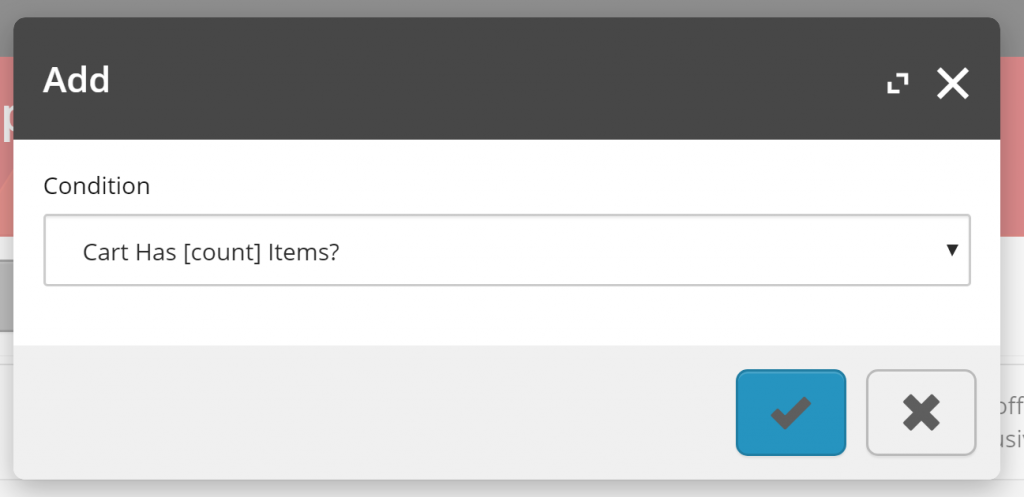
Adding a qualification/condition to a promotion – step 1.
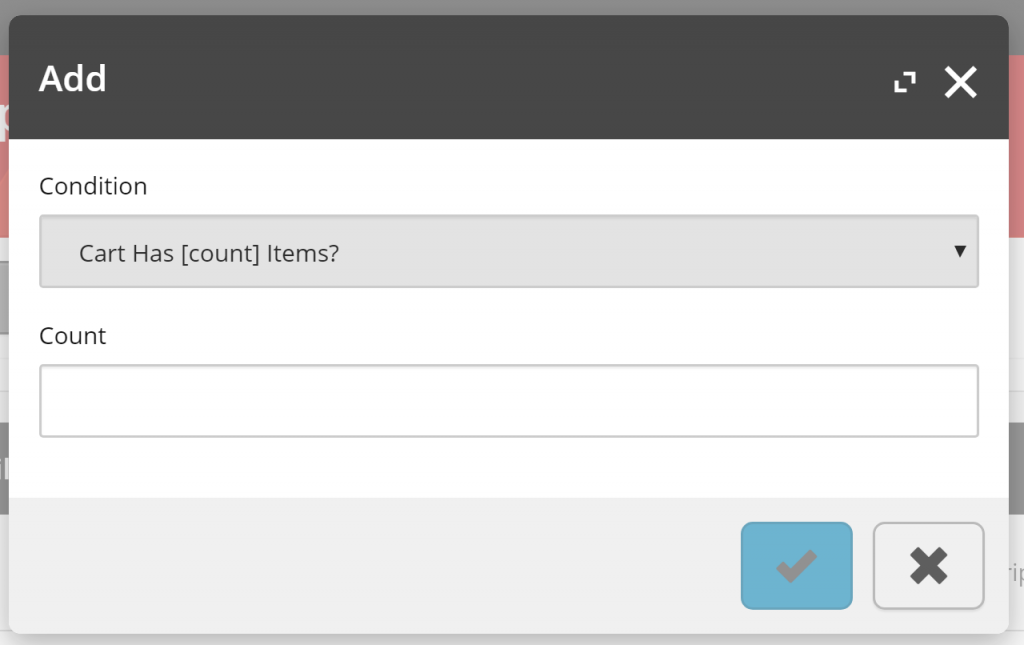
Adding a qualification/condition to a promotion – step 2.

A Dive into the Multi-Step Action Implementation

We will take a dive into the pieces that make up the multi-step action implementation to see just how we should be building our custom multi-step modal, using the Add Qualification modal for promotions as our working example.

This section is focused on explaining what will be found in the current platform implementation, which can be useful if looking to extend the BizFx and Commerce Engine functionality, but can be skipped if you are only after Implementing Custom Multi-Step Actions as quick as possible.

MultiStepActionPolicy

The MultiStepActionPolicy houses a single property, FirstStep, which will contain the EntityActionView that will be populated in the modal entity view.

public MultiStepActionPolicy()
{
    this.FirstStep = new EntityActionView();
}

public EntityActionView FirstStep { get; set; }

In the following code snippet, we see that the MultiStepActionPolicy is added to the EntityActionView, in which the QualificationsDetails that is assigned to the EntityView will use to populate the first step of the add qualification modal.

Line 18 highlights the Name of the entity view action, which will be resolved to its localised value from the …/Commerce Terms/BusinessTools/ViewActionNames/AddQualification, and populates modal’s title.

var actionPolicy = arg.GetPolicy<ActionsPolicy>();
actionPolicy.Actions.Add(
        new EntityActionView(new List<Policy>
        {
            new MultiStepActionPolicy
            {
                FirstStep = new EntityActionView
                {
                    Name = context.GetPolicy<KnownPromotionsActionsPolicy>().SelectQualification,
                    DisplayName = "Select Qualification",
                    Description = "Selects a Qualification",
                    IsEnabled = isEnabled,
                    EntityView = context.GetPolicy<KnownPromotionsViewsPolicy>().QualificationDetails
                }
            }
        })
        {
            Name = context.GetPolicy<KnownPromotionsActionsPolicy>().AddQualification,
            DisplayName = "Add Qualification",
            Description = "Adds a Qualification",
            IsEnabled = isEnabled,
            EntityView = string.Empty,
            Icon = "add"
        });
The entity view populated in the first step, of the Add Qualification modal, is resolved from the entity view action name of the EntityActionView, assigned to the MultiStepActionPolicy’s FirstStep, which in this case is the SelectQualification action.

LocalizeEntityViewBlock

In the LocalizeEntityViewBlock, we find that the SelectQualification action name is being populated with the localised term, however as mentioned above, the modal utilises the AddQualification localised term instead, therefore we don’t need to be concerned with this.

if (!action.HasPolicy<MultiStepActionPolicy>())
{
    continue;
}

var firstStepAction = action.GetPolicy<MultiStepActionPolicy>().FirstStep;
await SetActionLocalizedTerms(firstStepAction, context).ConfigureAwait(false);

MultiStepActionModel

This model is quite simple. The NextStep represents the name of the action to be executed when the modal form is submitted.

public MultiStepActionModel(string nextStep)
{
    this.NextStep = nextStep;
}

public string NextStep { get; set; }

In the following extract of DoActionSelectQualificationBlock, I have substituted out most of the code with comments, explaining the original code logic, to reduce the noise and keep focus on the multi-step implementation functionality.

In line 11, we see that the original condition property has been made readonly as we don’t want the user to change their mind at this stage, however we don’t want to hide the property as the user still needs to have context of what was previously selected.

Updating the readonly status of submitted view properties is considered a recommended practice.

Line 15 we have a comment that tells us that this is where the next step’s view properties are added to the current entity view, building out the modal form.

This also means that the Do Action Blocks acts a pseudo Get Entity View Block as the initial modal’s entity view is populated via the GetEntityView() API, utilising the IGetEntityViewPipeline under the hood, while subsequent updates in the multi-step implementation are triggered as the DoUxAction() API calls the IDoActionPipeline to process requests.

Finally, line 17 has the original entity view action name, ‘AddQualification’, added to the MultiStepActionModel as the NextStep and applied to the commerce context.

With the knowledge that adding the MultiStepActionModel to the context effectively creates the next step in the modal, there is no limit to how many steps we can add to a multi-step modal.

public override async Task<EntityView> Run(EntityView entityView, CommercePipelineExecutionContext context)
{
    /* validate action */

    /* validate promotion */

    var selectedCondition = entityView.Properties.FirstOrDefault(p => p.Name.Equals("Condition", StringComparison.OrdinalIgnoreCase));

    /* validate condition */

    selectedCondition.IsReadOnly = true;

    /* add and/or conditional operator. hide if no qualifications have been applied to the promotion so far */

    /* add new view properties for selected condition */

    context.CommerceContext.AddModel(new MultiStepActionModel(context.GetPolicy<KnownPromotionsActionsPolicy>().AddQualification));

    return entityView;
}
DoActionSelectQualificationBlock validates the Condition selection and updates the entity view to contain the remaining view properties required for configuring the ‘Cart Has [count] Items?’ qualification as the second step of this multi-step action modal.

CheckForMultiStepActionBlock

From the following snippet from CheckForMultiStepActionBlock, we see that it updates the current entity views action, removes the MultiStepActionModel from the commerce context, and adds the entity view to the commerce context.

In short, this logic is more of a helper, and we could get the same result by omitting the registration of the MultiStepActionModel, updating the entity view action, and add the entity view directly in the Do Action Block instead.

var multiAction = context.CommerceContext.GetModels<MultiStepActionModel>().FirstOrDefault();
if (string.IsNullOrEmpty(multiAction?.NextStep))
{
    return Task.FromResult(arg);
}

entityView.Action = multiAction.NextStep;
context.CommerceContext.RemoveModel(multiAction);
context.CommerceContext.AddModel(entityView);

The DoUxAction API

The last piece of the puzzle comes with BizFx’s handling of the response of the DoUxAction API when we submit the modal dialog.

If an entity view object is returned in the API response object, BizFx will render the modal with the updated view instead of closing the modal and refreshing the current page view.

If we were to change the modal’s entity view name during any of the steps it will not be reflected in the modal’s title as there is no handling for this implemented by default in BizFx.

Summary

Let’s review what we have learnt about multi-step actions.

  1. Adding the MultiStepActionPolicy to an EntityActionView basically swaps out the intended action from being executed in the initial GetEntityView() request, however the modal’s title will reflect the initial EntityActionView‘s localised name.
  2. The LocalizeEntityViewBlock application to the EntityActionView in the MultiStepActionPolicy’s FirstStep is superfluous and does not impact the multi-step implementation.
  3. Do Action Blocks act as pseudo Get Entity View Block for updating the modal’s entity view.
  4. When updating entity views with multi-step actions, previously input view properties should be set to readonly as a recommended practice.
  5. The usage of the MultiStepActionModel is more of a helper model in CheckForMultiStepActionBlock, rather than a dependent piece of the implementation.
  6. There is no limit to how many steps we can add to a multi-step action modal.
  7. The modal title is not updated with an updated entity view.
  8. When the Commerce Engine’s DoUxAction() API returns an entity view in the response model, BizFx will render it in the current modal view.

Implementing Custom Multi-Step Actions

For implementing custom multi-step actions we will skip the details about how to build out the pre-requisites, being the initial Populate View Actions Block to create the entity view action that will trigger the modal, and the Get Entity View Block that will populate the initial entity view that is rendered in the modal, and instead focus on the Do Action Block that will allow us to add the additional steps to the modal.
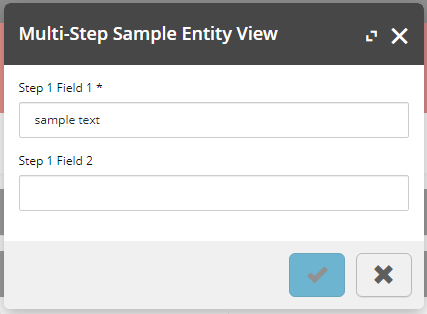
The multi-step sample show the initial entity view that we will create the second step for.

Essentially, we can implement multi-step actions without using any of the MultiStep classes, simply by adding the new entity view to the commerce context during a Do Action Block, however providing a more complete sample, the following code logic would be applied to our custom Do Action Block.

  1. Validate action
  2. Validate entity (if applicable)
  3. Validate current view properties
  4. Set current view properties to read only
  5. Add new view properties to entity view for next step
  6. Update entity view action with action to perform on the next time the modal is submitted
  7. Add entity view to the commerce context
public override async Task<EntityView> Run(EntityView entityView, CommercePipelineExecutionContext context)
{
    Condition.Requires(entityView).IsNotNull($"{Name}: The argument cannot be null");

    /* 1. Validate action */
    if (string.IsNullOrEmpty(entityView?.Action)
        || !entityView.Action.Equals("FirstAction", StringComparison.OrdinalIgnoreCase))
    {
        return await Task.FromResult(entityView).ConfigureAwait(false);
    }

    /* 2. Validate entity (if applicable) */
    // Not applicable

    /* Validate current view properties */
    // Not critical for sample implementation

    /* Set current view properties to read only */
    foreach (var property in entityView.Properties)
    {
        property.IsReadOnly = true;
    }

    /* Add new view properties to entity view for next step */
    entityView.Properties.Add(new ViewProperty
    {
        Name = "Step 2 Field 1"
    });

    entityView.Properties.Add(new ViewProperty
    {
        Name = "Step 2 Field 2",
        IsRequired = false
    });

    /* Update entity view action with action to perform on the next time the modal is submitted */
    entityView.Action = "SecondAction";

    /* Add entity view to the commerce context */
    context.CommerceContext.AddModel(entityView);

    return await Task.FromResult(entityView).ConfigureAwait(false);
}
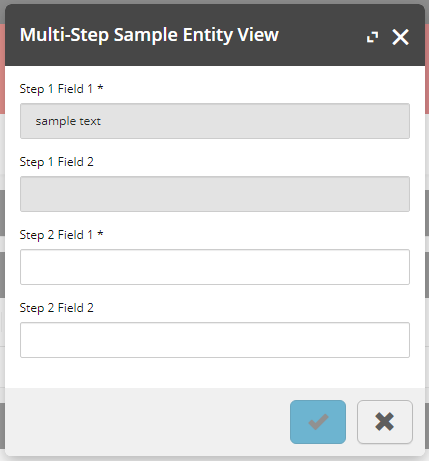
Our multi-step sample entity view after the modal has been submitted, creating the second step view for completing data input.

Sitecore Identity Server: Increasing the Token Lifetime for Local Development

Reading Time: < 1 minute

In this article, we will review how to change the authentication token timeout values that force us to log back in to Sitecore or request a new token from Postman. If you are like me, generally working with Sitecore/Sitecore Commerce 10+ hours per day, 6 days a week, it can seem like you are kicked out every 5 minutes. Personally, I set these timeouts to a week (604800 seconds).

Changing the timeouts are not recommended for production instances.

Changing the Timeouts in Sitecore Identity Server

Sitecore Identity Server was first introduced with Sitecore Commerce 9.0.0 and with the release of Sitecore 9.1, Sitecore Identity Server was added to Sitecore authentication process.

Updating the Token Lifetimes in 9.0.X

  1. Open <Sitecore Identity Server root>\wwwroot\appsettings.json.
  2. Under AppSettings.Clients, update the CommerceBusinessTools and Postman API clients for BizFx and Postman applications respectively :-
    1. Update the AccessTokenLifetimeInSeconds and IdentityTokenLifetimeInSeconds from the default 3600 (seconds) to the desired timespan, in seconds.
    2. Save the configuration.
  3. Restart the Sitecore Identity Server so that the updated configuration is consumed on startup.

Updating the Token Lifetimes in 9.3

  1. Open <Sitecore Identity Server root>\Config\production\Sitecore.Commerce.IdentityServer.Host.xml.
  2. Under /Settings/Sitecore/IdentityServer/Clients, update the CommerceClient and PostmanClient for BizFx and Postman applications respectively:-
    1. Update the AccessTokenLifetimeInSeconds and IdentityTokenLifetimeInSeconds from the default 3600 (seconds) to the desired timespan, in seconds.
    2. Save the configuration.
  3. Restart the Sitecore Identity Server so that the updated configuration is consumed on startup.

Sitecore Experience Commerce: Working with Digital Sellable Items – Part 1

Reading Time: 5 minutes

In this article, we will review the difference between physical and digital sellable items, while focusing on the lesser documented digital sellable items. We will also review how to configure digital sellable items in the business manager.

For a more technical details behind the implementation of digital sellable items, see Working with Digital Sellable Items – Part 2.

Sellable Item Classifications

Sellable items can either represent physical or digital items. The following high-level overviews detail some of the discerning factors between the two classifications of sellable items.

Physical Sellable Items

Physical sellable items are any tangible product that a customer can purchase and have delivered. This is the default product type when creating sellable items via the Merchandising Manager in Sitecore Commerce.

Inventory

With physical items, inventory is required to track stock levels and prevent overselling.

Fulfillment Option Types

When purchasing physical items, during the checkout delivery step, a customer typically enters a delivery address of where the items will be delivered to, or selects a ‘click and collect’ style fulfillment option type where they can pick up the items from.

The SXA Storefront provides the common ‘deliver to address’ (physical) fulfillment option type.

Digital Sellable Items

Digital sellable items represent non-tangible products that a customer can purchase that entitle the customer to a form of product or service. Examples of digital sellable items include services, such as installation, warranties, subscriptions, digital downloads, online access, and digital currency (gift cards).

Inventory

As digital sellable items are non-tangible, they do not require inventory information to be associated to them. This can also be thought of as having perpetual inventory, therefore always being available for purchase.

Fulfillment Option Types

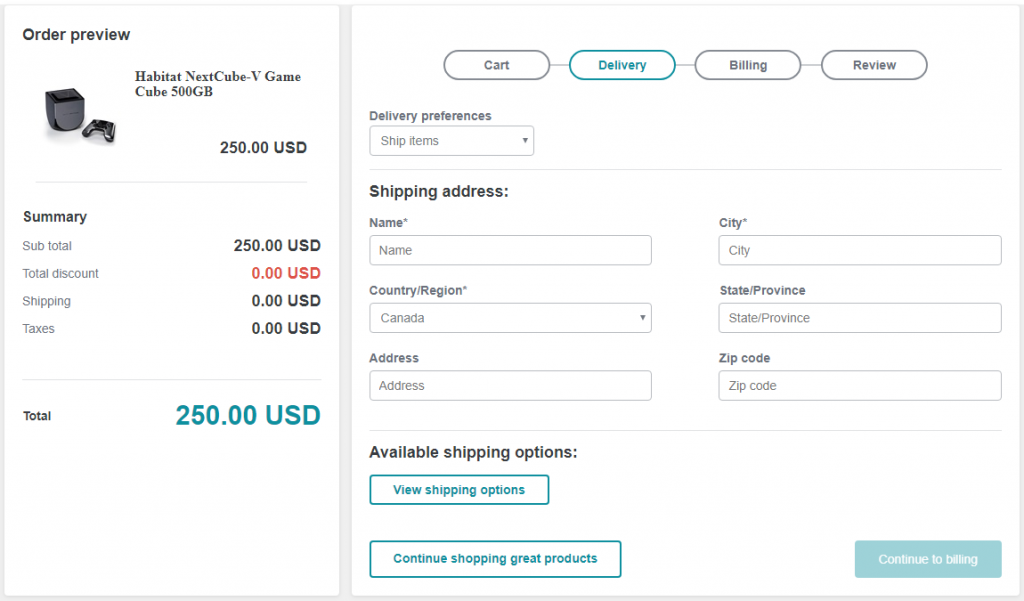
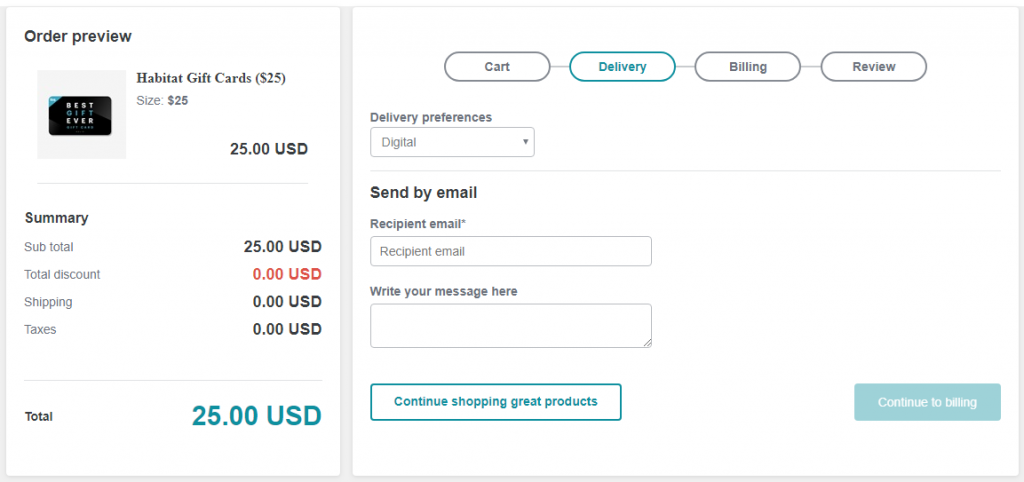
For digital sellable item purchases, the SXA Storefront provides a digital delivery sample implementation intended for digital gift card purchases, consisting of a recipient email and custom message, so the digital gift card can be personalised and delivered via email to the intended recipient.

Alternately, for other digital item fulfillment option types, custom implementations would be required to handle these scenarios, based on the client’s requirements. Some ideas of requirements are as follows:

  • Services: A custom form, potentially with a third party integration, to create a booking system.
  • Warranties: A custom form to register the sellable item that the warranty was purchased for.
  • Subscriptions: A custom form to register the subscription’s recipient details.
  • Digital Downloads: A custom form containing requesting the email address to send the digital download link to, or perhaps the user account functionality is customised to provide access to digital downloads.
  • Online access: Similar to digital downloads, the user may be given access to content via their logged in account, which may not require additional details to be taken during the Delivery step, however may require the user to make the purchase via a registered account.

Cart Lines

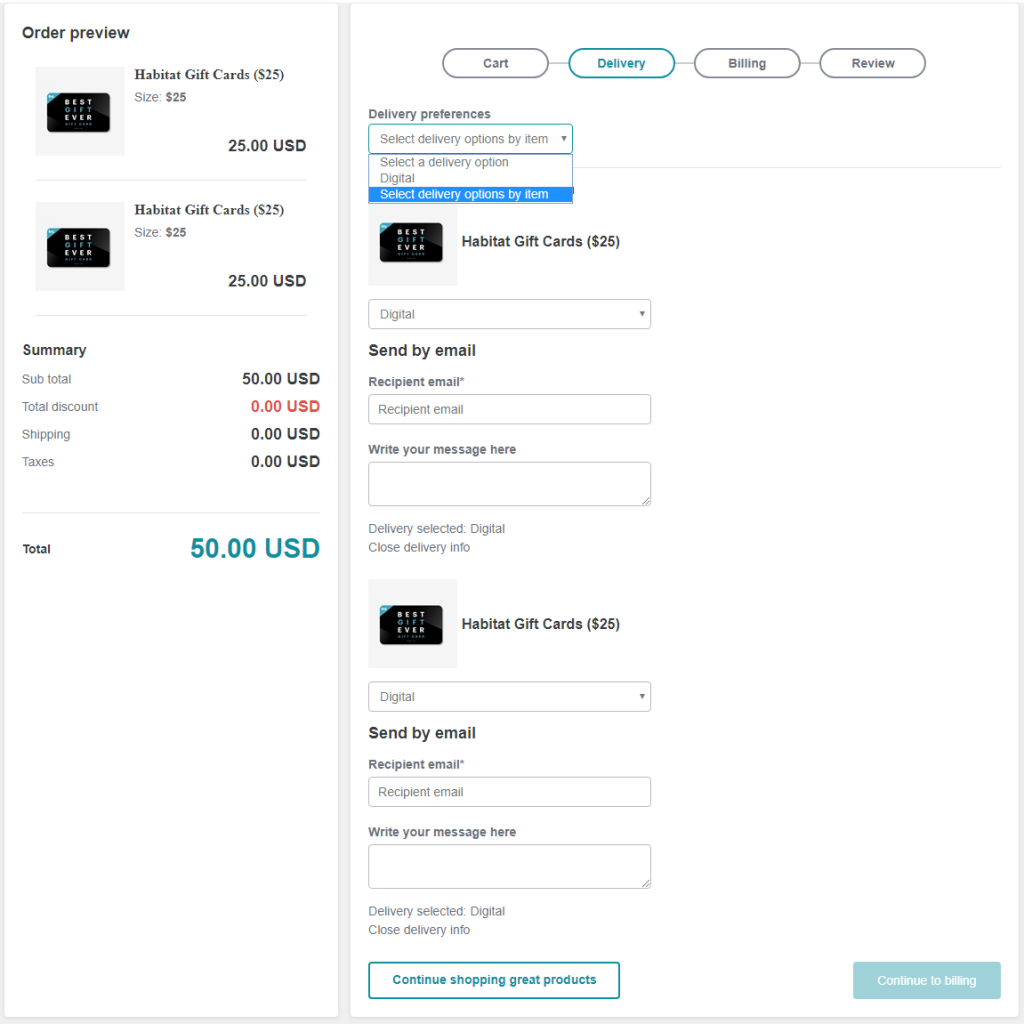
Digital sellable items are also separated into their own line items, e.g. when adding a digital sellable item with quantity of 2 this will create 2 cart lines with a quantity of 1, rather than 1 cart line with a quantity of 2. This provides the customer with the ability to input unique delivery information for each item during the checkout delivery step.

Entitlements

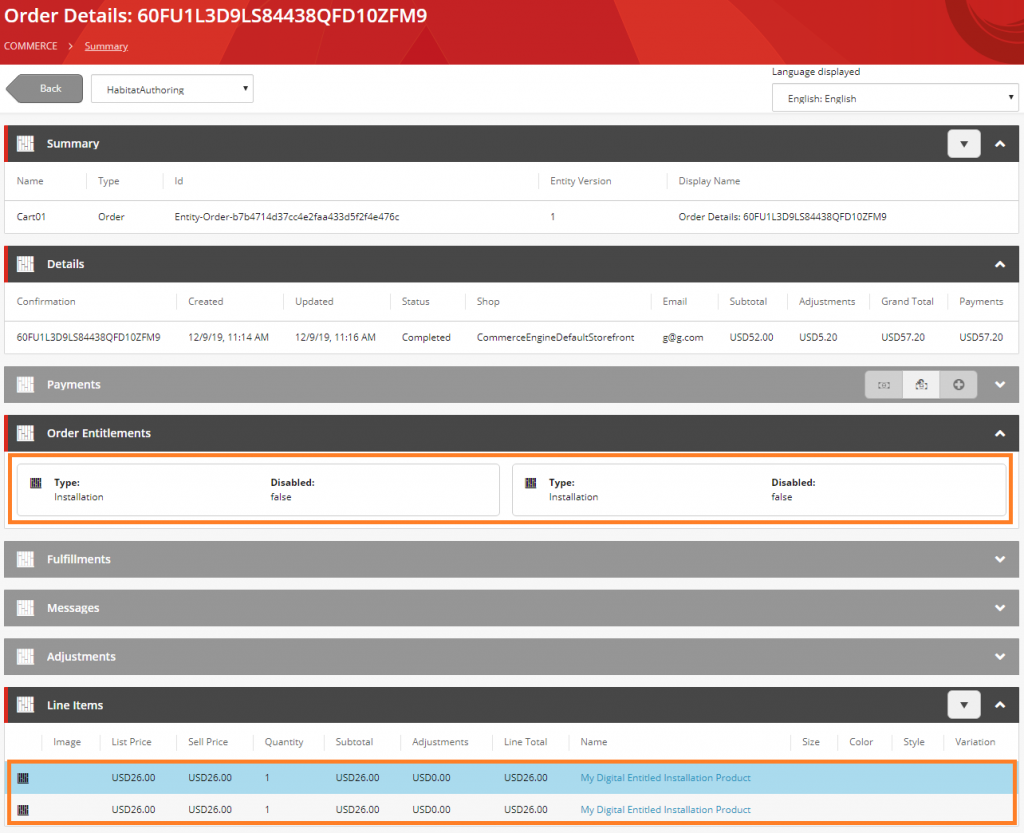
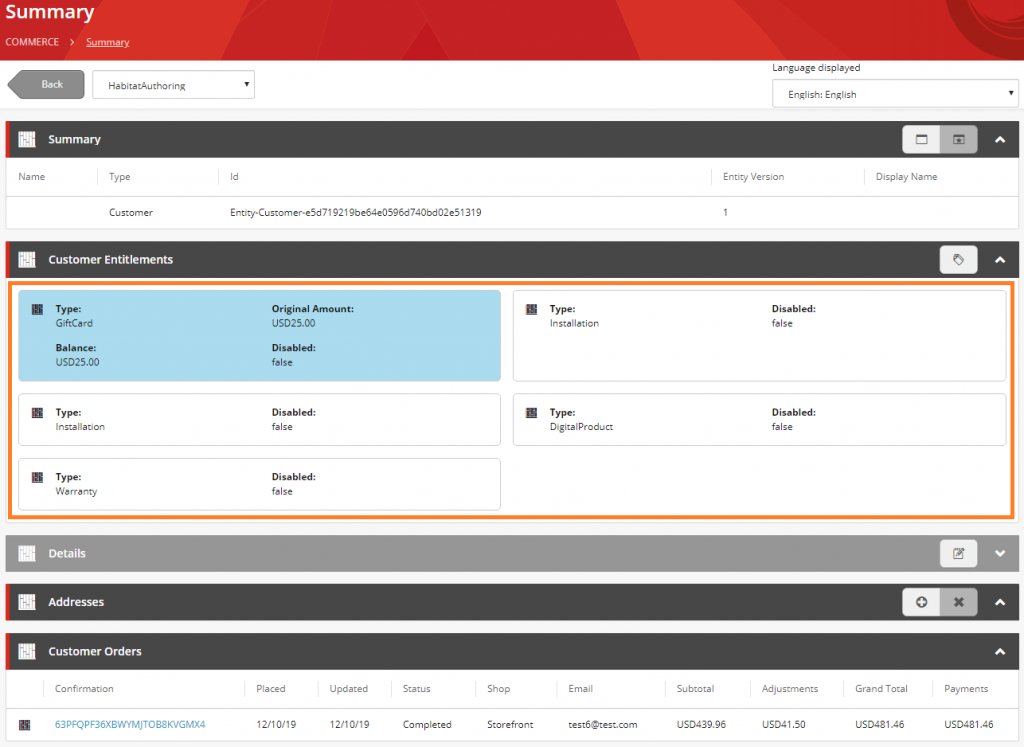
Another differentiating factor of digital sellable items are entitlements, which are registered to the order and customer account (where users are registered at the time of purchase), so that customer service representatives can view the current state of each entitlement.

Entitlements provides a basic implementation and a great starting point for customisation to meet business requirements.

Order Summary with entitlements
Customer Summary with entitements

Configuring Digital Sellable Items

Digital sellable items are determined by applying the appropriate Digital Sellable Item Tags on the sellable item and its variants. Let’s review this together.

In the Business Tools,

  1. Navigate to the Merchandising Manager
  2. Locate an existing new sellable item or create a new sellable item and navigate to the Sellable Item page view
  3. Follow either Configuring Standalone Sellable Items or Configuring Sellable Item With Variants
  4. Ensure the sellable item has a valid list price and/or price card with an active price snapshot, so that the sellable item is purchasable
  5. Publish the sellable item

Configuring Standalone Sellable Items

  1. Add the appropriate tag that represents a Digital Item.
  2. Add the appropriate tag that represents the desired type of Digital Item Type.
    This will likely be the same tag as the Digital Item, therefore not required, however it is good to validate that the tags match, especially if custom tags have been assigned to the digital item and digital item type tag policies.
  3. Add the tag “entitlement”.
Sellable item tags

Configuring Sellable Items With Variants

  1. On the sellable item, add the appropriate tag that represents a Digital Item.
  2. On each variant:
    1. Add the appropriate tag that represents the desired type of Digital Item Type.
    2. Add the tag “entitlement”.

Note: Technically, the variants inherit tags from the parent sellable item only if no tags have been specified on the variant. Configuring any tags on a variant will remove the inherited tags from the variant, therefore these instructions specify the fool-proof solution.

Sellable item tags
Variant tags

Digital Sellable Item Tags

The following tables contain the default tags that are used to classify sellable items as digital and their digital item types.

Note: Tags for digital sellable items are not treated as case-sensitive.

Digital Item Tags

ClassificationDefault Tags
Digital Itementitlement
service
installation
subscription
digitalsubscription
warranty
onlinetraining
onlinelearning
giftcards

Digital Item Type Tags

TypeDefault Tags
Virtual Gift Cardgiftcards
Digital ProductOnlineTraining
OnlineLearning
Subscription
DigitalSubscription
Warranty Warranty
InstallationInstallation
Service

Sitecore Experience Commerce: Accessing the GetRawEntity API

Reading Time: 2 minutes

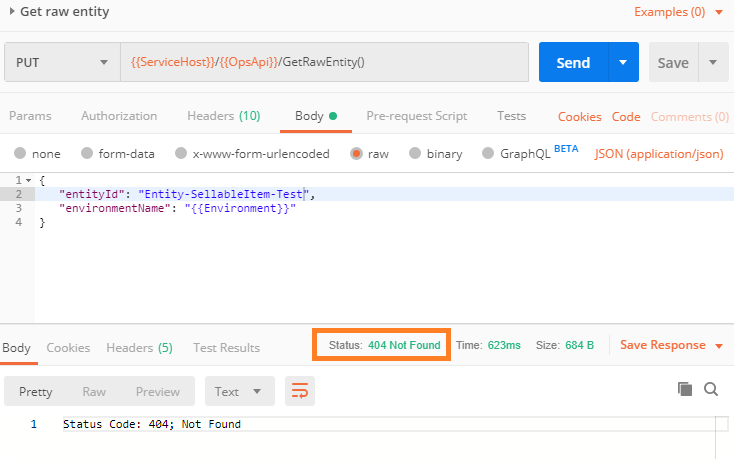
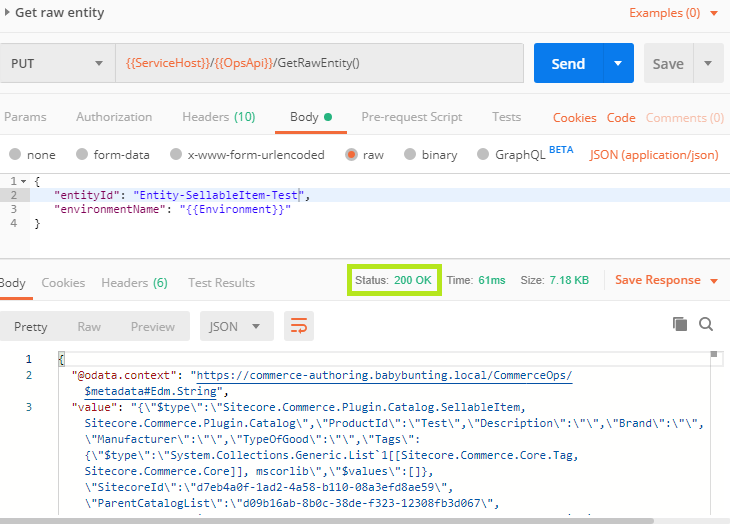
In this article, we will take a look at why the GetRawEntity api returns a 404 Not Found response for the default admin user in Sitecore Commerce.

Note: The GetRawEntity API is intended for troubleshooting and validation purposes and would be utilised by devops and developer users.

Reviewing the commerce logs we find that the QA role in not a role in the current request.

00064 22:41:06 ERROR CtxMsg.Error.QARoleNotFound: Text=QA is not a role in the current request.
00064 22:41:06 ERROR PipelineAbort:QA is not a role in the current request.

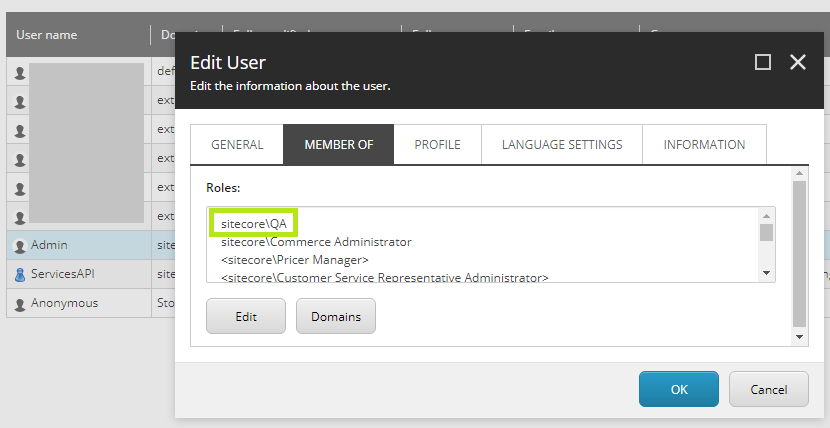
We can resolve this by updating the role memberships assigned the admin user, or any desired user.

  1. In Sitecore, go to the User Manager
  2. Select and edit the desired user
  3. In the Edit User modal,
    1. Select the MEMBER OF tab and edit the roles.
    2. Locate the sitecore\QA role and add it to the selected roles.

Note: If the user has already has received a token from Identity Server, a new token will need to be issued to receive the new role.

Sitecore Experience Commerce: Methods for Logging and Command Messaging

Reading Time: 2 minutes

In this article, we will look at the APIs available for logging to the logging framework and applying command messages to the CommerceContext.

The reason for grouping these two subjects together is due to seeing a lot of confusion around these areas when reviewing developers’ code in the field; there is some overlap between them, which is often overlooked.

In Sitecore Commerce, logging is based on Microsoft.Extensions.Logging, and the Sitecore Commerce Engine SDK is setup to utilise the SeriLog diagnostic library for logging.

The CommandMessages are flushed to calling CommerceCommands via the completion of the CommandActivity and are included in the response object of CommandsController APIs.

Logging and command messaging occurs within methods of the CommercePipelineExecutionContext and the CommerceContext.

CommercePipelineExecutionContext

LogInfoIf

public void LogInfoIf(bool conditionResult, string info);

Intuitive enough, the LogInfoIf method will log an Information level entry, info, if the conditionResult is met.

Abort

public override void Abort(string reason, object data);

The Abort method will abort the pipeline and will create an Error level log entry if the reason message doesn’t contain the magic string “Ok|”.

It’s also worth noting that this method is intended to abort the executing pipeline first and foremost, and the log entry is secondary. It is not intended solely for the purpose of logging.

Note: The data object would normally return the current CommercePipelineExecutionContext.

CommerceContext

AddDataMessage

public virtual void AddDataMessage(string messageType, string dataMessage);

The AddDataMessage will add the dataMessage to the command messages. It will also add the dataMessage to the logger at the Information level.

Tip: Avoid setting Debug level messages to avoid spamming your local development logs, which are defaulted to the Information level.

AddMessage

public virtual void AddMessage(CommandMessage message);

AddMessage will add a CommandMessage to the command messages.

The message will not invoke the logger.

AddMessage (Alternate)

public virtual Task<string> AddMessage(string code, string commerceTermKey, object[] args, string defaultMessage = null);

The overloaded AddMessage method’s logging behaviour is as follows:

  • Message codes of ValidationError or Warning will add a Warning message to the Logger.
  • All exception types will be logged using the LogException method. See LogException for more details.
  • An Error will also be logged as an Error.

For the CommandMessages, the localised message will attempted to be retrieved from Sitecore, using the commerce term key provided, and further formatted/interpolated with the args provided.

LogException

public virtual void LogException(string caller, Exception ex);

The LogException method will log an exception as an error with the exception message and stack trace details.

LogExceptionAndMessage

public virtual void LogExceptionAndMessage(string caller, Exception ex);

The LogExceptionAndMessage logs the exception as per the LogException method, however the exception message will be added to the CommandMessages at the Error level in addition.

Logger

public ILogger Logger { get; }

The Logger exposes the can be utilised to add the standard log-level entries to it, being:

  • LogDebug
  • LogInformation
  • LogWarning
  • LogError
  • LogCritical

Sitecore Experience Commerce: Promotion Evaluation and Application Logic

Reading Time: 4 minutesIn this article, we will review the default business logic that the Commerce Engine utilises to evaluate and apply promotions.

Note: References to date will indicate both date and time throughout this article.

Introduction

Before we get into the details around promotions, there are a few things we need to understand.

    • Promotions are separated into cart line level and cart level promotions, determined by the promotion benefits configured to each promotion. While multiple benefits can be added to promotions, additional benefits after the first can only be of the same benefit type.
    • Cart line calculations (subtotals, fulfillment fees, promotion discounts, taxes, totals) are evaluated and applied prior to the and cart calculations.
      Sitecore.Commerce.Plugin.Carts
      ICalculateCartLinesPipeline (Sitecore.Commerce.Plugin.Carts.Cart => Sitecore.Commerce.Plugin.Carts.Cart)
           ------------------------------------------------------------
           Plugin.Carts.ClearCartLinesBlock (Sitecore.Commerce.Plugin.Carts.Cart => Sitecore.Commerce.Plugin.Carts.Cart)
           ------------------------------------------------------------
           Plugin.Carts.ClearCartBlock (Sitecore.Commerce.Plugin.Carts.Cart => Sitecore.Commerce.Plugin.Carts.Cart)
           ------------------------------------------------------------
           Plugin.Carts.CalculateCartLinesSubTotalsBlock (Sitecore.Commerce.Plugin.Carts.Cart => Sitecore.Commerce.Plugin.Carts.Cart)
           ------------------------------------------------------------
           Plugin.Fulfillment.CalculateCartLinesFulfillmentBlock (Sitecore.Commerce.Plugin.Carts.Cart => Sitecore.Commerce.Plugin.Carts.Cart)
           ------------------------------------------------------------
           Plugin.Promotions.CalculateCartLinesPromotionsBlock (Sitecore.Commerce.Plugin.Carts.Cart => Sitecore.Commerce.Plugin.Carts.Cart)
           ------------------------------------------------------------
           Plugin.Tax.CalculateCartLinesTaxBlock (Sitecore.Commerce.Plugin.Carts.Cart => Sitecore.Commerce.Plugin.Carts.Cart)
           ------------------------------------------------------------
           Plugin.Carts.CalculateCartLinesTotalsBlock (Sitecore.Commerce.Plugin.Carts.Cart => Sitecore.Commerce.Plugin.Carts.Cart)
      -----------------------------------------------------------------
      Sitecore.Commerce.Plugin.Carts
      ICalculateCartPipeline (Sitecore.Commerce.Plugin.Carts.Cart => Sitecore.Commerce.Plugin.Carts.Cart)
           ------------------------------------------------------------
           Plugin.Carts.CalculateCartSubTotalsBlock (Sitecore.Commerce.Plugin.Carts.Cart => Sitecore.Commerce.Plugin.Carts.Cart)
           ------------------------------------------------------------
           Plugin.Fulfillment.CalculateCartFulfillmentBlock (Sitecore.Commerce.Plugin.Carts.Cart => Sitecore.Commerce.Plugin.Carts.Cart)
           ------------------------------------------------------------
           Plugin.Promotions.CalculateCartPromotionsBlock (Sitecore.Commerce.Plugin.Carts.Cart => Sitecore.Commerce.Plugin.Carts.Cart)
           ------------------------------------------------------------
           Plugin.Tax.CalculateCartTaxBlock (Sitecore.Commerce.Plugin.Carts.Cart => Sitecore.Commerce.Plugin.Carts.Cart)
           ------------------------------------------------------------
           Plugin.Carts.CalculateCartTotalsBlock (Sitecore.Commerce.Plugin.Carts.Cart => Sitecore.Commerce.Plugin.Carts.Cart)
           ------------------------------------------------------------
           Plugin.Payments.CalculateCartPaymentsBlock (Sitecore.Commerce.Plugin.Carts.Cart => Sitecore.Commerce.Plugin.Carts.Cart)
           ------------------------------------------------------------
           Plugin.Carts.WriteCartTotalsToContextBlock (Sitecore.Commerce.Plugin.Carts.Cart => Sitecore.Commerce.Plugin.Carts.Cart)
      
    • Exclusive promotions apply against the benefit type only, therefore it is possible to apply a cart line level exclusive promotion and a cart level exclusive promotion at the same time.

Evaluating Promotions

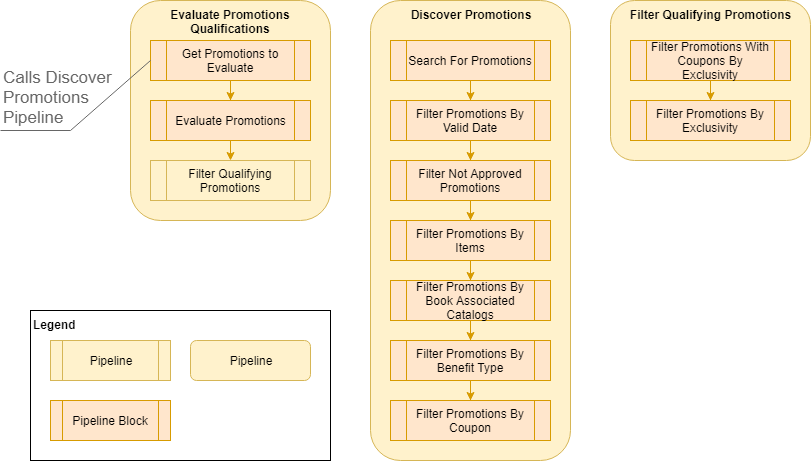
The following diagram shows the pipelines and pipeline blocks that are called during the process of evaluating the applicable promotions and additional filtering for exclusive promotion evaluation.

There are essentially 10 steps that make up the evaluation process:

  1. Search For Promotions: Retrieves all promotions.
  2. Filter Promotions By Valid Date: Removes promotions that do not fall within the Valid From/To dates based on effective date.
  3. Filter Not Approved Promotions: Removes promotions that are not approved and, if the promotion is disabled, where the effective date is prior to the updated date (the date the promotion was disabled). The latter rule is to allow the promotion to be active when reviewed the storefront at a previous point in time.
    Note: From 9.0.1, the GlobalPromotionsPolicy was introduced to allow promotions to be previewed in the storefront prior to submitting a promotion for approval.
  4. Filter Promotions By Items: Removes promotions where the cart contains no sellable items marked as included in the ItemsCollection qualification or where the cart contains any of the sellable items marked as excluded in the ItemsCollection qualification.
  5. Filter Promotions By Book Associated Catalogs: Removes promotions where the catalog, associated to its promotion book, does not match any of the catalogs associated to the sellable items of the cart lines.
  6. Filter Promotions By Benefit Type: Removes promotions where the type of benefits configured to the promotion does not match the benefit type being evaluated. i.e. Cart line level benefits (CartLineActions) and cart level benefits (CartActions) for CalculateCartLinesPipeline and CalculateCartLinesPipeline respectively.
  7. Filter Promotions By Coupon: Removes promotions that require a coupon that has not been applied to the cart.
  8. Evaluate Promotions: Filters out promotions where promotion qualifications and benefit rules do are not applicable to the current cart.
  9. Filter Promotions With Coupons By Exclusivity: If exclusive coupon promotions are present in the promotions list, the list will be filtered down to a single exclusive coupon promotion. The promotion will be determined by the Added date that their corresponding coupons were applied to the cart.
  10. Filter Promotions By Exclusivity: If exclusive automatic promotions are present in the promotions list, the list will be filtered down to a single exclusive automatic promotion. The promotion will be determined by the earliest (oldest) Valid From date, and in the event of multiple promotions sharing the same earliest Valid From date the promotion that was created earliest will take win.

Promotion Priorisation Rules

While the previous section covered how promotions are evaluated, and also provided some insight into promotion priorisation, we will now cover the prioritisation rules.

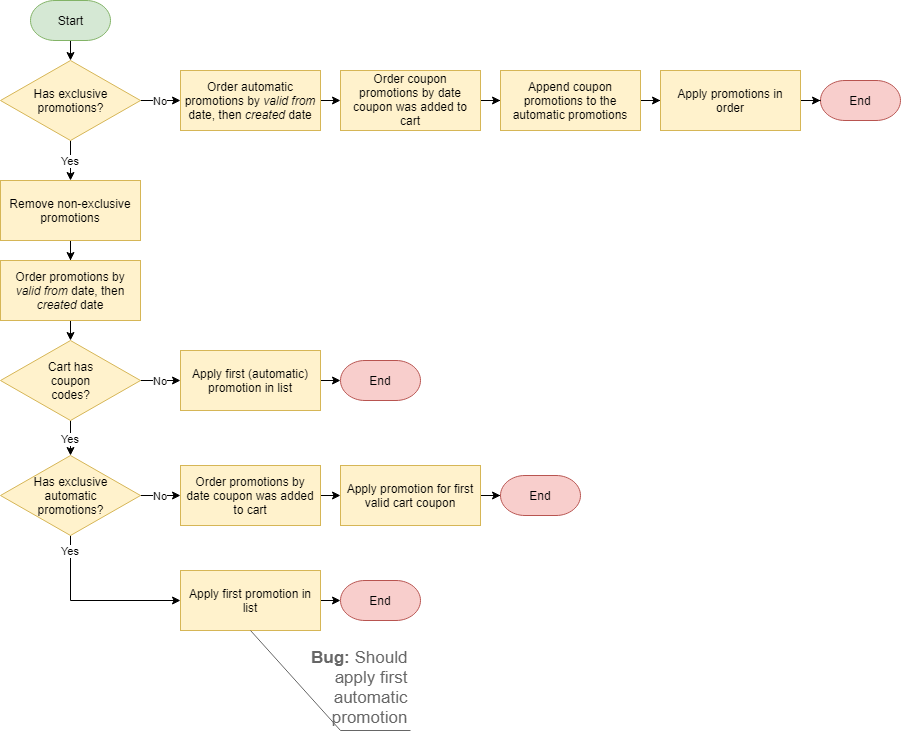
The following diagram shows the logic used to determine which promotion(s) to apply to the cart.

There are essentially 3 steps that make up the application process:

  1. Apply a single exclusive automatic promotion.
    • The promotion will be determined by the earliest (oldest) Valid From date, and in the event of multiple promotions sharing the same earliest Valid From date the promotion that was created earliest will take win.
    • If a promotion is applied here no further promotions are applied.
  2. Apply a single exclusive coupon promotion.
    • The promotion will be determined by the Added date that their corresponding coupons were applied to the cart.
    • If a promotion is applied here no further promotions are applied.
  3. Apply all non-exclusive promotions.
    • The promotion order will be determined by:
      1. Automatic promotions ordered by earliest (oldest) Valid From date, and in the event of multiple promotions sharing the same earliest Valid From date the promotion that was created earliest will take win.
      2. Coupon Promotions ordered by earliest Added date that their corresponding coupons were applied to the cart.

References

Configuring and Customising SEO Friendly URLs in Sitecore Commerce SXA Storefront

Reading Time: 4 minutes

In this article, we will look at the configuration and customisation options available for manipulating URLs in the Sitecore Commerce Storefront.

The goal will be to determine how to manipulate the URLs so that they are more SEO-friendly as represented by the following URL structures.

  • https://{domain}/category/{1st level category name}
  • https://{domain}/category/{1st level category name}/{2nd level category name}
  • https://{domain}/category/{1st level category name}/{2nd level category name}/{3rd level category name}
  • https://{domain}/product/{product id}

This would translate to the following examples

  • https://sxa.storefront.com/category/computers-and-tablets
  • https://sxa.storefront.com/category/computers-and-tablets/kids-tablets
  • https://sxa.storefront.com/category/computers-and-tablets/kids-tablets/boys-tablets
  • https://sxa.storefront.com/product/6042221

Throughout this article we will utilise the category Computers and Tablets > Kid’s Tablets and product Minnow Kid’s Tablet—7”, 8GB to review our progress. These examples also contain some non-alphanumeric characters to ensure we take these special characters into consideration.

How Storefront URLs are Generated

Storefront URLs are constructed using the configuration of the site’ s linkManager. The configuration is located at sitecore/linkManager/providers/add[@name=’commerce‘].

Configuration Properties

An important note about the provider configuration properties is that only 3 properties actually affect the generated URLs – includeFriendlyName, useShopLinks, and encodeNames.

  • includeFriendlyName: Includes the DisplayName of the category or product in the URL segment. i.e. {category DisplayName}={category FriendlyId} and {product DisplayName}={ProductId/FriendlyId}.
  • useShopLinks: Constructs URL with shop/{category}/{product} if enabled, otherwise as category/{category} and product/{product} for category and product URLs respectively.
  • includeCatalog: Not currently supported
  • addAspxExtension: N/A
  • alwaysIncludeServerUrl: N/A
  • encodeNames: Encodes the DisplayName portion of the category and product segments. Only supported when useShopLinks is true.
  • languageEmbedding: N/A
  • languageLocation: N/A
  • lowercaseUrls: Not currently supported
  • shortenUrls: Not currently supported
  • useDisplayName: Not currently supported

URLs Generated from Various Configurations

The following decision table shows the available configurations

 Rules
Conditions12345
useShopLinksYYYNN
includeFriendlyNameYYNYN
encodeNamesYN Y 
Actions12345
ShopXXX  
Product/Category   XX
Display Name prefixXX X 
Display Name encodingX  X 

The following table shows the URLs generated from the rules in the above table.

#PageURL
1Categoryhttps://sxa.storefront.com/shop/Kid%E2%80%99sTablets%3dhabitat_master-kid%20s%20tablets
 Producthttps://sxa.storefront.com/shop/Kid%E2%80%99sTablets%3dhabitat_master-kid%20s%20tablets/MinnowKid%E2%80%99sTablet%E2%80%947%E2%80%9D%2C8GB%3d6042221
2Categoryhttps://sxa.storefront.com/shop/Kid’sTablets%3dhabitat_master-kid%20s%20tablets
 Producthttps://sxa.storefront.com/shop/Kid’sTablets%3dhabitat_master-kid%20s%20tablets/MinnowKid’sTablet—7”%2C8GB%3d6042221
3Categoryhttps://sxa.storefront.com/shop/habitat_master-kid%20s%20tablets
 Producthttps://sxa.storefront.com/shop/habitat_master-kid%20s%20tablets/6042221
4Categoryhttps://sxa.storefront.com/category/Kid’sTablets%3dhabitat_master-kid%20s%20tablets
 Producthttps://sxa.storefront.com/product/MinnowKid’sTablet—7”%2C8GB%3d6042221
5Categoryhttps://sxa.storefront.com/category/habitat_master-kid%20s%20tablets
 Producthttps://sxa.storefront.com/product/6042221

In reviewing the results of the configurations above, rule set 5 creates the desired product URL structure we set out to accomplish.

Now we will focus on customising the website solution to generate our catalog URL structure.

Customising the Solution to Complete the SEO-Friendly URLs

Updating the CatalogUrlManager

We will need to override the BuildCategoryLink method of the CatalogUrlManager class to apply the following customisations:-

  • Generate the category hierarchy (or breadcrumb)
  • Remove the catalog name from the category’s Friendly Id.
public override string BuildCategoryLink(Item item, bool includeCatalog, bool includeFriendlyName)
{
    return BuildBreadcrumbCategoryUrl(item, includeCatalog, includeFriendlyName, CatalogFoundationConstants.Routes.CategoryUrlRoute);
}

protected virtual string BuildBreadcrumbCategoryUrl(Item item, bool includeCatalog, bool includeFriendlyName, string root)
{
    Assert.ArgumentNotNull(item, nameof(item));

    string catalogName = ExtractCatalogName(item, includeCatalog);
    var categoryBreadcrumbList = GetCategoryBreadcrumbList(item);

    return BuildBreadcrumbCategoryUrl(categoryBreadcrumbList, includeFriendlyName, catalogName, root);
}

protected virtual string BuildBreadcrumbCategoryUrl(List<Item> categories, bool includeFriendlyName, string catalogName, string root)
{
    Assert.ArgumentNotNull(categories, nameof(categories));

    var stringBuilder = new StringBuilder("/");
    if (IncludeLanguage)
    {
        stringBuilder.Append(Context.Language.Name);
        stringBuilder.Append("/");
    }
    if (!string.IsNullOrEmpty(catalogName))
    {
        stringBuilder.Append(EncodeUrlToken(catalogName, true));
        stringBuilder.Append("/");
    }
    stringBuilder.Append(root);

    var itemName = string.Empty;
    var itemFriendlyName = string.Empty;
    foreach (var category in categories)
    {
        stringBuilder.Append("/");
        ExtractCatalogItemInfo(category, includeFriendlyName, out itemName, out itemFriendlyName);
        if (!string.IsNullOrEmpty(itemFriendlyName))
        {
            stringBuilder.Append(EncodeUrlToken(itemFriendlyName, true));
            stringBuilder.Append(UrlTokenDelimiterEncoded);
        }
        itemName = RemoveCatalogFromItemName(root, itemName);
        stringBuilder.Append(EncodeUrlToken(itemName, false));
    }

    return StorefrontContext.StorefrontUri(stringBuilder.ToString()).Path;
}

protected virtual List<Item> GetCategoryBreadcrumbList(Item item)
{
    var categoryBreadcrumbList = new List<Item>();
    var startNavigationCategoryID = StorefrontContext.CurrentStorefront.GetStartNavigationCategory();

    while (item.ID != startNavigationCategoryID)
    {
        categoryBreadcrumbList.Add(item);
        item = item.Parent;
    }
    categoryBreadcrumbList.Reverse();

    return categoryBreadcrumbList;
}

protected virtual string RemoveCatalogFromItemName(string root, string itemName)
{
    if (root == CatalogFoundationConstants.Routes.CategoryUrlRoute)
    {
        var tokens = itemName.Split('-');
        if (tokens.Length > 1)
        {
            itemName = tokens[1];
        }
    }

    return itemName;
}

protected override void ExtractCatalogItemInfo(Item item, bool includeFriendlyName, out string itemName, out string itemFriendlyName)
{
    base.ExtractCatalogItemInfo(item, includeFriendlyName, out itemName, out itemFriendlyName);
    var parentItemName = item.Parent.Name.ToLowerInvariant();
    if (itemName.StartsWith(parentItemName))
    {
        itemName = itemName.Substring(parentItemName.Length);
    }
}

Category URL: https://sxa.storefront.com/category/computers%20and%20tablets/kid%20s%20tablets

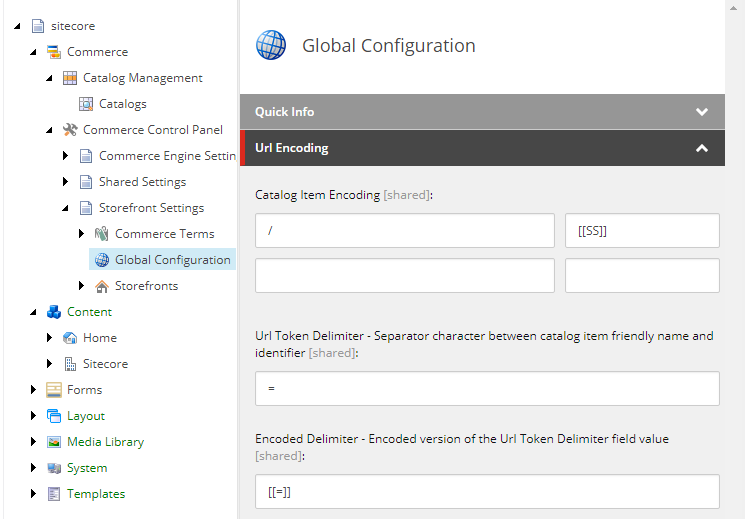
The URLs generated are looking good. We do have an issue with the URLs still containing encoded spaces. To control character encoding there is a configuration in the content editor at /sitecore/Commerce/Commerce Control Panel/Storefront Settings/Global Configuration > URL Encoding > Catalog Item Encoding.

Unfortunately there is a quirk in which it doesn’t accept space entries, so we will override the EncodeUrlToken and DecodeUrlToken methods instead. As we aren’t allowed to have hyphens in the category names, we won’t have any character conflicts where encoding or decoding.

protected override string EncodeUrlToken(string urlToken, bool removeInvalidPathCharacters)
{
    if (!string.IsNullOrEmpty(urlToken))
    {
        if (removeInvalidPathCharacters)
        {
            foreach (string invalidPathCharacter in _invalidPathCharacters)
            {
                urlToken = urlToken.Replace(invalidPathCharacter, string.Empty);
            }
        }
        EncodingTokenList.ForEach(t => urlToken = urlToken.Replace(t.Delimiter, t.EncodedDelimiter));
        urlToken = urlToken.Replace(' ', '-');
        urlToken = Uri.EscapeDataString(urlToken).Replace(UrlTokenDelimiter, EncodedDelimiter);
    }

    return urlToken;
}

protected override string DecodeUrlToken(string urlToken)
{
    if (!string.IsNullOrEmpty(urlToken))
    {
        urlToken = Uri.UnescapeDataString(urlToken).Replace(EncodedDelimiter, UrlTokenDelimiter);
        urlToken = urlToken.Replace('-', ' ');
        EncodingTokenList.ForEach(t => urlToken = urlToken.Replace(t.EncodedDelimiter, t.Delimiter));
    }

    return urlToken;
}

Category URL: https://sxa.storefront.com/category/computers-and-tablets/kid-s-tablets

Now that we have our category URL structure that meets our requirements, our last step is to ensure the URLs are resolving back to their correct Sitecore items.

Updating the CatalogPageItemResolver

Now we have covered the URL generation implementation, we now need to resolve these URLs back to their correct Sitecore items.

public override void Process(PipelineArgs args)
{
	if (Context.Item == null || SiteContext.CurrentCatalogItem != null)
	{
		return;
	}

	var contextItemType = GetContextItemType();
	switch (contextItemType)
	{
		case ItemTypes.Category:
		case ItemTypes.Product:
			var isProduct = contextItemType == ItemTypes.Product;
			var catalogItemIdFromUrl = GetCatalogItemIdFromUrl(isProduct);
			if (string.IsNullOrEmpty(catalogItemIdFromUrl))
			{
				break;
			}
			var catalog = StorefrontContext.CurrentStorefront.Catalog;
			var catalogItem = ResolveCatalogItem(catalogItemIdFromUrl, catalog, isProduct);
			if (catalogItem == null && !isProduct)
			{
				catalogItemIdFromUrl = GetCatalogItemIdFromUrl(true);
				if (string.IsNullOrEmpty(catalogItemIdFromUrl))
				{
					break;
				}
				catalogItem = ResolveCatalogItem(catalogItemIdFromUrl, catalog, isProduct);
			}
			if (catalogItem == null)
			{
				WebUtil.Redirect("~/");
			}

			SiteContext.CurrentCatalogItem = catalogItem;
		break;
	}
}

private string GetCatalogItemIdFromUrl(bool isProduct)
{
    var catalogItemId = string.Empty;
    var rawUrl = HttpContext.Current.Request.RawUrl;
    var urlTokens = rawUrl.Split('/');
    if (urlTokens.Any())
    {
        var item = urlTokens.Last();
        var queryStringPosition = item.IndexOf("?", StringComparison.OrdinalIgnoreCase);
        if (queryStringPosition > 0)
        {
            item = item.Substring(0, queryStringPosition);
        }

        if (isProduct && urlTokens.Length >= 4)
        {
            var parentCategoryName = urlTokens[urlTokens.Length - 2];
            item = $"{parentCategoryName}{item}";
        }
        catalogItemId = CatalogUrlManager.ExtractItemId(item);
    }

    return catalogItemId;
}

Summary

We learnt that the construction of the URL can be managed via Sitecore Configuration, the Sitecore Content Editor and via code customisations, depending on the URL requirements.

Source Code: Ajsuth.Foundation.Catalog

Naming Conventions in Sitecore Experience Commerce – Quick Reference Guide

Reading Time: < 1 minute

In this article, we will cover the common naming conventions found within Sitecore Experience Commerce to maintain a consistent approach in our custom plugins.

CRUD Operations

Starting with some simple CRUD operations, the following tables documents the naming conventions to utilise for the various Commerce classes

Entities

Create Entity

Naming Convention: Add<entity><context>

Commerce ReferenceExample
Controller ActionAddPriceBook (CommandsController)
CommandAddPriceBookCommand
ModelPriceBookAdded
PipelineAddPriceBookPipeline
Pipeline ArgumentAddPriceBookArgument
Pipeline BlockAddPriceBookBlock

Read Entity

Naming Convention: Get<entity><context>

Commerce ReferenceExample
Controller ActionGet (<Entity>Controller)
CommandN/A. Use FindEntityCommand instead
ModelFoundEntity (handled within FindEntityCommand)
PipelineIFindEntityPipeline (handled within FindEntityCommand)
Pipeline ArgumentFindEntityArgument (handled within FindEntityCommand)
Pipeline BlockSQL.FindEntityBlock (handled within FindEntityCommand)

Update Entity

Naming Convention: Update<entity><context>

Commerce ReferenceExample
Controller ActionEditPriceBook (CommandsController)
CommandEditPriceBookCommand
ModelPriceBookEdited (No current usages)
PipelineEditPriceBookPipeline
Pipeline ArgumentEditPriceBookArgument
Pipeline BlockEditPriceBookBlock

Delete Entity

Naming Convention: Delete<entity><context>

Commerce ReferenceExample
Controller ActionDeletePriceCard. (CommandsController)


Note: When deleting entities, it is important to consider how references to these entities need to be handled, as well as any child entity dependencies that may also need to be deleted, which would otherwise be orphaned.

CommandDeletePriceBookCommand
ModelPriceCardDeleted (No current usages)
PipelineIDeleteEntityPipeline
Pipeline ArgumentDeleteEntityArgument (handled within IDeleteEntityPipeline)
Pipeline BlockDeleteEntityBlock (handled within IDeleteEntityPipeline)

Components

Create Component

Naming Convention: Add<component><context>

Commerce ReferenceExample
Controller ActionAddCartLine
CommandAddCartLineCommand
ModelLineAdded
PipelineAddCartLinePipeline
Pipeline ArgumentCartLineArgument
Pipeline BlockAddCartLineBlock

Read Component

Naming Convention: N/A
Components only exist to extend entities and therefore will not live in isolation to be queried. If a component was to be queried it would be to retrieve it in the context of an entity and therefore the entity would be retrieved instead.

Update Component

Naming Convention: Update<component><context>

Commerce ReferenceExample
Controller ActionUpdateCartLine
CommandUpdateCartLineCommand
ModelLineUpdated
PipelineUpdateCartLinePipeline
Pipeline ArgumentCartLineArgument
Pipeline BlockUpdateCartLineBlock

Delete Component

Naming Convention: Update<component><context>

Commerce ReferenceExample
Controller ActionRemoveCartLine
CommandRemoveCartLineCommand
ModelLineRemoved (No current usages)
PipelineRemoveCartLinePipeline
Pipeline ArgumentCartLineArgument
Pipeline BlockRemoveCartLineBlock

Business Tools

Pipeline Block
Naming Convention
ExampleDescription
Get<Navigation Entity View>ViewBlockGetInventoryNavigationViewBlockCreates and constructs a navigation entity view
Get<Dashboard Entity View>ViewBlockGetInventoryDashboardViewBlockCreates and constructs a dashboard entity view
Get<Entities>ViewBlockGetInventorySetsViewBlockCreates and constructs an entity view for managed lists
Get<Entity>DetailsViewBlockGetInventoryDetailsViewBlockCreates and constructs an entity view for a specific entity
Populate<Entity View>ViewActionsBlockPopulateInventorySetsViewActionsBlockPopulates the actions of an entity view
DoAction<Action Name>BlockDoActionAddInventorySetBlockHandles the logic of an entity view action

Miscellaneous

Commerce ReferenceExample
Persist<Entity>BlockPersistCartEntity
Initialize<Entity/Entities>BlockInitializeCatalogBlock
<Entity>Argument (Pipeline Argument)CartArgument
<Entity><Entity>Argument (Pipeline Argument) CartPartyArgument

Sitecore Experience Commerce – Configuring Currencies for Storefronts

Reading Time: 2 minutesIn this article, we will look at all of the configurations around currency so that we don’t run into any currency related errors when working with the Business Tools in Sitecore Experience Commerce and our storefront website.

Currency Configurations in the Sitecore Content Editor – Commerce Control Panel

  1. In the Sitecore Content Editor,
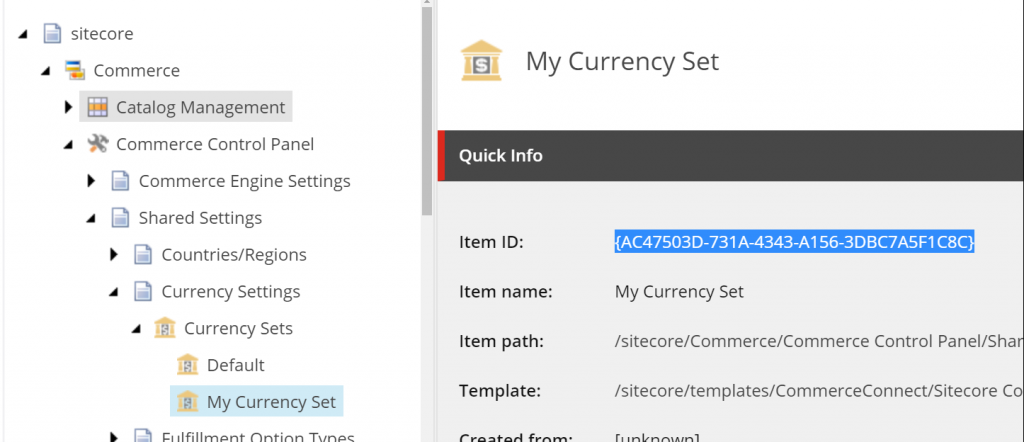
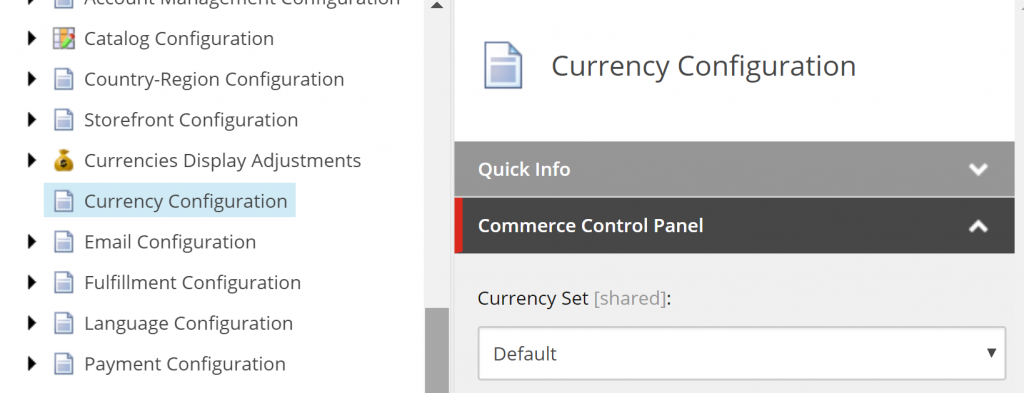
  2. Go to /sitecore/Commerce/Commerce Control Panel/Shared Settings/Currency Settings/Currency Sets/
    1. Create, edit or locate the currency set you wish to utilise
    2. Note the Item ID
  3. Go to /sitecore/Commerce/Commerce Control Panel/Storefront Settings/Storefronts/<Storefront>/Currency Configuration
  4. Set the Currency Set as desired
  5. Publish any changes made

Currency Configurations in the Commerce Engine Connect Config

  1. In the Sitecore configuration file, <Website Root>\App_Config\Include\Y.Commerce.Engine\Sitecore.Commerce.Engine.Connect.config, the property defaultShopCurrency may need to be updated.
    Note: It’s best practice to patch out this value rather than updating this configuration file directly to ensure it’s deployed to each environment and that upgrades can be performed without corrupting the website.
  2. Create or update the patch configuration file in your website’s solution with the desired currency value.
  3. Deploy the project/solution

Currency Configurations in BizFx

  1. In your BizFx solution, open \assets\config.json and review and edit the Currency value as appropriate
  2. Deploy the BizFx site
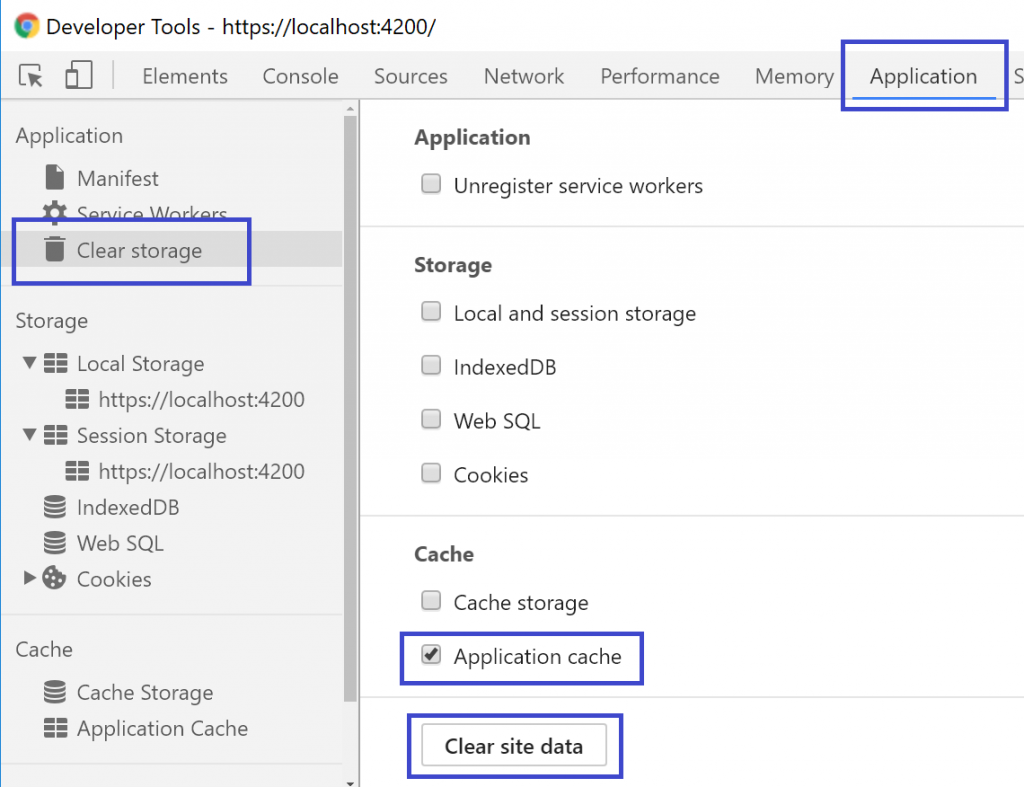
  3. Clear the Application cache in the browser if the config.json file is still being served from disk cache.

Currency Configurations in the Commerce Engine Environment Policies

  1. In the environment configurations, review and edit the following policy properties as appropriate:-
    • GlobalEnvironmentPolicy -> Default Currency
    • GlobalCurrencyPolicy -> DefaultCurrencySet (This will be the Sitecore Item ID that you noted from the Commerce Control Panel)
    • GlobalPhysicalFulfillmentPolicy ->
      • DefaultCartFulfillmentFees -> CurrencyCode
      • DefaultCartFulfillmentFee -> CurrencyCode
      • DefaultItemFulfillmentFees -> CurrencyCode
      • DefaultItemFulfillmentFee -> CurrencyCode
      • FulfillmentFees -> Fee -> CurrencyCode
  2. Deploy the Commerce Engine Solution
  3. Run Bootstrap

Currency Configurations in Postman Environment

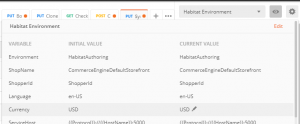
  1. In the environment configurations set up for the project instances, review and update the Currency value as appropriate.

Business Tools UI Hints and UI Types

Reading Time: 8 minutes

In this article, we will look at what UI Hints and UI Types are and show samples is each being used within the Business Tools.

Note: This article is a work in progress.

UI Hints

The UI Hints property sets the rendering type for the properties of the entity views and entity action views.

EntityActionView

RelatedList

The RelatedList UI Hint is used to redirect the user to an entity view page instead of opening up a modal for user interaction. The entity view page URL is constructed from the EntityView property in the following format <domain>/entityView/<entity view>.

e.g. https://localhost:4200/entityView/OrdersList-CompletedOrders

var actions = entityView.GetPolicy<ActionsPolicy>().Actions;
var entityActionView = new EntityActionView()
{
	Name = "CompletedOrders",
	IsEnabled = true,
	UiHint = "RelatedList",
	EntityView = "OrdersList-CompletedOrders",
	Icon = "signal_flag_checkered"
}
actions.Add(entityActionView);

EntityView

The following list of UI Hints can be utilised for entity views.

Flat (default)

The default UI Hint for entity views is Flat. The hint is used for rendering a single set of properties as plain text.

Entity View UsageSupportedApplicable UI Types
PageYesN/A (All types will render as raw string values)
ModalYes
  • Empty (string) Text
  • Empty (bool) Checkbox
  • Empty (DateTimeOffset)
  • AutoComplete
  • DownloadCsv
  • Multiline
  • RichText
  • SelectList
  • Tags

Grid

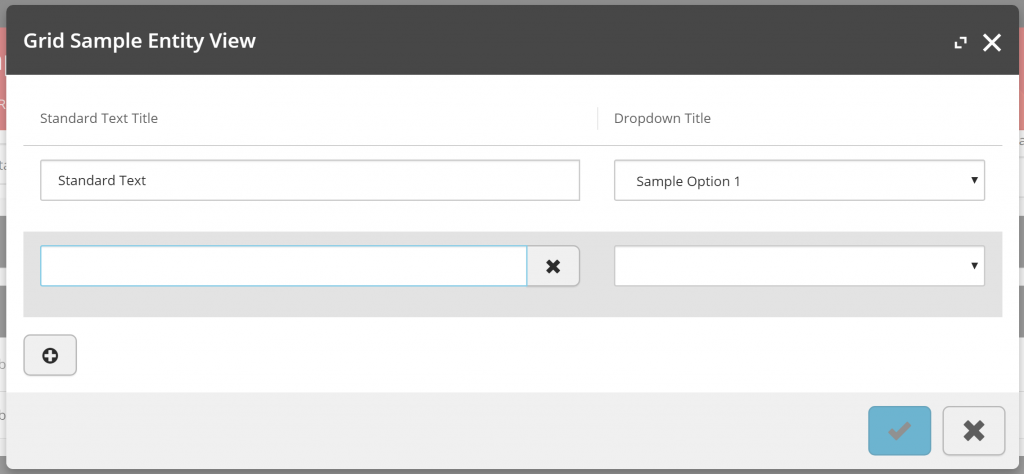
The Grid UI Hint supports the rendering of child entity views in a table-row layout in the modal window, allowing additional rows to be added and removed.

Notes:

  • The Dropdown UI Type does not apply the remove row control, therefore if all view properties of the row are set to Dropdown the row will not be able to be removed.
  • Only a single child entity view is supported as the UI renders a single Add Row button, which applies to the first child entity view.
  • Omitting the “AllowAdd” ViewProperty will exclude the Add Row button from the Grid.
entityView.UiHint = UiHints.Grid;
entityView.Properties.Add(new ViewProperty { Name = "AllowAdd", RawValue = false, IsRequired = false, IsReadOnly = true, IsHidden = true });
Entity View UsageSupportedApplicable UI Types
PageNoN/A
ModalYes
  • Empty (string) Text
  • SelectList

List

The List UI Hint creates a card-like layout, each list item represented by a child entity view containing properties of supported UI Types.

Entity View UsageSupportedApplicable UI Types
PageYes
  • Empty (String)
  • Empty (DateTimeOffset)
  • Empty (Decimal)
  • Empty (Sitecore.Commerce.Core.Money)
  • DownloadCsv
  • EntityLink
  • FullDateTime
  • Html
  • ItemLink
  • List
  • Multiline
  • SubItemLink
ModalNoN/A

MediaPicker

Details to come.

Entity View UsageSupportedApplicable UI Types
PageNoN/A
ModalYes???

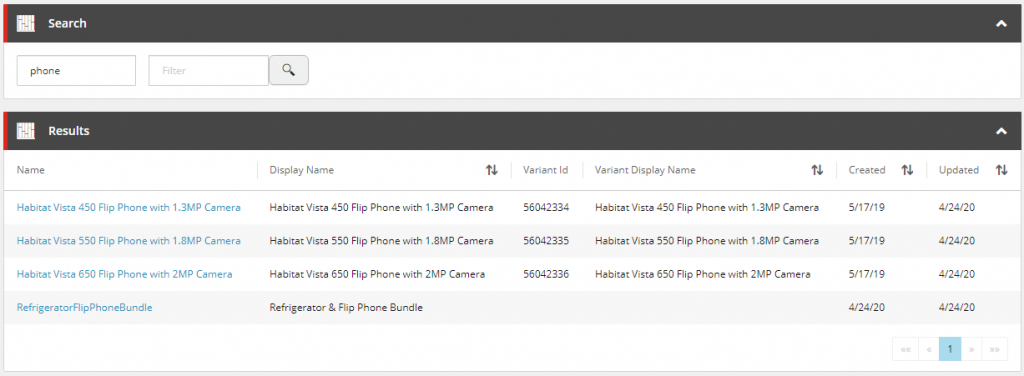
The Search UI Hint is an implicit implementation driven by the GetSearchViewBlock, based on the SearchViewPolicies configured for the environment.

The current request’s view name is used to retrieved the corresponding SearchViewPolicy by its ViewName property and will use the SearchScopeName to resolve the SearchScopePolicy for the search queries of the control. Where a SearchScopePolicy has been resolved, the Search entity view will be added to the page, and upon execution of the search control the Results entity view will be added without any additional configuration or implementation.

Notes:

  • An EntityType is also specified in the SearchViewPolicy for the InventorySet as additional validation for the generic ‘Master’ entity view name that is utilised by all entity types.
{
  "$type": "Sitecore.Commerce.Plugin.Search.SearchViewPolicy, Sitecore.Commerce.Plugin.Search",
  "SearchScopeName": "XC93_CatalogItemsScope",
  "ViewName": "MerchandisingDashboard"
}
Entity View UsageSupportedApplicable UI Types
PageYesN/A
ModalNoN/A

Table

Similar to the List UI Hint, the Table UI Hint creates a table-row layout, each list item represented by a child entity view containing properties of supported UI Types.

Entity View UsageSupportedApplicable UI Types
PageYes
  • Empty (String)
  • Empty (DateTimeOffset)
  • Empty (Decimal)
  • Empty (Sitecore.Commerce.Core.Money)
  • DownloadCsv
  • EntityLink
  • FullDateTime
  • Html
  • ItemLink
  • List
  • Multiline
  • SubItemLink
ModalNoN/A

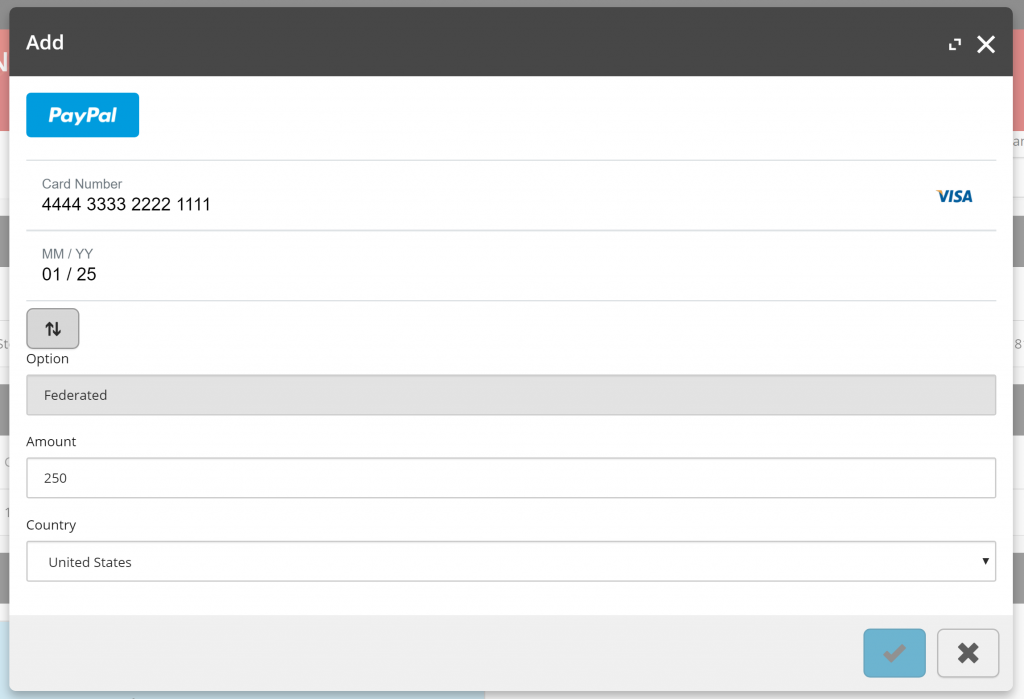
BraintreePayment

The BraintreePayment UI Hint is utilised to handle adding braintree payments. It injects an iframe to manage payment information via the Braintree gateway, but otherwise provides similar support as the default Flat UI Hint for view property rendering.

Notes:

  • This UI Hint is intended for sole use with the Braintree payment integration and not for general use.
Entity View UsageSupportedApplicable UI Types
PageNoN/A
ModalYes
  • Empty (string) Text
  • Empty (bool) Checkbox
  • Empty (DateTimeOffset) Date Time picker
  • AutoComplete
  • DownloadCsv
  • Dropdown
  • Multiline
  • RichText
  • Tags

UI Types

The UI Types property sets the control type that will be rendered against entity views.

View Property

The following list of UI Types can be utilised for view properties.

Empty

When no UI Type is provided, the UI control rendered is based off of the data type that is set against the RawValue property of the ViewProperty. The data types that influence the controls rendered are as follows:-

String

The default data type is the String value, which will render a text field. Most data types will fallback to their raw string value when evaluated.

var viewProperty = new ViewProperty()
{
	Name = "Standard Text Title",
	RawValue = "Standard Text"
};

entityView.Add(viewProperty);
Boolean (Checkbox)

Boolean values will be rendered as checkboxes for supported UI Hints, otherwise rendering as a string value.

var viewProperty = new ViewProperty()
{
	Name = "Boolean Field Title",
	RawValue = false
};

entityView.Add(viewProperty);
<!-- /wp:html -->

<!-- wp:heading {"level":5} -->
<h5 id="datetimeoffset">DateTimeOffset (Date Time Picker)</h5>
<!-- /wp:heading -->

<!-- wp:paragraph -->
<p><strong>DateTimeOffset</strong> values will be rendered as jQuery Date Time pickers for supported&nbsp;<em>UI Hints</em>, otherwise rendering as a string value.</p>
<!-- /wp:paragraph -->

<!-- wp:paragraph -->
<p><strong>Note:</strong> <em>ReadOnly</em> mode is not supported for this control. <em>(Confirmed up to XC 9.1)</em></p>
<!-- /wp:paragraph -->

<!-- wp:image {"id":327} -->
<figure class="wp-block-image"><img src="/wp-content/uploads/2018/10/uitype-datetimepicker-1-300x71.png" alt="" class="wp-image-327"/></figure>
<!-- /wp:image -->

<!-- wp:html -->

var viewProperty = new ViewProperty()
{
	Name = "Date Time Offset Field Title",
	RawValue = DateTimeOffset.Now
};

entityView.Add(viewProperty);
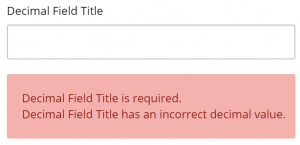
Decimal

Decimal values will render an input field with appropriate validation.

var viewProperty = new ViewProperty()
{
	Name = "Decimal Field Title",
	RawValue = (decimal)0.0
};
entityView.Add(viewProperty);

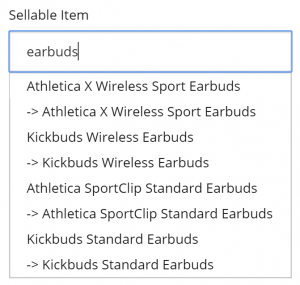
Autocomplete

Search control that auto-completes after 4 characters. Can be combined with a policy to configure what it searches for.

See Business Tools: The Autocomplete UI Type Control for a more in depth look into this control.

var searchScopePolicy = SearchScopePolicy.GetPolicyByType(context.CommerceContext, context.CommerceContext.Environment, typeof(SellableItem));
var policy = new Policy()
{
	PolicyId = "EntityType",
	Models = new List<Model>()
	{
		new Model() { Name = "SellableItem" }
	}
};
var policyList = new List<Policy>() { searchScopePolicy, policy };

var viewProperty = new ViewProperty()
{
	Name = "Autocomplete Title",
	UiType = UiTypes.Autocomplete,
	Policies = policyList
};

DownloadCsv

Used for the coupon CSV download control.

var items = new List<string>() { "item1", "item2" };
var viewProperty = new ViewProperty()
{
	Name = "DownloadCsv Title",
	UiType = UiTypes.DownloadCsv,
	RawValue = new JArray(items.Select(item => new JObject()
	{
		{
			"Code",
			item
		}
	})).ToString()
};

entityView.Add(viewProperty);

Allows linking directly to an entity. It will render a HTML link and build a URL to the Entity using the entity view’s ItemId property in the following format <domain>/entityView/Master/<entity version>/<item id>.

e.g. https://localhost:4200/entityView/Master/1/Entity-Catalog-Habitat_Master

FullDateTime

Renders date and time in short format.

var viewProperty = new ViewProperty()
{
	Name = "FullDateTime Title",
	UiType = "FullDateTime",
	RawValue = DateTimeOffset.Now
};

entityView.Add(viewProperty);

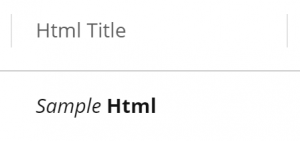
Html

Renders value as html.

var viewProperty = new ViewProperty()
{
	Name = "Html Title",
	UiType = "Html",
	RawValue = "<i>Sample</i> <b>Html</b>"
};

entityView.Add(viewProperty);

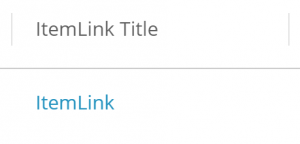
Creates a URL link in the format <domain>/entityView/<entity view name>/<Entity Version>/<entity id>/<item id>.

e.g. https://localhost:4200/entityView/Variant/1/Entity-SellableItem-6042567/56042567

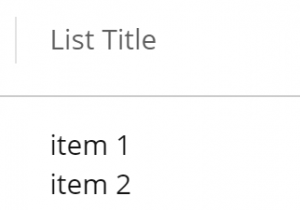
List

Typically used to render a combobox. If it has an AvailableOptionsPolicy it well render as a combo with those as options.

var viewProperty = new ViewProperty()
{
	Name = "List Title",
	UiType = "List",
	RawValue = new String[] { "item 1", "item 2" }
};

entityView.Add(viewProperty);

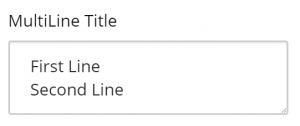
MultiLine

Multiline text editor.

var viewProperty = new ViewProperty()
{
	Name = "MultiLine Title",
	UiType = "MultiLine",
	RawValue = "First Line\nSecond Line"
};

entityView.Add(viewProperty);

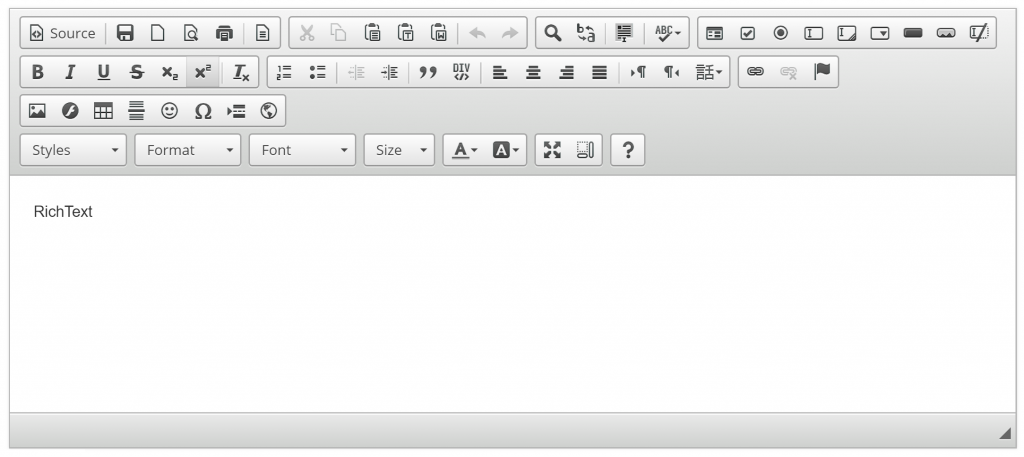
RichText

WYSISWYG Rich text editor.

var viewProperty = new ViewProperty()
{
	Name = "RichText Title",
	UiType = "RichText"
};

entityView.Add(viewProperty);

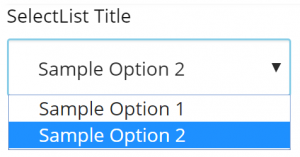
SelectList

Renders a dropdown control. The list of options must be defined via the AvailableSelectionsPolicy. This behaves the save as Dropdown and Options UI Types.

var viewProperty = new ViewProperty()
{
	Name = "SelectList Title",
	UiType = "SelectList"
};

var availableSelectionsPolicy = new AvailableSelectionsPolicy();
availableSelectionsPolicy.List.Add(new Selection() { DisplayName = "Sample Option 1", Name = "Option 1" });
var selection = new Selection() { DisplayName = "Sample Option 2", Name = "Option 2", IsDefault = true };
availableSelectionsPolicy.List.Add(selection);
viewProperty.Policies = new List<Policy>() { availableSelectionsPolicy };
viewProperty.RawValue = viewProperty.GetPolicy<AvailableSelectionsPolicy>().List.Where(s => s.IsDefault).FirstOrDefault()?.Name ?? string.Empty

entityView.Add(viewProperty);

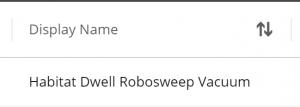
Sortable

Used when rendering table headers to signify that they’re sortable.

Similar to the ItemLink, the SubItemLink creates a URL link in the format <domain>/entityView/<entity view name>/<entity version>/<item id [0]>/<item id [1]>, splitting the ItemId by the pipe separator. This UI Type is used when referencing entities differing from the current entity view.

e.g. https://localhost:4200/entityView/Variant/1/Entity-SellableItem-6042567/56042567

Tags

Renders jQuery tag control.

var viewProperty = new ViewProperty()
{
	Name = "Tags Title",
	UiType = UiTypes.Tags,
	RawValue = new String[] { "item1", "item2" },
	OriginalType = UiTypes.List
};

entityView.Add(viewProperty);

Summary

We have reviewed the various UI Hints and UI Types that are available to us for customising the Business Tools and the instances where they are applicable.