Sitecore Experience Commerce: Customising Commerce Content in the Sitecore Indexes for Storefront Search Results

Reading Time: 4 minutes

In this article, we will look at how to control the storefront search results by customising the commerce content that is indexed in the Sitecore master and web indexes.

If you are looking for how to add new fields for faceting and other purposes, see Adding a property field to an index.

How Storefront Search Works

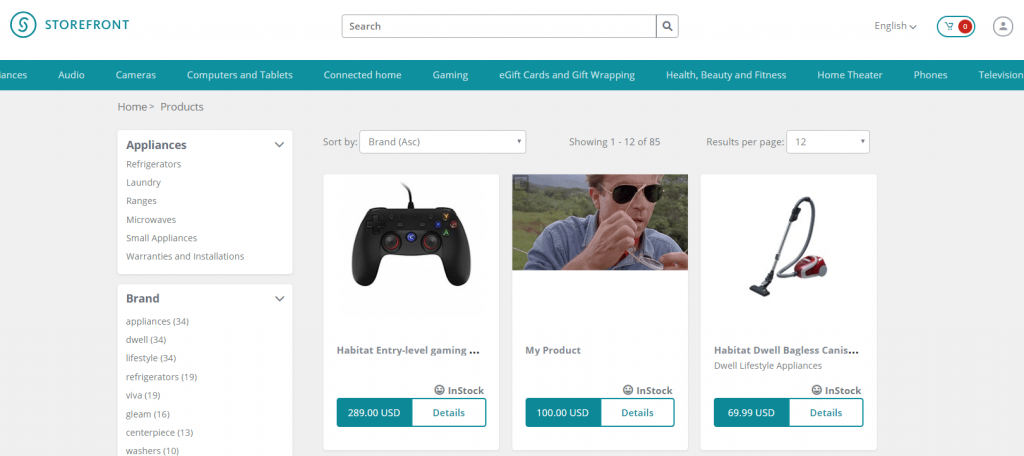
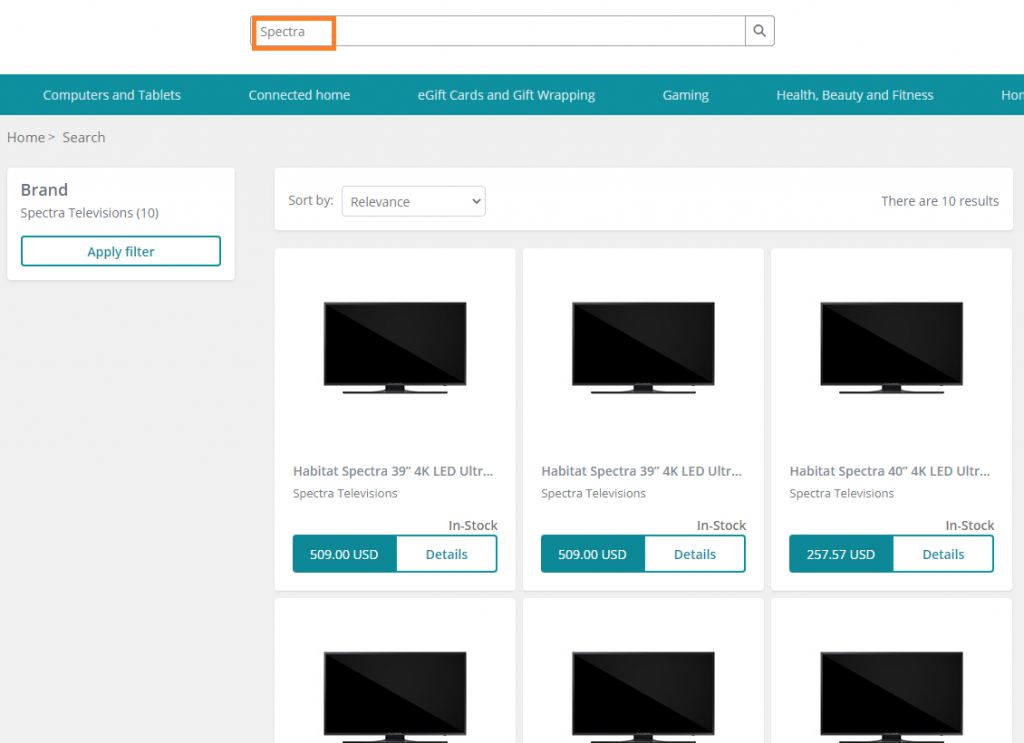
The SXA Search component creates a solr query based on a number of criteria, however focusing on how the search term is involved in the query, we see that the sxacontent field is our culprit for this customisation. This can be seen highlighted below in our storefront and in our search log.

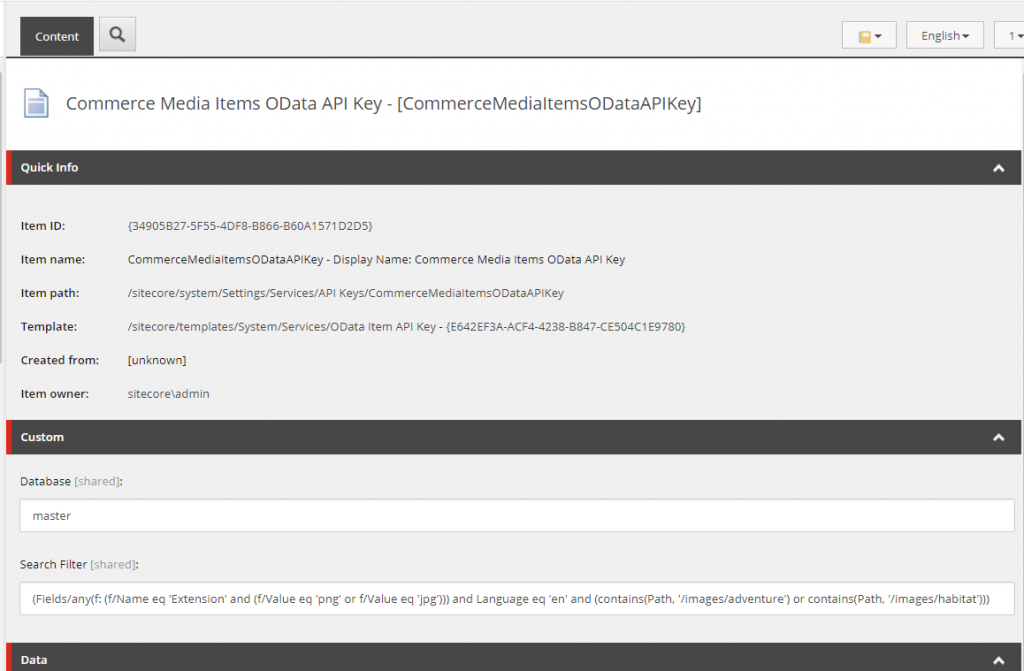
From XC 9.3 onwards, the commerce portion of the Sitecore indexes were migrated over to the Commerce Engine for indexing performance improvements. There are a number of handlers utilised for populating the indexes with catalog data, however for managing the content related to the storefront search component we will look at the SxaContentFieldHandler.

See Catalog Search Field Handlers for a full list of handlers provided with XC, which are utilised when registering index fields in Plugin.Search.Solr.PolicySet-1.0.0.json.

The SxaContentFieldHandler Class

By default, the sellable item properties that are added to the sxacontent field consist of the following entries:

  • Tags
  • ProductId
  • Name
  • DisplayName
  • ItemDefinition
  • Brand

As we can see from the sitecore_web_index in Solr, a query for a specific ‘Spectra’ product, productid_t:6042260, shows that these properties are indexed against the sellable item.

{
  "sxacontent_txm":["39inch|4k|uhd|television|spectra",
    "6042260",
    "Habitat Spectra 39” 4K LED Ultra HD Television",
    "Habitat Spectra 39” 4K LED Ultra HD Television",
    "Product",
    "Spectra Televisions"],
  "productid_t":"6042260",
  ...
}

A common property that I have seen often requested to be included for searching is the sellable item’s description, so we will use this property as well as a generic property from a custom component for demonstration purposes.

In the sample code below, we see that we inherit from the default SxaContentFieldHandler and execute the base ComposeValue method, which will populate the default fields listed above. We then simply add the properties to the sxaContent reponse object, which in this case is a list of strings.

You may have noticed that we are only adding the properties to sxacontent if a value is present. This is to minimise the bloat of empty entries and may lead to performance improvement however insignificant it may be. You may prefer to leave empty entries in the index to simplfy troubleshooting in mapping each entry back to its source property, so choose an approach that best suits you.

public class MySxaContentFieldHandler : Sitecore.Commerce.Plugin.Catalog.SxaContentFieldHandler
{
    public override object ComposeValue(object source, ConcurrentDictionary<string, object> context)
    {
        var sxaContent= base.ComposeValue(source, context) as List<string>;
        if (!(source is SellableItem) || sxaContent == null || sxaContent.Count() == 0)
        {
            return sxaContent;
        }

        var sellableItem = source as SellableItem;

        if (!string.IsNullOrWhiteSpace(sellableItem.Description))
        {
            sxaContent.Add(sellableItem.Description);
        }

        var myProperty = sellableItem.GetComponent<MyCustomComponent>().MyCustomProperty;
        if (!string.IsNullOrWhiteSpace(myProperty))
        {
            sxaContent.Add(myProperty);
        }

        return sxaContent;
    }
}

Now that we have created our modified SxaContentFieldHandler class, we register it in Plugin.Search.Solr.PolicySet-1.0.0.json for both the master and web indexes.

{
  "$type": "Sitecore.Commerce.Plugin.Search.ItemIndexablePolicy, Sitecore.Commerce.Plugin.Search",
  "IndexName": "sitecore_web_index",
  "FieldTypeMappers": [ ... ],
  "Fields": [
    {
      "$type": "Sitecore.Commerce.Plugin.Search.Solr.SolrIndexFieldConfiguration, Sitecore.Commerce.Plugin.Search.Solr",
      "Name": "sxacontent",
      "Type": "System.Collections.Generic.List`1[System.String]",
      "TypeHint": "textCollection",
      "Handler": {
        "$type": "Sitecore.Commerce.Engine.Search.MySxaContentFieldHandler, Sitecore.Commerce.Engine"
      }
    },
    ...
  ]
}

After deploying our customisation, boostrapping, and reindexing, we can see our custom entries in the sxacontent field.

{
  "sxacontent_txm":["39inch|4k|uhd|television|spectra",
    "6042260",
    "Habitat Spectra 39” 4K LED Ultra HD Television",
    "Habitat Spectra 39” 4K LED Ultra HD Television",
    "Product",
    "Spectra Televisions",
    "Enjoy incredible picture and dramatic detail with 4X the resolution of full HD. Enjoy incredible hues of color with technology that blends digital color for near-perfect representation. Experience Ultra HD picture quality with enhanced detail in every way.",
    "mycustomproperty"],
  "productid_t":"6042260",
  ...
}

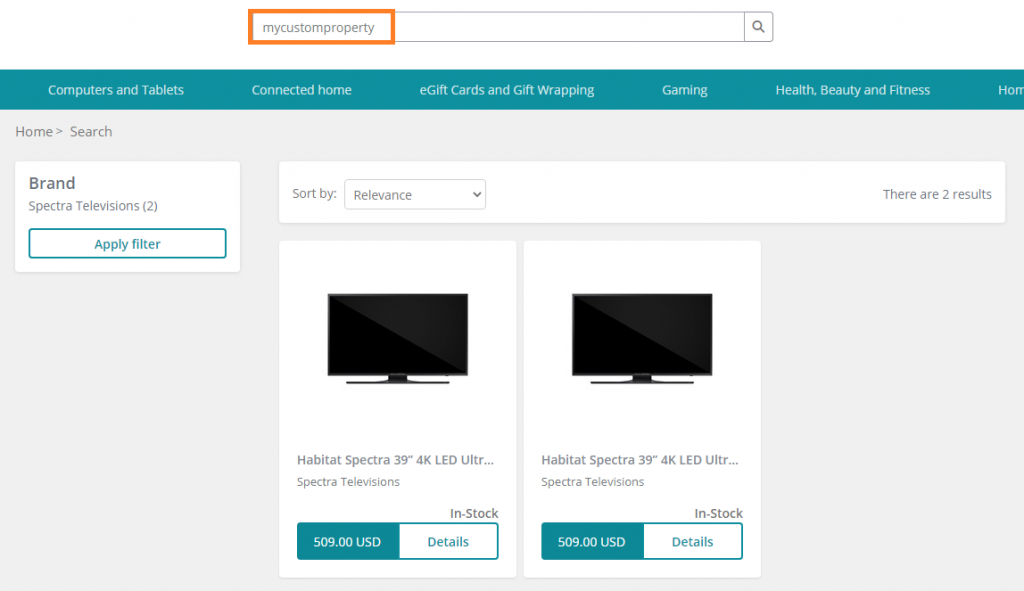
And by performing a search in the storefront our search results now return our product from our custom search entries.

Development Considerations

Field Handlers are Synchronous

At this time, field handlers have been implemented synchronously and expect the information you require to be available on the provided source entity, e.g. sellable item in this case, therefore if you are looking at sourcing data externally it may be worth further consideration.

Following Helix Priniciples

Whether upgrading from a pre XC 9.3 solution or introducing existing component properties into the search index, by implementing the custom SxaContentFieldHandler you may be faced with having to break helix principles, i.e. housing your custom SxaContentFieldHandler in a feature project while referencing another feature project to retrieve the desired properties/content. As feature projects should not reference each other, I reluctantly chose to add MySxaContentFieldHandler to the Commerce Engine project in this instance.

References

Sitecore Experience Commerce: Implementing Multi-Step Actions in the Business Tools

Reading Time: 6 minutes

In this article, we will look at multi-step actions and how we can implement them for customising the Sitecore Commerce Business Tools.

What is a Multi-Step Action?

The multi-step action is the approach to building out entity view modals to act as a kind of wizard, where inputs from each step can affect the subsequent steps.

Adding a qualification/condition to a promotion – step 1.
Adding a qualification/condition to a promotion – step 2.

A Dive into the Multi-Step Action Implementation

We will take a dive into the pieces that make up the multi-step action implementation to see just how we should be building our custom multi-step modal, using the Add Qualification modal for promotions as our working example.

This section is focused on explaining what will be found in the current platform implementation, which can be useful if looking to extend the BizFx and Commerce Engine functionality, but can be skipped if you are only after Implementing Custom Multi-Step Actions as quick as possible.

MultiStepActionPolicy

The MultiStepActionPolicy houses a single property, FirstStep, which will contain the EntityActionView that will be populated in the modal entity view.

public MultiStepActionPolicy()
{
    this.FirstStep = new EntityActionView();
}

public EntityActionView FirstStep { get; set; }

In the following code snippet, we see that the MultiStepActionPolicy is added to the EntityActionView, in which the QualificationsDetails that is assigned to the EntityView will use to populate the first step of the add qualification modal.

Line 18 highlights the Name of the entity view action, which will be resolved to its localised value from the …/Commerce Terms/BusinessTools/ViewActionNames/AddQualification, and populates modal’s title.

var actionPolicy = arg.GetPolicy<ActionsPolicy>();
actionPolicy.Actions.Add(
        new EntityActionView(new List<Policy>
        {
            new MultiStepActionPolicy
            {
                FirstStep = new EntityActionView
                {
                    Name = context.GetPolicy<KnownPromotionsActionsPolicy>().SelectQualification,
                    DisplayName = "Select Qualification",
                    Description = "Selects a Qualification",
                    IsEnabled = isEnabled,
                    EntityView = context.GetPolicy<KnownPromotionsViewsPolicy>().QualificationDetails
                }
            }
        })
        {
            Name = context.GetPolicy<KnownPromotionsActionsPolicy>().AddQualification,
            DisplayName = "Add Qualification",
            Description = "Adds a Qualification",
            IsEnabled = isEnabled,
            EntityView = string.Empty,
            Icon = "add"
        });
The entity view populated in the first step, of the Add Qualification modal, is resolved from the entity view action name of the EntityActionView, assigned to the MultiStepActionPolicy’s FirstStep, which in this case is the SelectQualification action.

LocalizeEntityViewBlock

In the LocalizeEntityViewBlock, we find that the SelectQualification action name is being populated with the localised term, however as mentioned above, the modal utilises the AddQualification localised term instead, therefore we don’t need to be concerned with this.

if (!action.HasPolicy<MultiStepActionPolicy>())
{
    continue;
}

var firstStepAction = action.GetPolicy<MultiStepActionPolicy>().FirstStep;
await SetActionLocalizedTerms(firstStepAction, context).ConfigureAwait(false);

MultiStepActionModel

This model is quite simple. The NextStep represents the name of the action to be executed when the modal form is submitted.

public MultiStepActionModel(string nextStep)
{
    this.NextStep = nextStep;
}

public string NextStep { get; set; }

In the following extract of DoActionSelectQualificationBlock, I have substituted out most of the code with comments, explaining the original code logic, to reduce the noise and keep focus on the multi-step implementation functionality.

In line 11, we see that the original condition property has been made readonly as we don’t want the user to change their mind at this stage, however we don’t want to hide the property as the user still needs to have context of what was previously selected.

Updating the readonly status of submitted view properties is considered a recommended practice.

Line 15 we have a comment that tells us that this is where the next step’s view properties are added to the current entity view, building out the modal form.

This also means that the Do Action Blocks acts a pseudo Get Entity View Block as the initial modal’s entity view is populated via the GetEntityView() API, utilising the IGetEntityViewPipeline under the hood, while subsequent updates in the multi-step implementation are triggered as the DoUxAction() API calls the IDoActionPipeline to process requests.

Finally, line 17 has the original entity view action name, ‘AddQualification’, added to the MultiStepActionModel as the NextStep and applied to the commerce context.

With the knowledge that adding the MultiStepActionModel to the context effectively creates the next step in the modal, there is no limit to how many steps we can add to a multi-step modal.

public override async Task<EntityView> Run(EntityView entityView, CommercePipelineExecutionContext context)
{
    /* validate action */

    /* validate promotion */

    var selectedCondition = entityView.Properties.FirstOrDefault(p => p.Name.Equals("Condition", StringComparison.OrdinalIgnoreCase));

    /* validate condition */

    selectedCondition.IsReadOnly = true;

    /* add and/or conditional operator. hide if no qualifications have been applied to the promotion so far */

    /* add new view properties for selected condition */

    context.CommerceContext.AddModel(new MultiStepActionModel(context.GetPolicy<KnownPromotionsActionsPolicy>().AddQualification));

    return entityView;
}
DoActionSelectQualificationBlock validates the Condition selection and updates the entity view to contain the remaining view properties required for configuring the ‘Cart Has [count] Items?’ qualification as the second step of this multi-step action modal.

CheckForMultiStepActionBlock

From the following snippet from CheckForMultiStepActionBlock, we see that it updates the current entity views action, removes the MultiStepActionModel from the commerce context, and adds the entity view to the commerce context.

In short, this logic is more of a helper, and we could get the same result by omitting the registration of the MultiStepActionModel, updating the entity view action, and add the entity view directly in the Do Action Block instead.

var multiAction = context.CommerceContext.GetModels<MultiStepActionModel>().FirstOrDefault();
if (string.IsNullOrEmpty(multiAction?.NextStep))
{
    return Task.FromResult(arg);
}

entityView.Action = multiAction.NextStep;
context.CommerceContext.RemoveModel(multiAction);
context.CommerceContext.AddModel(entityView);

The DoUxAction API

The last piece of the puzzle comes with BizFx’s handling of the response of the DoUxAction API when we submit the modal dialog.

If an entity view object is returned in the API response object, BizFx will render the modal with the updated view instead of closing the modal and refreshing the current page view.

If we were to change the modal’s entity view name during any of the steps it will not be reflected in the modal’s title as there is no handling for this implemented by default in BizFx.

Summary

Let’s review what we have learnt about multi-step actions.

  1. Adding the MultiStepActionPolicy to an EntityActionView basically swaps out the intended action from being executed in the initial GetEntityView() request, however the modal’s title will reflect the initial EntityActionView‘s localised name.
  2. The LocalizeEntityViewBlock application to the EntityActionView in the MultiStepActionPolicy’s FirstStep is superfluous and does not impact the multi-step implementation.
  3. Do Action Blocks act as pseudo Get Entity View Block for updating the modal’s entity view.
  4. When updating entity views with multi-step actions, previously input view properties should be set to readonly as a recommended practice.
  5. The usage of the MultiStepActionModel is more of a helper model in CheckForMultiStepActionBlock, rather than a dependent piece of the implementation.
  6. There is no limit to how many steps we can add to a multi-step action modal.
  7. The modal title is not updated with an updated entity view.
  8. When the Commerce Engine’s DoUxAction() API returns an entity view in the response model, BizFx will render it in the current modal view.

Implementing Custom Multi-Step Actions

For implementing custom multi-step actions we will skip the details about how to build out the pre-requisites, being the initial Populate View Actions Block to create the entity view action that will trigger the modal, and the Get Entity View Block that will populate the initial entity view that is rendered in the modal, and instead focus on the Do Action Block that will allow us to add the additional steps to the modal.

The multi-step sample show the initial entity view that we will create the second step for.

Essentially, we can implement multi-step actions without using any of the MultiStep classes, simply by adding the new entity view to the commerce context during a Do Action Block, however providing a more complete sample, the following code logic would be applied to our custom Do Action Block.

  1. Validate action
  2. Validate entity (if applicable)
  3. Validate current view properties
  4. Set current view properties to read only
  5. Add new view properties to entity view for next step
  6. Update entity view action with action to perform on the next time the modal is submitted
  7. Add entity view to the commerce context
public override async Task<EntityView> Run(EntityView entityView, CommercePipelineExecutionContext context)
{
    Condition.Requires(entityView).IsNotNull($"{Name}: The argument cannot be null");

    /* 1. Validate action */
    if (string.IsNullOrEmpty(entityView?.Action)
        || !entityView.Action.Equals("FirstAction", StringComparison.OrdinalIgnoreCase))
    {
        return await Task.FromResult(entityView).ConfigureAwait(false);
    }

    /* 2. Validate entity (if applicable) */
    // Not applicable

    /* Validate current view properties */
    // Not critical for sample implementation

    /* Set current view properties to read only */
    foreach (var property in entityView.Properties)
    {
        property.IsReadOnly = true;
    }

    /* Add new view properties to entity view for next step */
    entityView.Properties.Add(new ViewProperty
    {
        Name = "Step 2 Field 1"
    });

    entityView.Properties.Add(new ViewProperty
    {
        Name = "Step 2 Field 2",
        IsRequired = false
    });

    /* Update entity view action with action to perform on the next time the modal is submitted */
    entityView.Action = "SecondAction";

    /* Add entity view to the commerce context */
    context.CommerceContext.AddModel(entityView);

    return await Task.FromResult(entityView).ConfigureAwait(false);
}
Our multi-step sample entity view after the modal has been submitted, creating the second step view for completing data input.

Sitecore Experience Commerce: Resolving Site-Catalog Association Lock

Reading Time: 2 minutes

In this article, we look at how to fix the “‘<catalog>’ is already associated to another site.” error message that can occur when attempting to save the catalog association to a site, although no other sites have an association to this catalog at the time.

Note: This solution is only intended for local development and not recommended for production instances.

Background

Over in Sitecore Commerce, the category and sellable item entities contain a ParentCatalogList property that houses the Sitecore ids of the associated catalog entities. For catalog entities however, the ParentCatalogList is being repurposed for the site association Sitecore id and acts as a lock, preventing the catalog from being associated to other sites.

If you happen to have deleted a site that had a existing catalog association, the catalog commerce entity will not be updated to release the lock. Similar scenarios may also be seen if the commerce shared database is restored to an environment that has conflicting sitecore ids with existing sites, as often can be seen during development across teams that do not sync their Sitecore and Commerce data.

Solution

Removing the lock can be achieved by executing the following script against the commerce shared database.

Update the database name and catalog friendly id values, in the highlighted lines, as appropriate.

USE SitecoreCommerce9_SharedEnvironments
GO

DECLARE @catalogEntityId VARCHAR(MAX) = 'Habitat_Master';
DECLARE @uniqueId VARCHAR(MAX);
DECLARE @entity VARCHAR(MAX);
DECLARE @modifiedEntity VARCHAR(MAX);

SELECT @entity = Entity,
       @uniqueId = Entities.UniqueId
FROM   sitecore_commerce_storage.CatalogEntities AS Entities
       INNER JOIN sitecore_commerce_storage.CatalogEntity AS Entity
               ON Entities.UniqueId = Entity.UniqueId
WHERE  Id = 'Entity-Catalog-' + @catalogEntityId

UPDATE sitecore_commerce_storage.CatalogEntity
SET    Entity = JSON_MODIFY(@entity, '$.ParentCatalogList', '')
WHERE  UniqueId = @uniqueId

Now that we have released the lock, we can associate the catalog to our site, however we may still encounter issues navigating through the catalog structure in the content editor and attempting to publish the site may throw null reference exceptions.

Error message when trying to navigate to category under catalog in the Content Editor.

Site Publish Error Message
Job started: Publish to ‘web’|#Exception: System.Reflection.TargetInvocationException: Exception has been thrown by the target of an invocation. —> System.NullReferenceException: Object reference not set to an instance of an object.
at Sitecore.Commerce.Engine.Connect.DataProvider.ReadOnlyCatalogDataProvider.GetChildIDs(ItemDefinition parentItem, CallContext context)

These issues are caused by the catalog’s Template Overrides, which are configured to templates that don’t exist in this Sitecore instance.

Updating the Template Overrides to valid templates for the site will resolve these issues and you should be up and running again.

Sitecore Identity Server: Increasing the Token Lifetime for Local Development

Reading Time: < 1 minute

In this article, we will review how to change the authentication token timeout values that force us to log back in to Sitecore or request a new token from Postman. If you are like me, generally working with Sitecore/Sitecore Commerce 10+ hours per day, 6 days a week, it can seem like you are kicked out every 5 minutes. Personally, I set these timeouts to a week (604800 seconds).

Changing the timeouts are not recommended for production instances.

Changing the Timeouts in Sitecore Identity Server

Sitecore Identity Server was first introduced with Sitecore Commerce 9.0.0 and with the release of Sitecore 9.1, Sitecore Identity Server was added to Sitecore authentication process.

Updating the Token Lifetimes in 9.0.X

  1. Open <Sitecore Identity Server root>\wwwroot\appsettings.json.
  2. Under AppSettings.Clients, update the CommerceBusinessTools and Postman API clients for BizFx and Postman applications respectively :-
    1. Update the AccessTokenLifetimeInSeconds and IdentityTokenLifetimeInSeconds from the default 3600 (seconds) to the desired timespan, in seconds.
    2. Save the configuration.
  3. Restart the Sitecore Identity Server so that the updated configuration is consumed on startup.

Updating the Token Lifetimes in 9.3

  1. Open <Sitecore Identity Server root>\Config\production\Sitecore.Commerce.IdentityServer.Host.xml.
  2. Under /Settings/Sitecore/IdentityServer/Clients, update the CommerceClient and PostmanClient for BizFx and Postman applications respectively:-
    1. Update the AccessTokenLifetimeInSeconds and IdentityTokenLifetimeInSeconds from the default 3600 (seconds) to the desired timespan, in seconds.
    2. Save the configuration.
  3. Restart the Sitecore Identity Server so that the updated configuration is consumed on startup.

Sitecore Experience Commerce: Managing Catalog Images

Reading Time: 5 minutes

In this article, we will look at how to manage catalog images that are associated to sellable items in the Business ToolsMerchandising Manager.

With the Habitat Master catalog and SXA Storefront site that is setup during the installation of Sitecore Experience Commerce, we have a great reference point for implementing custom sites. However, one of the not so obvious configurations is how to configure catalog images for new catalogs.

Commerce Media Items OData API Key

In Sitecore’s Core database (pre XC 9.1) or Master database (from XC 9.1), the Commerce Media Items OData API Key contains the Search Filter property, which is responsible for applying the filter of media items that are restricted in the search results.

(Fields/any(f: (f/Name eq 'Extension' and (f/Value eq 'png' or f/Value eq 'jpg'))) and Language eq 'en' and (contains(Path, '/images/adventure') or contains(Path, '/images/habitat')))

The Search Filter value itself is performing 3 levels of filtering:-

  1. Extension Type: The supported media extension types.
  2. Language: The language is utilised to prevent duplicate media items from being returned, i.e. per language version.
  3. Location: The media library folder where the catalog images are stored.

Note: This is a global configuration that will apply to all media search controls in Sitecore Commerce. This means that although we can segregate catalog images to different Media Library folders in Sitecore, the Image search results in the Business Tools will return results for all configured catalog image folder locations and extension types.  This makes sense considering sellable items can be associated across catalogs.

Configuring Image Extension Types

The default configured image types include jpg and png formats. To modify the extension types, we look at the extension part of the filter where we can add or remove the Value comparisons as desired.

(f: (f/Name eq 'Extension' and (f/Value eq 'png' or f/Value eq 'jpg')))

Configure the Value comparison in the format f/Value eq ‘<extension type>’. Don’t modify the wrapping logic. When specifying multiple extensions use the ‘or’ clause as per the initial configuration.

Adding Extension Type Example

In this example, I will add the gif extension type and sample image to validate the change.

Configure the Extension Type

In the Sitecore Content Editor using the Core database (pre XC 9.1) or Master database (from XC 9.1) :-

  1. Go to /sitecore/system/Settings/Services/API Keys/CommerceMediaItemsODataAPIKey
  2. Update the extension part of the Search Filter value to include the ‘gif’ comparison.
(f: (f/Name eq 'Extension' and (f/Value eq 'png' or f/Value eq 'jpg' or f/Value eq 'gif')))

Add Images of the New Extension Type

In the Sitecore Content Editor using the Master database:-

  1. Go to /sitecore/media library/Images/<catalog image folder>
  2. Upload the media file to the folder.

    e.g. sunglasses.gif
  3. Publish the item.
  4. Re-index the master/web databases.

Add the Image to a Sellable Item

In the Business Tools’ Merchandising Manager:-

  1. Navigation to the desired Sellable Item or create a new Sellable Item.
    1. Ensure the Sellable Item‘s Entity Version has not been published, otherwise a new version will need to be created.
  2. Under the Images section, click the Add an Image button.
  3. Search for the image name.
  4. Select the image name and click the tick (accept) button.
  5. Promote the sellable item through the workflow states until it’s published.

View the Image on the Sellable Item in the Storefront

In the Storefront’s website:-

  1. Either navigate to the Category or Search Results Page, containing the product, navigate to any page that contains any component that displays the Sellable Item, e.g. Promoted Products component, or navigate directly to the Product Details Page.

Configuring Image Source Location

For media image location, we need to configure the location part of the filter where we can add or remove the Path comparisons as desired.

By default, we see that the locations have been configured for the folders that have been utilised for the Adventure Works and Habitat catalogs.

(contains(Path, '/images/adventure') or contains(Path, '/images/habitat'))

Configure the Path to the location of the catalog images folder in the format contains(Path, ‘/<catalog image folder location>’)  where <catalog image folder location> is under the Media Library Sitecore item tree. When using multiple folder locations (usually one folder per catalog), use the ‘or’ clause as per the initial configuration.

Update: I found that the contains function had some issues with parsing the Path value where spaces are used in the item names, hence ‘/images/adventure’ rather than ‘/images/adventure works’. Another issue I found was that using the contains function also meant that any folder structure, outside the Media Library item, in the Sitecore tree that matched the path would also be included for the media search results causing undesired entries.

To resolve this, I found a more performant an accurate solution using the startswith function, which appears to resolve the Path value relative to the Media Library item and accepts spaces in the item names.

(startswith(Path, '/images/adventure works/')

Please note that I haven’t updated the remainder of this article with this change, but keep it in mind when making updating the filter yourself.

Adding Catalog Image Folder Example

In this example, I will add the HelloWorld catalog image folder type and sample image to validate the change.

Configure the Location Folders

In the Sitecore Content Editor using the Core database (pre XC 9.1) or Master database (from XC 9.1) :-

  1. Go to /sitecore/system/Settings/Services/API Keys/CommerceMediaItemsODataAPIKey
  2. Update the location part of the Search Filter value to include the ‘helloworld’ comparison.
(contains(Path, '/images/adventure') or contains(Path, '/images/habitat') or contains(Path, '/images/helloworld'))

Add Images of the Catalog Image Folder

In the Sitecore Content Editor using the Master database:-

  1. Go to /sitecore/media library/Images/HelloWorld
  2. Upload the media file to the folder.

    e.g. sunglasses.jpg
  3. Publish the item.
  4. Re-index the master/web databases.

Search for the Image in the Merchandising Manager

In the Business Tools’ Merchandising Manager:-

  1. Navigation to the desired Sellable Item or create a new Sellable Item.
    1. Ensure the Sellable Item‘s Entity Version has not been published, otherwise a new version will need to be created.
  2. Under the Images section, click the Add an Image button.
  3. Search for the image name.
  4. Ensure the image shows in the search results

Summary

We learnt that the configurations of image folder location and filtered media extension types for catalog images are set in the Search Filter field of the Commerce Media Items OData API Key Sitecore item in the Core database (pre XC 9.1) or Master database (from XC 9.1) . We also learnt that the configurations are global and will apply to all media search controls in the Business Tools.