OrderCloud: Working with Promotions

Reading Time: 10 minutes

In this article, we will review how the OrderCloud platform applies promotion discounts on an order and its line items, identify when promotions are validated, calculated, and invalidated, and approaches to working with promotions to ensure robust implementations through error handling and extending promotions.

Introduction

The promotions resource is one of the few OrderCloud resources that is currently backed by the rules engine, with each promotion utilising two rule expressions. The EligibleExpression is a boolean expression, which will evaluate whether an order is eligible to have the promotion applied, and a ValueExpression, which evaluates the order and returns a monetary value, which is then used in determining the order and line level PromotionDiscounts.

Promotions that have been applied to orders are referred to as order promotions, which contain static a discount value Amount and reference data for the underlying promotion, which can allow a promotion entity to be updated and impact existing order promotions upon re-evaluation.

Order Level vs Line Item Level Promotions

Order Level Promotions

With the LineItemLevel promotion property set to false, the promotion intends to calculate the order promotion’s Amount (discount) to be applied to the order’s PromotionDiscount, aggregated with all other promotion discounts.

Expressions written for order level promotions can target properties within the order and line items models, however line items require are targeted specifcally via the items functions, e.g. order.Subtotal > 100 and items.any(ProductID = 'ABC').

In the following example, the order worksheet shows the calculated line item level order promotions being applied to the order’s PromotionDiscount, affecting the Total, which also contains line level discounts.

{
  "Order": {
    "ID": "OrderLevelPromotionOrder",
    ...
    "Subtotal": 100,
    "PromotionDiscount": 40, // (25 + 15) order level discounts
    "Total": 60,
    ...
  },
  "OrderPromotions": [
    {
      "Amount": 25,
      "LineItemID": null,
      "ID": "promo1",
      "LineItemLevel": false,
      "Code": "promo1",
      "EligibleExpression": "order.ID = 'OrderLevelPromotionOrder'",
      "ValueExpression": "25",
      ...
    },
    {
      "Amount": 15,
      "LineItemID": null,
      "ID": "promo2",
      "LineItemLevel": false,
      "Code": "promo2",
      "EligibleExpression": "true",
      "ValueExpression": "15",
      ...
    },
    ...
  ],
  ...
}

Line Item Level Promotions

Alternatively, promotions can be configured as a line item level promotion by setting the LineItemLevel property to true. Line item level promotions are used to apply the promotion discount to specific line items that meet the rule configured under the EligibleExpression. While the order model can be targeted within the expressions, the line item are evaluated individually with their own context and do not have any knowledge of each other. The order promotion’s Amount will be aggregated to the line item’s PromotionDiscount as well as the order’s PromotionDiscount.

To target the line items, the item.<property> syntax and the item functions are used, e.g. item.ProductID = 'ABC' or item.incategory('category1').

In the following example, the order worksheet shows the calculated line item level order promotions being applied to the order and line items’ PromotionDiscount, affecting the Total and LineTotal properties.

{
  "Order": {
    "ID": "LineItemLevelPromotionOrder",
    ...
    "Subtotal": 200,
    "PromotionDiscount": 55, // 30 (line item level) + 25 order level
    "Total": 145,
    ...
  },
  "LineItems": [
    {
      "ID": "LineItemID1",
      "ProductID": "ABC"
      ...
      "PromotionDiscount": 30, // (20 + 10) line item level discounts
      "LineTotal": 70,
      "LineSubtotal": 100,
      ...
    }
  ],
  "OrderPromotions": [
    {
      "Amount": 20,
      "LineItemID": "LineItemID1",
      "ID": "promo2",
      "LineItemLevel": true,
      "Code": "promo2",
      ...
      "EligibleExpression": "item.incategory('category1')",
      "ValueExpression": "item.LineSubtotal * .2",
      "CanCombine": true,
      ...
    },
    {
      "Amount": 10,
      "LineItemID": "LineItemID1",
      "ID": "promo3",
      "LineItemLevel": true,
      "Code": "promo3",
      ...
      "EligibleExpression": "item.ProductID = 'ABC'",
      "ValueExpression": "10",
      "CanCombine": true,
      ...
    },
    ...
  ],
  ...
}

The Can Combine Exclusivity Flag

The promotion’s CanCombine flag dictates how promotions can be applied to an order. With the flag set to true the promotion can be applied to an order along with other promotions that have the CanCombine flag also set to true. When the flag is set to false, it is treated as an exclusive promotion that can only be added to an order in isolation.

The initial promotion that has been applied to an order determines whether additional promotions can be applied to an order.

In table 1 and table 2, we see the results of applying five promotions consecutively, with a combination of CanCombine flags set to true and false. Table 1 initially applies a promotion that can be combined with other promotions and therefore results in multiple promotions being applied to the order with the exclusive (CanCombine is false) promotions being rejected. Conversely, table 2 shows that by applying an exclusive promotion first, no other promotions can be added to the order.

PromotionCanCombineAcceptedOrder Promotions Applied
Promotion 1trueYesPromotion 1
Promotion 2trueYesPromotion 1, Promotion 2
Promotion 3falseNoPromotion 1, Promotion 2
Promotion 4trueYesPromotion 1, Promotion 2, Promotion 3
Promotion 5falseNoPromotion 1, Promotion 2, Promotion 3
Table 1: Example applying multiple CanCombine (true) promotions to an order.
PromotionCanCombineAcceptedOrder Promotions Applied
Promotion 3falseYesPromotion 3
Promotion 1trueNoPromotion 3
Promotion 2trueNoPromotion 3
Promotion 5falseNoPromotion 3
Promotion 4trueNoPromotion 3
Table 2: Example applying an exclusive CanCombine (false) promotion to an order.

API Promotion Logic Overview

Promotion Validation, Calculation, and Invalidation

In working with the promotions resource of the OrderCloud platform, understanding how internal promotion logic impacts an order will help identify where middleware and front end applications should be expecting to handled errors.

There are three aspects to promotions that need to be considered:

  • Validate / Evaluate: Whether or not an endpoint will trigger validation/evaluation of existing promotions.
    These endpoints may throw API errors for invalidated promotions, which could occur due to any of the following reasons listed below in Can Invalidate? as well as a promotion expiring expiring due to lapsed time.
  • Calculate: Whether or not an endpoint will attempt to calculate the current value of all order promotions. Where the promotion amount has been overridden from the Calculate Order integration event, these are considered frozen and will not be updated.
  • Can Invalidate?: Whether or not an endpoint can cause order promotions to be in an invalid state. This occurs as the OrderCloud platform does not validate the order promotions after its transaction, and therefore will not be able to inform the calling system of the possible invalidation in the API response. Invalidation may occur from:
    • An order has been updated or a line item has been added/updated/removed, resulting in the order no longer meeting the eligible expression criteria.
    • A promotion has been updated by a business user, e.g. eligible expression, start date, end date, etc., which would no longer be valid for an order and/or its line items.

With these aspects of promotion logic defined, table 3 documents all endpoints relevant to promotions and promotion invalidation.

EndpointValidate / EvaluateCalculateCan Invalidate?
Add Promotion to OrderY1Y1N
Remove Promotion from OrderNNN
Line Item AddedY2YY
Line Item Updated (PUT / PATCH)Y2YY
Line Item DeletedNNY
Order Updated (PUT / PATCH)Y3YY
Calculate OrderYYN
Validate OrderYNN
Submit OrderYNN
Approve OrderYYN
Update Promotion (PUT / PATCH)NNY4
Delete PromotionNNN5
Delete Promotion AssignmentNNN4
Table 3: Overview of OrderCloud API promotion behaviour
  1. The promotion being added will be added to the existing order promotions for processing.
  2. Although the line item models are updated in memory, the promotion validation occurs against the database models, therefore even if an changes to an order line items would make an ineligible promotion eligible after the transaction, the API will still throw a Promotion.NotEligible API error.
  3. The order model is updated in memory prior of promotion validation, allowing an order with ineligible promotions to be resolved with the order update request.
  4. Promotion validation relating to promotion assignments only occurs during the Add Promotion to Order endpoint and is not validated for subsequent validation measures, therefore the promotion may continue to apply and calculate for the order if the promotion assignment has been removed.
  5. Deleted promotions are removed directly from the database, which will remove the deleted promotion from any unsubmitted order or null out the promotion ID of a submitted order.

Promotion-Related API Errors

When the OrderCloud API validates / evaluates order promotions, table 4 documents the possible API errors that can be returned in the API Response that the implementer may want to handle as a global catch all or have error handling built for specific API errors.

API ErrorReason
NotFound1Order or promotion was not found.
Promotion.OwnerIDMustMatchOrderToCompanyID1The order is being directly purchased from a suppiler, however the supplier is not the owner of the promotion.
Promotion.NotYetValidPromotion StartDate is later than current date/time.
Promotion.ExpiredPromotion ExpirationDate is earlier than current date/time.
Promotion.ExceedsUsageLimitPromotion RedemptionCount is greater than RedemptionLimit or user’s redemption count greater than RedemptionLimitPerUser.
Promotion.CannotCombineMore than one promotion has been applied to the order and one or more promotions have CanCombine set to false.
Promotion.AlreadyAdded1The promotion being added is already applied to the order.
Promotion.NotEligibleThe EligibleExpression has been evaluated to false.
Table 4: Overview of promotion-related API Errors.
  1. Add Promotion to Order endpoint only.

Promotion Calculation Logic

For promotion calculation logic, when evaluating expressions against the order’s Total or line item’s LineTotal, the totals are not updated with any promotion discounts previously applied/calculated. This is to prevent one order’s promotion invalidating or incorrectly calculating subsequent order promotions.

Table 5 shows an example of two promotions calculated by the OrderCloud platform when applied to an order.

Promotionorder.TotalDiscount
$10 off order where order.Total > 9010010
10% off order where order.Total > 9010010
Result8020
Table 5: Total not including existing discounts (OrderCloud behaviour).

To see what would happen if the totals were updated per promotion calculation, let’s look at the following scenarios.

If the promotion discounts were updated on a running order total, table 6 shows that EligibleExpressions on subsequent promotions could have evaluated to false, resulting in them not being eligble.

Promotionorder.TotalDiscount
$10 off order where order.Total > 9010010
10% off order where order.Total > 9090Not Eligible
Result9010
Table 6: Example promotion validation/evaluation where the total includes existing discounts (which is not OrderCloud behaviour).

Similarly, if we focus on the promotion discount values alone, we see that if OrderCloud were to use a dynamic total that included the previous discounts then the results could be affected by the order they are evaluated in, which is represented in table 7 and table 8.

Promotionorder.TotalDiscount
10% off order10010
$10 off order9010
Result8020
Table 7: Example promotion discount calculations where the total includes existing discounts (which is not OrderCloud behaviour).
Promotionorder.TotalDiscount
$10 off order10010
10% off order909
Result8119
Table 8: Example promotion discount calculations where the total includes existing discounts, calculated in a different order (which is not OrderCloud behaviour).

Promotion Prioritisation Logic

When the OrderCloud platform is evaluating an order with multiple order promotions, regardless of whether the promotions are order level or line item level, there are currently no smarts to prioritise one promotion over another. As a result, there’s no guarantee that order promotions will always be evaluated in a consistent order. With the promotion calculation logic not rolling discounts into the order and line totals, this should not affect the outcome of the final order and line item discount values.

Extending Promotion Functionality

Handling Promotion Invalidation

From table 3, we now have an understanding of the API endpoints will trigger order promotion validation, in turn revealing invalidated order promotions, which our middleware and front end applications would ideally handle gracefully, but requires custom implementation to achieve.

In the following example, we take the approach of wrapping any OrderCloud endpoint, which will validate/evaluate the order promotions, in a try catch and by creating logic specifically for handling a promotion that is no longer eligible our calling system can silently resolve these issues and then attempt to call the intended endpoint again, without the previous API error.

As there could be multiple API errors that follow up on subsequent calls, we allow for multiple retries, however this is just a guide that would likely be amended to cater for the specific business requirements of any given solution.

Promotion Evaluation Endpoint Wrapper

var hasError = false;
var retryCount = 0;
do
{
    try
    {
        hasError = false;
        await orderCloudClient.<Evaluate Endpoint>(); // Add Promotion to Order, Line Item Added, etc.
    }
    catch (OrderCloudException ex)
    {
        hasError = true;
        retryCount++;
        if (ex.HttpStatus == HttpStatusCode.BadRequest &&
            ex.Errors.Any(error =>
                error.ErrorCode == OrderCloud.SDK.ErrorCodes.Promotion.NotEligible))
        {
            var codes = ex.Errors.Select(error => (error.Data as Promotion)?.Code);
            // Resolve all promotion errors, e.g. remove promotions,
            // record removed promotions to notify the user, etc.
        }
    }
} while (hasError && retryCount < 3);

Overriding Line Item Promotion Discounts

It’s possible that the way a business handles line item discounts differs to the calculation logic of OrderCloud and the rules engine, e.g. promotion discounts may be rounded or weighted across line items, which can be supported through the use of the order calculate order checkout integration event.

The calculate integration event provides the ability to create LineItemOverrides.PromotionOverrides, which supports overriding promotion amounts. The overriden Amount will be applied to the respective order promotion Amount and a hidden frozen flag will be set to true to prevent any future order promotion calculations from reverting back to the value calculated from the ValueExpression.

{
  "Order": {
    "ID": "LineItemLevelPromotionOrder",
    ...
    "Subtotal": 200,
    "PromotionDiscount": 39.95, // 19.95 (line item level) + 20 order level
    "Total": 160.05,
    ...
  },
  "LineItems": [
    {
      "ID": "LineItemID1",
      ...
      "PromotionDiscount": 19.95, // (9.95 + 10) line item level discounts
      "LineTotal": 80.05,
      "LineSubtotal": 100,
      ...
    }
  ],
  "OrderPromotions": [
    {
      "Amount": 9.95,
      "LineItemID": "LineItemID1",
      "ID": "promo2",
      "LineItemLevel": true,
      "Code": "promo2",
      ...
      "EligibleExpression": "item.incategory('category1')",
      "ValueExpression": "item.LineSubtotal * .2",
      "CanCombine": true,
      ...
    },
    
    ...
  ],
  "OrderCalculateResponse": {
    "LineItemOverrides": [
    {
      "LineItemID": "LineItemID1",
      "PromotionOverrides": [
        {
          "PromotionID": "promo2",
          "Amount": 9.95
        }
      ],
      "Remove": null
      }
    ],
    "HttpStatusCode": 200,
    "Succeeded": true
  },
  ...
}

To remove a line item promotion’s override, the order calculate integration event will need explicitly return the respective LineItemOverrides item with the Remove property set to true. Omitting it from the request will not remove the hidden frozen flag, meaning the overrides will still be applied to the order promotions and will not be calculated from the ValueExpression.

Implementing the Calculate Integration Event

Where promotion line item overrides are required in a solution, it is likely that you would need to call the integration event immediately after any API endpoint to calls the calculate endpoint in order to ensure that discounts are kept in sync as per the following code snippet.

await orderCloudClient.<Calculate Endpoint>(); // Add Promotion to Order, Line Item Added, etc.
await orderCloudClient.IntegrationEvents.CalculateAsync(OrderDirection.Outgoing, orderID);

Custom Promotion Logic

While OrderCloud does not support creating custom functions for the rules engine’s expression evaluation, we have to look for alternate paths achieve custom promotion logic in an OrderCloud solution.

Copy Data to Order or Line Item xp

If the order or line item models are lacking the object models for creating expression queries against, e.g. selected shipping methods, then the first approach is to copy data onto the order or line item xp. This may be considered xp abuse, but a necessary evil, especially for calculated and transient data.

In taking this approach, you will also be responsible for maintaining the data integrity of this duplicate data to ensure it does not become stale when the platform validates order promotions during API endpoint requests listed in table 3.

With the introduction of premium order search, do not forget that xp property data types must be consistent across all orders to prevent the index from breaking.
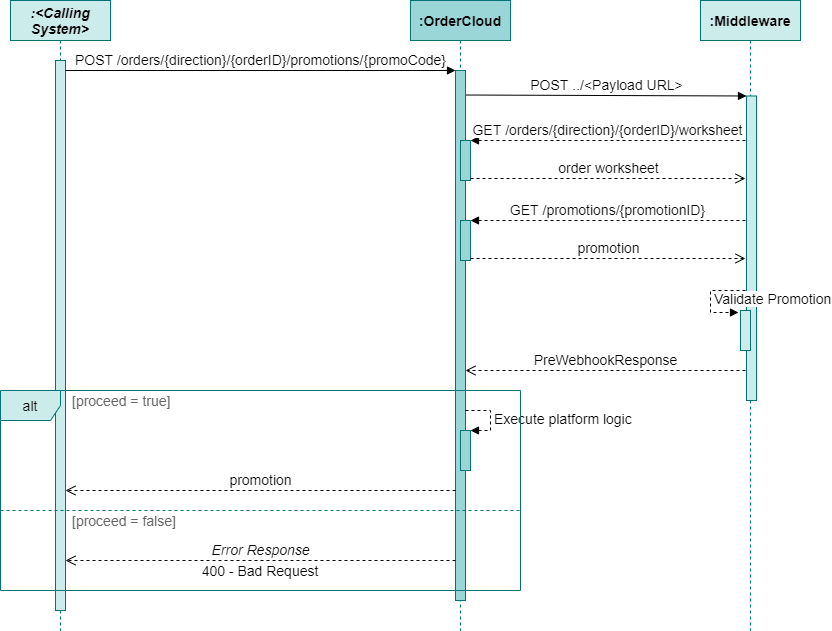
Pre-Hook Webhooks

When needing to replace a promotion’s EligibleExpression with custom promotion logic, webhooks can be leveraged to intercept the Add Promotion to Order requests with the following high-level approach.

  1. Create a promotion
    1. Set EligibleExpression as true so that always evaluates to true.
    2. Use xp to store the flag of the promotion custom logic name, e.g. promotion.xp.CustomLogicRule = 'MyRule'.
  2. Create a pre-hook webhook for the Add Promotion to Order endpoint.
  3. For the application receiving the payload (see figure 1):
    1. Call get order worksheet for order and line item models.
    2. Call get promotion for promotion model, if applicable.
    3. Validate the requested promotion requires custom logic and execute the custom logic to determine if the order is eligible.
    4. Set the webhook response proceed property with the eligibility state of the order promotion, to inform the OrderCloud API whether to apply the promotion or not.
  4. In order to re-validate custom logic for flagged promotions, for any API call that triggers promotion validate / evaluate (from table 3):
    1. All flagged promotions would need to be removed and then re-added to trigger the pre-hook custom validation again, prior to calling the evaluate endpoint.
Figure 1: Example pre-hook webhook for implementing custom promotion logic.

References

OrderCloud: Resource Dependency Cheat Sheet

Reading Time: 5 minutes

In this article, we will review the OrderCloud resources that we interact with directly or indirectly within the OrderCloud API to identify the dependencies that will guide the order of operations for implementations such as a data import. We will also identify a few platform nuances, or gotchas, to be aware of.

Introduction

We will start at the end, for quick reference, with the following dependency overview diagram shows OrderCloud resources, excluding the complete set of order resources, organised into priority groups. Each group number, represents the order in which data should typically be processed in an implementation to avoid any dependency conflicts in the OrderCloud API responses. For example, resources in group 1 would typically be executed before resources in group 2, group 2 before group 3, etc.

The overview diagram does not show the actual dependencies between resources, however in Resource Dependencies we break down each section (or logically grouped resources), aligned to the OrderCloud portal, to document the specific dependencies and note any nuances that should be considered when working with resources.

Figure 1: Resource dependency groups overview.

Resource Dependencies

In the following resource dependency graphs, the varying line colours are simply to differentiate the dependency references for each resource. The following legend also applies to the all graphs.

A resource reference is a reference in the resource’s url as opposed to the request body, e.g. /catalogs/{catalogID}/categories.

In order to understand the dependency graphs, we will look at the following example, where we want to import/sync supplier data via the OrderCloud API. If we were to attempt to create a supplier user where the supplier does not exist, we would encounter an EntityNotFound error in the API’s response.

Figure 2: Resource dependency example.

Using the dependency graph we can see that the supplier is a dependency and therefore if we aren’t planning on creating or updating the supplier then we should at least validate its existence before proceeding and with additional defensive programming we can proactively consider an alternate path of code logic instead.

private async Task&lt;User&gt; CreateSupplierUser(User supplierUser, string supplierID, string accessToken)
{
    var supplier = await oc.Suppliers.GetAsync(supplierID, accessToken);
    if (supplier == null)
    {
        // We implement our alternate code path here, for example:
        Logger.LogError($"Supplier '{supplierID}' should already exist. Supplier User '{supplierUser.ID}' will not be created.");
        return null;
    }

    return await oc.SupplierUsers.CreateAsync(supplierID, supplierUser, accessToken);
}

If we were importing all supplier information, using the dependency graph as a reference, we can identify the order of operations for our implementation to avoid dependency conflicts and optimise performance. For example, we know that we need to import suppliers before importing supplier users, while supplier addresses, suppliers users and supplier user groups can be safely imported asynchronously because they belong to the same dependency group.

// Group 1 dependencies
await ImportSuppliers();

// Group 2 dependencies
var supplierAddresses = ImportSupplierAddresses();
var supplierUsers = ImportSupplierUsers();
var supplierUserGroups = ImportSupplierUserGroups();
await Task.WhenAll(supplierAddresses, supplierUsers, supplierUserGroups);

// Group 3 dependencies
await ImportSupplierUserGroupAssignments();

Identifying the order of operations and employing defensive programming techniques will be critical in your solution design.

Authentication and Authorization Resources

Figure 3: Authentication and Authorization resource dependencies.

Seller

The seller resource dependencies have been broken out across two diagrams for clarity.

Figure 4: Seller resource dependencies.
Figure 5: Seller resource dependencies (cont.).

Buyers

The buyer resource has an implicit reference to the catalog resource as there is a nuance in the platform relating to buyer creation. When creating a buyer, the OrderCloud platform will create a catalog with the same ID. If a catalog with the same ID already exists, an IdExists error will be returned. However, if the catalog‘s ID is passed in as the DefaultCatalogID then the catalog will be associated to it instead, whereas if there is no catalog in existence an NotFound error will be returned.

Conditions1234
DefaultCatalogID providedNNYY
Catalog existsNYNY
Actions1234
Catalog created (201 response code)X
Catalog assigned to Buyer (201 response code)X
IdExists error (409 response code)X
NotFound error (404 response code)X
Table 1: Decision table for POST /buyers.
Figure 6: Buyer resource dependencies.

Suppliers

Figure 7: Supplier resource dependencies.

Product Catalogs

The product catalogs resource dependencies have been broken out across two diagrams for clarity.

Figure 8: Product Catalogs resource dependencies.

You will notice that the spec and spec option has a cyclical dependency. The nuance to the spec resource is that the DefaultOptionID cannot be assigned until after the spec option has been created, however it relies on the spec to exist. This chicken or egg scenario can be resolved by temporarily removing the DefaultOptionID before creating the spec and spec options then patching the value back onto the spec afterwards.

For the implicit references of Inventory > Product and Variant Inventory > Variant, the inventory objects updated on the Product and Variant input models, so they can be treated as being on the same level if applied together. However, the inventory cannot be created/updated without the existence on the Product/Variant entities.

// 1. Remove the DefaultOptionID from the spec prior to creation
var defaultOptionID = spec.DefaultOptionID;
spec.DefaultOptionID = null;
await orderCloudClient.Specs.CreateAsync(spec, accessToken);

// 2. Create the spec options
await ImportSpecOptions(specOptions);

// 3. Patch the spec's DefaultOptionID
await PatchSpecDefaultOptionID(spec, defaultOptionID);
Figure 9: Product Catalogs resource dependencies (cont.).

Orders and Fulfillment

For orders and fulfillment, we will focus on the promotion and seller approval rule resources as these a more typical of a Marketplace setup, whereasall other order resources typically represent historical order placement data, which is outside the scope of this article.

There is a seemingly cyclical dependency between the promotion and order resources, however the promotion-to-order is an implicit resource reference, which does not impact the validation logic for persistence of the promotion resource. Instead, it is used to identify the overall redemption count and user redemption count from orders placed and is used in the validation logic when applying a promotion to an order. When migrating data, excluding order data, between environments, this data inconsistency may be incorrectly identified as an environmental bug, which you can avoid troubleshooting with this knowledge.

Figure 10: Orders and Fulfillment resource dependencies.

Summary

Resource dependencies can be considered a huge gotcha when it comes to long-term maintenance. By having a sound knowledge of resource dependencies and nuances within the OrderCloud API, and employing defensive programming techniques, robust and performant ecommerce implementation can become a byproduct of good solution design.

References

OrderCloud: Debugging Integration Events and Webhooks using ngrok

Reading Time: 3 minutes

In this article, we will review how we can redirect traffic from OrderCloud’s integration events and webhooks to our local web server to assist debugging efforts in local development.

The OrderCloud Headstart application will be referenced in this example, which may differ slightly from your integration service/middleware application.

Introduction

As OrderCloud’s integration events and webhooks require public urls to be available for testing and having complete functionality available, the question quickly arises as to how developers will be able to develop and debug the respective middleware endpoints in a local environment. One solution we will review is to use ngrok, a free service, which allows us to expose a web server running on our local machine to the internet.

Installation, Configuration, and Testing

High-level steps are provided below, however steps may vary based on operating systems and command tools. See ngrok: Getting Started > Setup & Installation, and register or log in to a free account, for alternative setup steps.

Preparing ngrok

Using Powershell, install ngrok using choco.

choco install ngrok

Add the authtoken, available from ngrok: Getting Started > Your Authtoken once signed up for a free account.

ngrok authtoken <auth token>

Exposing the Secure Web Server with ngrok

Moving over to the local imiddleware, we will need to obtain the port number used, e.g. the HTTPS url from the applicationUrl in the Local profile.

{
  "profiles": {
    "Local": {
      "commandName": "Project",
      "environmentVariables": {
        "APP_CONFIG_CONNECTION": "<app config connection>",
        "ASPNETCORE_ENVIRONMENT": "Development"
      },
      "applicationUrl": "https://localhost:5001;http://localhost:5000"
    }
  }
}

Now we can start HTTP tunnel forwarding to our local middleware.

ngrok http https://localhost:<port number>

The tunnel will then be created with a random URL, which we need to take note of for our OrderCloud configurations.

Figure 1: Randomly generated URL from grok.

Configuring OrderCloud’s Integration Events

In OrderCloud, we can create or update an integration event using the generated URL from ngrok as the CustomImplementationUrl. The HashKey will also need to be configured to match the OrderCloudSettings:WebhookHashKey appsettings in HeadStart.

As ngrok does generate a random URL each time when using free accounts, the CustomImplementationUrl will need to be patched each time you expose the local web server.

{
  "ID": "Middleware",
  "Name": "Middleware",
  "ElevatedRoles": [
    "FullAccess"
  ],
  "EventType": "OrderCheckout",
  "HashKey": "samplehash",
  "CustomImplementationUrl": "https://8f79-125-253-105-232.ngrok.io"
}

If the integration event has been newly created, don’t forget to assign it to the API client’s OrderCheckoutIntegrationEventID so that the integration event can trigger the endpoints of the middleware.

{
  "ID": <api client id>,
  "ClientSecret": null,
  "AccessTokenDuration": 600,
  "Active": true,
  "AppName": "Storefront",
  "RefreshTokenDuration": 0,
  "DefaultContextUserName": "Storefront-anonymous-user",
  "xp": {},
  "AllowAnyBuyer": true,
  "AllowAnySupplier": false,
  "AllowSeller": false,
  "IsAnonBuyer": true,
  "AssignedBuyerCount": 0,
  "AssignedSupplierCount": 0,
  "OrderCheckoutIntegrationEventID": "Middleware",
  "OrderCheckoutIntegrationEventName": "Middleware",
  "MinimumRequiredRoles": [],
  "MinimumRequiredCustomRoles": [],
  "MaximumGrantedRoles": [],
  "MaximumGrantedCustomRoles": []
}

Configuring OrderCloud’s Webhooks

When configuring webhooks, the Url will require the complete application service/middleware application endpoint to be defined, along with the HashKey, which should be configured to match the OrderCloudSettings:WebhookHashKey appsettings in HeadStart.

Webhooks also require the ApiClientIDs to be assigned on the resource itself rather that the API client and the WebhooksRoutes need to be specified in order for the OrderCloud API to trigger the webhook, which should then be redirected from ngrok through to the local web server.

{
  "ID": "MyWebhook",
  "Name": "MyWebhook",
  "Url": "https://8f79-125-253-105-232.ngrok.io/mywebhook",
  "HashKey": "samplehash",
  "ElevatedRoles": [
    "BuyerAdmin"
  ],
  "ApiClientIDs": [
    <api client id>
  ],
  "WebhookRoutes": [
    {
      "Route": "v1/buyers",
      "Verb": "POST"
    }
  ]
}

Testing the Endpoints in the Middleware

With Visual Studio’s debugger attached to the local IIS site or is being debugged directly, when an integration event or webhook endpoint is requested via an appropriate API client, ngrok will redirect the request to the local web server and the debugger will be able to capture the traffic for local debugging.

Figure 2: Visual Studio’s debugger successfully triggered from OrderCloud’s estimateshipping endpoint redirected to a localwebserver using grok.

Troubleshooting

An attempt was made to access a socket in a way forbidden by its access permissions

When attempting to run ngrok, if the response “An attempt was made to access a socket in a way forbidden by its access permissions” is received, restarting the Host Network Services Windows service should resolve this issue.

References

Sitecore Experience Commerce: Extending CatalogItemBase Entities with Components

Reading Time: 11 minutes

In this article, we will review how to extend the schema of catalog, category, and sellable item (including its variants), entities by programatically creating and assigning components to them, render the components to their respective entity page in the BizFx, and allow the CommerceConnect dataprovider to consume the component data when syncing the catalog items to Sitecore.

The usage of the term ‘catalog items‘ throughout this article is a collective term referring to catalog, category and sellable item commerce entities as well as variants, a.k.a. item variation components.

Implementation Details

Components can be used as a programmatic alternative to composer templates to extend catalog items. Components can be more powerful than composer templates as developers have more control over the implementation of custom components, although the trade off requires additional development effort. Some additional highlights of differences between composer templates and components are listed below.

  • Composer templates cannot be utilised to extend variants, only the sellable items themselves, therefore components are required to extend variants.
  • Components do not require developers to create a migration plan to move composer templates between deployment environments.
  • Composer templates are restricted to a specific set of data types for custom properties, while components can utilise a larger set of data types and UI Types for improved business user experience.
  • Components require get view blocks, populate view action blocks, and do action blocks to allow business users to view and edit component properties within the Commerce Tools, whereas the composer templates requires configuration, which can be completed controlled by a business user.

Creating New Components

We first create our components that will extend our catalog items and add our custom properties.

For extending our catalog items, only samples for sellable items and variants will be provided, however to extend categories and catalogs, this would be achieved by following the sellable item samples and substituting sellable item references with that of category or catalog references.

public class SellableItemExtensionComponent : Component
{
    public string CountryOfOrigin { get; set; } = "Australia";
    public int EnergyRating { get; set; } = 10;
}
public class VariationExtensionComponent : Component
{
    public string Material { get; set; } = "Steel";
    public bool IsClearance{ get; set; } = true;
}

Default values for properties are usually omitted in implementations, however values have been assigned here to demonstrate reading these values for the get view blocks in the next step.

Rendering Components in BizFx Using Get View Blocks

To render the properties in the Commerce Tools, we add entity views to the appropriate Merchandising pages using get view blocks and registering them to IGetEntityViewPipeline.

Important: Ensure component property names match view property names.
When translating components to entity views, it is not only good practice to assign the name of the view property with the corresponding name of component property, but it is crucial for Commerce Connect data provider to populate the values of the Sitecore catalog items. The data provider effectively maps properties by matching names if the Sitecore catalog item field names to the commerce entity properties from its representation within a JToken.

public class GetSellableItemExtensionViewBlock : SyncPipelineBlock<EntityView, EntityView, CommercePipelineExecutionContext>
{
    public override EntityView Run(EntityView entityView, CommercePipelineExecutionContext context)
    {
        // Ensure parameters are provided
        Condition.Requires(entityView, nameof(entityView)).IsNotNull();
        Condition.Requires(context, nameof(context)).IsNotNull();

        var viewsPolicy = context.GetPolicy<KnownCatalogViewsPolicy>();
        var request = context.CommerceContext.GetObject<EntityViewArgument>();

        // Validate that the page entity is a sellable item
        // Validate the view name matches the requested page
        if (!(request?.Entity is SellableItem) ||
            !request.ViewName.EqualsOrdinalIgnoreCase(viewsPolicy.Master))
        {
            return entityView;
        }

        var sellableItem = request.Entity as SellableItem;
        var extensionComponent = sellableItem.GetComponent<SellableItemExtensionComponent>();

        // Create an entity view to hold the component properties
        var propertiesEntityView = new EntityView
        {
            DisplayName = "Extended Information",
            Name = "Extended Information",
            EntityId = entityView.EntityId,
            EntityVersion = entityView.EntityVersion,
            ItemId = entityView.ItemId
        };

        // Add the entity view as a child of the page entity view
        entityView.ChildViews.Add(propertiesEntityView);

        // Add the component properties to the entity view
        propertiesEntityView.Properties = new List<ViewProperty>
        {
            CreateViewProperty(nameof(extensionComponent.CountryOfOrigin), extensionComponent.CountryOfOrigin),
            CreateViewProperty(nameof(extensionComponent.EnergyRating), extensionComponent.EnergyRating)
        };

        return entityView;
    }

    /// Helper method to simplify ViewProperty creation
    private ViewProperty CreateViewProperty(string name, object value, string uiType = "")
    {
        return new ViewProperty
        {
            Name = name,
            RawValue = value,
            UiType = uiType
        };
    }
}
public class GetVariationExtensionViewBlock : SyncPipelineBlock<EntityView, EntityView, CommercePipelineExecutionContext>
{
    public override EntityView Run(EntityView entityView, CommercePipelineExecutionContext context)
    {
        // Ensure parameters are provided
        Condition.Requires(entityView, nameof(entityView)).IsNotNull();
        Condition.Requires(context, nameof(context)).IsNotNull();

        var viewsPolicy = context.GetPolicy<KnownCatalogViewsPolicy>();
        var request = context.CommerceContext.GetObject<EntityViewArgument>();

        // Validate that the page entity is a sellable item
        // Validate the view name matches the requested page
        if (!(request?.Entity is SellableItem) ||
            !request.ViewName.EqualsOrdinalIgnoreCase(viewsPolicy.Variant))
        {
            return entityView;
        }

        var sellableItem = request.Entity as SellableItem;
        // Get the component from the sellable items variant (ItemId) and do not inherit from the sellable item if not present on the variant
        var extensionComponent = sellableItem.GetComponent<VariationExtensionComponent>(entityView.ItemId, false);

        // Create an entity view to hold the component properties
        var propertiesEntityView = new EntityView
        {
            DisplayName = "Extended Information",
            Name = "Extended Information",
            EntityId = entityView.EntityId,
            EntityVersion = entityView.EntityVersion,
            ItemId = entityView.ItemId
        };

        entityView.ChildViews.Add(propertiesEntityView);

        // Add the entity view as a child of the page entity view
        propertiesEntityView.Properties = new List<ViewProperty>
        {
            CreateViewProperty(nameof(extensionComponent.Material), extensionComponent.Material),
            CreateViewProperty(nameof(extensionComponent.IsClearance), extensionComponent.IsClearance)
        };

        return entityView;
    }

    /// Helper method to simplify ViewProperty creation
    private ViewProperty CreateViewProperty(string name, object value, string uiType = "")
    {
        return new ViewProperty
        {
            Name = name,
            RawValue = value,
            UiType = uiType
        };
    }
}

The get view blocks are registered to IGetEntityViewPipeline in the pipeline configuration.

public class ConfigureSitecore : IConfigureSitecore
{
    public void ConfigureServices(IServiceCollection services)
    {
        var assembly = Assembly.GetExecutingAssembly();

        services.RegisterAllPipelineBlocks(assembly);
        services.RegisterAllCommands(assembly);
        services.Sitecore().Rules(config => config.Registry(registry => registry.RegisterAssembly(assembly)));
        services.Sitecore().Pipelines(pipelines => pipelines

            .ConfigurePipeline<IGetEntityViewPipeline>(pipeline => pipeline
                .Add<Pipelines.Blocks.GetSellableItemExtensionViewBlock>().After<PopulateEntityVersionBlock>()
                .Add<Pipelines.Blocks.GetVariationExtensionViewBlock>().After<PopulateEntityVersionBlock>()
            )

        );
    }
}

Upon deployment, we can see the new entity views appear on the Sellable Item and Variant pages with our default values.

SellableItemExtensionComponent rendered as Extended Information on the Sellable Item Details Page.
VariationExtensionComponent rendered as Extended Information on the Variant Details Page.

View property display names can be managed via Commerce terms under the Commerce Control Panel in the Sitecore Content Editor, allowing language specific user-friendly names to be configured for the property names rendered in the entity views.

Registering Components for Sitecore Catalog Item Templates

With components translated to entity views and rendered on our Merchandising pages, we need to register our component properties so that the Commerce Connect data provider can updating the commerce data templates in Sitecore.

In the screenshot below, registered components can be seen under /sitecore/templates/Commerce/Catalog Generated/Components/ConnectSellableItem, which are registered by the data provider to the ConnectSellableItem template.

Both sellable items and variants share the same template. This means that properties registered to a sellable item will appear on the variant and vice versa.

To register our components, we simply need to include an additional view name in the validation section of our get view blocks. This view name would be either ConnectCatalog, ConnectCategory, or ConnectSellableItem, depending of the entity context.

if (!(request?.Entity is SellableItem) ||
    (!request.ViewName.EqualsOrdinalIgnoreCase(viewsPolicy.Master) &&
    !request.ViewName.EqualsOrdinalIgnoreCase(viewsPolicy.ConnectSellableItem)))
{
    return entityView;
}
if (!(request?.Entity is SellableItem) ||
    (!request.ViewName.EqualsOrdinalIgnoreCase(viewsPolicy.Variant) &&
    !request.ViewName.EqualsOrdinalIgnoreCase(viewsPolicy.ConnectSellableItem)))
{
    return entityView;
}

We should now see our components registered as templates in Sitecore.

Once the changes have been deployed, if the changes are not reflected in Sitecore, run the Update Data Templates command from the Commerce ribbon menu.

As we have created the entity view with the name ‘Extended Information’ for both sellable items and variants, properties are merged into a single template.

Populating Component Property Values on Sitecore Items

Our templates have been generated in Sitecore, however if we look at a sellable item or variant Sitecore item, we will find that the values have not been populated. This is because the data provider uses different Commerce Engine APIs to generate the templates and populate the Sitecore catalog item property values.

In our get view block examples, GetComponent<SellableItemExtensionComponent>() is creating a new component, but is not persisted to the sellable item and its variants. The data provider populates Sitecore items from each instance of the commerce entity, rather than our entity view representation of the commerce entity, which is why no values are populated at this time.

Important: Ensure component properties are unique across the commerce entity.
The data provider essentially flattens the commerce entity when populating the Sitecore catalog items. This means that if a property with the same name exists multiple times across the commerce entity and its nested component properties, the data provider will use the first instance to populate the Sitecore catalog items.

Sitecore Content Editor: Extended Information values have not been populated

In order for us to populate the values, we need to take a step back to populate and persist property values to the catalog items in the Commerce Engine.

First, we will register populate view actions blocks, containing an edit action, to the Extended Information entity views in the Merchandising pages.

public class PopulateSellableItemExtensionViewActionsBlock : SyncPipelineBlock<EntityView, EntityView, CommercePipelineExecutionContext>
{
    public override EntityView Run(EntityView entityView, CommercePipelineExecutionContext context)
    {
        // Ensure parameters are provided
        Condition.Requires(entityView, nameof(entityView)).IsNotNull();

        var viewsPolicy = context.GetPolicy<KnownCatalogViewsPolicy>();
        var request = context.CommerceContext.GetObject<EntityViewArgument>();

        // Validate the context of the request, i.e. entity, view name, and action name
        if (!(request?.Entity is SellableItem) ||
            !request.ViewName.EqualsOrdinalIgnoreCase(viewsPolicy.Master) ||
            !entityView.Name.EqualsOrdinalIgnoreCase("Extended Information") ||
            !string.IsNullOrEmpty(request.ForAction))
        {
            return entityView;
        }

        // Add action to entity view
        var actionPolicy = entityView.GetPolicy<ActionsPolicy>();
        actionPolicy.Actions.Add(
            new EntityActionView
            {
                Name = "EditExtensionProperties",
                DisplayName = "Edit Extension Properties",
                Description = "Edit Extension Properties",
                IsEnabled = true,
                EntityView = "ExtensionProperties",
                Icon = "edit"
            });
                

        return entityView;
    }
}
public class PopulateVariationExtensionViewActionsBlock : SyncPipelineBlock<EntityView, EntityView, CommercePipelineExecutionContext>
{
    /// <summary>Executes the pipeline block's code logic.</summary>
    /// <param name="entityView">The entity view.</param>
    /// <param name="context">The context.</param>
    /// <returns>The <see cref="EntityView"/>.</returns>
    public override EntityView Run(EntityView entityView, CommercePipelineExecutionContext context)
    {
        // Ensure parameters are provided
        Condition.Requires(entityView, nameof(entityView)).IsNotNull();

        var viewsPolicy = context.GetPolicy<KnownCatalogViewsPolicy>();
        var request = context.CommerceContext.GetObject<EntityViewArgument>();

        // Validate the context of the request, i.e. entity, view name, and action name
        if (!(request?.Entity is SellableItem) ||
            !request.ViewName.EqualsOrdinalIgnoreCase(viewsPolicy.Variant) ||
            !entityView.Name.EqualsOrdinalIgnoreCase("Extended Information") ||
            !string.IsNullOrEmpty(request.ForAction))
        {
            return entityView;
        }

        // Add action to entity view
        var actionPolicy = entityView.GetPolicy<ActionsPolicy>();
        actionPolicy.Actions.Add(
            new EntityActionView
            {
                Name = "EditExtensionProperties",
                DisplayName = "Edit Extension Properties",
                Description = "Edit Extension Properties",
                IsEnabled = true,
                EntityView = "ExtensionProperties",
                Icon = "edit"
            });
                

        return entityView;
    }
}
services.Sitecore().Pipelines(pipelines => pipelines

    .ConfigurePipeline<IPopulateEntityViewActionsPipeline>(pipeline => pipeline
        .Add<Pipelines.Blocks.PopulateSellableItemExtensionViewActionsBlock>().After<InitializeEntityViewActionsBlock>()
        .Add<Pipelines.Blocks.PopulateVariationExtensionViewActionsBlock>().After<InitializeEntityViewActionsBlock>()
    )

);

The get view blocks created earlier are then amended and refactored to include support for the create/edit action, which will render the entity view in the modal.

public override EntityView Run(EntityView entityView, CommercePipelineExecutionContext context)
{
    // Ensure parameters are provided
    Condition.Requires(entityView, nameof(entityView)).IsNotNull();
    Condition.Requires(context, nameof(context)).IsNotNull();

    var viewsPolicy = context.GetPolicy<KnownCatalogViewsPolicy>();
    var request = context.CommerceContext.GetObject<EntityViewArgument>();

    // Determine the context of rendering the entity view, e.g. create/edit or view (page or via commerce context)
    var isViewAction = (request.ViewName.EqualsOrdinalIgnoreCase(viewsPolicy.Master) ||
        request.ViewName.EqualsOrdinalIgnoreCase(viewsPolicy.ConnectSellableItem)) &&
        string.IsNullOrWhiteSpace(request.ForAction);
    var isEditAction = request.ViewName.EqualsOrdinalIgnoreCase("ExtensionProperties") && request.ForAction.EqualsOrdinalIgnoreCase("EditExtensionProperties");

    // Validate the context of the request, i.e. entity, view name, and action name
    if (!(request?.Entity is SellableItem) ||
        (!isViewAction &&
        !isEditAction))
    {
        return entityView;
    }

    var sellableItem = request.Entity as SellableItem;
    var extensionComponent = sellableItem.GetComponent<SellableItemExtensionComponent>();

    var propertiesEntityView = entityView;
    if (isViewAction)
    {
        // Create an entity view to host the component properties
        propertiesEntityView = new EntityView
        {
            DisplayName = "Extended Information",
            Name = "Extended Information",
            EntityId = entityView.EntityId,
            EntityVersion = entityView.EntityVersion,
            ItemId = entityView.ItemId
        };

        // Add the entity view as a child of the current entity view
        entityView.ChildViews.Add(propertiesEntityView);
    }
            
    // Add the component properties to the entity view
    propertiesEntityView.Properties = new List<ViewProperty>
    {
        CreateViewProperty(nameof(extensionComponent.CountryOfOrigin), extensionComponent.CountryOfOrigin),
        CreateViewProperty(nameof(extensionComponent.EnergyRating), extensionComponent.EnergyRating)
    };

    return entityView;
}
public override EntityView Run(EntityView entityView, CommercePipelineExecutionContext context)
{
    // Ensure parameters are provided
    Condition.Requires(entityView, nameof(entityView)).IsNotNull();
    Condition.Requires(context, nameof(context)).IsNotNull();

    var viewsPolicy = context.GetPolicy<KnownCatalogViewsPolicy>();
    var request = context.CommerceContext.GetObject<EntityViewArgument>();

    // Determine the context of rendering the entity view, e.g. create/edit or view (page or via commerce context)
    var isViewAction = (request.ViewName.EqualsOrdinalIgnoreCase(viewsPolicy.Variant) ||
        request.ViewName.EqualsOrdinalIgnoreCase(viewsPolicy.ConnectSellableItem)) &&
        string.IsNullOrWhiteSpace(request.ForAction);
    var isEditAction = request.ViewName.EqualsOrdinalIgnoreCase("ExtensionProperties") && request.ForAction.EqualsOrdinalIgnoreCase("EditExtensionProperties");

    // Validate the context of the request, i.e. entity, view name, and action name
    if (!(request?.Entity is SellableItem) ||
        (!isViewAction &&
        !isEditAction))
    {
        return entityView;
    }

    var sellableItem = request.Entity as SellableItem;
    // Get the component from the sellable items variant (ItemId) and do not inherit from the sellable item if not present on the variant
    var extensionComponent = sellableItem.GetComponent<VariationExtensionComponent>(entityView.ItemId, false);

    var propertiesEntityView = entityView;
    if (isViewAction)
    {
        // Create an entity view to hold the component properties
        propertiesEntityView = new EntityView
        {
            DisplayName = "Extended Information",
            Name = "Extended Information",
            EntityId = entityView.EntityId,
            EntityVersion = entityView.EntityVersion,
            ItemId = entityView.ItemId
        };

        // Add the entity view as a child of the current entity view
        entityView.ChildViews.Add(propertiesEntityView);
    }

    // Add the component properties to the entity view
    propertiesEntityView.Properties = new List<ViewProperty>
    {
        CreateViewProperty(nameof(extensionComponent.Material), extensionComponent.Material),
        CreateViewProperty(nameof(extensionComponent.ReleaseDate), extensionComponent.ReleaseDate, "FullDateTime")
    };

    return entityView;
}

The default values from the components are also removed to provide a true representation of the catalog item property values that are persisted to the database.

public class SellableItemExtensionComponent : Component
{
    public string CountryOfOrigin { get; set; }
    public int EnergyRating { get; set; }
}
public class VariationExtensionComponent : Component
{
    public string Material { get; set; }
    public bool isClearance { get; set; }
}

To persist the changes made to the Edit Extension Properties entity view, do action blocks are responsibile for processing the entity view submission action, which in this case is translating the entity view properties back to the component on the commerce entity and then persisting it.

public class DoActionEditSellableItemExtensionViewBlock : AsyncPipelineBlock<EntityView, EntityView, CommercePipelineExecutionContext>
{
    protected CommerceCommander Commander { get; set; }

    public DoActionEditSellableItemExtensionViewBlock(CommerceCommander commander)
    {
        this.Commander = commander;
    }

    public override async Task<EntityView> RunAsync(EntityView entityView, CommercePipelineExecutionContext context)
    {
        // Ensure parameters are provided
        Condition.Requires(entityView, nameof(entityView)).IsNotNull();

        var viewsPolicy = context.GetPolicy<KnownCatalogViewsPolicy>();

        // Validate the context of the request, i.e. entity, view name, and action name
        var entity = context.CommerceContext.GetObject<CommerceEntity>(p => p.Id.EqualsOrdinalIgnoreCase(entityView.EntityId));
        if (!(entity is SellableItem) ||
            !entityView.Name.EqualsOrdinalIgnoreCase("ExtensionProperties") ||
            !entityView.Action.EqualsOrdinalIgnoreCase("EditExtensionProperties") ||
            !string.IsNullOrWhiteSpace(entityView.ItemId))
        {
            return entityView;
        }

        var sellableItem = entity as SellableItem;
        var extensionComponent = sellableItem.GetComponent<SellableItemExtensionComponent>();

        // Assign component property values from the entity view property values
        extensionComponent.CountryOfOrigin = entityView.GetPropertyValueByName(nameof(extensionComponent.CountryOfOrigin));
        extensionComponent.EnergyRating = int.Parse(entityView.GetPropertyValueByName(nameof(extensionComponent.EnergyRating)));

        // Persist the changes to the sellable item
        await Commander.PersistEntity(context.CommerceContext, sellableItem).ConfigureAwait(false);

        return entityView;
    }
}
public class DoActionEditVariationExtensionViewBlock : AsyncPipelineBlock<EntityView, EntityView, CommercePipelineExecutionContext>
{
    protected CommerceCommander Commander { get; set; }

    public DoActionEditVariationExtensionViewBlock(CommerceCommander commander)
    {
        this.Commander = commander;
    }

    public override async Task<EntityView> RunAsync(EntityView entityView, CommercePipelineExecutionContext context)
    {
        // Ensure parameters are provided
        Condition.Requires(entityView, nameof(entityView)).IsNotNull();

        var viewsPolicy = context.GetPolicy<KnownCatalogViewsPolicy>();

        // Validate the context of the request, i.e. entity, view name, and action name
        var entity = context.CommerceContext.GetObject<CommerceEntity>(p => p.Id.EqualsOrdinalIgnoreCase(entityView.EntityId));
        if (!(entity is SellableItem) ||
            !entityView.Name.EqualsOrdinalIgnoreCase("ExtensionProperties") ||
            !entityView.Action.EqualsOrdinalIgnoreCase("EditExtensionProperties") ||
            string.IsNullOrWhiteSpace(entityView.ItemId))
        {
            return entityView;
        }

        var sellableItem = entity as SellableItem;
        var extensionComponent = sellableItem.GetComponent<VariationExtensionComponent>(entityView.ItemId, false);

        // Assign component property values from the entity view property values
        extensionComponent.Material = entityView.GetPropertyValueByName(nameof(extensionComponent.Material));
        extensionComponent.IsClearance = bool.Parse(entityView.GetPropertyValueByName(nameof(extensionComponent.IsClearance)));

        // Persist the changes to the sellable item
        await Commander.PersistEntity(context.CommerceContext, sellableItem).ConfigureAwait(false);

        return entityView;
    }
}
services.Sitecore().Pipelines(pipelines => pipelines

    .ConfigurePipeline<IDoActionPipeline>(pipeline => pipeline
        .Add<Pipelines.Blocks.DoActionEditSellableItemExtensionViewBlock>().After<ValidateEntityVersionBlock>()
        .Add<Pipelines.Blocks.DoActionEditVariationExtensionViewBlock>().After<ValidateEntityVersionBlock>()
    )

);

Now we should see our persisted values render in the Extended Infomation entity views of the Merchandising pages and against their respective catalog items in the Sitecore Content Editor.

If the property values are not reflected in Sitecore, run the Refresh Commerce Cache command from the Commerce ribbon menu.

Extended Information populated on sellable item Sitecore item.
Extended Information populated on variant Sitecore item.

Variants will have sellable item properties populated, while sellable items will not have variant properties populated as variants represent a specialised form of the sellable item, while the sellable item should not know the specifics of any one variant.

Summary

Implementation Highlights

The following bullet points can be utilised as a checklist to ensure that all bases have been covered :

  • Create components to house custom properties.
  • Create get view blocks to retrieve components properties for BizFx pages (view), BizFx modals (create and edit actions) and CommerceConnect (generate catalog item template).
  • Create populate view actions blocks to allow business user to trigger actions, e.g. create, edit, delete.
  • Create do action blocks to persist create, edit, delete actions to commerce entities.

Considerations for Extending Catalog Items

  • Logically group properties into multiple components over using a catch all component. This could mean grouping related properties, grouping only properties that will be mapped to the Sitecore catalog items, or grouping properties into a component that will be utilised to extend cart lines.
  • View property names should match their component property names in order for the values to be mapped from the commerce entity to the Sitecore catalog item properties.
  • Property names must be unique for the catalog item commerce entity, otherwise this can cause a conflict in mapping values; properties are resolved by mapping the first instance of a property with the given name on the commerce entity.
  • Sellable items and variants Sitecore items inherit the same catalog generated templates.
    • Sellable items will host the variant properties on their Sitecore items, however these values will not be populated.
    • Variants will host the sellable item properties on their Sitecore items and these properties will be populated with the sellable item property values.

References

Sitecore KB article: How to extend Catalog system entities schema in Sitecore Experience Commerce

Source Code

Sitecore Commerce Catalog Component Extension Sample project repository

Sitecore Experience Commerce: Working with Environment Variables

Reading Time: 3 minutes

In this article, we will review how environment variables are utilised in the Commerce Engine solution. These are findings that provide some more context on top of Commerce Developer Reference: Configuring the Commerce Engine using environment variables, which will allow us to work with them more effectively.

Introduction

Environment variables are primarily utilised in 3 areas of the Commerce Engine and each area has nuances that we need to be aware of. The first area is in the Commerce Engine configuration file, config.json. The second is the global environment configuration, global.json. The third are is made up of the role environment and policy set configurations.

Environment variables will only be consumed into the Commerce Engine’s configuration builder if they are prefixed with "COMMERCEENGINE_".

Environment Variable Usage in Configuration Files

The Commerce Engine Configuration File (config.json)

Using the environment variable configuration provider, the config.json is updated without the need for placeholders or data type specification.

Updating a property value simply requires adding an environment variable that represents the path of the property to be overridden.

For example, adding the environment variable, COMMERCEENGINE_Serilog__MinimumLevel__Default: Information, will override the corresponding configuration property by resolving it to the structure of the configuration.

{
  "AppSettings": { ... },
  "Serilog": {
    ...
    "MinimumLevel": {
      "Default": "Warning",
      ...
    }
  },
  ...
}

While the placeholder values aren’t relevant to the overrides themselves, the Commerce Engine is distributed with ‘PlaceholderFor<property>’ values in config.json. Consider these flags to ensure that environment variables are not omitted. When replacing other properties in the Commerce Engine configuration, placeholders are not required.

The Global Environment Configuration File (global.json)

Similar to the config.json, the global environment configuration file, global.json, is loaded during the start up process of the Commerce Engine. However, while the Commerce Engine leverages the environment variables for this configuration, the replacement strategy differs from the environment variable configuration provider in that instead of resolving variables to the structure of the configuration file it instead resolves via placedholder matches.

For example, the environment variable COMMERCEENGINE_GlobalDatabaseUserName: sa will override the corresponding configuration property by resolving it to the placeholder.

{
  ...
  "Name": "GlobalEnvironment",
  "Policies: {
    "$type": "System.Collections.ObjectModel.ReadOnlyCollection`1[[Sitecore.Commerce.Core.Policy, Sitecore.Commerce.Core]], mscorlib",
    "$values": [
      ...
      {
        "$type": "Sitecore.Commerce.Plugin.SQL.EntityStoreSqlPolicy, Sitecore.Commerce.Plugin.SQL",
        ...
        "UserName": "PlaceholderForGlobalDatabaseUserName",
        ...
      },
      ...
    ]
  }
}

Role Environment and Policy Set Configuration Files

For environment variables used in role environment and policy set configurations, the Commerce Engine also uses the same strategy as per the global.json (placeholder matching over structure resolution), however the replacement is performed at the time of bootstrapping the Commerce Engine, not during the start up process of the Commerce Engine.

This means that while the role environment and policy set configurations will retain the ‘PlaceholderFor…’ values on disk, the engine startup will still load configurations from the commerce global database. Therefore, the Commerce Engine role will not resolve changes during the start up process with updated variables (e.g. running docker-compose up for containers).

Changing environment variables used in role environment and policy set configuration files, should be thought the same as making changes to the configuration files themselves, where bootstrapping the Commerce Engine is required to consume the changes.

Supported Data Types in Placeholders

In Commerce Developer Reference: Configuring the Commerce Engine using environment variables, it 3 mentions supported data types for placeholders, where string is the implicit (default) type, and boolean and integer values can be represented by appending ‘|bool’ and ‘|int’ to placeholder names respectively.

The reality is that under the hood all that is happening is identifying whether the value should be wrapped with quotation marks or not. This means that we can actually support other data types, such as decimals by appending either ‘|bool’ or ‘|int’ to the placeholder.

Data types apply to placeholders in the global environment, role environment and policy set configuration files. They do not apply to placeholders in the Commerce Engine configuration file (config.json).

PlaceholderValuesResults
“PlaceholderForMyVariable”dev.sitecore.com
true
“dev.sitecore.com”
“true”
“PlaceholderForMyVariable|bool” or
“PlaceholderForMyVariable|int”
dev.sitecore.com
true
3
1.2 (decimal)
dev.sitecore.com
true
3
1.2

Summary

The following table summarises how environment variables are utilised in the various configuration files of the Commerce Engine.

Configuration File(s)Property ResolverAllows Fallback / Default Value*AppliesApplied ByRequires Bootstrap
config.jsonStructureYesDuring start upEnvironment variable configuration provider (.Net Core)No
global.jsonPlaceholderNoDuring start upCommerce EngineNo
Environment/Policy Set ConfigurationsPlaceholderNoDuring BootstrapCommerce EngineYes
*Where environment variable not provided.

References

Sitecore Experience Commerce: Pipeline Block Types

Reading Time: 3 minutes

In this article, we will look at the foundational pipeline block types that are used to construct pipelines within the Commerce Engine plugins and custom solutions.

Asynchronous vs Synchronous Pipeline Blocks

From XC 10.0, the PipelineBlock class has been split into AsyncPipelineBlock and SyncPipelineBlock classes for improved performance and stability, with the primary implementation difference being whether to call the pipeline block asynchronously or not during pipeline execution.

A notable change to the AsyncPipelineBlock is that it uses the RunAsync method instead of the Run method to enforce that the return type is a Task<TOutput> and as an added reminder that the pipeline block is in fact asynchronously executed.

How Async and Sync Pipeline Blocks Work in the Same Pipeline

The initial questions I had when seeing the pipeline split were “how does this affect registering pipeline blocks to pipelines?” and “how does this affect the way in which pipelines are executed?”. The good news here is that is doesn’t affect either from an implementation standpoint.

From the registration perspective, both async and sync pipelines are registered as per XC 9.X registration mechanisms.

.AddPipeline<IMyPipeline, MyPipeline>(pipeline => pipeline
    .Add<MySyncPipelineBlock>()
    .Add<MyAsyncPipelineBlock>()
    .Add<MyAsyncConditionalPipelineBlock>()
    .Add<MyAsyncPolicyTriggerConditionalPipelineBlock>()
    .Add<MyConditionalPipelineBlock>()
    .Add<MyAsyncConditionalPipelineBlock>()
)

From the async/sync execution perspective, async pipeline blocks are awaited before continuing on to the following pipeline block, which ensures the output of a pipeline block is the input of the following pipeline block.

Specialised Pipeline Blocks

You may have seen a few types of enhanced pipeline blocks in XC 9.X+, being ConditionalPipelineBlock and PolicyTriggerConditionalPipelineBlock, which may have been better suited to your custom implementations over adding conditional statements to the begining of your Run/RunAsync method.

Conditional Pipeline Blocks

As indicated by their names, the ConditionalPipelineBlock and AsyncConditionalPipelineBlock classes will be conditionally executed. This is achieved by defining the BlockCondition predicate to be evaluated to determine if the Run/RunAsync method should be called.

Where the evaluated BlockCondition returns false, an alternate method called ContinueTask is executed instead of Run/RunAsync and is intended to simply return the arg or null.

Returning arg from ContinueTask considers the pipeline block as optional whereas returning null may consider the pipeline block as mandatory depending on how this output is handled in subsequent pipeline blocks or the pipeline itself.

Warning: Using the ContinueTask method to run alternate code logic may be a sign of a bad code smell, such as breaking the separation of concerns rule. Having 2 separate pipeline blocks with inverted predicates is the recommended approach.

public class MyConditionalPipelineBlock : ConditionalPipelineBlock<MyArgument, MyArgument, CommercePipelineExecutionContext>
{
    public MyConditionalPipelineBlock()
    {
        BlockCondition = obj => ((CommercePipelineExecutionContext)obj).CommerceContext.HasPolicy<MyCustomPolicy>();
    }

    public override MyArgument Run(MyArgument arg, CommercePipelineExecutionContext context)
    {
        Condition.Requires(arg, nameof(arg)).IsNotNull();

        // My code logic

        return arg;
    }

    public override MyArgument ContinueTask(MyArgument arg, CommercePipelineExecutionContext context)
    {
        return arg;
    }
}

Policy Trigger Conditional Pipeline Blocks

Another more specialised form of conditional pipeline blocks are the PolicyTriggerConditionalPipelineBlock and AsyncPolicyTriggerConditionalPipelineBlock. These blocks actually have somewhat inverted logic to their name as you will need to specify the name of a policy in the ShouldNotRunPolicyTrigger property which will ensure the pipeline is not executed.

When the policy name is present in the request header’s PolicyKeys value the pipeline block will execute the ContinueTask method over the Run/RunAsync method (See Conditional Pipeline Blocks for more details).

A full set of existing policy keys and their usages can be found in Commerce Developer Reference: Policy keys. It is recommended that the Commerce Engine policy keys be avoided when creating custom policy trigger conditional pipeline blocks.

The BlockCondition predicate is already implemented to manage the conditional logic as mentioned above and the ContinueTask method will return the arg as policy trigger conditional pipeline blocks should be considered optional and not mandatory.

public class MyPolicyTriggerConditionalPipelineBlock : PolicyTriggerConditionalPipelineBlock<MyArgument, MyArgument, CommercePipelineExecutionContext>
{
    public override string ShouldNotRunPolicyTrigger => "IgnoreMyPipelineBlock";

    public override MyArgument Run(MyArgument arg, CommercePipelineExecutionContext context)
    {
        Condition.Requires(arg, nameof(arg)).IsNotNull();

        // My code logic

        return arg;
    }
}

References