Valid Certificate Thumbprint not Matching in Sitecore Experience Commerce 9

Reading Time: < 1 minute

The certificate thumbprint is configured in the website’s configuration file, located at <Website Root>/App_Config/Y.Commerce.Engine/Sitecore.Commerce.Engine.Connect.config (or in a custom patch file created for your solution) and in the Commerce Engine environments under <Commerce Engine Root>/wwwroot/config.json.

If you have configured a valid thumbprint that contains lowercase letters, for example 2700da6ab17c56a01f6d0762b76b3ca77933a68a, this will trigger the following errors in the Commerce Engine logs.

[20:13:57 ERR] ClientCertificateValidationMiddleware: Certificate with thumbprint 2700DA6AB17C56A01F6D0762B76B3CA77933A68A does not have a matching Thumbprint.
[20:13:57 INF] ClientCertificateValidationMiddleware: Certificate with thumbprint 2700DA6AB17C56A01F6D0762B76B3CA77933A68A is not valid.

This is caused by the logic used to compare the thumbprint values. The thumbprint in the Sitecore configuration file is transformed to uppercase while the thumbprint from the Commerce Engine configuration is not, so when the case-sensitive comparison is performed the result is a mismatch.

As the thumbprint is not case-sensitive, you can safely update the thumbprint values to be uppercase to resolve these errors.

Managing Commerce Configuration to Align with Helix Principles

Reading Time: 3 minutes

In this article, we will review a sample configuration of the layers.config file to better manage your solution’s configuration files when working with Sitecore Experience Commerce 9 (XC9).

Deprecated Article: See Sitecore: Using a Dedicated Custom Include Folder for Actual Custom Configuration Files for a more streamline approach to this problem.

If you take a look at an XC9 website’s /App_Config/Include folder, you would have noticed that there’s still some chaos happening with folder and file prefixes of ‘Y’ and ‘Z’ to assign priority order to the patch configuration files. On top of this, you may have even previous worked on projects where there have been crazy levels of prefixing ‘z’, ‘zz’, ‘zzzzz’, etc. to folders and files (I know I have seen some crazy levels of this), leading to developers pulling their hair out trying to locate the file’s origin. As chaotic as this is, we will look at how we can bring back order for our solution.

Configuring layers.config

Our intention is to ensure that our solution’s patch config files are always in a position to override the platform’s patch files, while adhering to the Helix layers principle.

With the following approach, the only additional consideration introduced is to review the platform’s custom config folders and files during any future upgrades to update the layers.config file to ensure the intended load order remains in tact.

Note: The following way is just one of many that can be implemented to achieve the same outcome. There is no one right way, so if you manage your solution’s configuration files differently there is no need to align to this.

  1. Backup the layers.config. Always important when you plan on modifying any files that are not part of your project solution (as infrequent as this should be).
  2. Copy the layers.config file out of the App_Config folder into a core project in the same location. This is because the layers.config file itself cannot be patched and we would want this file version controlled so that the file can be deployed to all environments, and modified (if required) by our colleagues.
  3. The layers.config file is then updated to specify the load order for all current folders. While this step is a bit of a pain, as any omissions will mean that any folder/files unspecified will be applied after the loadOrder , it allows us to ensure that all of our solution configuration files will be applied last, having the highest level of priority.
    <layer name="Custom" includeFolder="/App_Config/Include/">
      <loadOrder>
        <add path="Cognifide.PowerShell.config" type="File" />
        <add path="Sitecore.Commerce.Carts.config" type="File" />
        <add path="Sitecore.Commerce.Catalogs.config" type="File" />
        <add path="Sitecore.Commerce.config" type="File" />
        <add path="Sitecore.Commerce.Customers.config" type="File" />
        <add path="Sitecore.Commerce.GiftCards.config" type="File" />
        <add path="Sitecore.Commerce.Globalization.config" type="File" />
        <add path="Sitecore.Commerce.Inventory.config" type="File" />
        <add path="Sitecore.Commerce.LoyaltyPrograms.config" type="File" />
        <add path="Sitecore.Commerce.Orders.config" type="File" />
        <add path="Sitecore.Commerce.Payments.config" type="File" />
        <add path="Sitecore.Commerce.Prices.config" type="File" />
        <add path="Sitecore.Commerce.Shipping.config" type="File" />
        <add path="Sitecore.Commerce.WishLists.config" type="File" />
        <add path="z.Cognifide.PowerShell.config" type="File" />
        <add path="ContentTesting" type="Folder" />
        <add path="Examples" type="Folder" />
        <add path="Feature" type="Folder" />
        <add path="Foundation" type="Folder" />
        <add path="Foundation.Overrides" type="Folder" />
        <add path="Project" type="Folder" />
        <add path="Y.Commerce.Engine" type="Folder" />
        <add path="Z.Commerce.Engine" type="Folder" />
        <add path="z.Feature.Overrides" type="Folder" />
        <add path="Z.Foundation" type="Folder" />
        <add path="Z.Foundation.Overrides" type="Folder" />
        <add path="Z.LayoutService" type="Folder" />
      </loadOrder>
    </layer>
  4. We then create three folders, following the Helix principles for our project solution. I just chose to use ‘Helix’ as a prefix to drill the point in.
    1. Helix.Feature
    2. Helix.Foundation
    3. Helix.Project
  5. Add the new folders to the <loadOrder>.
    <layer name="Custom" includeFolder="/App_Config/Include/">
      <loadOrder>
        ...
        <add path="Z.LayoutService" type="Folder" />
        <add path="Helix.Foundation" type="Folder" />
        <add path="Helix.Feature" type="Folder" />
        <add path="Helix.Project" type="Folder" />
      </loadOrder>
    </layer>
  6. As you are developing your solution you may find that you need to set the load order for the individual configuration files within a certain layer. In this case, you can list out the file order required. In the sample below, we have Feature A, Feature B, and Feature C. Feature A has a configuration conflict with Feature B and needs higher priority. Feature C has no conflicts. We only need to specify the config for Feature A after the folder to ensure the correct patch order.
  7. <layer name="Custom" includeFolder="/App_Config/Include/">
      <loadOrder>
        ...
        <add path="Helix.Feature" type="Folder" />
        <add path="Helix.Feature/Feature.A.config" type="File" />
        <add path="Helix.Project" type="Folder" />
      </loadOrder>
    </layer>
  8. Deploy your solution.

Summary

While you could continue down the path of having project with ‘z’, ‘zz’, ‘zzzzz’, etc. prefixes, by taking the initial steps to isolate and manage your solution’s patch files under managed folder and file load order, we bring the chaos back to order with meaningfully named patch files that can be found exactly where you expect them to be located.

An Introduction to Sharding and Custom Sharding in Sitecore Experience Commerce 9

Reading Time: 3 minutesIn this article, we will look at list and entity sharding that has been introduced in Sitecore Experience Commerce 9 (XC9), when we would create a custom shard, and how we can implement our own custom shard.

Sharding – What is it?

Let’s take a quick step back and review the Shared Environment database from Sitecore Commerce 8.2.1. All commerce entities and lists were found under tables named CommerceEntities and CommerceLists respectively. These tables consisted of data pertaining to carts, orders, pricing and promotions.

With the introduction of XC9, additional entities and lists have been added to cater for the catalog and customer data, as part of the final phase out process of the Commerce Server.

Now it’s a known fact that with any database that continues to accumulate data that inevitably there will be increasing performance degradation. This isn’t the end of the world as databases can be tuned for performance, but there is a simple and logical way of managing data for optimal performance. This is where sharding comes into play.

Sharding, in XC9, is the logical partitioning of entities and lists into separate tables, to isolate and manage data growth for improved performance and data maintenance.

Sharding is managed via the ListShardingPolicy and EntityShardingPolicy policies in the Plugin.SQL.Sharding.PolicySet-x.y.z.json.
Each policy specifies the properties, RegularExpression and (database) TableName, which the Commerce Engine utilises to identify where the entity/list should be read from and stored to. When a list/entity is not matched to one of these policies regular expressions, it defaults to the CommerceEntities/CommerceLists tables.

When is Sharding  Required?

Just because a new entity is introduced in your project, this doesn’t automatically mean that a new shard has to be implemented. Instead consider how this new entity will be utilised over time. If there is an expectation that over time this data will grow considerably where it should be housed separately, then sharding would be a good idea. However, if the data stored for this new entity is expected to be kept to a low volume, leaving the data in the default tables would be fine.

What is the Purpose of Sharding in the Commerce Global Database?

Simple answer. There is no purpose at this time. The script to create the databases was reusable and created the same structure. Only the CommerceEntities and CommerceLists tables are utilised for the Global database and I suspect this may be cleaned up in a future release.

How to Implement Custom Sharding

Creating Policies in the Commerce Engine

The following code snippet is a sample of a shard I am creating for a side-project for fulfillments.

{
    "$type": "Sitecore.Commerce.Plugin.SQL.ListShardingPolicy, Sitecore.Commerce.Plugin.SQL",
    "RegularExpression": "^List-Fulfillment.*?$",
    "TableName": "FulfillmentsLists"
},
{
    "$type": "Sitecore.Commerce.Plugin.SQL.ListShardingPolicy, Sitecore.Commerce.Plugin.SQL",
    "RegularExpression": "^List-DeletedFulfillmentsIndex-.*?$",
    "TableName": "FulfillmentsLists"
},
{
    "$type": "Sitecore.Commerce.Plugin.SQL.EntityShardingPolicy, Sitecore.Commerce.Plugin.SQL",
    "RegularExpression": "Entity-Fulfillment.*?$",
    "TableName": "FulfillmentsEntities"
},
{
    "$type": "Sitecore.Commerce.Plugin.SQL.EntityShardingPolicy, Sitecore.Commerce.Plugin.SQL",
    "RegularExpression": "Fulfillment-.*?$",
    "TableName": "FulfillmentsEntities"
}

Important note: Where sharding will be altered for a project, it is best to identify and implement it prior to development to avoid having to migrate data from its existing database table.

Creating a Database Table Shard

Database tables are based on either the entity table, or the list table definition. To create a new table shard, follow the process below for both table types.

In SQL Server Management Studio:-

  1. Right-clicking an existing table
  2. Selecting Script Table as > CREATE To > New Query Editor Window
  3. Updating the table name as appropriate, e.g.  [dbo].[<MyEntityType>Entities]
  4. For entity tables, update the constraint name as well, e.g. [PK_<MyEntityType>Entities]
  5. Execute the script


Decoupling the Sample Plugins from the Sitecore Commerce 9 SDK

Reading Time: 2 minutesThe Sitecore Commerce SDK comes with a number of sample plugins which serve varying purposes, including upgrading/migrating data from Sitecore Commerce 8.2.1, providing Habitat and AdventureWorks sample data for testing and getting familiar with the Commerce Engine’s services, and a working Braintree payment integration.

Customer.Sample.Solution

In this article, we will look at the steps required to decouple the sample projects from the solution and resolve the dependencies that the Commerce Engine project has on them, to provide a clean starting point for customising and extending your project’s instance of the Commerce Engine.

Note: We will leave the Braintree plugin in the solution so we can still checkout in the storefront. We will also leave the habitat environment configuration files, which can be updated to the custom environment names for your solution.

We will go into detail below, but let’s take a quick look at what’s required at a high level:-

  1. Add dependency references to the Commerce Engine
  2. Add necessary pipeline configurations to the Commerce Engine
  3. Remove policies for sample projects from the environment configuration files and policy sets
  4. Remove sample environment configurations and policies from the Commerce Engine
  5. Remove sample projects from the solution
  6. Test the Commerce Engine

Add Dependency References to the Commerce Engine

The following dependencies will need to be added to the Commerce Engine for the project to build once the sample projects have been removed:-

  • Sitecore.Commerce.Plugin.Coupons
  • Sitecore.Commerce.Plugin.Journaling
  • Sitecore.Commerce.Plugin.SQL
  • Sitecore.Commerce.Plugin.Tax

Note: For versioning, confirm with the other plugin references.

Add Necessary Pipeline Configurations to the Commerce Engine

The Commerce Engine is missing a few pipeline configurations that hook up some of the cart functionality. To resolve this, perform the following steps:

  1. Copy the ServiceCollectionExtensions class from the Plugin.Sample.AdventureWorks project into the Commerce Engine project at Pipelines > Blocks.
  2. Rename the namespace to Sitecore.Commerce.Engine.
  3. Copy the ConfigureSitecore class from the Plugin.Sample.AdventureWorks project into the Commerce Engine project.
  4. Rename the namespace to Sitecore.Commerce.Engine.
  5. Replace the ConfigureServices method with the following:
    public void ConfigureServices(IServiceCollection services)
    {
        var assembly = Assembly.GetExecutingAssembly();
        services.RegisterAllPipelineBlocks(assembly);
        services.ConfigureCartPipelines();
    }
  6. Resolve ConfigureCartPipelines by adding in the following to the class:
    using Sitecore.Commerce.Engine.Pipelines.Blocks;

Remove Sample Environment Configurations and Policies from the Commerce Engine

Highlighted in red are the properties, policies, and environment configuration files to be removed from the solution.

  • Global.json
    • EnvironmentList
      • “AdventureWorksShops”
      • “AdventureWorksAuthoring”
    • Plugin.Sample.Upgrade.MigrationPolicy
    • Plugin.Sample.Upgrade.MigrationSqlPolicy
  • PlugIn.AdventureWorks.CommerceAuthoring-1.0.0.json
  • PlugIn.AdventureWorks.CommerceMinions-1.0.0.json
  • PlugIn.AdventureWorks.CommerceShops-1.0.0.json
  • PlugIn.Habitat.CommerceAuthoring-1.0.0.json
    • Sitecore.Commerce.Core.EnvironmentInitializationPolicy
      • “Environment.Habitat.DefaultRelationships-1.0”
      • “Environment.Habitat.SellableItems-1.0”
      • “Environment.Habitat.Pricing-1.0”
      • “Environment.Habitat.Promotions-1.0”
      • “Environment.Habitat.Catalog-1.0”
    • Plugin.Sample.Customers.CsMigration.ProfilesSqlPolicy
    • Plugin.Sample.Customers.CsMigration.ProfilePropertiesMappingPolicy

Remove Sample Projects from the Solution

We can now remove the following projects from the solution:-

  • Plugin.Sample.AdventureWorks
  • Plugin.Sample.Customers.CsMigration
  • Plugin.Sample.Habitat
  • Plugin.Sample.Upgrade

The solution should now resemble the image below.

Test the Commerce Engine

To verify the solution:-

  1. Run the Commerce Engine project locally.
  2. Run the Bootstrap request, either via postman or browser.
  3. Run the CleanEnvironment request.
  4. Run the InitializeEnvironment request.

Safely Removing the Commerce Engine Default Storefront

Reading Time: 2 minutesIn this article, we will go through the few configuration updates required to remove the Commerce Engine Default Storefront completely. Without these updates the website and Business Tools will throw errors, such as “InvalidShop” – “Shop ‘CommerceEngineDefaultStorefront’ does not exist.”

Once we have created our replacement storefront, e.g. Storefront (above), we take the Item Name and update the configurations in the following places:-

  1. <Website Root>\App_Config\Include\Y.Commerce.Engine\Sitecore.Commerce.Engine.Connect.config at configuration > sitecore > commerceEngineConfiguration > defaultShopName
    In following development best practices, we don’t want to modify this configuration file directly. Instead, we create a patch file in our project.
  2. <Sitecore BixFx Root>\assets\config.json under ShopName
  3. In Postman’s environment configuration under ShopName

Once the above configurations have been updated to the desired storefront, the Commerce Engine Default Storefront storefront can be deleted.

Troubleshooting Changes to BixFx config.json in Chrome

In making changes to the BizFx configuration, if the Business Tools gets hung with loader displaying, check the Networking tab of the Developer Tools for the config.json to see if the request is coming from disk cache.

To resolve this:-

  1. Go to Application > Clear Storage
  2. Only the Cache > Application cache needs to be checked
  3. Clear site data
  4. Reload the page

We can now see the response for config.json has our updated ShopName.

Setting Currency Set for Catalog Product List Prices

Reading Time: < 1 minuteIn this article we go through the process of configuring the Currency Set that will be utilised when adding and editing the List Pricing properties of Sellable Items in the Merchandising Manager.

  1. In the Sitecore Content Editor, Go to /sitecore/Commerce/Commerce Control Panel/Shared Settings/Currency Settings/Currency Sets/.
  2. Copy the Item ID of the desired currency set. In the example below, I have created My Currency Set, which I will be using for this example.

  3. In the Commerce Authoring Environment configuration file (e.g. Habitat.CommerceAuthoring.json), locate the GlobalCurrencyPolicy and update the DefaultCurrencySet to the currency set’s Item ID.
    {
        "$type": "Sitecore.Commerce.Core.GlobalCurrencyPolicy, Sitecore.Commerce.Core",
        "DefaultCurrencySet": "AC47503D-731A-4343-A156-3DBC7A5F1C8C"
    }
  4. Run the Bootstrap() command of the Commerce Engine.
  5. Confirm against any Sellable Item in the Merchandising Manager by clicking on the Add or Edit List Price actions.


Configuring Customers for Multi-Commerce-Site Solutions

Reading Time: 5 minutes

Overview

In this post I will be taking you through the configuration and implementation required to enable separate customer accounts per site in a multi-commerce-site solution.

Note: We won’t go through the process of adding a second commerce storefront in this post.

Understanding Customer Accounts

Let us first understand how customer accounts are associated to a site using the Sitecore Retail Demo as our reference solution.

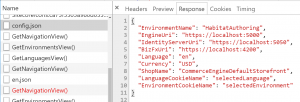
First of all, we review the Sitecore configurations, via http://retail.dev.local/sitecore/admin/showconfig.aspx, for pipelines that create users.  We see that the commerce.customers.createUser pipeline employs the SitecoreUserRespository, which handles all CRUD operations for users. Notably, the domain parameter of the repository, ‘CommerceUsers’ , is utilised to construct the user’s name in the format <domain>\<website user name>.

This is great news!

We have just identified that customer accounts are registered with a domain, so our next step is to identify how to configure the domain per site, so that users don’t share the same account and login details across sites in a multi-site solution.

Now, we could update the domain on the repository configuration, but this only solves the issue of updating the domain in a single domain implementation. We need to investigate the ‘CommerceUsers’ domain further.

Further Investigation and Implementation

Looking back into the Sitecore configurations, we want to identify other usages instances of ‘CommerceUsers’ to determine if they will be relevant to our customisation. We can see that this domain is associated to the following:-

  1. Profile import
    <sitecore>
      <commerceServer>
        <ProfileImport patch:source="CommerceServer.Profiles.config">
          <setting name="FieldForUserNameGeneration" value="GeneralInfo.email_address"/>
          <setting name="EmailAddressFieldName" value="GeneralInfo.email_address"/>
          <setting name="ProfileUniqueQueryKey" value="GeneralInfo.user_id"/>
          <setting name="ErrorThreshold" value="10"/>
          <setting name="Domain" value="CommerceUsers"/>
          <setting name="OutFile" value=""/>
          <setting name="MaxDegreeOfParallelism" value="4"/>
        </ProfileImport>
      </commerceServer>
    </sitecore>
    
  2. Site
    <sitecore>
      <sites>
        <site name="storefront" targetHostName="retail.dev.local" hostName="retail|storefront" commerceShopName="storefront" virtualFolder="/" physicalFolder="/" rootPath="/sitecore/content/storefront" startItem="/Home" dictionaryPath="/sitecore/content/storefront/global/dictionary" dictionaryAutoCreate="false" placeholderSettingsRoot="/sitecore/layout/Placeholder Settings/Project/Retail" mailTemplatesRoot="/sitecore/content/Storefront/Global/Mails" domain="CommerceUsers" allowDebug="true" htmlCacheSize="50MB" registryCacheSize="0" viewStateCacheSize="0" xslCacheSize="25MB" filteredItemsCacheSize="10MB" enablePreview="true" enableWebEdit="true" enableDebugger="true" disableClientData="false" cacheRenderingParameters="true" renderingParametersCacheSize="10MB" formsRoot="/sitecore/system/Modules/Web Forms for Marketers/Retail" loginPage="/login" enableItemLanguageFallback="true" patch:source="z.Sitecore.Demo.Retail.DevSettings.config" database="master" cacheHtml="false"/>
      </sites>
    </sitecore>
    
  3. Sitecore user repository
    <sitecore>
      <sitecoreUserRepository type="Sitecore.Commerce.Data.Customers.SitecoreUserRepository, Sitecore.Commerce" singleInstance="true" patch:source="Sitecore.Commerce.Customers.config">
        <param ref="entityFactory"/>
        <param desc="serializationProperty">__Serialization</param>
        <param desc="domain">CommerceUsers</param>
        <param desc="role">User Role</param>
      </sitecoreUserRepository>
    </sitecore>
    
  4. Profile provider for the Commerce Server
    <sitecore>
      <switchingProviders>
        <profile>
          <provider providerName="cs" storeFullNames="true" wildcard="%" domains="CommerceUsers" patch:source="CommerceServer.Profiles.config"/>
        </profile>
      </switchingProviders>
    </sitecore>
    

Profile Import

The profile import can be identified as out of scope for the base minimum requirements of setting up separate customer accounts per site, so we will leave this as an exercise to be completed separately leveraging the knowledge obtained from this investigation and implementation.

Site

Logically, this is the starting point for unique site configurations, but without the initial investigation developers would most likely fall into the trap of assuming the site’s domain attribute was the source domain used in creating users.

As we know that we should utilise the site configured domain when creating users, we don’t have to change the value of the domain for now. We will need to keep in mind that SitecoreUserRepository should be retrieving the value from the site configuration and not the static parameter it currently utilises.

Sitecore User Repository

In our initial investigation we determined that this repository was using the domain parameter to construct the db user’s name , however we didn’t identify how we could replace the parameter with the site domain attribute.

Taking a look closer at how the domain parameter is utilised within the repository, we see that there is a virtual method GetDomain() which we can override to return the site’s domain. Let’s do this now.

The Sitecore.Foundation.Multisite project seems to be the appropriate place to house the implementation to override the GetDomain() method as the project itself and the customisation we are about to implement are both agnostic of site-specific details.

The following snippet of codes shows how trivial updating the domain is by simply returning the site’s domain name. (You will need to reference the Sitecore.Commerce.dll if the project does not already include it)

using Sitecore.Commerce.Entities;

namespace Sitecore.Foundation.MultiSite.Infrastructure.Pipelines
{
  public class SitecoreUserRepository : Sitecore.Commerce.Data.Customers.SitecoreUserRepository
  {
    public SitecoreUserRepository(IEntityFactory entityFactory, string serializationProperty, string domain, string role)
      : base(entityFactory, serializationProperty, domain, role)
    {
    }

    protected override string GetDomain()
    {
      return Context.Domain.Name;
    }
  }
}

We follow this up by registering class in the config

<configuration xmlns:patch="http://www.sitecore.net/xmlconfig/" xmlns:set="http://www.sitecore.net/xmlconfig/set/">
  <sitecore>
    <sitecoreUserRepository type="Sitecore.Commerce.Data.Customers.SitecoreUserRepository, Sitecore.Commerce">
      <patch:attribute name="type">Sitecore.Foundation.MultiSite.Infrastructure.Pipelines.SitecoreUserRepository, Sitecore.Foundation.MultiSite</patch:attribute>
    </sitecoreUserRepository>
  </sitecore>
</configuration>

We publish our changes, check the showconfig page to ensure the deploy was successful, and register a user (andrew2@test.com) with the debugger attached at a break point with our custom code as a sanity check that the code is being executed. Success!

If we change the domain in our site config to ‘DomainA’ we should expect to see a user registered under the new domain, right? Let’s check.

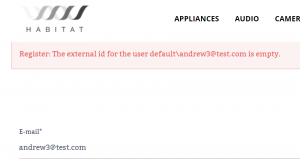
Register: The external id for the user default\andrew3@test.com is empty.

What happened? Well, upon investigation there are 2 issues here. The first is that the user was created in our Sitecore core database dbo.aspnet_Users table, however the user was not created as a commerce user in the Commerce Server profiles database dbo.UserObject table. The second is that the domain name does not match the ‘DomainA’ we applied and instead has been set to ‘default’.

As we still need to look at the configuration for Profile provider for the Commerce Server, let’s start there.

Profile provider for the Commerce Server

Following on from missing user in the Commerce Server profile database and our earlier investigation, we determined that the Commerce Server configuration has not been updated to accept profiles from a domain other than ‘CommerceUsers’, so let’s update the attribute to ‘DomainA’ and see what happens.

<?xml version="1.0"?>
<configuration xmlns:patch="http://www.sitecore.net/xmlconfig/">
  <sitecore>
    <switchingProviders>
      <profile>
        <provider providerName="cs">
          <patch:attribute name="domains">DomainA</patch:attribute>
        </provider>
      </profile>
    </switchingProviders>
  </sitecore>
</configuration>

Similar to the SitecoreUserRepository configuration, we have just updated the domains attribute to handle a single domain solution, however the domains attribute can be configured with a comma-separated list of values, so no additional customisation is required other than to set the additional domains as required. i.e.

<patch:attribute name="domains">DomainA,DomainB</patch:attribute>

Configuring Domains

We appear to have missed something. In \Website\App_Config\Security folder, the Domains.config contains the registration for domains. In this instance we can just update ‘CommerceUsers’ directly to ‘DomainA’ in the domains configuration, or copy the domain definition and change the domain name appropriately. We add the file to our solution, publish and test again.

Note: Domains can also be maintained in the Domain Manager, but by adding the file to our solution, we can ensure that all developers domain configurations are automated and kept in sync via solution deployments.

<?xml version="1.0" encoding="utf-8"?>
<domains xmlns:sc="Sitecore">
  <domain name="sitecore" ensureAnonymousUser="false" />
  <domain name="extranet" />
  <domain name="default" isDefault="true" />
  <sc:templates>
    <domain type="Sitecore.Security.Domains.Domain, Sitecore.Kernel">
      <ensureAnonymousUser>true</ensureAnonymousUser>
      <locallyManaged>false</locallyManaged>
    </domain>
  </sc:templates>
  <domain name="DomainA" defaultProfileItemId="{0FFEC1BD-4D35-49CF-8B7D-7F01930834ED}" ensureAnonymousUser="false" />
  <domain name="CommerceCustomers" />
  <domain name="modules"/>
  <domain name="habitat"/>
  <domain name="DomainB" defaultProfileItemId="{0FFEC1BD-4D35-49CF-8B7D-7F01930834ED}" ensureAnonymousUser="false" />
</domains>

Success!

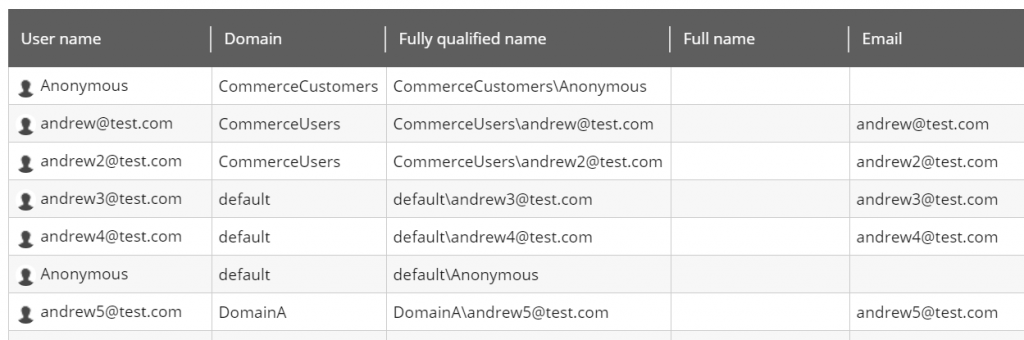
We are able to register users under a different domain that is associated with the site via configuration of the domain attribute. The accounts have also been confirmed in the Sitecore core database dbo.aspnet_Users table, and the Commerce Server profiles database dbo.UserObject table.

In the future, if we want to change the domain we only need update the site’s domain attribute and ensure the domain is registered in the Domains.config.

Summary

In wrapping up, we managed to get a better understanding of how customer accounts are associated to a site (by domain, not directly tied to a site), we were able to identify and implement the customisations required in order to support a multi-commerce-site solution, and we also ended up getting our solution into a state we can manage adding and assigning domains via config to be deployed with the solution without any manual steps outside of configuration.