Sitecore Experience Commerce: Debugging the Commerce Engine from Visual Studio in XC 10

Reading Time: 2 minutes

In this article, we will review how to attach a running Commerce Engine instance to the Visual Studio Debugger for local debugging.

Introduction

In Sitecore Experience Commerce 9.X.Y, the Commerce Engine was built on .NET Core 2.2 or lower, which either only supported the out-of-process hosting or is the default configuration. This meant that IIS was essentially being used as a proxy to forward requests to the Commerce Engine application, which is why you are probably familiar with attaching the debugger to a process named Sitecore.Commerce.Engine.exe. By hovering over the process, the source Commerce Engine could easily be identified when attaching the process to Visual Studio.

Sitecore Experience Commerce 10 now leverages .Net Core 3.1, which uses in-process hosting, meaning the Commerce Engine instance run in the same process as its IIS worker process. Overall, the in-process hosting provides improved performanced as requests aren’t being proxied over the loopback adapter.

Now that we have a better understanding of the switch from out-of-process to in-process hosting in XC 10, it should be apparent as to why we need to amend how we attach the Commerce Engine to Visual Studio’s debugger.

Attaching the Commerce Engine instance to the Visual Studio Debugger

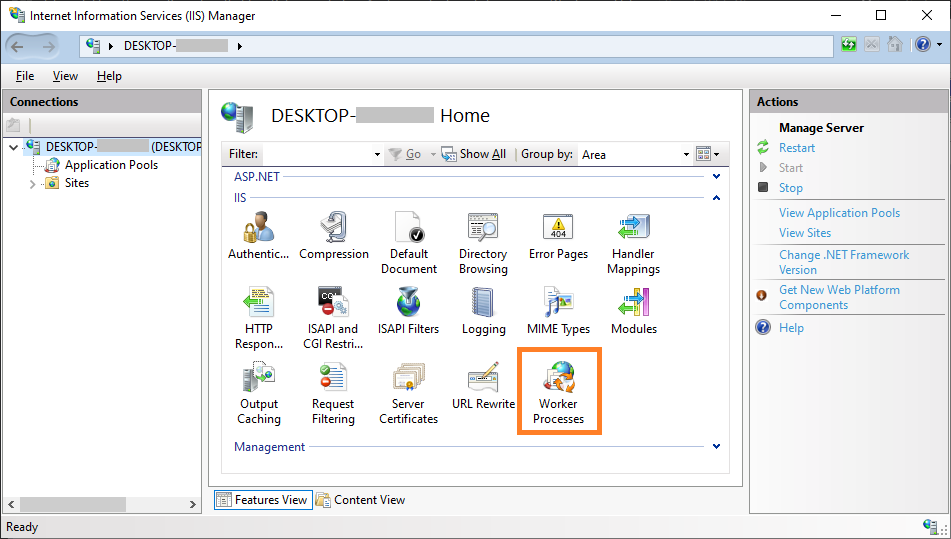
First thing we will need to do is to retrieve the process Id to verfiy that we are attaching the correct process in Visual Studio. To do this, open IIS and navigate to the Worker Processes view.

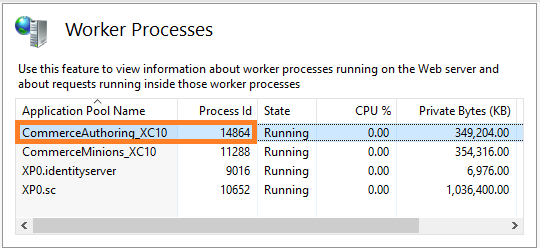
In the Worker Processes view, look for the application pool name containing the name of the application pool configured for the Commerce Engine instance and note the Process Id.

If the application pool does not show the Commerce Engine instance, it has likely not started, or shut down due to inactivity. Execute a request to the Commerce Engine instance and refresh the Worker Processes view in IIS.

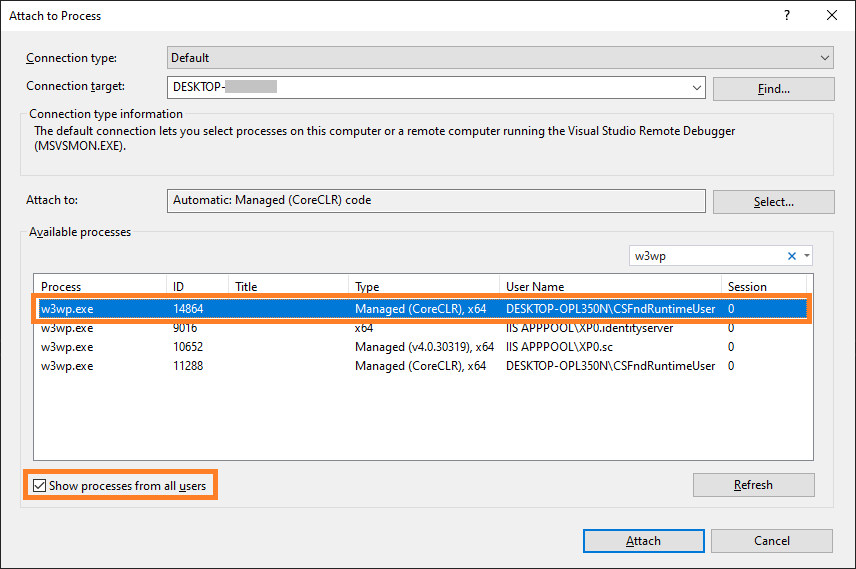
Over in Visual Studio, open the Attach to Process dialog, select the Show processes from all users as you will likely be running the Commerce Engine under a dedicated user profile, and locate the ID that we identified from the Worker Proccesses view in IIS. The ‘w3wp’ can also be applied to the process filters to more easily locate the process.

References

Microsoft: Host ASP.Net Core on Windows with IIS > Hosting models

Sitecore Experience Commerce: Creating a Commerce Engine Plugin in XC 10

Reading Time: 3 minutes

In this article, we will look at the steps in creating a custom plugin project for the Commerce Engine solution using the current developer experience in XC 10.

Introduction

With XC 10, creating a Sitecore Commerce plugin project is currently not available as a Visual Studio extension project template and has been migrated to the .Net Core CLI as a static project template.

As per previous versions of the the Sitecore Commerce plugin project, this is intended as a reference project representing a loose end-to-end implementation with sample classes. It is also commonly utilised as the starting template for your project, where you will remove the sample classes and utilise the csproj file and the project’s folder structure as the skeleton for your plugins.

Installing the Sitecore.Commerce.Plugin.Template

The plugin project template is no longer distributed via the Commerce Engine SDK and is now available via the Sitecore Commerce Official NuGet Feed. To download the project template, search for Sitecore.Commerce.Plugin.Template and navigate to the package details page.

On the package details page, scroll down and download the package from right panel under the Info section.

The plugin project template can now be installed via the .Net Core CLI. Open PowerShell and run the following command, dotnet new -i <full path to Sitecore.Commerce.Plugin.Template.*.*.*.nupkg>.

dotnet new -i C:\Projects\Sitecore.Commerce.Plugin.Template.6.0.4.nupkg

Now if we run the dotnet new command in PowerShell, we can see the installed plugin project template.

Creating a new Sitecore Commerce Plugin Project

Now with the plugin project tempate installed, we can create a new project using the template.

Using you Commerce Engine solution’s root directory, the following command will create the plugin project in the desired directory, dotnet new pluginsample -o <relative path to project directory>/<project name>.

dotnet new pluginsample -o src/Foundation/MyPlugin/Engine/Foundation.MyPlugin.Engine

Note: The project name has not been configured at this time, so we will perform some post project creation steps to resolve this.

After creating the project, navigate to the folder where the project was created and rename Sitecore.Commerce.Plugin.Sample.csproj to your project name, e.g. Foundation.MyPlugin.Engine.csproj

To resolve namespaces within the project, you can use a tool, such as Notepad++, to replace all references of ‘Sitecore.Commerce.Plugin.Sample’ to <your project name>, e.g. Foundation.MyPlugin.Engine.

Adding the Plugin to the Commerce Engine Solution

With our new project created, we can add it the Commerce Engine solution by right-clicking a solution folder, selecting the Add Existing Project command, and adding the project from its location.

Finally add the project to the Commerce Engine by adding the project reference to the Sitecore.Commerce.Engine project.

Working with the BizFx SDK: Preparing the Base Solution for Customisation

Reading Time: 3 minutes

In this article, we will look at preparing the BizFx project for customisation, by first aligning the default configuration of the SDK with the configuration that was deployed with the Sitecore Commerce installation, and then reviewing how to build and deploy solution.

Fair warning: I am not an expert in Angular, however the information provided is enough for getting started and performing the bare minimum to align the BizFx SDK for custom solutions.

Creating the BizFx Development Solution

The Sitecore Commerce On Premise package contains the BizFx SDK and the speak files that will be required for the new project.

Extract the contents of the Sitecore.BizFX.SDK.*.*.*.zip into your desired folder location, e.g. C:\projects\, and copy the speak-ng-bcl-*.*.*.tgz and speak-styling-*.*.*-r*****.tgz files into the same folder as the SDK.

The BizFx SDK does come with a README.md file containing some general instructions on preparing the solution for building, however we will highlight the main aspects of these instructions and cover some addition steps for local and production deployments.

In src\assets\config.json we need to copy the values from our local BizFx installation, located by default at <web root>\<BizFx>\assets\config.json, so that when we deploy our new version the configuration isn’t corrupted. You’ll notice the values that need to be updated are named ‘PlaceholderFor<context>’.

{
  "EnvironmentName": "HabitatAuthoring",
  "EngineUri": "PlaceholderForAuthoringUrl",
  "IdentityServerUri": "PlaceholderForIdentityServerUrl",
  "BizFxUri": "PlaceholderForBizFxUrl",
  "Language": "PlaceholderForDefaultLanguage",
  "Currency": "PlaceholderForDefaultCurrency",
  "ShopName": "PlaceholderForDefaultShopName",
  "LanguageCookieName": "selectedLanguage",
  "EnvironmentCookieName": "selectedEnvironment",
  "AutoCompleteTimeout_ms": 300
}

The other value that will need to be updated for projects will be the EnvironmentName, which is used to select the default environment in BizFx.

It is recommended that the LanguageCookieName and EnvironmentCookieName properties remain as their default value as they may only need to be changed for advanced customisations. We will not cover modifying these properties in this article.

Prerequisites for Building

Assuming node installed already, from the BizFx solution folder, open your preferred CLI tool and run the following commands:-

npm config set @speak:registry=https://sitecore.myget.org/F/sc-npm-packages/npm/
npm config set @sitecore:registry=https://sitecore.myget.org/F/sc-npm-packages/npm/
​​​​​​​npm install speak-ng-bcl-0.8.0.tgz
npm install speak-styling-0.9.0-r00078.tgz
npm install @sitecore/bizfx
npm install

Building and Deploying the BizFx Solution

For building the BizFx Angular application, the ng build command will compile into an output folder named dist, defaulting to the workspace folder. Within the dist folder, the sdk will be the equivalent of the <BizFx> website folder in the web root.

For production builds execute the ng build --prod command, which optimises the compiled solution for production deployments.

For more information about the Angular commands see https://angular.io/cli.

To deploy the BizFx solution, copy the contents of the dist/sdk into the <web root>\<BizFx> folder.

Building and Deploying via Gulp

For building and deploying the BizFx solution, I use a gulp script to wrap the angular commands. See the Source Code link at the end of the article to download the script.

If you haven’t installed gulp, run the following command:-

​​​​​​​npm install gulp

Running the default gulp command will build the solution, clean out the BizFx folder in the web root and the deploy the solution to the BizFx folder.

As the gulp tasks will be performing operations on system restricted folders, make sure you run the gulp command under Administrator privileges.

Source Code: Ajsuth.BizFx.DeploymentScripts

Decoupling the Sample Plugins from the Sitecore Commerce 9 SDK

Reading Time: 2 minutesThe Sitecore Commerce SDK comes with a number of sample plugins which serve varying purposes, including upgrading/migrating data from Sitecore Commerce 8.2.1, providing Habitat and AdventureWorks sample data for testing and getting familiar with the Commerce Engine’s services, and a working Braintree payment integration.

Customer.Sample.Solution

In this article, we will look at the steps required to decouple the sample projects from the solution and resolve the dependencies that the Commerce Engine project has on them, to provide a clean starting point for customising and extending your project’s instance of the Commerce Engine.

Note: We will leave the Braintree plugin in the solution so we can still checkout in the storefront. We will also leave the habitat environment configuration files, which can be updated to the custom environment names for your solution.

We will go into detail below, but let’s take a quick look at what’s required at a high level:-

  1. Add dependency references to the Commerce Engine
  2. Add necessary pipeline configurations to the Commerce Engine
  3. Remove policies for sample projects from the environment configuration files and policy sets
  4. Remove sample environment configurations and policies from the Commerce Engine
  5. Remove sample projects from the solution
  6. Test the Commerce Engine

Add Dependency References to the Commerce Engine

The following dependencies will need to be added to the Commerce Engine for the project to build once the sample projects have been removed:-

  • Sitecore.Commerce.Plugin.Coupons
  • Sitecore.Commerce.Plugin.Journaling
  • Sitecore.Commerce.Plugin.SQL
  • Sitecore.Commerce.Plugin.Tax

Note: For versioning, confirm with the other plugin references.

Add Necessary Pipeline Configurations to the Commerce Engine

The Commerce Engine is missing a few pipeline configurations that hook up some of the cart functionality. To resolve this, perform the following steps:

  1. Copy the ServiceCollectionExtensions class from the Plugin.Sample.AdventureWorks project into the Commerce Engine project at Pipelines > Blocks.
  2. Rename the namespace to Sitecore.Commerce.Engine.
  3. Copy the ConfigureSitecore class from the Plugin.Sample.AdventureWorks project into the Commerce Engine project.
  4. Rename the namespace to Sitecore.Commerce.Engine.
  5. Replace the ConfigureServices method with the following:
    public void ConfigureServices(IServiceCollection services)
    {
        var assembly = Assembly.GetExecutingAssembly();
        services.RegisterAllPipelineBlocks(assembly);
        services.ConfigureCartPipelines();
    }
  6. Resolve ConfigureCartPipelines by adding in the following to the class:
    using Sitecore.Commerce.Engine.Pipelines.Blocks;

Remove Sample Environment Configurations and Policies from the Commerce Engine

Highlighted in red are the properties, policies, and environment configuration files to be removed from the solution.

  • Global.json
    • EnvironmentList
      • “AdventureWorksShops”
      • “AdventureWorksAuthoring”
    • Plugin.Sample.Upgrade.MigrationPolicy
    • Plugin.Sample.Upgrade.MigrationSqlPolicy
  • PlugIn.AdventureWorks.CommerceAuthoring-1.0.0.json
  • PlugIn.AdventureWorks.CommerceMinions-1.0.0.json
  • PlugIn.AdventureWorks.CommerceShops-1.0.0.json
  • PlugIn.Habitat.CommerceAuthoring-1.0.0.json
    • Sitecore.Commerce.Core.EnvironmentInitializationPolicy
      • “Environment.Habitat.DefaultRelationships-1.0”
      • “Environment.Habitat.SellableItems-1.0”
      • “Environment.Habitat.Pricing-1.0”
      • “Environment.Habitat.Promotions-1.0”
      • “Environment.Habitat.Catalog-1.0”
    • Plugin.Sample.Customers.CsMigration.ProfilesSqlPolicy
    • Plugin.Sample.Customers.CsMigration.ProfilePropertiesMappingPolicy

Remove Sample Projects from the Solution

We can now remove the following projects from the solution:-

  • Plugin.Sample.AdventureWorks
  • Plugin.Sample.Customers.CsMigration
  • Plugin.Sample.Habitat
  • Plugin.Sample.Upgrade

The solution should now resemble the image below.

Test the Commerce Engine

To verify the solution:-

  1. Run the Commerce Engine project locally.
  2. Run the Bootstrap request, either via postman or browser.
  3. Run the CleanEnvironment request.
  4. Run the InitializeEnvironment request.