OrderCloud: Order Submit Logic

Reading Time: 4 minutes

In this article, we will review the business logic that Sitecore OrderCloud utilises when the order submit endpoint (POST /orders/{direction}/{orderID}/submit) is executed for a better checkout design, implementation and error handling.

Introduction

When it comes to submitting an order that is either incomplete or has become invalid, the OrderCloud API provides fairly easy to understand error codes to facilitate troubleshooting. What is not provided however, is a complete list of error codes that one may expect from an endpoint in order to be proactive in catering for such situations.

While a global catch all may be the quickest and easiest way to approach order submission error handling, the user experience of being informed that “A technical difficulty has occurred. Please contact support” in your storefront’s checkout will likely have a negative impact on the conversion rate. In addition, the admin application tends to be neglected with the love required to support business users in identifying and rectifying the issues themselves, so more often than not it is the developer to the rescue, but there are ways we can prevent these scenarios from occurring.

As OrderCloud is always utilising the latest code base, it is possible that the documented processes can change over time without warning.

Order Submission Logic

The following sections covering order submission logic, will highlight most of the platform logic, but will omit more trivial details.

When an exception is thrown by the API, denoted by the red End terminators with given error code, any pending changes to the underlying database entities are rolled back.

Order Submit

The order submit logic is essentially the entry point for validating and processing a submitted order.
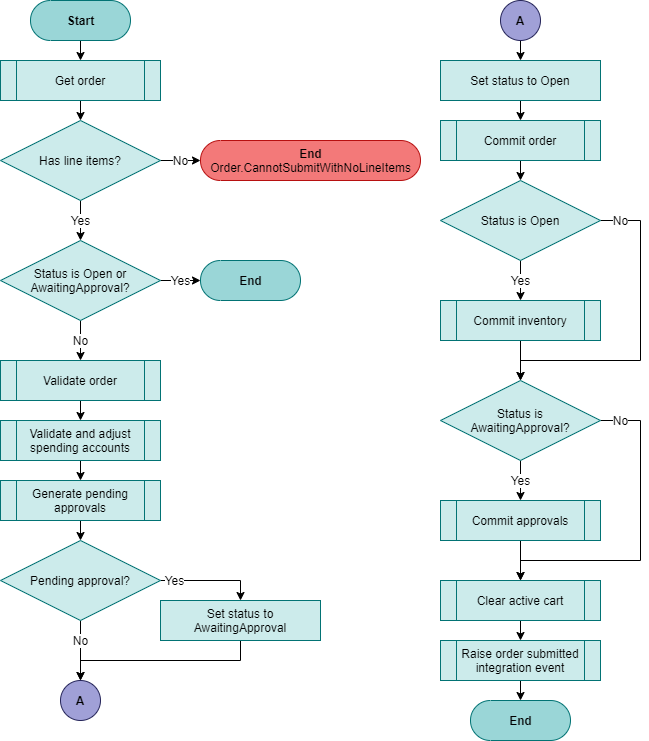
Figure 1: Order submit logic.

Validate Order

The validate order process not only used in the order submit process, but is the entire validation taking place for the order validate endpoints.

In figure 2, soft errors, represented by the red boxes, allows the API to validate other areas of the order and return errors in list form, which can see your overall solution being more performant with less back and forth to resolve all order validation errors.

The Deduct inventory sub-process will validate inventory is available for the order, but does not persist inventory changes as this can be found in figure 1, under Commit inventory.
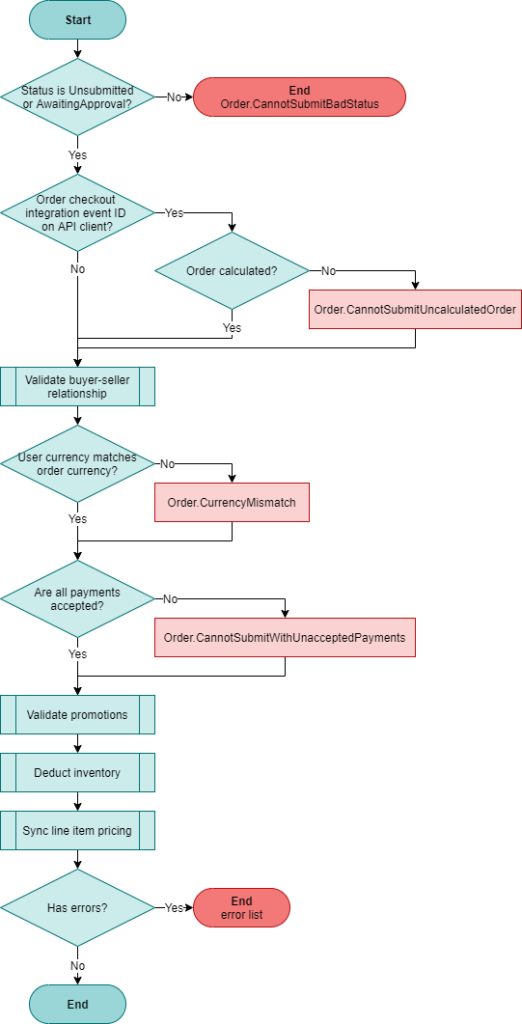
Figure 2: Validate order logic.

Validate Buyer-Seller Relationship

The buyer-seller relationship effectively validates that the user is authorised to purchase an order directly from a supplier. The relationship can be implicit, i.e. the supplier can be configured with AllBuyerCanOrder set as true or the user is an admin user, or an explicit relationship between the buyer and supplier has been defined.
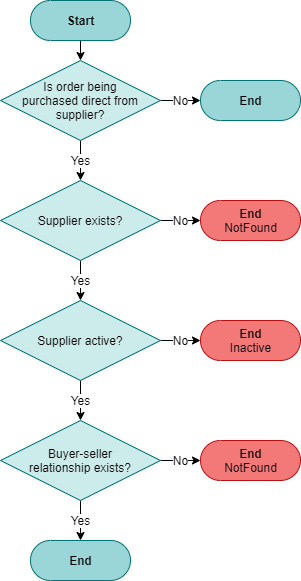
Figure 3: Validate buyer-seller relationship logic.

Validate Promotions

The validate promotions logic in figure 4 shows the relevant flow for the order submit process.
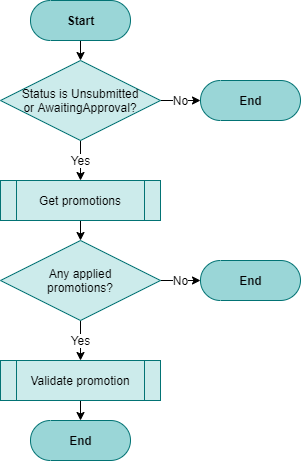
Figure 4: Validate promotions logic.

Validate Promotion

For each promotion applied to the order, it is validated during the order submit to ensure it is still eligible. Any and all errors found are added to the error list, which will be returned by the API as part of the validate order logic in figure 2.
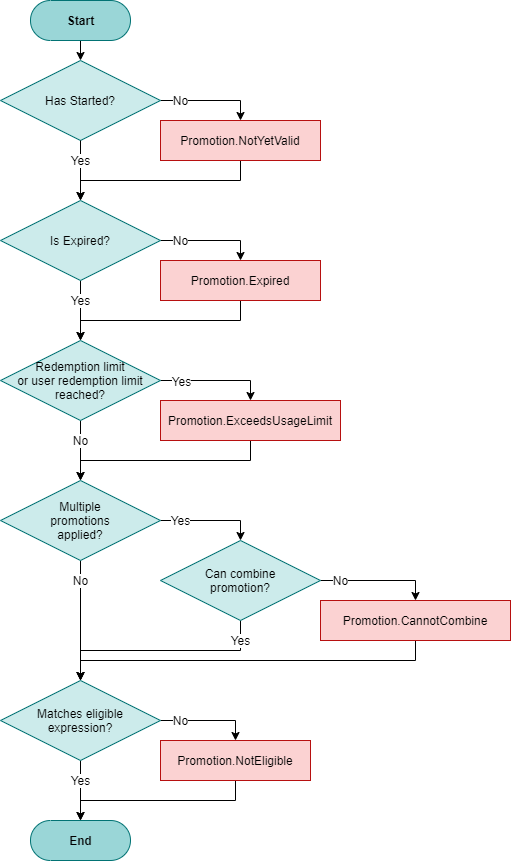
Figure 5: Validate promotion logic.

Deduct Line Item Inventory

Order inventory will be validated to ensure that there is sufficient inventory for all order lines. Any and all errors found are added to the error list, which will be returned by the API as part of the validate order logic in figure 2.
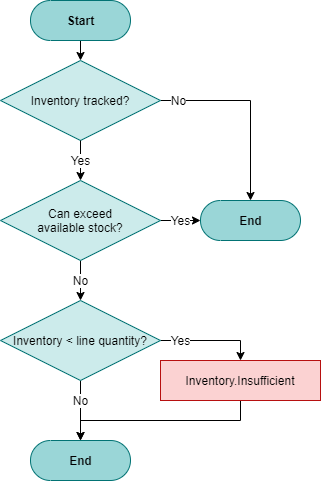
Figure 6: Deduct line item inventory logic.

Validate and Adjust Spending Account

For the sub-process Validate and adjust spending accounts in figure 1, the following flowchart represents how each spending account is evaluated as they are iterated over for all applied payments for the order.
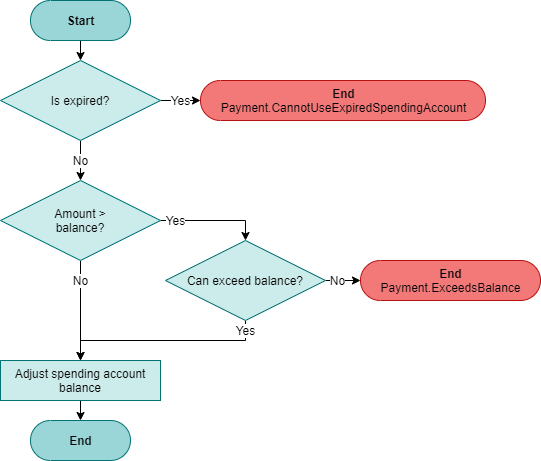
Figure 7: Validate and adjust spending account logic.

Summary

With this insight into the order submit processes, you should now be well equipped to identify how extending OrderCloud order submit functionality through webhooks, wrapped API calls, and integration events fit in with your solutions, as well as anticipate the many errors that can occur and be more proactive with more specific error handling over a global catch all implementation.

References

OrderCloud: Resource Dependency Cheat Sheet

Reading Time: 5 minutes

In this article, we will review the OrderCloud resources that we interact with directly or indirectly within the OrderCloud API to identify the dependencies that will guide the order of operations for implementations such as a data import. We will also identify a few platform nuances, or gotchas, to be aware of.

Introduction

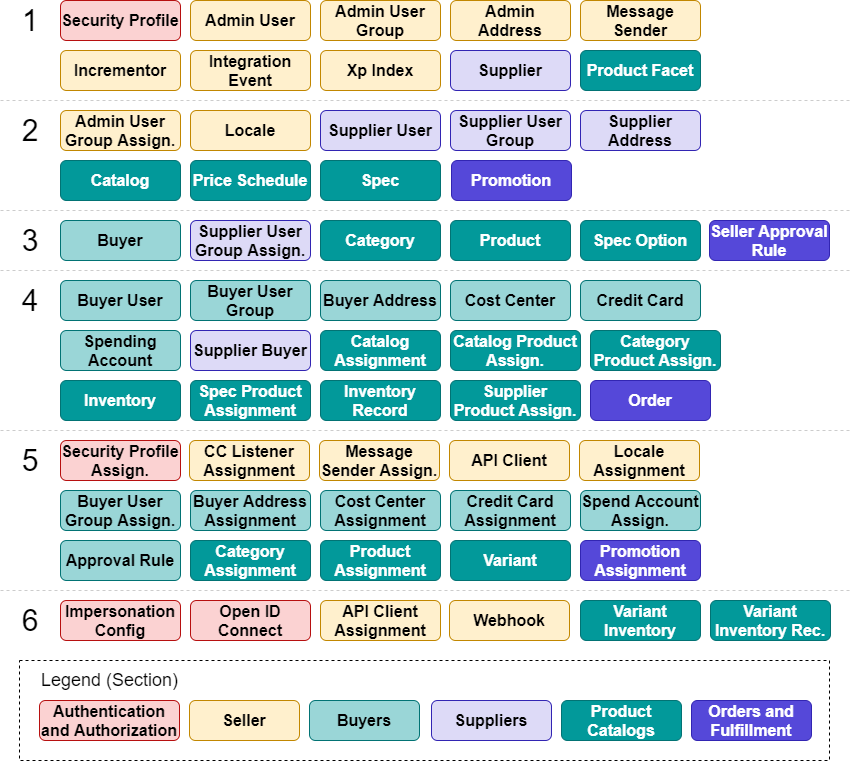
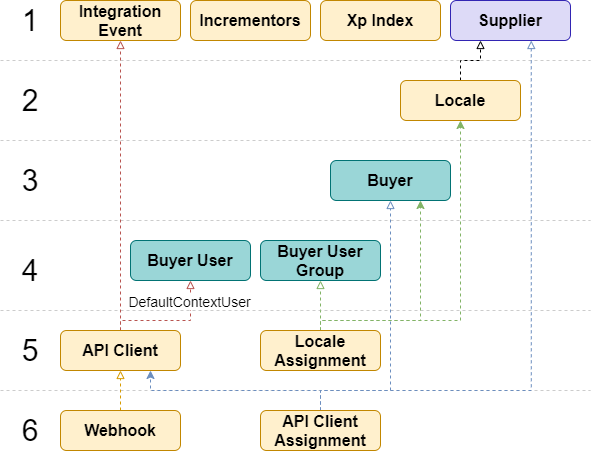
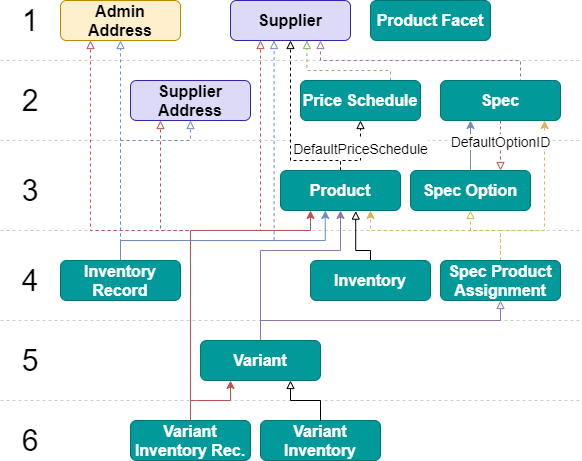
We will start at the end, for quick reference, with the following dependency overview diagram shows OrderCloud resources, excluding the complete set of order resources, organised into priority groups. Each group number, represents the order in which data should typically be processed in an implementation to avoid any dependency conflicts in the OrderCloud API responses. For example, resources in group 1 would typically be executed before resources in group 2, group 2 before group 3, etc.

The overview diagram does not show the actual dependencies between resources, however in Resource Dependencies we break down each section (or logically grouped resources), aligned to the OrderCloud portal, to document the specific dependencies and note any nuances that should be considered when working with resources.

Figure 1: Resource dependency groups overview.

Resource Dependencies

In the following resource dependency graphs, the varying line colours are simply to differentiate the dependency references for each resource. The following legend also applies to the all graphs.

A resource reference is a reference in the resource’s url as opposed to the request body, e.g. /catalogs/{catalogID}/categories.

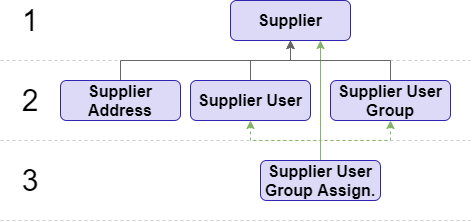
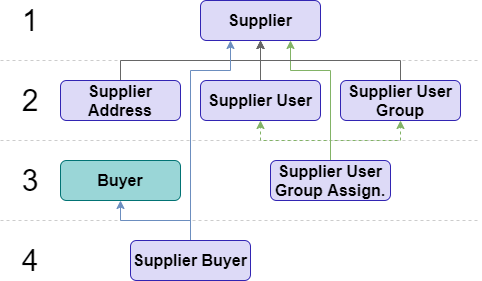
In order to understand the dependency graphs, we will look at the following example, where we want to import/sync supplier data via the OrderCloud API. If we were to attempt to create a supplier user where the supplier does not exist, we would encounter an EntityNotFound error in the API’s response.

Figure 2: Resource dependency example.

Using the dependency graph we can see that the supplier is a dependency and therefore if we aren’t planning on creating or updating the supplier then we should at least validate its existence before proceeding and with additional defensive programming we can proactively consider an alternate path of code logic instead.

private async Task<User> CreateSupplierUser(User supplierUser, string supplierID, string accessToken)
{
    var supplier = await oc.Suppliers.GetAsync(supplierID, accessToken);
    if (supplier == null)
    {
        // We implement our alternate code path here, for example:
        Logger.LogError($"Supplier '{supplierID}' should already exist. Supplier User '{supplierUser.ID}' will not be created.");
        return null;
    }

    return await oc.SupplierUsers.CreateAsync(supplierID, supplierUser, accessToken);
}

If we were importing all supplier information, using the dependency graph as a reference, we can identify the order of operations for our implementation to avoid dependency conflicts and optimise performance. For example, we know that we need to import suppliers before importing supplier users, while supplier addresses, suppliers users and supplier user groups can be safely imported asynchronously because they belong to the same dependency group.

// Group 1 dependencies
await ImportSuppliers();

// Group 2 dependencies
var supplierAddresses = ImportSupplierAddresses();
var supplierUsers = ImportSupplierUsers();
var supplierUserGroups = ImportSupplierUserGroups();
await Task.WhenAll(supplierAddresses, supplierUsers, supplierUserGroups);

// Group 3 dependencies
await ImportSupplierUserGroupAssignments();

Identifying the order of operations and employing defensive programming techniques will be critical in your solution design.

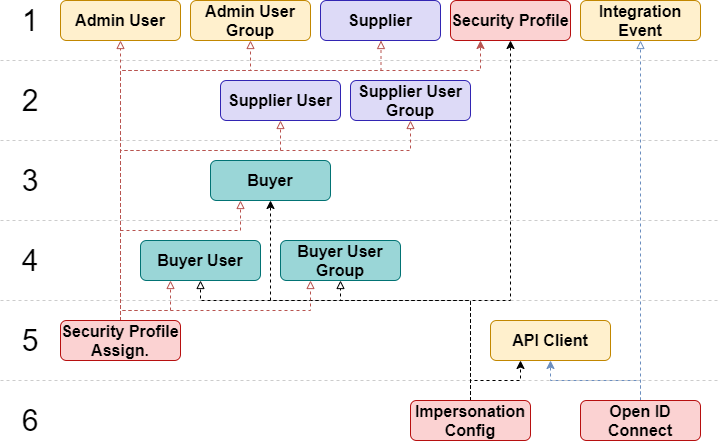
Authentication and Authorization Resources

Figure 3: Authentication and Authorization resource dependencies.

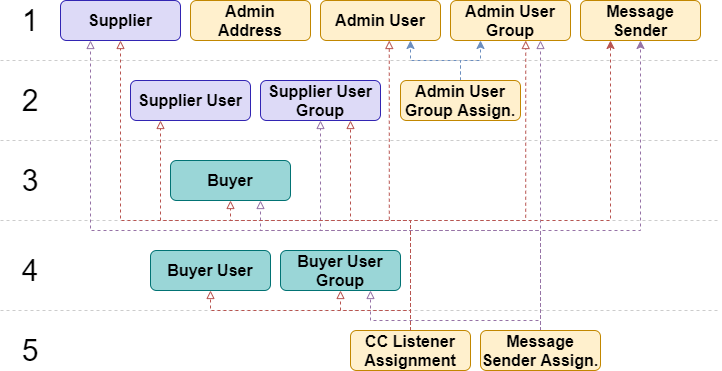
Seller

The seller resource dependencies have been broken out across two diagrams for clarity.

Figure 4: Seller resource dependencies.
Figure 5: Seller resource dependencies (cont.).

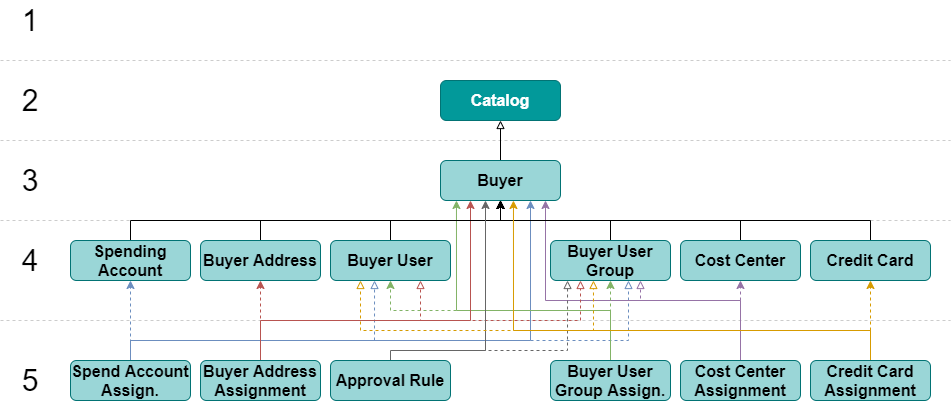
Buyers

The buyer resource has an implicit reference to the catalog resource as there is a nuance in the platform relating to buyer creation. When creating a buyer, the OrderCloud platform will create a catalog with the same ID. If a catalog with the same ID already exists, an IdExists error will be returned. However, if the catalog‘s ID is passed in as the DefaultCatalogID then the catalog will be associated to it instead, whereas if there is no catalog in existence an NotFound error will be returned.

Conditions1234
DefaultCatalogID providedNNYY
Catalog existsNYNY
Actions1234
Catalog created (201 response code)X
Catalog assigned to Buyer (201 response code)X
IdExists error (409 response code)X
NotFound error (404 response code)X
Table 1: Decision table for POST /buyers.
Figure 6: Buyer resource dependencies.

Suppliers

Figure 7: Supplier resource dependencies.

Product Catalogs

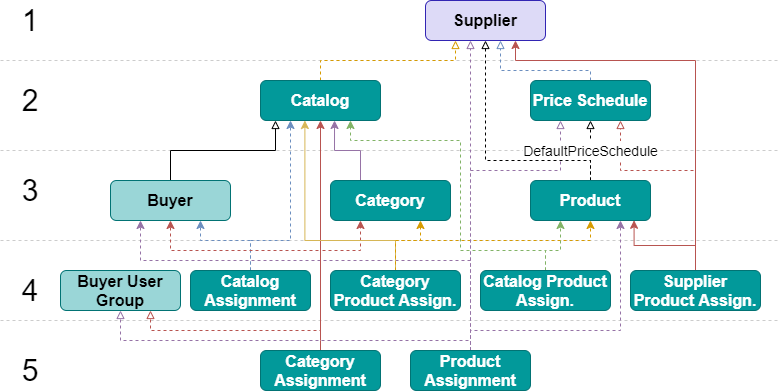
The product catalogs resource dependencies have been broken out across two diagrams for clarity.

Figure 8: Product Catalogs resource dependencies.

You will notice that the spec and spec option has a cyclical dependency. The nuance to the spec resource is that the DefaultOptionID cannot be assigned until after the spec option has been created, however it relies on the spec to exist. This chicken or egg scenario can be resolved by temporarily removing the DefaultOptionID before creating the spec and spec options then patching the value back onto the spec afterwards.

For the implicit references of Inventory > Product and Variant Inventory > Variant, the inventory objects updated on the Product and Variant input models, so they can be treated as being on the same level if applied together. However, the inventory cannot be created/updated without the existence on the Product/Variant entities.

// 1. Remove the DefaultOptionID from the spec prior to creation
var defaultOptionID = spec.DefaultOptionID;
spec.DefaultOptionID = null;
await orderCloudClient.Specs.CreateAsync(spec, accessToken);

// 2. Create the spec options
await ImportSpecOptions(specOptions);

// 3. Patch the spec's DefaultOptionID
await PatchSpecDefaultOptionID(spec, defaultOptionID);
Figure 9: Product Catalogs resource dependencies (cont.).

Orders and Fulfillment

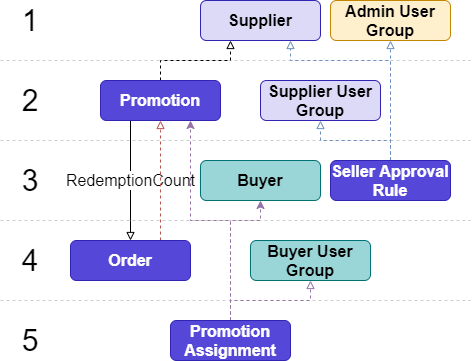
For orders and fulfillment, we will focus on the promotion and seller approval rule resources as these a more typical of a Marketplace setup, whereasall other order resources typically represent historical order placement data, which is outside the scope of this article.

There is a seemingly cyclical dependency between the promotion and order resources, however the promotion-to-order is an implicit resource reference, which does not impact the validation logic for persistence of the promotion resource. Instead, it is used to identify the overall redemption count and user redemption count from orders placed and is used in the validation logic when applying a promotion to an order. When migrating data, excluding order data, between environments, this data inconsistency may be incorrectly identified as an environmental bug, which you can avoid troubleshooting with this knowledge.

Figure 10: Orders and Fulfillment resource dependencies.

Summary

Resource dependencies can be considered a huge gotcha when it comes to long-term maintenance. By having a sound knowledge of resource dependencies and nuances within the OrderCloud API, and employing defensive programming techniques, robust and performant ecommerce implementation can become a byproduct of good solution design.

References

OrderCloud: Debugging Integration Events and Webhooks using ngrok

Reading Time: 3 minutes

In this article, we will review how we can redirect traffic from OrderCloud’s integration events and webhooks to our local web server to assist debugging efforts in local development.

The OrderCloud Headstart application will be referenced in this example, which may differ slightly from your integration service/middleware application.

Introduction

As OrderCloud’s integration events and webhooks require public urls to be available for testing and having complete functionality available, the question quickly arises as to how developers will be able to develop and debug the respective middleware endpoints in a local environment. One solution we will review is to use ngrok, a free service, which allows us to expose a web server running on our local machine to the internet.

Installation, Configuration, and Testing

High-level steps are provided below, however steps may vary based on operating systems and command tools. See ngrok: Getting Started > Setup & Installation, and register or log in to a free account, for alternative setup steps.

Preparing ngrok

Using Powershell, install ngrok using choco.

choco install ngrok

Add the authtoken, available from ngrok: Getting Started > Your Authtoken once signed up for a free account.

ngrok authtoken <auth token>

Exposing the Secure Web Server with ngrok

Moving over to the local imiddleware, we will need to obtain the port number used, e.g. the HTTPS url from the applicationUrl in the Local profile.

{
  "profiles": {
    "Local": {
      "commandName": "Project",
      "environmentVariables": {
        "APP_CONFIG_CONNECTION": "<app config connection>",
        "ASPNETCORE_ENVIRONMENT": "Development"
      },
      "applicationUrl": "https://localhost:5001;http://localhost:5000"
    }
  }
}

Now we can start HTTP tunnel forwarding to our local middleware.

ngrok http https://localhost:<port number>

The tunnel will then be created with a random URL, which we need to take note of for our OrderCloud configurations.

Figure 1: Randomly generated URL from grok.

Configuring OrderCloud’s Integration Events

In OrderCloud, we can create or update an integration event using the generated URL from ngrok as the CustomImplementationUrl. The HashKey will also need to be configured to match the OrderCloudSettings:WebhookHashKey appsettings in HeadStart.

As ngrok does generate a random URL each time when using free accounts, the CustomImplementationUrl will need to be patched each time you expose the local web server.

{
  "ID": "Middleware",
  "Name": "Middleware",
  "ElevatedRoles": [
    "FullAccess"
  ],
  "EventType": "OrderCheckout",
  "HashKey": "samplehash",
  "CustomImplementationUrl": "https://8f79-125-253-105-232.ngrok.io"
}

If the integration event has been newly created, don’t forget to assign it to the API client’s OrderCheckoutIntegrationEventID so that the integration event can trigger the endpoints of the middleware.

{
  "ID": <api client id>,
  "ClientSecret": null,
  "AccessTokenDuration": 600,
  "Active": true,
  "AppName": "Storefront",
  "RefreshTokenDuration": 0,
  "DefaultContextUserName": "Storefront-anonymous-user",
  "xp": {},
  "AllowAnyBuyer": true,
  "AllowAnySupplier": false,
  "AllowSeller": false,
  "IsAnonBuyer": true,
  "AssignedBuyerCount": 0,
  "AssignedSupplierCount": 0,
  "OrderCheckoutIntegrationEventID": "Middleware",
  "OrderCheckoutIntegrationEventName": "Middleware",
  "MinimumRequiredRoles": [],
  "MinimumRequiredCustomRoles": [],
  "MaximumGrantedRoles": [],
  "MaximumGrantedCustomRoles": []
}

Configuring OrderCloud’s Webhooks

When configuring webhooks, the Url will require the complete application service/middleware application endpoint to be defined, along with the HashKey, which should be configured to match the OrderCloudSettings:WebhookHashKey appsettings in HeadStart.

Webhooks also require the ApiClientIDs to be assigned on the resource itself rather that the API client and the WebhooksRoutes need to be specified in order for the OrderCloud API to trigger the webhook, which should then be redirected from ngrok through to the local web server.

{
  "ID": "MyWebhook",
  "Name": "MyWebhook",
  "Url": "https://8f79-125-253-105-232.ngrok.io/mywebhook",
  "HashKey": "samplehash",
  "ElevatedRoles": [
    "BuyerAdmin"
  ],
  "ApiClientIDs": [
    <api client id>
  ],
  "WebhookRoutes": [
    {
      "Route": "v1/buyers",
      "Verb": "POST"
    }
  ]
}

Testing the Endpoints in the Middleware

With Visual Studio’s debugger attached to the local IIS site or is being debugged directly, when an integration event or webhook endpoint is requested via an appropriate API client, ngrok will redirect the request to the local web server and the debugger will be able to capture the traffic for local debugging.

Figure 2: Visual Studio’s debugger successfully triggered from OrderCloud’s estimateshipping endpoint redirected to a localwebserver using grok.

Troubleshooting

An attempt was made to access a socket in a way forbidden by its access permissions

When attempting to run ngrok, if the response “An attempt was made to access a socket in a way forbidden by its access permissions” is received, restarting the Host Network Services Windows service should resolve this issue.

References

Sitecore Experience Commerce: Debugging the Commerce Engine from Visual Studio in XC 10

Reading Time: 2 minutes

In this article, we will review how to attach a running Commerce Engine instance to the Visual Studio Debugger for local debugging.

Introduction

In Sitecore Experience Commerce 9.X.Y, the Commerce Engine was built on .NET Core 2.2 or lower, which either only supported the out-of-process hosting or is the default configuration. This meant that IIS was essentially being used as a proxy to forward requests to the Commerce Engine application, which is why you are probably familiar with attaching the debugger to a process named Sitecore.Commerce.Engine.exe. By hovering over the process, the source Commerce Engine could easily be identified when attaching the process to Visual Studio.

Sitecore Experience Commerce 10 now leverages .Net Core 3.1, which uses in-process hosting, meaning the Commerce Engine instance run in the same process as its IIS worker process. Overall, the in-process hosting provides improved performanced as requests aren’t being proxied over the loopback adapter.

Now that we have a better understanding of the switch from out-of-process to in-process hosting in XC 10, it should be apparent as to why we need to amend how we attach the Commerce Engine to Visual Studio’s debugger.

Attaching the Commerce Engine instance to the Visual Studio Debugger

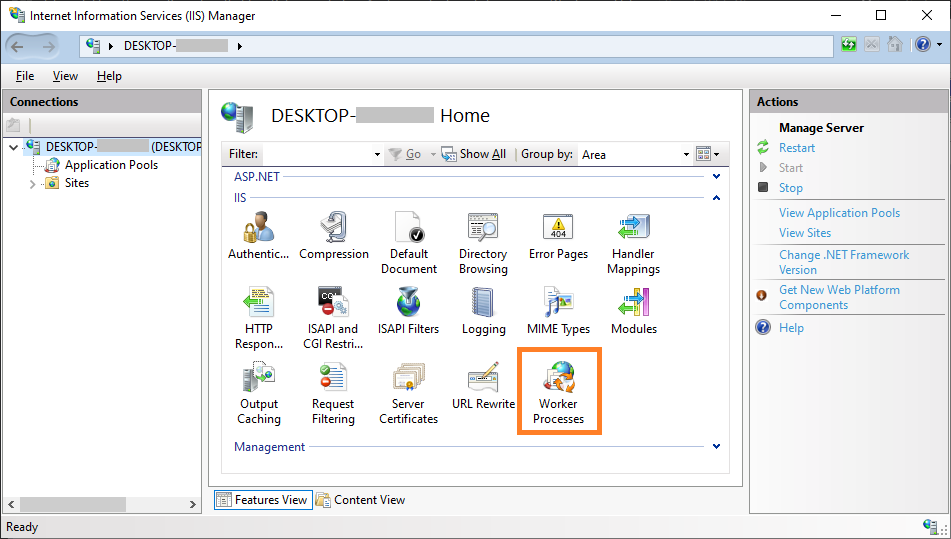
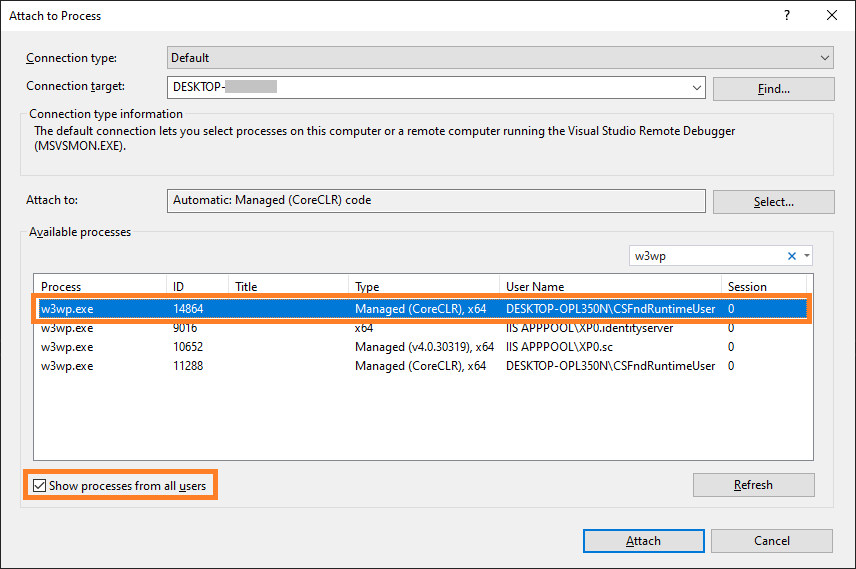
First thing we will need to do is to retrieve the process Id to verfiy that we are attaching the correct process in Visual Studio. To do this, open IIS and navigate to the Worker Processes view.

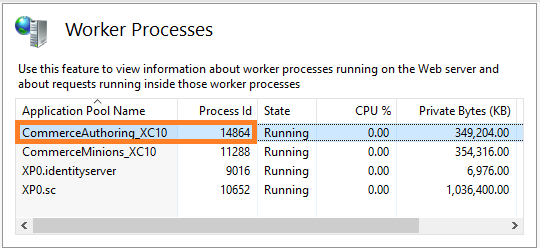
In the Worker Processes view, look for the application pool name containing the name of the application pool configured for the Commerce Engine instance and note the Process Id.

If the application pool does not show the Commerce Engine instance, it has likely not started, or shut down due to inactivity. Execute a request to the Commerce Engine instance and refresh the Worker Processes view in IIS.

Over in Visual Studio, open the Attach to Process dialog, select the Show processes from all users as you will likely be running the Commerce Engine under a dedicated user profile, and locate the ID that we identified from the Worker Proccesses view in IIS. The ‘w3wp’ can also be applied to the process filters to more easily locate the process.

References

Microsoft: Host ASP.Net Core on Windows with IIS > Hosting models

Sitecore Commerce Class Templates for Visual Studio

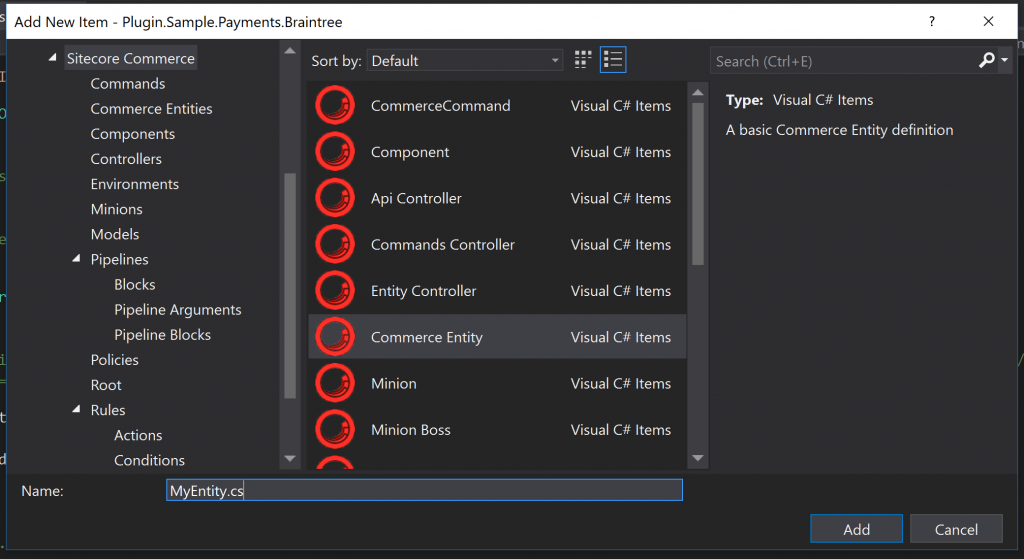
Reading Time: < 1 minuteTo speed up development with Commerce Engine customisations, I have created a library of templates for Visual Studio. This should remove the necessity of referencing the sample commerce engine plugin project or decompiling and cleaning code from certain DLLs just to get to a starting point for your customisations.

The templates can be installed in Visual Studio via the Extensions and Updates or by downloading it from Visual Studio Marketplace: Sitecore Commerce Engine Templates.

Source Code: Sitecore Commerce Engine Class Templates