

1,392 views
In this series of articles, we will go through the process of creating a new Sitecore Commerce Engine plugin from scratch that will eventuate into a complete end-to-end solution. We will touch most of the areas of Sitecore Experience Commerce, demonstrating the flexibility and extensibility of the platform. Our plugin will be the Sitecore Commerce Stores Plugin.
Note: This is intended to be a walk-through guide rather than production-ready, deployable code.
Each article in this series will try to isolate implementation aspects to avoid information overload. We will cover:-
- Part 1 – Creating a New Dashboard Item in the Business Tools
- Part 2 – Creating EntityViews, Actions, and Entities
- Part 3 – Creating a Shard for the Stores Entities and Lists
- More to come…
Creating a New Dashboard Item in the Business Tools
Creating the Navigation View
The Business Tools navigation is created from navigation blocks registered to the IBizFxNavigationPipeline. The naming convention used for navigation blocks is Get<Concept>NavigationViewBlock.
So first up, we create our GetStoresNavigationViewBlock. The structure of the Run method for these blocks is as follows:-
- Ensure mandatory parameters have been provided
- Create the navigation entity view to navigate to the concept dashboard
- Add the navigation view as a child view of the Business Tools Navigation view
- Return the updated Business Tools Navigation view
public override Task<EntityView> Run(EntityView entityView, CommercePipelineExecutionContext context)
{
	// 1. Ensure mandatory parameters have been provided
	Condition.Requires(entityView).IsNotNull($"{Name}: The argument cannot be null.");

	// 2. Create the navigation entity view to navigate to the concept dashboard
	var dashboardName = context.GetPolicy<KnownStoresViewsPolicy>().StoresDashboard;
	var storesDashboardView = new EntityView()
	{
		Name = dashboardName,
		ItemId = dashboardName,
		Icon = Views.Constants.Icons.MarketStand,
		DisplayRank = 6
	};

	// 3. Add the navigation view as a child view of the Business Tools Navigation view
	entityView.ChildViews.Add(storesDashboardView);

	// 4. Return the updated Business Tools Navigation view
	return Task.FromResult(entityView);
}
Referencing the code snippet above, the EntityView‘s Icon property can be set to any of the values for the icon font utilised. See my previous post, EntityView Icons in Sitecore Commerce Business Tools, for reviewing available icons.
The DisplayRank is also a self-explanatory property setting its position amongst the other ChildViews of the Business Tools navigation view.
Next, we register the navigation block in ConfigureSitecore.cs, in the BizFx Navigation Pipeline.
.ConfigurePipeline<IBizFxNavigationPipeline>(pipeline => pipeline
	.Add<Pipelines.Blocks.GetStoresNavigationViewBlock>().After<GetNavigationViewBlock>()
)
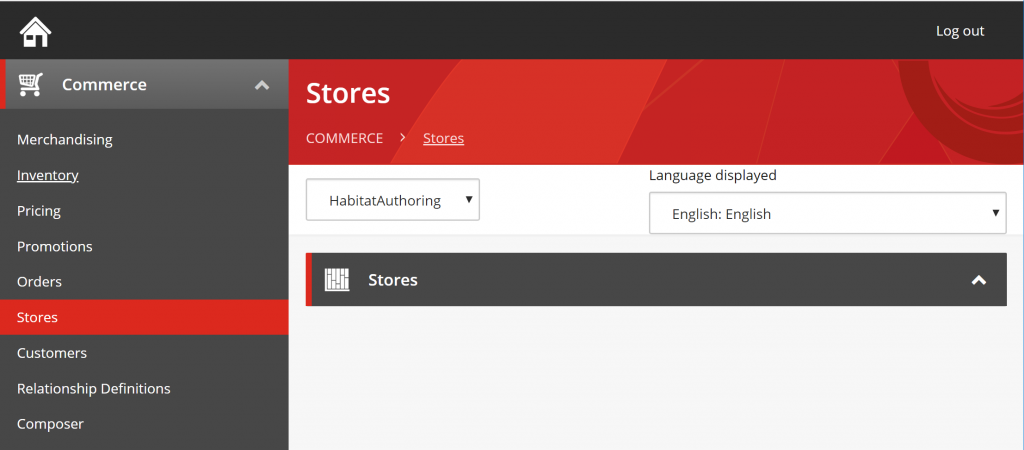
Commerce Dashboard
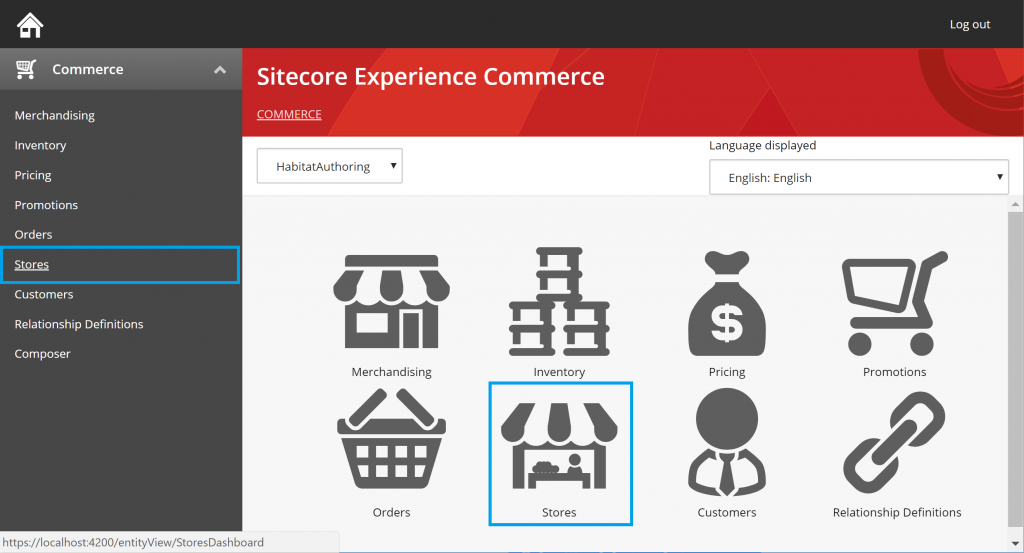
Stores Dashboard
Adding Commerce Terms
Now the Stores navigation item will actually read “StoresDashboard” at this point. We will need to add a commerce term to override the text.
In the Sitecore Content Editor, navigate to /sitecore/Commerce/Commerce Control Panel/Commerce Engine Settings/Commerce Terms/BusinessTools/ViewNames and create a new item StoresDashboard.
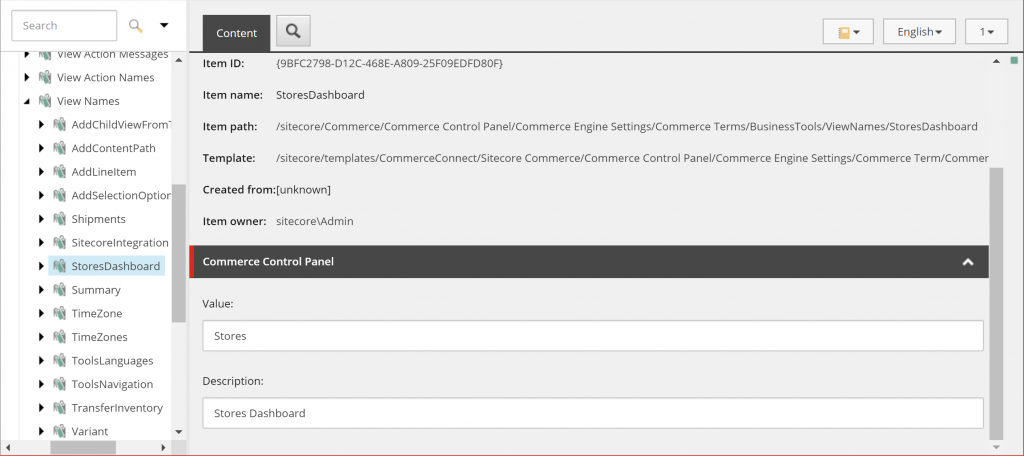
In order to propagate this new data through to the Business Tools we need to run the Ensure/Sync default content paths request from Postman. This will sync the Sitecore content data into the Commerce Engine’s Shared Environments ContentEntities table.
Summary
So we added a new empty dashboard into the Business Tools. There’s nothing really to show but an icon and an empty dashboard view. Not to worry. Continue on to Part 2 – Creating EntityViews, Actions, and Entities (coming soon)
Source Code: Sitecore Commerce Stores Plugin release tag for this article