In this article, we will look at all of the configurations around currency so that we don’t run into any currency related errors when working with the Business Tools in Sitecore Experience Commerce and our storefront website.
Currency Configurations in the Sitecore Content Editor – Commerce Control Panel
In the Sitecore Content Editor,
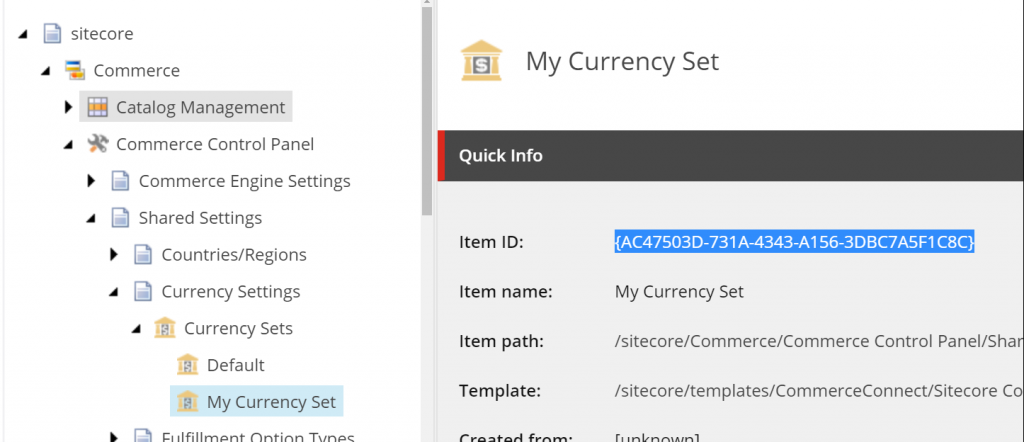
Go to /sitecore/Commerce/Commerce Control Panel/Shared Settings/Currency Settings/Currency Sets/
Create, edit or locate the currency set you wish to utilise
Note the Item ID
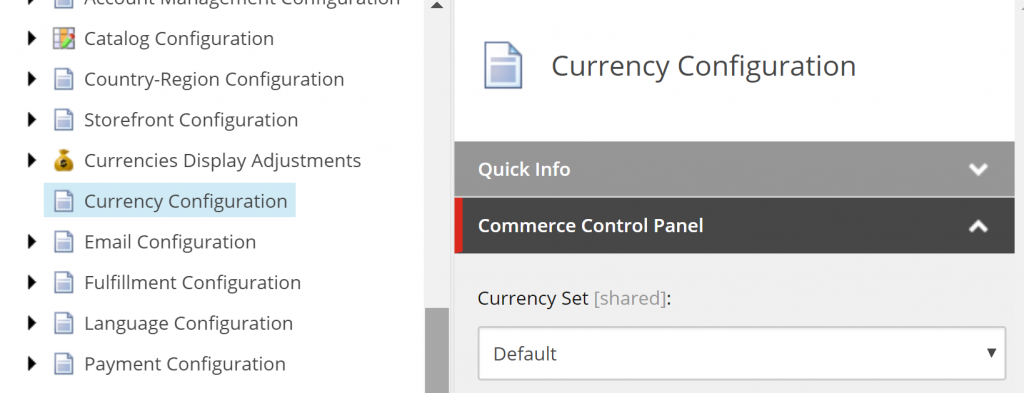
Go to /sitecore/Commerce/Commerce Control Panel/Storefront Settings/Storefronts/<Storefront>/Currency Configuration
Set the Currency Set as desired
Publish any changes made
Currency Configurations in the Commerce Engine Connect Config
In the Sitecore configuration file, <Website Root>\App_Config\Include\Y.Commerce.Engine\Sitecore.Commerce.Engine.Connect.config, the property defaultShopCurrency may need to be updated. Note: It’s best practice to patch out this value rather than updating this configuration file directly to ensure it’s deployed to each environment and that upgrades can be performed without corrupting the website.
Create or update the patch configuration file in your website’s solution with the desired currency value.
Deploy the project/solution
Currency Configurations in BizFx
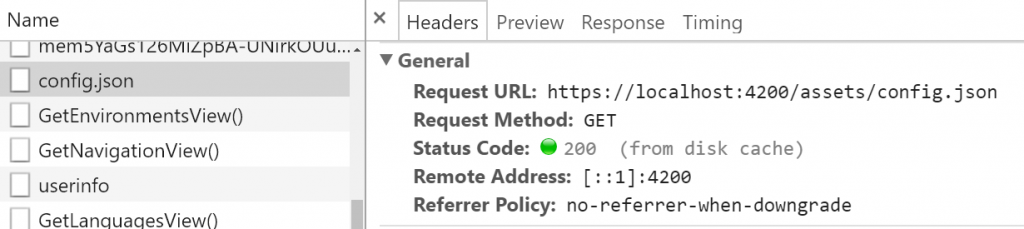
In your BizFx solution, open \assets\config.json and review and edit the Currency value as appropriate
Deploy the BizFx site
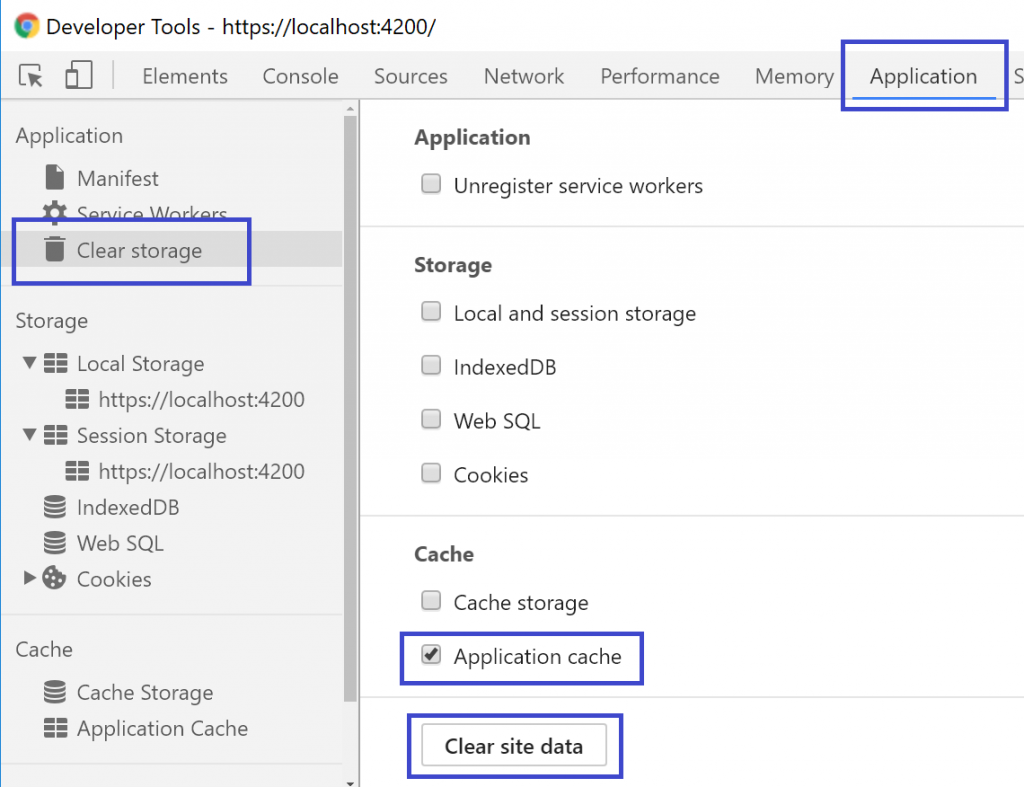
Clear the Application cache in the browser if the config.json file is still being served from disk cache.
Currency Configurations in the Commerce Engine Environment Policies
In the environment configurations, review and edit the following policy properties as appropriate:-
GlobalEnvironmentPolicy -> Default Currency
GlobalCurrencyPolicy -> DefaultCurrencySet (This will be the Sitecore Item ID that you noted from the Commerce Control Panel)
GlobalPhysicalFulfillmentPolicy ->
DefaultCartFulfillmentFees -> CurrencyCode
DefaultCartFulfillmentFee -> CurrencyCode
DefaultItemFulfillmentFees -> CurrencyCode
DefaultItemFulfillmentFee -> CurrencyCode
FulfillmentFees -> Fee -> CurrencyCode
Deploy the Commerce Engine Solution
Run Bootstrap
Currency Configurations in Postman Environment
In the environment configurations set up for the project instances, review and update the Currency value as appropriate.
In this article, we will look at what UI Hints and UI Types are and show samples is each being used within the Business Tools.
Note: This article is a work in progress.
UI Hints
The UI Hints property sets the rendering type for the properties of the entity views and entity action views.
EntityActionView
RelatedList
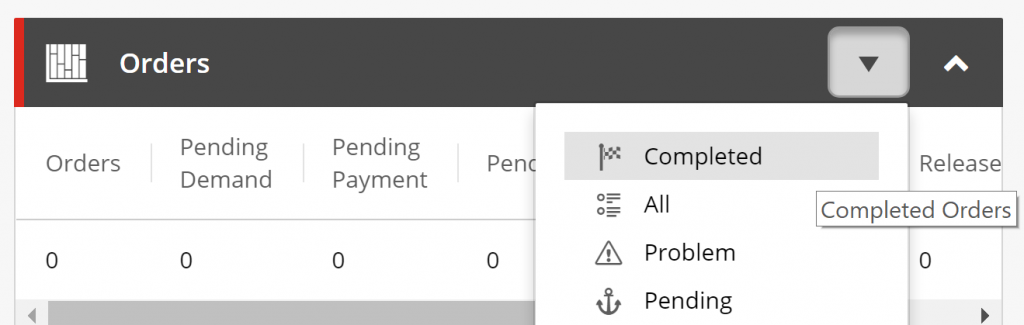
The RelatedListUI Hint is used to redirect the user to an entity view page instead of opening up a modal for user interaction. The entity view page URL is constructed from the EntityView property in the following format <domain>/entityView/<entity view>.
e.g. https://localhost:4200/entityView/OrdersList-CompletedOrders
var actions = entityView.GetPolicy<ActionsPolicy>().Actions;
var entityActionView = new EntityActionView()
{
	Name = "CompletedOrders",
	IsEnabled = true,
	UiHint = "RelatedList",
	EntityView = "OrdersList-CompletedOrders",
	Icon = "signal_flag_checkered"
}
actions.Add(entityActionView);
EntityView
The following list of UI Hints can be utilised for entity views.
The default UI Hint for entity views is Flat. The hint is used for rendering a single set of properties as plain text.
Entity View Usage
Supported
Applicable UI Types
Page
Yes
N/A (All types will render as raw string values)
Modal
Yes
Empty (string) Text
Empty (bool) Checkbox
Empty (DateTimeOffset)
AutoComplete
DownloadCsv
Multiline
RichText
SelectList
Tags
Grid
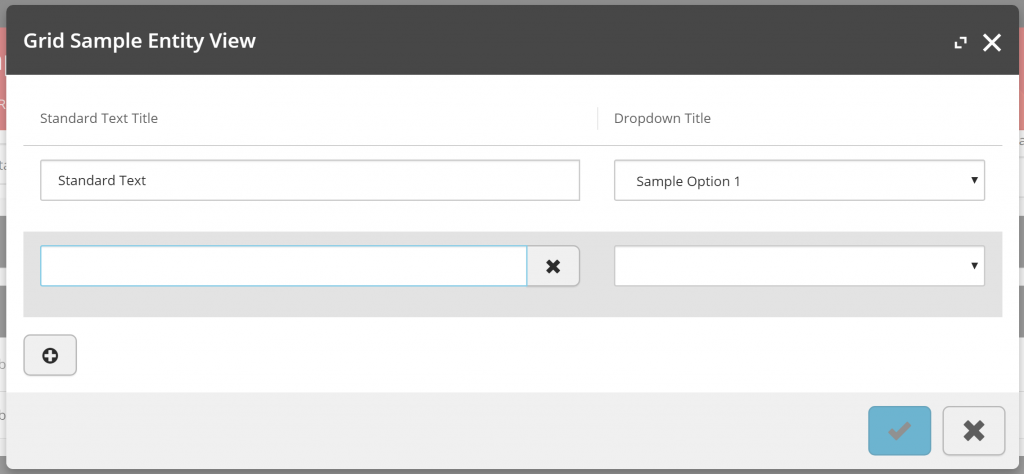
The GridUI Hint supports the rendering of child entity views in a table-row layout in the modal window, allowing additional rows to be added and removed.
Notes:
The DropdownUI Type does not apply the remove row control, therefore if all view properties of the row are set to Dropdown the row will not be able to be removed.
Only a single child entity view is supported as the UI renders a single Add Row button, which applies to the first child entity view.
Omitting the “AllowAdd”ViewProperty will exclude the Add Row button from the Grid.
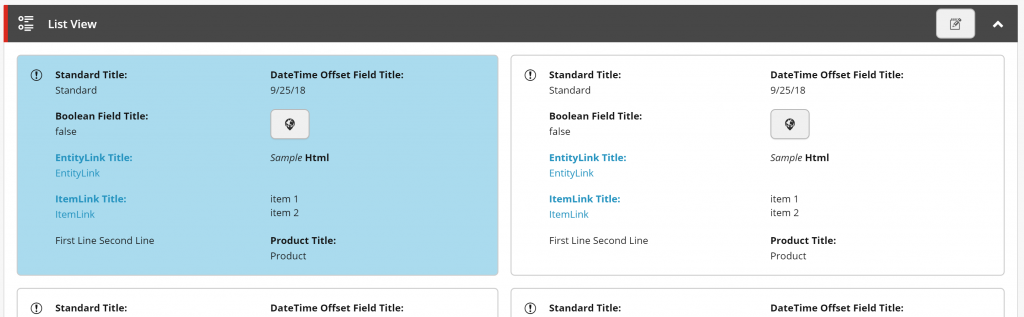
The ListUI Hint creates a card-like layout, each list item represented by a child entity view containing properties of supported UI Types.
Entity View Usage
Supported
Applicable UI Types
Page
Yes
Empty (String)
Empty (DateTimeOffset)
Empty (Decimal)
Empty (Sitecore.Commerce.Core.Money)
DownloadCsv
EntityLink
FullDateTime
Html
ItemLink
List
Multiline
SubItemLink
Modal
No
N/A
MediaPicker
Details to come.
Entity View Usage
Supported
Applicable UI Types
Page
No
N/A
Modal
Yes
???
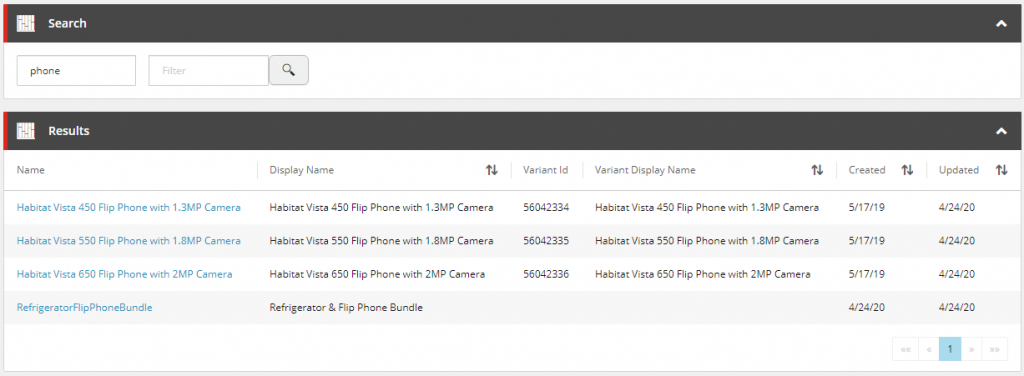
Search
The Search UI Hint is an implicit implementation driven by the GetSearchViewBlock, based on the SearchViewPolicies configured for the environment.
The current request’s view name is used to retrieved the corresponding SearchViewPolicy by its ViewName property and will use the SearchScopeName to resolve the SearchScopePolicy for the search queries of the control. Where a SearchScopePolicy has been resolved, the Search entity view will be added to the page, and upon execution of the search control the Results entity view will be added without any additional configuration or implementation.
Notes:
An EntityType is also specified in the SearchViewPolicy for the InventorySet as additional validation for the generic ‘Master’ entity view name that is utilised by all entity types.
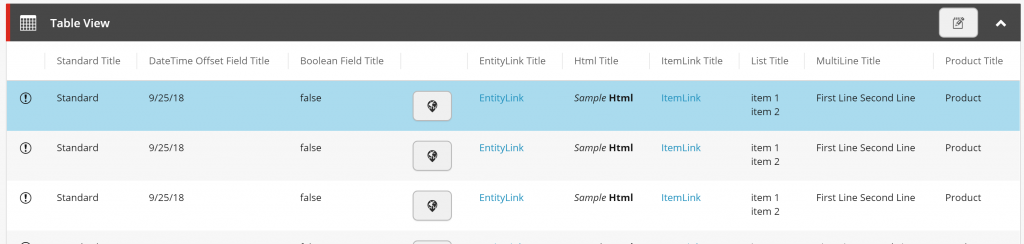
Similar to the ListUI Hint, the TableUI Hint creates a table-row layout, each list item represented by a child entity view containing properties of supported UI Types.
Entity View Usage
Supported
Applicable UI Types
Page
Yes
Empty (String)
Empty (DateTimeOffset)
Empty (Decimal)
Empty (Sitecore.Commerce.Core.Money)
DownloadCsv
EntityLink
FullDateTime
Html
ItemLink
List
Multiline
SubItemLink
Modal
No
N/A
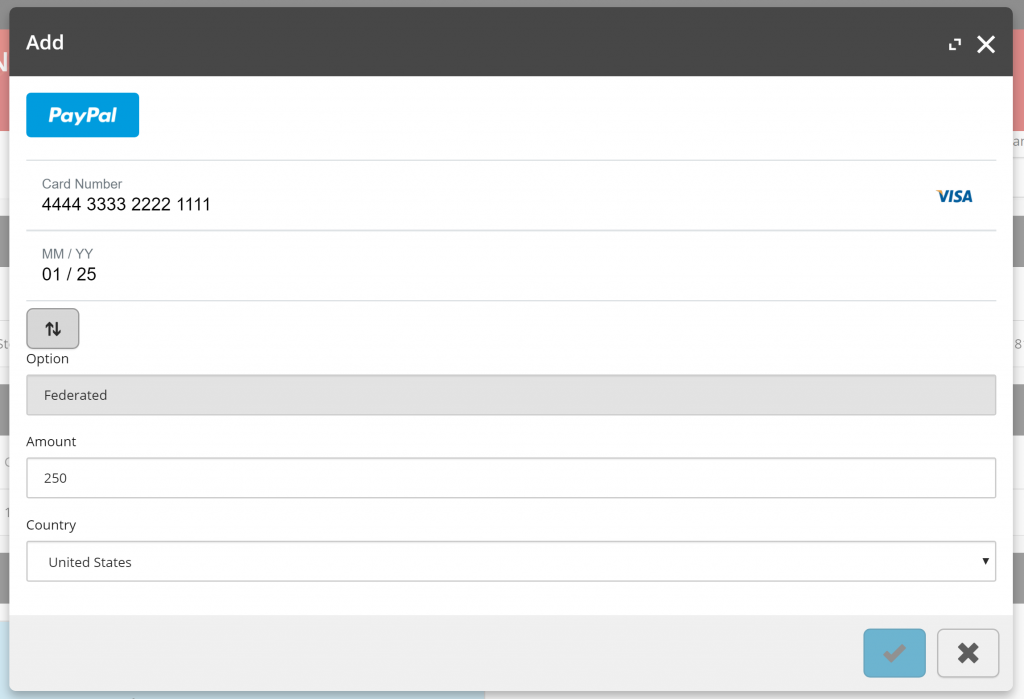
BraintreePayment
The BraintreePaymentUI Hint is utilised to handle adding braintree payments. It injects an iframe to manage payment information via the Braintree gateway, but otherwise provides similar support as the default FlatUI Hint for view property rendering.
Notes:
This UI Hint is intended for sole use with the Braintree payment integration and not for general use.
Entity View Usage
Supported
Applicable UI Types
Page
No
N/A
Modal
Yes
Empty (string) Text
Empty (bool) Checkbox
Empty (DateTimeOffset) Date Time picker
AutoComplete
DownloadCsv
Dropdown
Multiline
RichText
Tags
UI Types
The UI Types property sets the control type that will be rendered against entity views.
View Property
The following list of UI Types can be utilised for view properties.
When no UI Type is provided, the UI control rendered is based off of the data type that is set against the RawValue property of the ViewProperty. The data types that influence the controls rendered are as follows:-
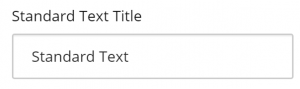
String
The default data type is the String value, which will render a text field. Most data types will fallback to their raw string value when evaluated.
var viewProperty = new ViewProperty()
{
	Name = "Standard Text Title",
	RawValue = "Standard Text"
};

entityView.Add(viewProperty);
Boolean (Checkbox)
Boolean values will be rendered as checkboxes for supported UI Hints, otherwise rendering as a string value.
var viewProperty = new ViewProperty()
{
Name = "Boolean Field Title",
RawValue = false
};
entityView.Add(viewProperty);
<!-- /wp:html -->
<!-- wp:heading {"level":5} -->
<h5 id="datetimeoffset">DateTimeOffset (Date Time Picker)</h5>
<!-- /wp:heading -->
<!-- wp:paragraph -->
<p><strong>DateTimeOffset</strong> values will be rendered as jQuery Date Time pickers for supported <em>UI Hints</em>, otherwise rendering as a string value.</p>
<!-- /wp:paragraph -->
<!-- wp:paragraph -->
<p><strong>Note:</strong> <em>ReadOnly</em> mode is not supported for this control. <em>(Confirmed up to XC 9.1)</em></p>
<!-- /wp:paragraph -->
<!-- wp:image {"id":327} -->
<figure class="wp-block-image"><img src="/wp-content/uploads/2018/10/uitype-datetimepicker-1-300x71.png" alt="" class="wp-image-327"/></figure>
<!-- /wp:image -->
<!-- wp:html -->
var viewProperty = new ViewProperty()
{
Name = "Date Time Offset Field Title",
RawValue = DateTimeOffset.Now
};
entityView.Add(viewProperty);
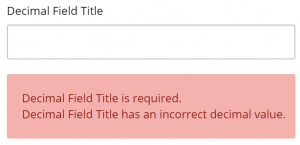
Decimal
Decimal values will render an input field with appropriate validation.
var viewProperty = new ViewProperty()
{
	Name = "Decimal Field Title",
	RawValue = (decimal)0.0
};
entityView.Add(viewProperty);
Autocomplete
Search control that auto-completes after 4 characters. Can be combined with a policy to configure what it searches for.
var searchScopePolicy = SearchScopePolicy.GetPolicyByType(context.CommerceContext, context.CommerceContext.Environment, typeof(SellableItem));
var policy = new Policy()
{
	PolicyId = "EntityType",
	Models = new List<Model>()
	{
		new Model() { Name = "SellableItem" }
	}
};
var policyList = new List<Policy>() { searchScopePolicy, policy };

var viewProperty = new ViewProperty()
{
	Name = "Autocomplete Title",
	UiType = UiTypes.Autocomplete,
	Policies = policyList
};
DownloadCsv
Used for the coupon CSV download control.
var items = new List<string>() { "item1", "item2" };
var viewProperty = new ViewProperty()
{
	Name = "DownloadCsv Title",
	UiType = UiTypes.DownloadCsv,
	RawValue = new JArray(items.Select(item => new JObject()
	{
		{
			"Code",
			item
		}
	})).ToString()
};

entityView.Add(viewProperty);
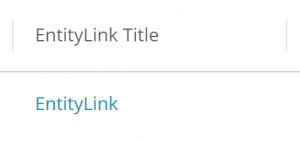
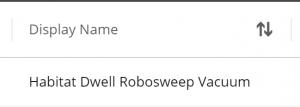
EntityLink
Allows linking directly to an entity. It will render a HTML link and build a URL to the Entity using the entity view’s ItemId property in the following format <domain>/entityView/Master/<entity version>/<item id>.
e.g. https://localhost:4200/entityView/Master/1/Entity-Catalog-Habitat_Master
var entityView = new EntityView()
{
	ItemId = "Entity-Catalog-Habitat_Master"
};

var viewProperty = new ViewProperty()
{
	Name = "EntityLink Title",
	UiType = "EntityLink",
	EntityVersion = 1
};

entityView.Add(viewProperty);
FullDateTime
Renders date and time in short format.
var viewProperty = new ViewProperty()
{
	Name = "FullDateTime Title",
	UiType = "FullDateTime",
	RawValue = DateTimeOffset.Now
};

entityView.Add(viewProperty);
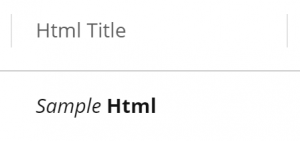
Html
Renders value as html.
var viewProperty = new ViewProperty()
{
	Name = "Html Title",
	UiType = "Html",
	RawValue = "<i>Sample</i> <b>Html</b>"
};

entityView.Add(viewProperty);
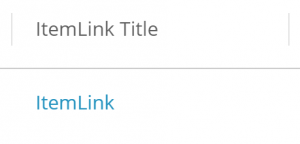
ItemLink
Creates a URL link in the format <domain>/entityView/<entity view name>/<Entity Version>/<entity id>/<item id>.
e.g. https://localhost:4200/entityView/Variant/1/Entity-SellableItem-6042567/56042567
var entityView = new EntityView()
{
	EntityId = "Entity-SellableItem-6042567",
	ItemId = "5604257",
	Name = "Variant",
	EntityVersion = 1
};

var viewProperty = new ViewProperty()
{
	Name = "ItemLink Title",
	UiType = "ItemLink"
};

entityView.Add(viewProperty);
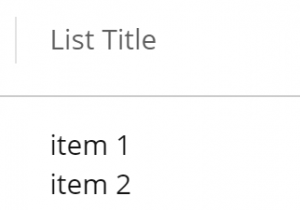
List
Typically used to render a combobox. If it has an AvailableOptionsPolicy it well render as a combo with those as options.
var viewProperty = new ViewProperty()
{
	Name = "List Title",
	UiType = "List",
	RawValue = new String[] { "item 1", "item 2" }
};

entityView.Add(viewProperty);
MultiLine
Multiline text editor.
var viewProperty = new ViewProperty()
{
	Name = "MultiLine Title",
	UiType = "MultiLine",
	RawValue = "First Line\nSecond Line"
};

entityView.Add(viewProperty);
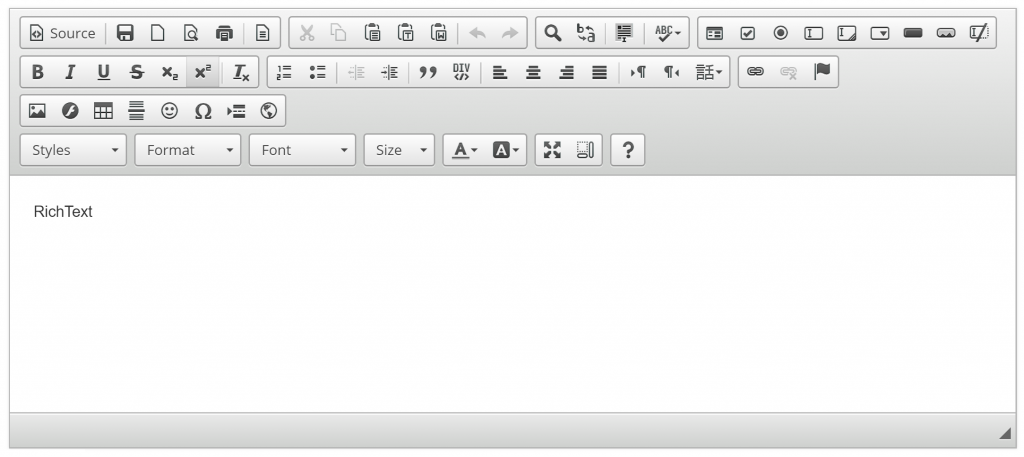
RichText
WYSISWYG Rich text editor.
var viewProperty = new ViewProperty()
{
	Name = "RichText Title",
	UiType = "RichText"
};

entityView.Add(viewProperty);
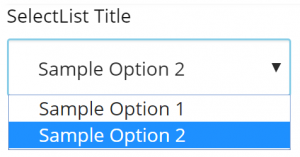
SelectList
Renders a dropdown control. The list of options must be defined via the AvailableSelectionsPolicy. This behaves the save as Dropdown and OptionsUI Types.
var viewProperty = new ViewProperty()
{
	Name = "SelectList Title",
	UiType = "SelectList"
};

var availableSelectionsPolicy = new AvailableSelectionsPolicy();
availableSelectionsPolicy.List.Add(new Selection() { DisplayName = "Sample Option 1", Name = "Option 1" });
var selection = new Selection() { DisplayName = "Sample Option 2", Name = "Option 2", IsDefault = true };
availableSelectionsPolicy.List.Add(selection);
viewProperty.Policies = new List<Policy>() { availableSelectionsPolicy };
viewProperty.RawValue = viewProperty.GetPolicy<AvailableSelectionsPolicy>().List.Where(s => s.IsDefault).FirstOrDefault()?.Name ?? string.Empty

entityView.Add(viewProperty);
Sortable
Used when rendering table headers to signify that they’re sortable.
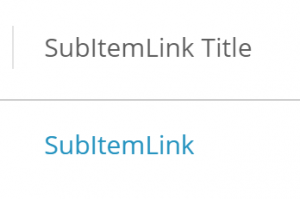
SubItemLink
Similar to the ItemLink, the SubItemLink creates a URL link in the format <domain>/entityView/<entity view name>/<entity version>/<item id [0]>/<item id [1]>, splitting the ItemId by the pipe separator. This UI Type is used when referencing entities differing from the current entity view.
e.g. https://localhost:4200/entityView/Variant/1/Entity-SellableItem-6042567/56042567
var entityView = new EntityView()
{
	ItemId = "Entity-SellableItem-6042567|5604257",
	Name = "Variant"
};

var viewProperty = new ViewProperty()
{
	Name = "SubItemLink Title",
	UiType = "SubItemLink",
	EntityVersion = 1
};

entityView.Add(viewProperty);
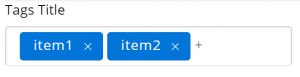
Tags
Renders jQuery tag control.
var viewProperty = new ViewProperty()
{
	Name = "Tags Title",
	UiType = UiTypes.Tags,
	RawValue = new String[] { "item1", "item2" },
	OriginalType = UiTypes.List
};

entityView.Add(viewProperty);
Summary
We have reviewed the various UI Hints and UI Types that are available to us for customising the Business Tools and the instances where they are applicable.