Transitioning from Sitecore Experience Commerce to OrderCloud: Order Workflow and Minions

Reading Time: 8 minutes

In this article, we will review and compare the order workflows between Sitecore Experience Commerce and OrderCloud to facilitate developers looking to transition from XC to OrderCloud as well as identify a path for migration of existing XC solutions to OrderCloud. We will also review minions from XC and how this these processes can be brought over into OrderCloud to facilitate order workflow automation.

We will look at a high-level comparison of architecture, functionality, and data models, where applicable, with greater focus on transitioning from Sitecore Experience Commerce, meaning identifying a close path to parity in OrderCloud, using the Habitat catalog and SXA Storefront.

Order Workflow

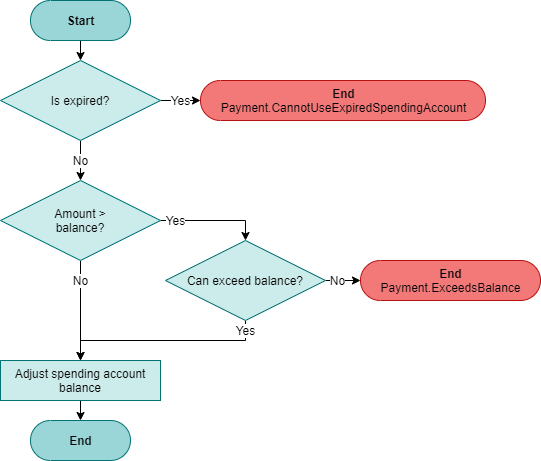
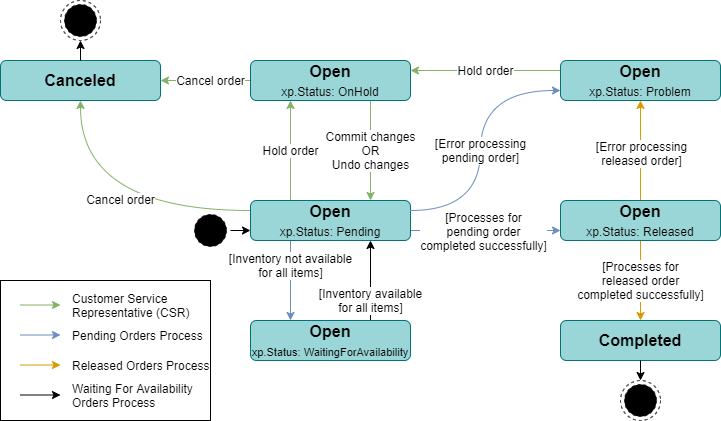
In XC, the default order workflow demonstrates the capabilities of post-order placement processing where order status transitions are achieved through manual intervention or automated processes (minions). It is intended to be extended and customised to cater for the unique business requirements of each project.

While figure 1 represents the default order workflow, XC can be customised to create or remove order statuses, and create or remove the triggers that transition an order between statuses, e.g. manual intervention via business users (customer service representatives) or automated processes such as minions.

Figure 1: XC’s order status workflow.

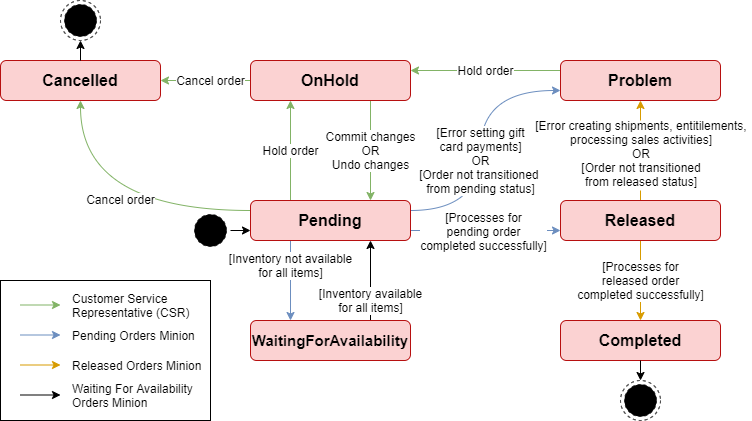
To provide clarity regarding each order status, XC’s definitions are:

  • Pending: Initial order state – order paid, no fulfillment.
  • OnHold: Prevents order from being progressed by minions. Customer service representatives may modify, line items, payments, shipments, etc.
  • WaitingForAvailability: One or more items in the order are not available. This status is expected for items on backorder or preorder.
  • Released: Intended status for indicating the order passed validation and is ready for shipping. It is also typically used in customisations to the workflow to indicate the order has been exported to an external order management system (OMS).
  • Problem: An order that has an unexpected status when processed by minions. Manual intervention by customer service representatives is available to transition the order back into a state to be picked up my the minions again, however this typically indicates a bug within custom implementations, which requires developer intervention.
  • Completed: Order has been shipped, has had entitlements generated, and has nothing left to process. Complete orders are eligible for the return mechandise authorisation (RMA) processes.
  • Cancelled: Order has been cancelled and can no longer be processed by minions or customer service representatives.

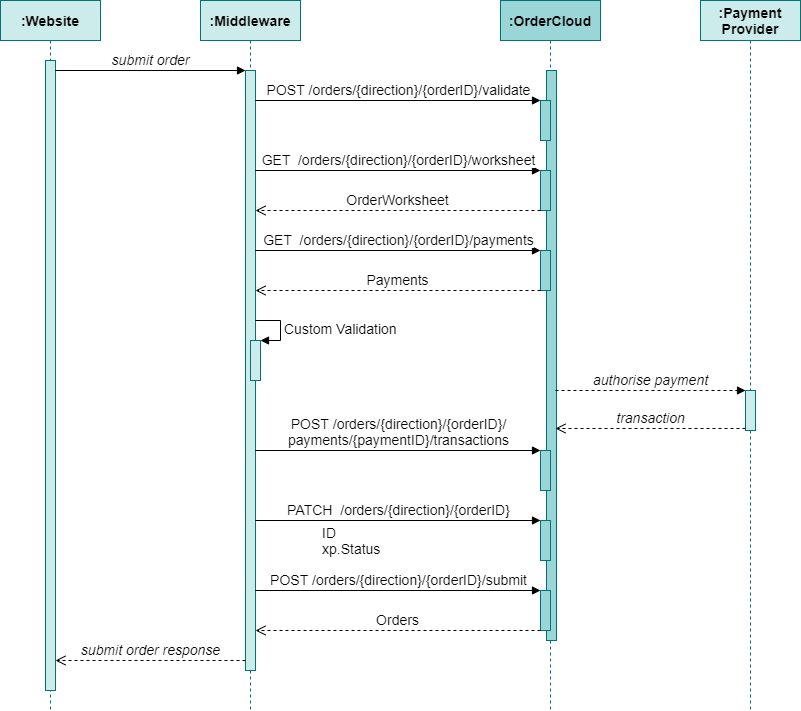
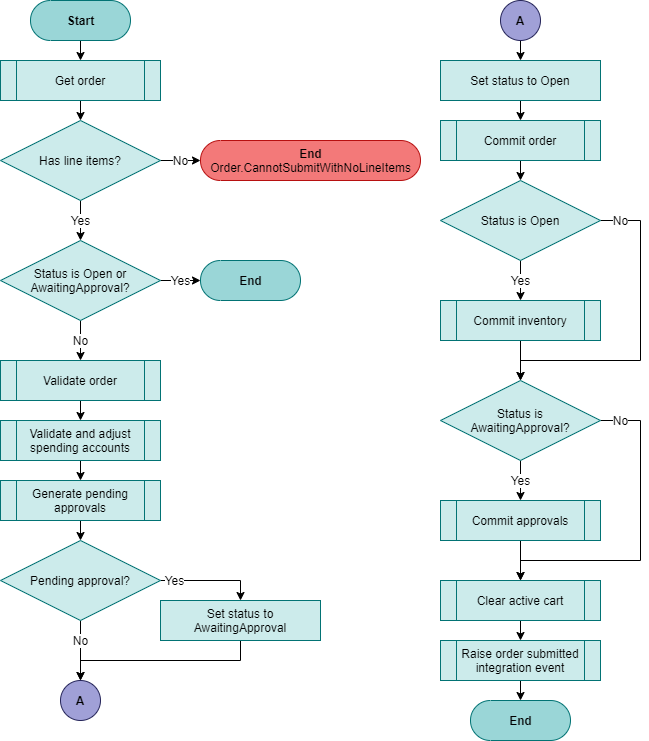
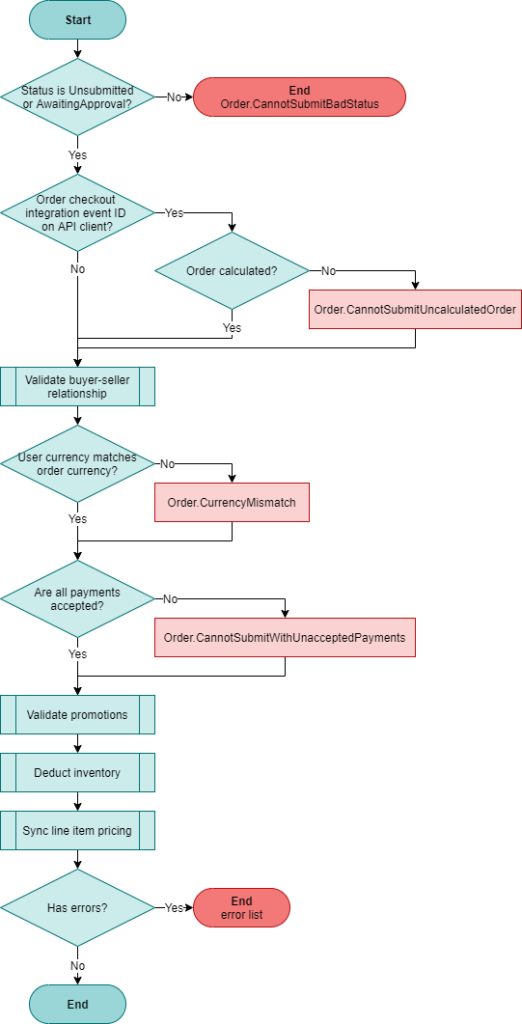
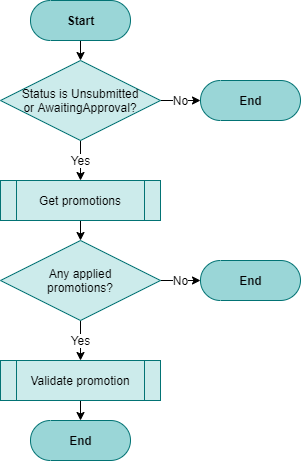
In OrderCloud, the order status workflow differs to XC’s in that order submission can include an approval process, which is typically a B2B order scenario, while the post-order placement workflow for order status transitions is minimal, as per figure 2.

To implement a custom order workflow, we will cover an approach below in Custom Order Status in OrderCloud.

Figure 2: OrderCloud’s order status workflow.

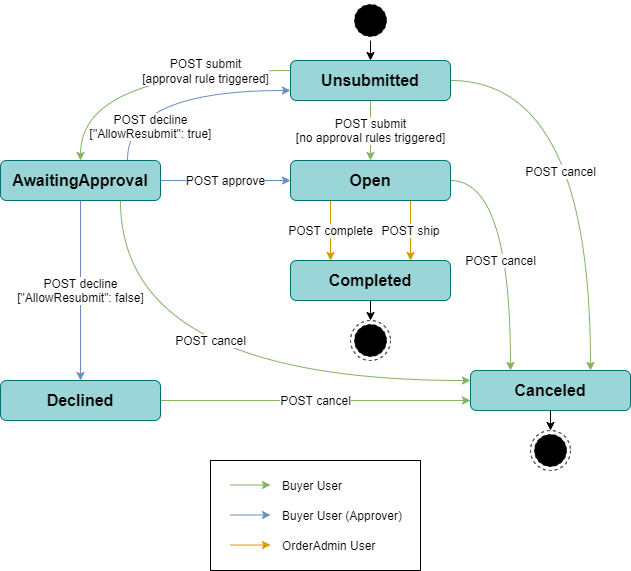
OrderCloud’s order status definitions are:

  • Unsubmitted: Created but has not yet been submitted.
  • Open: Submitted but not yet fulfilled.
  • AwaitingApproval: On hold awaiting approval.
  • Declined: Submitted but has been declined.
  • Completed: Submitted and all the line items on the order have been shipped.
  • Canceled: Order can no longer be submitted.

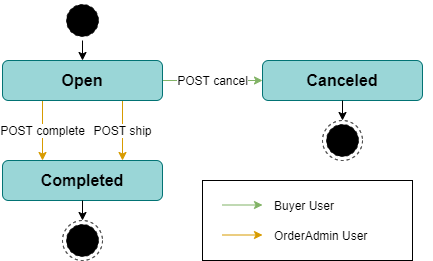
Removing the order statuses for approval and the cart equivalent “Unsubmitted” status, we see that OrderCloud simply transitions between Open (XC’s Pending) and Completed or Canceled statuses.

Figure 3: OrderCloud’s order status workflow (XC equivalent).

Custom Order Status in OrderCloud

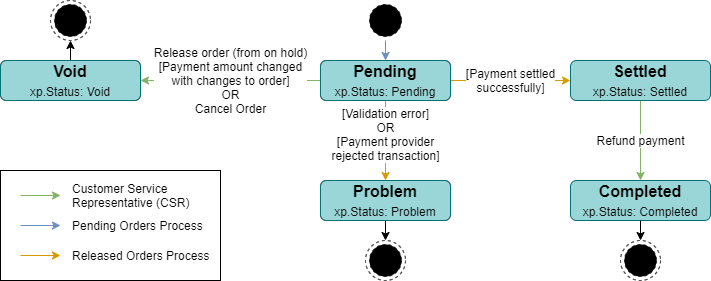
To achieve an XC equivalent order workflow in OrderCloud, the missing order statuses may be introduced under OrderCloud’s Open status, using xp to represent the custom status. Typically, this would be achieved by PATCHing the order’s xp, using either middleware as a proxy to support wrap OrderCloud API endpoints with custom logic, or have middleware perform validation via pre-hook webhooks to prevent invalid status transitions.

There is no restriction in modifying the workflow or introducing new statuses via xp, only considerations for ensuring that the workflow transitions from end-to-end as intended.

Figure 4: The XC workflow equivalent in OrderCloud.

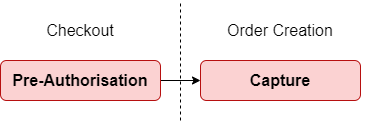
Transaction and Payment Status

We previously have covered the payment concepts between XC and OrderCloud in Tax and Payments, but what we didn’t cover was the statuses that belong to these entities and how they can be utilised in the SXA storefront.

For Sitecore Experience Commerce, the federated payment components have a TransactionStatus property, which is intended on tracking the raw statuses specific to the payment provider. They are typically used only for transparency and reconciliation purposes, rather than driving business logic in XC.

Figure 5: The default workflow for transaction status of federated payments.

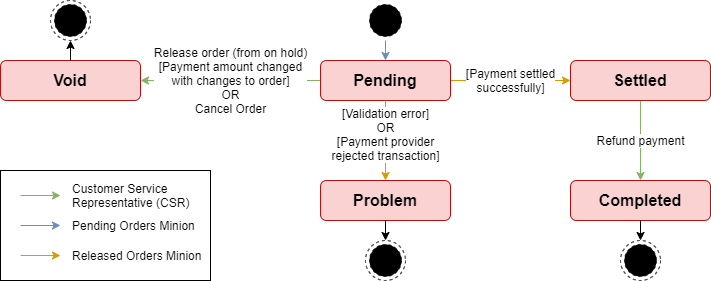
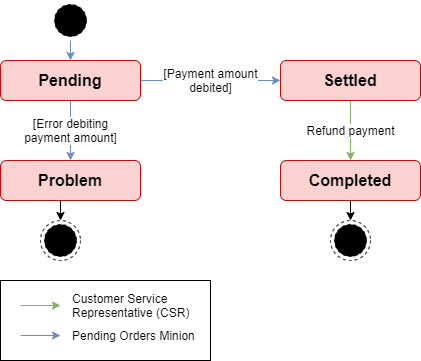
Sales activities have a PaymentStatus property, which also is intended on tracking the transaction status in a more agnostic fashion by reducing payment provider statuses to more generic status buckets, which can then be used to influence business logic. In Order Workflow, figure 1 shows that the payment status affecting the order status, namely by placing an order into a problem state where the payment status is set as Problem.

Figure 6 and 7 shows the workflows for payment sales activities in XC, which modifies existing sales activity for subsequent transactions, hence representing as transitions, however this is commonly customised to create a separate sales activity per transition for a complete historical view of events and reconciliation reporting.

Figure: 6: The default workflow for payment status of federated payments.
Figure 7: The default workflow for payment status of gift cards.

Translating XC’s payments over to OrderCloud payments resources, we see that transactions have the ResultCode property, which could be considered the equivalent to XC’s payment status, while XC’s transaction status could be stored on the payment’s xp. Looking at the payments resource in OrderCloud however we see that the intended architecture for transactions is to track each transaction for a payment rather than updating the its status, as the transactions can be created or deleted, but not updated.

Rather than porting XC’s architecture over to OrderCloud directly, there are some improvements we could introduce to reduce the complexity of the overall solution, which includes the business logic used in the order workflow and not just recreating the payment entities like for like. For example, if we treat transactions as a snapshot in time for a given payment, rather than a dynamic object representing only the most recent transaction, the ResultCode would probably be better can be used for the raw transaction status given by the payment provider.

Figure 8: Transaction ResultCode (status) workflow. Each status will be represented by its own transaction.

For the overall payment status, we can use the payment’s xp to maintain the most recent transaction status in a normalised form, agnostic of payment provider, which would simply be translated as part of the payment provider integration.

Figure 9: Payment status workflow example in OrderCloud.

Order Minions

Order minions are background jobs that process all orders in a given status to either perform some function on and/with the order, before transitioning it to its next status.

Pending Orders Minion

The pending orders minion is a shell for processing orders fresh from being placed. It is expected to be customised to fit each project’s requirements, and can be thought of as an extension of the create order process, delegated with performing asynchronous activities in a separate Commerce Engine running the minions role, which typically would run on dedicated resources. This is to mitigate any performance impacts on the Commerce Engine instance(s) running the shops role, which serves the storefront’s live traffic.

The pending order minion will usually be extended with processes such as exporting the order to an order management system (OMS), sending an order invoices via an email service provider, generating gift cards, activating subscriptions, and more.

In OrderCloud, we will review the order submit integration event and batch order processing approaches to process pending orders.

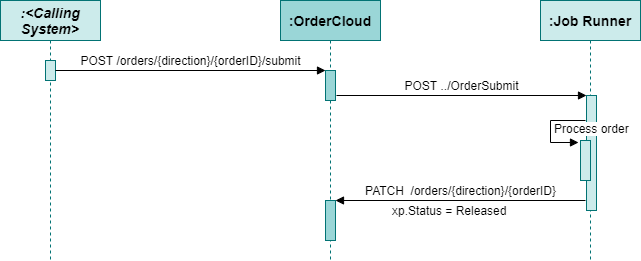
Order Submit Integration Event

The order submit integration event is a non-blocking asynchronous call from OrderCloud, calling a job runner application, allowing an order to be processed immediately without blocking the storefront/buyer application. The job runner application, in this case, will update the order’s custom status in the xp, so that other automated jobs can process the order appropriately within the order workflow.

Third party integrations, such as Azure Service Bus, may further faciliate mitigating transient issues, increase resilience, and offload processing power from the job runner application.

Figure 10: Order submit integration event.

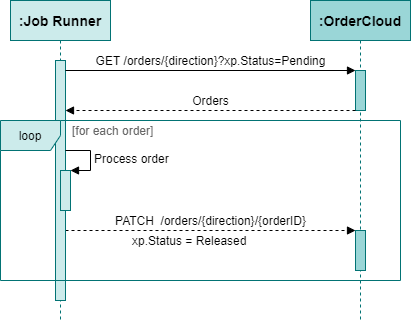
Batch Order Processing

An alternate approach to integration events for processing orders is batch jobs, which is more closely aligned to pending orders minion behaviour, by leveraging the custom order status in the order xp and the ElasticSearch backed premium search for orders.

Figure 11: Batch processing pending orders.

Released Orders Minion

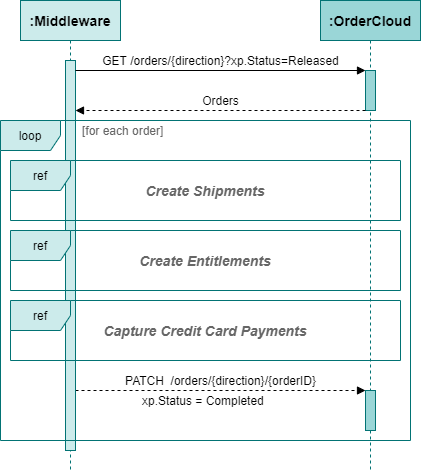
The released orders minion processes orders in the released state by creating shipments against the order, generating entitlements, capture payments, then transition the order into a completed state as depicted in figure 12. We don’t need to bring over fault pipeline blocks, and as discussed in Orders – Shipments, we will be able to fold the shipment generation together.

Figure 12: A comparison of XC’s released order process and an equivalent approach in OrderCloud.

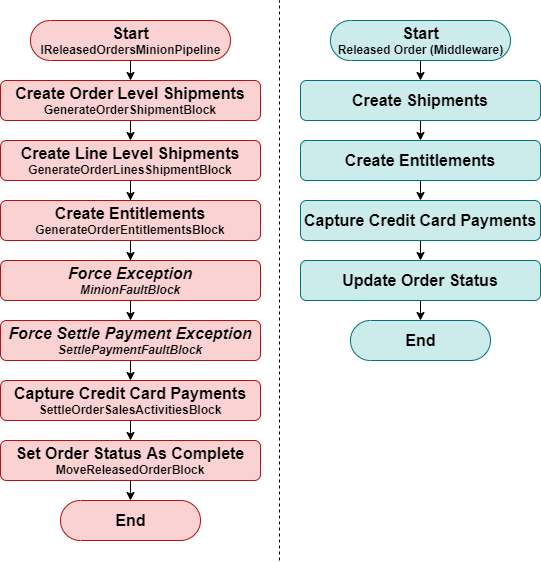
To replicate the released orders minion in OrderCloud, we would need to follow the batch processing orders approach as described for the pending order minion equivalent behaviour.

While it might seem that the pending orders minion and released orders minion should be folded into a single process, the intention behind segregating these order states into separate processing jobs is due to the expected customisations, which may see manual triggering/transitioning or delayed processing between order states that will be considered against the project’s business requirements.

Figure 13: Batch processing released orders.

Waiting For Availability Orders Minion

The waiting for availability order minion simply iterates over orders in registered to the WaitingForOrders list and determines if all products on the order have availability, in which they are returned to the Pending status/list. It is intended to support back-order and preorder scenarios, however as these features aren’t completely functional, customisation is required to complete the implementation and cater for any unique business requirements.

Pre-order and backorder inventory features are not natively supported in OrderCloud and as XC’s implementation is also incomplete, we won’t cover how to port this across in detail, only to highlight that we can leverage the same batch processing approach we have already outlined as a framework for implementing this as an automated job.

References

Continue the Series

  1. Transitioning from Sitecore Experience Commerce to OrderCloud: Customers to Buyer Users
  2. Transitioning from Sitecore Experience Commerce to OrderCloud: Customers and Buyers – API Access
  3. Transitioning from Sitecore Experience Commerce to OrderCloud: Catalogs and Categories
  4. Transitioning from Sitecore Experience Commerce to OrderCloud: Sellable Items To Products
  5. Transitioning from Sitecore Experience Commerce to OrderCloud: Inventory and Pricing
  6. Transitioning from Sitecore Experience Commerce to OrderCloud: Carts to Unsubmitted Orders and Carts
  7. Transitioning from Sitecore Experience Commerce to OrderCloud: Fulfillments to Shipping
  8. Transitioning from Sitecore Experience Commerce to OrderCloud: Tax and Payments
  9. Transitioning from Sitecore Experience Commerce to OrderCloud: Orders
  10. Transitioning from Sitecore Experience Commerce to OrderCloud: Order Workflow and Minions
  11. Transitioning from Sitecore Experience Commerce to OrderCloud: Promotions

Transitioning from Sitecore Experience Commerce to OrderCloud: Orders

Reading Time: 10 minutes

In this article, we will review and compare orders and related features between Sitecore Experience Commerce and OrderCloud to facilitate developers looking to transition from XC to OrderCloud as well as identify a path for migration of existing XC solutions to OrderCloud.

We will look at a high-level comparison of architecture, functionality, and data models, with greater focus on transitioning from Sitecore Experience Commerce, meaning identifying a close path to parity in OrderCloud, using the Habitat catalog and SXA Storefront.

Conceptual Architecture and Features

Journalling (Auditing)

The journalling functionality in XC takes a snapshot of an entity when it is persisted as a means of effectively producing a change log against the entity for auditing and historical purposes. The entities are registered to the commerce role configuration under the EntityJournalingPolicy, and only the order entity is registered to the policy as part of the habitat role configurations by default.

While OrderCloud does not currently expose its logs via the API, two approaches for implementing audit logs are webhooks and middleware proxy requests, both of which require a custom database to store the audit snapshots.

The Webhook Approach

While webhooks may turn out to be sufficient for your auditing requirements, there are considerations to be aware of to ensure that you don’t get caught out with these gotchas.

Regardless if you choose to use pre-hooks or post-hooks, OrderCloud may touch multiple entities within a single request that could impact the completeness of the implementation, leading to the inability for complete reconciliation and may be mistaken as data corruption.

The post-hook webhooks will forward on OrderCloud’s response and user token to the webhooks url (typically the middleware), The user token can be parsed to retrieve information about the user making the request.

Note: Assignment requests return a response code of 204 and an empty body. The assignment model will not be available in these requests.

The pre-hook webhooks on the other hand, capture the request body, however creating a log at this point would be premature as the OrderCloud API will typically rollback or not commit changes until the request has been fully validated and processed. Pre-hooks are also a blocking process, which will lead to performance impacts on your solution.

The Middleware Proxy Approach

Using middleware as a proxy for all OrderCloud requests that will have auditing attached may provide the most complete approach but may also come with the most complexity and performance implications.

The proxy request in middleware doesn’t mean you are limited to only calling the OrderCloud API in question, but can provide the opportunity to retrieve the entity prior to making changes, and then retreiving the entity after changes have been made for endpoints such as any PATCH endpoint, which doesn’t return the entity in the response. While this may seem great, you will be facing performance implications, which can only be managed through asynchronous calls to an extent. It is also possible to cater for multiple entities being touched in OrderCloud with this approach, but again will have performance implications.

Entitlements

In XC, entitlements can be considered as a product classification that typically represents a sellable item as a trackable unit of ownership or license, which may change from customer or ambient activity, such as redemptions or expiry. Upon purchase of a sellable item with an entitlement classification, the Commerce Engine will create an specialised entitlement commerce entity, which can then be further customised for extended functionality. for the spei include gift cards, installations, warrranties, services and subscriptions.

Figure 1: Entitlement creation from order.

The entitlements are created with entity references to the order and the customer entities, while the order and customer entities are also updated with entity references back to the entitlements to form two-way relationships.

Figure 2: Entitlement architecture in XC.

As OrderCloud does not have any native support for entitlements, we are still able to support this feature via customisation with considerations in mind. Most importantly, xp for any given entity is limited to 8000 bytes, therefore storing all entitlement data directly on the buyer user’s xp could see the character limit be exceeded over time as more entitlements are created for the buyer user. Instead, a third-party database, such as Cosmos DB, can be utilised to store the entitlement data, while only storing the reference id of the entitlement record against the buyer user’s xp, minimising the required xp storage.

Figure 3: Entitlement architecture in an OrderCloud solution.

Shipments

In Fulfillment to Shipping, we covered the fulfillment components and shipping estimates that are applied to orders to gather fulfillment information during the storefront checkout delivery step. Post order-placement, the actual fulfillment of the order may or may not be in alignment with representation of fulfillment in the storefront and can be controlled via customisation. For example, the shipping details may have been collected for the entire order and a flat fee charged, however business processes may see the order be fulfilled across multiple shipments. Any variance to actual shipping costs from the estimates would typically not be reconciled with the customer.

XC provides the shipment commerce entity and, as part of the Released Orders Minion, will generate a shipment for the order or for each line item, respective to whether cart-level or cart line-level fulfillments were applied to the cart during the checkout steps.

Figure 4: XC shipments for cart-level and cart line-level fulfillments.

In OrderCloud, shipment flexibility is increased as shipments are not bound to the ship estimates, like XC’s shipments to physical fulfillments. Shipments can be created against the entire order or a subset of line items with support for partial quantity fulfillment.

Figure 5: OrderCloud shipments for order-level and line-level fulfillments do not have to align to ship estimates.

Return Merchandise Authorisation (RMA)

RMAs in the Commerce Engine are another partial implementation to get faciliate development by providing the foundation. This is commonly an area of customisation to allow RMAs to fit with the business processes, e.g. restricting returns on certain items, calculating refunds, determining whether the inventory needs to be incremented on a return, etc. The RMA functionality allows customer service representatives to raise a return request, with a line item, quantity, and reason for return, and the RMA will be created with an approval process. The remaining functionality is introduced via customisation.

In OrderCloud, order returns are a recently released feature that has more complete functionality than XC’s RMA offering. A return can be created against multiple line items, which also consists of an approval workflow and custom refund calculations can be achieved via the OrderReturn integration event.

Functionality

The Storefront Checkout Order Submission Step

In XC, submitting an order is not just about converting a cart to an order, but performing necessary processes such as payment authorisation and validating the order is in a valid state prior to finalising the order. The following sections cover these processes that we would look to transfer into an OrderCloud implementation.

Turning our attention to the storefront functionality of the order confirmation checkout step from Carts to Unsubmitted Orders: Storefront User Journey, we will look at adding the email address and payment details to the cart/unsubmitted order, focusing on varying APIs of the two platforms.

Figure 6: The order submission aspect of the storefront user journey.

When submitting an order in XC, the Commerce Engine will perform validations and processes that accompany order creation, which is depicted at a high level in figure 7. The darker nodes represent functionality that is built into OrderCloud’s order submit endpoint, while the nodes in italics represent functionality we wouldn’t need to bring over to OrderCloud. This leaves the Authorise Payment and Assign Confirmation ID as the custom functionality we would need to incorporate into an OrderCloud solution.

Figure 7: A comparison of XC’s create order process and an equivalent approach in OrderCloud.
Order Validation

When submitting orders in XC, the Commerce Engine ensures the cart is in a valid state prior to converting it to an order. The validation can be tightened through customisation for business specific validation requirements, but for the default validation rules, the Commerce Engine will evaluate the following:

  • The payments total matches the cart’s grand total.
  • An email is assigned to the cart.
  • The cart has line items.
  • Applied coupons for promotions are eligible.
  • Applied promotions are eligible.
  • Inventory availability is not exceeded.

Similarly, OrderCloud’s submit order endpoint validates an order with the following:

  • The order has line items.
  • The order wasn’t already submitted.
  • The order has been calculated via integration event, if applicable.
  • All payments have been accepted.
  • Applied promotions are eligible.
  • Inventory availability is not exceeded.

The difference validate gaps between the two platforms that we will need to implement for parity:

  • The payments total matches the order’s grand total.
  • An email is assigned to the order.

For more details on the internal logic of OrderCloud’s order submit process, including validation, see Order Submit Logic.

Payment Capture
Credit Cards

The SXA storefront provides an auth-capture implementation for braintree payments where upon order submission the payment is authorised and during the released order minion the payment is captured.

Figure 8: High level credit card payment flow in XC.

In OrderCloud, the payments resource represents credit card payments and validation is independent of the order creation and validation processes. In figure 10, we see that the authorise payment is incorporated as part of the middleware’s order creation process.

Gift Cards

For the gift card implementation, the gift card amount is captured post order placement, during the pending orders minion.

XC’s gift card implementation is only intended as a sample, which would typically be replaced with an integration with a gift card provider, so we typically wouldn’t need to focus so much on the default XC implementation and instead focus on porting the custom integration.

Figure 9: High level gift card payment flow in XC.

For gift cards, in the previous article, Taxes and Payments, we identified that the gift cards were represented as spending accounts in OrderCloud.

Order Confirmation Id

The order’s OrderConfirmationId is generated as part of order creation, however this is commonly overwritten with an order number incrementor implementation for a user-friendly confirmation id or an external system (e.g. OMS) identifier for reconciliation purposes.

In OrderCloud, generating unique order IDs is a native feature. While entity IDs are generated with a unique alphanumeric characters, OrderCloud’s incrementors resource can be configured and referenced when explicitly assigning an entity ID. This is achieved by wrapping the incrementor ID in curly braces, which also supports prefixed and suffixed values for even further versatility.

// Request Body
{
  "ID": "MyPrefix-{MyOrderIncrementorID}"
}

// Response Body
{
  "ID": "MyPrefix-010010",
  ...
  "IsSubmitted": false,
  "xp": null
}

A few consideration when it comes to the order confirmation IDs:

  • In a multi-tenant solution, you can create a unique incrementor, which may create the same incrementor value, e.g. 010010, however when assigning an order ID, a unique storefront prefix can prevent duplicate IDs from being created, e.g. <Storefront 1>-{Storefront1OrderIncrementorID}.
  • If your solution cannot guarantee unique IDs for orders across the Marketplace, the ID can be stored on the order’s xp instead.
Order Submission by Middleware Proxy

In reviewing the order submission process between XC and OrderCloud, it’s important to understand that XC development methodology differs from OrderCloud in that XC allows the implementor to extend and modify the Commerce Engine directly, while OrderCloud opts to leave customisation to the implementor by way of middleware to supplement and enhance the platforms native behaviour. We will generally be able to achieve close parity when it comes to the happy paths, while unhappy paths will rely on the middleware to perform the order submit request along with surrounding custom logic.

In OrderCloud, we have the ability to extend platform functionality prior to execution by using middleware as a proxy, wrapping the OrderCloud API endpoints, or creating pre-hook webhooks to intercept an API request. Both approaches have merit and will typically be a design and implementation decision.

For more information on extending OrderCloud, see Flexible Fullfilment – Extending OrderCloud.

In our happy path only example, figure 10 provides an OrderCloud solution equivalent of XC’s create order process, by wrapping OrderCloud’s order submit and several other related endpoints, encompassing all aspects of the order submission process.

  1. By calling the order validate endpoint, we ensure that no stale data, in particular order calculations, are being retrieved from the cache of other API calls we will make, such as getting the order worksheet.
  2. The order worksheet is retrieved to perform custom validation.
  3. Payments are not stored on the order worksheet at this time, so it is necessary to retrieve payments separate to the order.
  4. For our custom validation:
    1. We identified in Tax and Payments that XC has an order-specific email, which may not be the user’s address, so we would need to confirm that the order-specific email has been provided on the order.
    2. We also acknowledged earlier that XC validates the cart’s payments total against the grand total, so this is another custom validation we can implement in our OrderCloud solution.
  5. While XC doesn’t create a sales activity until the post-order processing stage, OrderCloud transactions are required to keep track of payment activity.
  6. Patching the order request covers:
    1. Updating the order confirmation id with our incrementor id. It is possible that the order’s ID is generated upon initial creation instead of during the order creation process, however this will see submitted orders not necessarily coming in in a linear fashion and potentially many generated IDs being discarded due to order abandonment.
    2. Applying the initial custom order status, which we will visit in a later article.
Figure 10: An example approach for XC create order equivalent in an OrderCloud solution.

References

Continue the Series

  1. Transitioning from Sitecore Experience Commerce to OrderCloud: Customers to Buyer Users
  2. Transitioning from Sitecore Experience Commerce to OrderCloud: Customers and Buyers – API Access
  3. Transitioning from Sitecore Experience Commerce to OrderCloud: Catalogs and Categories
  4. Transitioning from Sitecore Experience Commerce to OrderCloud: Sellable Items To Products
  5. Transitioning from Sitecore Experience Commerce to OrderCloud: Inventory and Pricing
  6. Transitioning from Sitecore Experience Commerce to OrderCloud: Carts to Unsubmitted Orders and Carts
  7. Transitioning from Sitecore Experience Commerce to OrderCloud: Fulfillments to Shipping
  8. Transitioning from Sitecore Experience Commerce to OrderCloud: Tax and Payments
  9. Transitioning from Sitecore Experience Commerce to OrderCloud: Orders
  10. Transitioning from Sitecore Experience Commerce to OrderCloud: Order Workflow and Minions
  11. Transitioning from Sitecore Experience Commerce to OrderCloud: Promotions

OrderCloud: Order Submit Logic

Reading Time: 4 minutes

In this article, we will review the business logic that Sitecore OrderCloud utilises when the order submit endpoint (POST /orders/{direction}/{orderID}/submit) is executed for a better checkout design, implementation and error handling.

Introduction

When it comes to submitting an order that is either incomplete or has become invalid, the OrderCloud API provides fairly easy to understand error codes to facilitate troubleshooting. What is not provided however, is a complete list of error codes that one may expect from an endpoint in order to be proactive in catering for such situations.

While a global catch all may be the quickest and easiest way to approach order submission error handling, the user experience of being informed that “A technical difficulty has occurred. Please contact support” in your storefront’s checkout will likely have a negative impact on the conversion rate. In addition, the admin application tends to be neglected with the love required to support business users in identifying and rectifying the issues themselves, so more often than not it is the developer to the rescue, but there are ways we can prevent these scenarios from occurring.

As OrderCloud is always utilising the latest code base, it is possible that the documented processes can change over time without warning.

Order Submission Logic

The following sections covering order submission logic, will highlight most of the platform logic, but will omit more trivial details.

When an exception is thrown by the API, denoted by the red End terminators with given error code, any pending changes to the underlying database entities are rolled back.

Order Submit

The order submit logic is essentially the entry point for validating and processing a submitted order.

Figure 1: Order submit logic.

Validate Order

The validate order process not only used in the order submit process, but is the entire validation taking place for the order validate endpoints.

In figure 2, soft errors, represented by the red boxes, allows the API to validate other areas of the order and return errors in list form, which can see your overall solution being more performant with less back and forth to resolve all order validation errors.

The Deduct inventory sub-process will validate inventory is available for the order, but does not persist inventory changes as this can be found in figure 1, under Commit inventory.

Figure 2: Validate order logic.

Validate Buyer-Seller Relationship

The buyer-seller relationship effectively validates that the user is authorised to purchase an order directly from a supplier. The relationship can be implicit, i.e. the supplier can be configured with AllBuyerCanOrder set as true or the user is an admin user, or an explicit relationship between the buyer and supplier has been defined.

Figure 3: Validate buyer-seller relationship logic.

Validate Promotions

The validate promotions logic in figure 4 shows the relevant flow for the order submit process.

Figure 4: Validate promotions logic.

Validate Promotion

For each promotion applied to the order, it is validated during the order submit to ensure it is still eligible. Any and all errors found are added to the error list, which will be returned by the API as part of the validate order logic in figure 2.

Figure 5: Validate promotion logic.

Deduct Line Item Inventory

Order inventory will be validated to ensure that there is sufficient inventory for all order lines. Any and all errors found are added to the error list, which will be returned by the API as part of the validate order logic in figure 2.

Figure 6: Deduct line item inventory logic.

Validate and Adjust Spending Account

For the sub-process Validate and adjust spending accounts in figure 1, the following flowchart represents how each spending account is evaluated as they are iterated over for all applied payments for the order.

Figure 7: Validate and adjust spending account logic.

Summary

With this insight into the order submit processes, you should now be well equipped to identify how extending OrderCloud order submit functionality through webhooks, wrapped API calls, and integration events fit in with your solutions, as well as anticipate the many errors that can occur and be more proactive with more specific error handling over a global catch all implementation.

References

Sitecore Experience Commerce: Adding Custom Properties to Search in BizFx

Reading Time: 8 minutes

In this article, we will review how we can extend the search components in Business Tools (BizFx) to support search functionality using custom properties for its results.

This article will not consider locale-support.

Introduction

As the search functionality in BizFx is fairly primitive, from a business user perspective, and a common request is to provide customisation guidance for the search functionality in the Business Tools, we will use the Search component from the Merchandising dashboard for our example in extending the search functionality.

Figure 1: Search component in the Merchandising Dashboard.

This implementation will assume the sellable items that have custom properties added via composer templates, however you will be able to adapt the solution where properties have been added programatically with components or policies.

Figure 2: A sellable item extended with a composer template.

Implementation and Configuration

Updating the Solr Schema

We first need to add our custom property to the managed schema of our Solr cores related to our search scopes. These schemas are found in the file system where Solr is deployed, under server/solr/<search scope>/conf/managed-schema.

The commerce engine uses switch on rebuild so we need to update the managed schema for both CatalogItemsScope and CatalogItemsScope-Rebuild for this instance.

    <!-- CommerceEngine Catalog -->
    <field name="displayname" type="string" indexed="true" stored="true"/>
    <field name="datecreated" type="pdate" indexed="true" stored="true"/>
    <field name="dateupdated" type="pdate" indexed="true" stored="true"/>
    <field name="artifactstoreid" type="string" indexed="true" stored="true"/>
    <field name="parentcataloglist" type="string" indexed="true" stored="true" multivalued="true"/>
    <field name="variantid" type="string" indexed="true" stored="true"/>
    <field name="variantdisplayname" type="string" indexed="true" stored="true"/>
    <field name="inventorysetids" type="string" indexed="true" stored="true"/>
    <field name="productid" type="string" indexed="true" stored="true"/>
    <field name="name" type="string" indexed="true" stored="true"/>
    <field name="yearmanufactured" type="string" indexed="true" stored="true"/>

The managed-schema that would be created with the XC instance will be organised to easily identify the commerce entity fields. While fields can be added via Solr, the managed-schema will be regenerated in a less XC friendly manner and make long-term mainentance more difficult.

With our Solr schema updated, if we are working locally, we will need to restart the Solr service, otherwise you will need to manage the deployment of the schema to your deployment environments.

Populating the Index’ Custom Fields

The commerce indexes are created and updated by both the FullIndexMinion and the IncrementalIndexMinion. It is within these minions that we can inject our custom code to populate the new custom fields with our commerce entity properties.

We’ll create a new pipeline block, called InitializeExtendedSellableItemIndexingViewBlock, which we can see the Run() method in the following snippet. We perform the necessary validation and copy our entity properties to custom index fields.

public override EntityView Run(EntityView arg, CommercePipelineExecutionContext context)
{
    // 1. Validation
    Condition.Requires(arg, nameof(arg)).IsNotNull();
    Condition.Requires(context, nameof(context)).IsNotNull();

    var argument = context.CommerceContext.GetObjects<SearchIndexMinionArgument>().FirstOrDefault();
    if (string.IsNullOrEmpty(argument?.Policy?.Name))
    {
        return arg;
    }

    // 2. Prepare Entities
    var entityItems = argument.Entities?.OfType<SellableItem>().ToList();
    if (entityItems == null || !entityItems.Any())
    {
        return arg;
    }

    // 3. Prepare custom properties
    var scopeIndexablePropertiesPolicy = IndexablePropertiesPolicy.GetPolicyByScope(context.CommerceContext, context.CommerceContext.Environment, argument.Policy.Name);
    if (scopeIndexablePropertiesPolicy?.ComposerProperties == null || !scopeIndexablePropertiesPolicy.ComposerProperties.Any())
    {
        return arg;
    }

    var searchViewNames = context.GetPolicy<KnownSearchViewsPolicy>();
    var childViews = arg.ChildViews.OfType<EntityView>().ToList();

    // 4. Iterate over each entity
    foreach (var si in argument.Entities.OfType<SellableItem>())
    {
        // 5. Get existing document entity view
        var documentView = childViews.First(v => v.EntityId.EqualsOrdinalIgnoreCase(si.Id)
            && v.Name.EqualsOrdinalIgnoreCase(searchViewNames.Document));

        // 6. Add custom fields
        AddComposerFields(si, documentView, scopeIndexablePropertiesPolicy);
    }

    return arg;
}

The highlighted section, 3. Prepare custom properties, is used for our AddComposerFields() method.

To add properties to the Solr document, we only need to register the field name and value to a new ViewProperty of the document EntityView and the platform will later translate and push this data into Solr. This would typically look like the following.

documentView.Properties.Add(new ViewProperty
{
    Name = "<Insert Field Name Here>",
    RawValue = "<Insert Field Value Here>"
});

In our AddComposerFields() implementation, we leverage our custom policy to identify and process fields from the composer templates.

protected void AddComposerFields(
    SellableItem si,
    EntityView documentView,
    IndexablePropertiesPolicy scopeIndexablePropertiesPolicy)
{
    // 1. Iterate over each composer template configuration
    foreach (var composerView in scopeIndexablePropertiesPolicy.ComposerProperties)
    {
        // 2. Get property value
        var composerEntityView = si.GetComposerViewFromName(composerView.Key);

        if (composerEntityView == null)
        {
            continue;
        }

        // 3. Iterate over each custom property to index
        foreach (var property in composerView.Value)
        {
            var value = composerEntityView.GetPropertyValue(property.PropertyName);

            if (value == null)
            {
                continue;
            }

            // 4. Add property to index document
            documentView.Properties.Add(new ViewProperty
            {
                Name = property.IndexFieldName,
                RawValue = value
            });
        }
    }
}

The implementation is made flexible by avoiding hard-coding any composer template or property names and instead using the custom IndexablePropertiesPolicy, which we append our configured policy to the SolrSearchPolicySet. In ComposerProperties we add our composer template name, e.g. "ManufacturedDetails", and then an array of composer property models, where the PropertyName represents the composer template property name and the IndexFieldName represents the Solr core field name.

{
  "$type": "Ajsuth.Sample.Catalog.Search.Engine.Policies.IndexablePropertiesPolicy, Ajsuth.Sample.Catalog.Search.Engine",
  "SearchScopeName": "CatalogItemsScope",
  "ComposerProperties": {
    "ManufacturedDetails": [
      {
        "PropertyName": "YearManfactured",
        "IndexFieldName": "yearmanufactured"
      }
    ]
  }
}

We register our pipeline block to both the full and incremental index minion pipelines.

.ConfigurePipeline<IIncrementalIndexMinionPipeline>(pipeline => pipeline
    .Add<Pipelines.Blocks.InitializeExtendedSellableItemIndexingViewBlock>()
        .After<InitializeSellableItemIndexingViewBlock>()
)

.ConfigurePipeline<IFullIndexMinionPipeline>(pipeline =>pipeline
    .Add<Pipelines.Blocks.InitializeExtendedSellableItemIndexingViewBlock>()
        .After<InitializeSellableItemIndexingViewBlock>()
)

By adding our InitializeExtendedSellableItemIndexingViewBlock after the InitializeSellableItemIndexingViewBlock rather than directly replacing and overriding the initial platform pipeline block, we may suffer a minor performance impact as we will need to interate over our entities another time, however we won’t have to copy platform code into our pipeline block, which will ultimately keep our code as clean as possible while preventing complexity for during upgrades.

We then follow our deployment process for our changes:

  1. Deploy our Solr managed-schemas and restart the Solr service to ingest the updated schemas.
  2. Deploying our Commerce Engine code to all instances.
  3. Bootstrap the Commerce Engine to ingest our IndexablePropertiesPolicy configuration.
  4. Restart the minions Commerce Engine instance to consume the updated policy set.
  5. Executing the Run FullIndex Minion – Catalog Items request from postman.
  6. Verify our Solr core now how our custom field indexed.
Figure 3: yearmanufactured property added to Solr core.

If you aren’t seeing the custom field for any indexed document check the *-Rebuild core as that may the current active core.

Searching Against Custom Fields in the Search Component

With the custom properties added to the indexes, we finally need to update the search component to include the new property as part of the search query.

Figure 4: Search does not query against the custom yearmanufactured field by default.

Using Solr Query Syntax

With no further customisation or configuration, we could use the Solr query syntax to apply to set the Search Term with the specific field query, e.g. yearmanufactured:2009, as the search component will process this as a raw query.

Figure 5: Search can query against the custom yearmanufactured field using Solr query syntax.

Including the Custom Field for SearchScope Queries

The search component queries against the Search Term properties appended to the _text_ field in Solr. If we wanted to add a custom field to default search query, then we can update the managed-schema of the Solr cores to include it. Below lists all of the fields that are used for the search queries as well as our custom field.

<copyField source="displayname" dest="_text_"/>
<copyField source="variantid" dest="_text_"/>
<copyField source="variantdisplayname" dest="_text_"/>
<copyField source="productid" dest="_text_"/>
<copyField  source="name" dest="_text_"/>
<copyField source="yearmanufactured" dest="_text_"/>

After deploying and restarting the Solr service, search component queries from the Business Tools will now query the custom fields as well in the default search.

Figure 6: Search queries against the custom yearmanufactured field by default with updated managed-schema.

Customising the Search Results

The last piece of the puzzle is to add our custom indexed fields to the Results entity view as seen below.

The Results entity view is populated with indexed commerce entity data and not raw commerce entity data.

First, we want to update the IndexablePolicy in the SearchPolicySet for our given search scope, with our custom field.

{
"$type": "Sitecore.Commerce.Plugin.Search.IndexablePolicy, Sitecore.Commerce.Plugin.Search",
"SearchScopeName": "CatalogItemsScope",
"Properties": {
  ...,
  "YearManufactured": {
    "TypeName": "System.String",
    "IsKey": false,
    "IsSearchable": true,
    "IsFilterable": true,
    "IsSortable": true,
    "IsFacetable": false,
    "IsRetrievable": true
  }
}

For our implementation purposes, we only need to be concerned about the IsRetrievable and IsSortable properties of the IndexableSettings object. The IsRetrievable property will allow us to provide a fallback property with an empty value, while the IsSortable property will configured the column to be sortable. Both follow the platform implementation pattern.

Next, I would like to tell you that we could extend the Results entity view simply by extending pipelines with additional pipeline blocks, but we will need to copy and replace the original pipeline blocks for the most consistent approach across commerce indexes. There is a ProcessDocumentSearchResultsBlock within the commerce plugins that will relate to the search scope, which we would copy into our solution. In this instance, we copy the pipeline block from the Sitecore.Commerce.Plugin.Catalog.dll.

Without re-writing the platform code, we will have to face a bit more rigid manual coding over a more automated, iterative approach to the IndexableSettings of our IndexablePolicy. The key area of the pipeline block we need to focus on is shown on line 5, where the results view properties are cleared. We need to copy our custom field from the properties before hand (1. Copy the field view property) and then repopulate the results view afterwards (3. Add desired indexed fields back into results view), which effectively strips the results view or the other indexed fields that we don’t want to render.

// 1. Copy the field view property 
var yearmanufactured = child.Properties.FirstOrDefault(p => p.Name.EqualsOrdinalIgnoreCase("YearManufactured"));

// 2. Clear the results view properties
child.Properties.Clear();

if (name != null)
{
    name.UiType = ViewsConstants.EntityLinkUiType;
}

// 3. Add desired indexed fields back into results view
child.AddViewPropertyToEntityViewOrDefault(name, retrievableProperties, CoreConstants.Name, typeof(string).FullName);
child.AddViewPropertyToEntityViewOrDefault(displayName, retrievableProperties, CoreConstants.DisplayName, typeof(string).FullName);
child.AddViewPropertyToEntityViewOrDefault(variantId, retrievableProperties, CatalogConstants.VariantId, typeof(string).FullName);
child.AddViewPropertyToEntityViewOrDefault(variantDisplayName, retrievableProperties, CatalogConstants.VariantDisplayName, typeof(string).FullName);
child.AddViewPropertyToEntityViewOrDefault(createdDate, retrievableProperties, CoreConstants.DateCreated, typeof(DateTimeOffset).FullName);
child.AddViewPropertyToEntityViewOrDefault(updatedDate, retrievableProperties, CoreConstants.DateUpdated, typeof(DateTimeOffset).FullName);
child.AddViewPropertyToEntityViewOrDefault(yearmanufactured, retrievableProperties, "YearManufactured", typeof(string).FullName);

We replace the platform pipeline block in SearchPipeline in our pipeline registrations.

.ConfigurePipeline<ISearchPipeline>(pipeline => pipeline
    .Replace<Sitecore.Commerce.Plugin.Catalog.ProcessDocumentSearchResultBlock, Pipelines.Blocks.ProcessDocumentSearchResultBlock>()
)

The platform pipeline block we are overriding is fully qualified here to to explicitly replace the correct pipeline block.

All that is left is to deploy the code, which is short looks requires:

  • Deploying our Commerce Engine code to all instances.
  • Bootstrap the Commerce Engine to ingest our updated IndexablePolicy configuration.
  • Restart the authoring Commerce Engine instance to consume the updated policy set.

Performing our search now, we will see that we have our custom field appended to the end of the Results entity view, which can be used to sort the results.

Figure 7: The Results entity view is customised with the yearmanufactured indexed field.

Summary

While the search component of BizFx was not developed with the intention of being configurable, we have identified a few ways to customise the search component, which will hopefully cover most business user scenarios and saves us from having to implement our own search component from scratch.

References