Transitioning from Sitecore Experience Commerce to OrderCloud: Carts to Unsubmitted Orders and Carts

Reading Time: 11 minutes

In this article, we will review and compare Sitecore Experience Commerce carts and OrderCloud unsubmitted orders to facilitate developers looking to transition from XC to OrderCloud as well as identify a path for migration of existing XC solutions to OrderCloud.

We will look at a high-level comparison of architecture, functionality, and data models, with greater focus on transitioning from Sitecore Experience Commerce, meaning identifying a close path to parity in OrderCloud, using the Habitat catalog and SXA Storefront.

Conceptual Architecture and Features

Carts vs Unsubmitted Orders and Carts

Architecture Overview

In XC, the cart entity stores information about the order to be placed. When an order is placed, the contents of a cart is copied over into a new order entity with an initial order status of Pending.

OrderCloud has two approaches in handling the cart/order lifecycle. The solution can leverage unsubmitted orders or the OrderCloud’s cart resource.

Unsubmitted Orders

In OrderCloud, an order represents both the cart and order within the cart/order lifecycle, using the Status property to identify its current state. The initial status of the order is Unsubmitted, which is effectively the XC cart equivalent. When the order is submitted, the order will then transition its status to Open, matching the XC order with status of Pending.

It is also possible that the OrderCloud order submitted status will be set to AwaitingApproval, however this status is not relevant for the SXA storefront comparison.
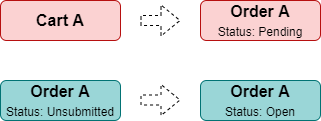
Figure 1: The XC and OrderCloud representations of a shopping cart being constructed and their initial state once the order has been submitted.

Referencing figure 2, there are a few important details regarding the XC and SXA cart to order architecture in relation to OrderCloud’s architecture:

  1. SXA sees that a customer only interacts with a single cart per storefront, by using the naming convention, “Default<customer id><storefront name>“, to identify the cart id and is the only means of a relationship that the customer has with the cart in the XC database.
  2. The Commerce Engine’s /carts endpoint, which retrieves the cart, requires the cartId parameter and does not have consideration for the user context.
  3. While order ids must be unique, orders are created with randomly generated ids and are not copied from the cart’s fixed id. Orders are persisted, accompanied with a list entry, which represent the relationship between the customer and the orders they have placed.
  4. During order creation, after the cart contents has been copied to the order, the cart is emptied to allow it to be used for subsequent order placement.

In comparison to OrderCloud’s architecture, orders are tightly coupled to their owners via the FromUserID property, and as both order ids in XC and OrderCloud are generated, there is no chance for Id conflicts.

  1. In managing a single order, the most recent unsubmitted order is considered the active ‘cart’ and as such does not need to rely on an order id to identify the cart as its relationship to the user as it’s tightly coupled to the owner via the FromUserID property.
  2. The /me/orders endpoint retrieves the order based on user context, which is extracted from the auth token, rather than the order id.
  3. The order id is also generated by default, so there’s no chance of an ID conflict when allowing the platform to generate it.
  4. There is no implementation concerns around migrating a cart to an order.
Figure 2: The SXA storefront will use a single cart per customer, which is converted into each order, whereas OrderCloud creates the orders directly allowing multiple unsubmitted orders being active simultaneously.
OrderCloud Carts

As an alternate approach to tracking and utilising the unsubmitted orders in an implementation, OrderCloud also provides a cart resource, which can simplify the implementation as it behaves much the same as the orders resource without the need for identifying, persisting, and passing the order ID for requests. Instead, the cart resource will point to the latest unsubmitted orders or create a new order if no unsubmitted orders exist for the user. When the cart is submitted, the next unsubmitted order, if available, will become the active cart.

More information can be found in Introducing the Cart API.

Choosing Between Orders and Cart Implementations

When deciding whether to use the orders or cart resource in an implementation, the cart resource will typically be the preferred implementation practice for the majority of storefronts as it can handle a single cart or multiple carts for profiled users, allowing the implementation to switch the order context for the user.

For marketplaces requiring multiple storefronts, e.g. a storefront per brand or storefront per country, where user accounts are shared across storefronts, the orders resource allows the storefront to control the order context for each user as seen in figure 4.
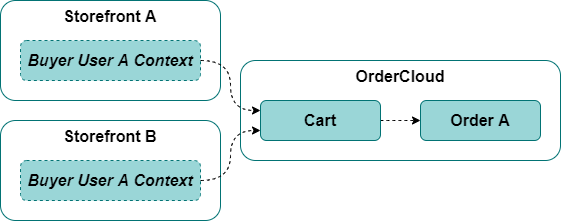
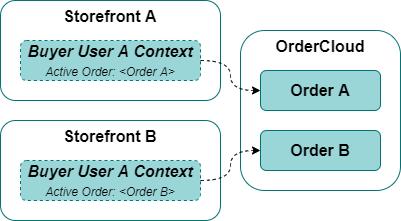
Figure 3: In a multi-storefront, shared user scenario, the cart resource’s order context is dependent on the user.
Figure 4: In a multi-storefront, shared user scenario, the order resource allows the implementation to control the order context.

Storefront User Journey

In figure 5, we see a high-level user journey for the SXA storefront alongside the OrderCloud equivalent. While OrderCloud’s user journey appears to be longer, this is only due to order requiring explicit creation and XC consolidating shipping address and shipping method into fulfillment details, and billing address and payment into payment details. Ultimately, the user journey is matched and there are no sacrifices necessary.
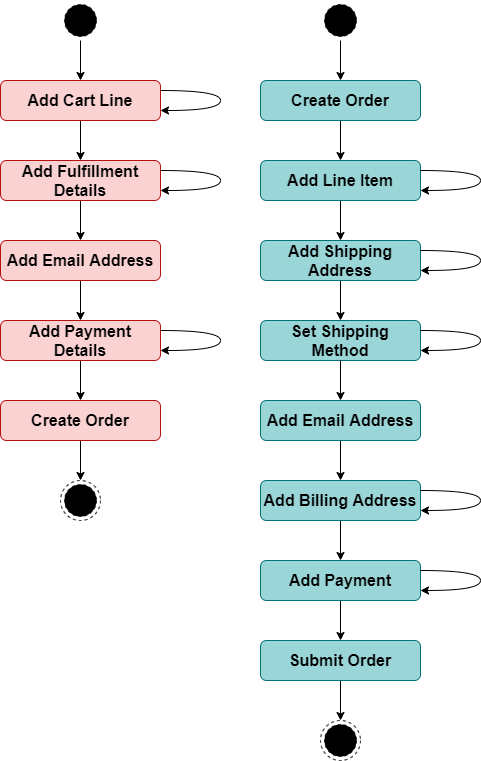
Figure 5: Cart to order vs unsubmitted order to submitted order user journey comparison.

Viewing the Cart/Order

In XC, the GET /Carts({cartId}) endpoint is typically called with the $expand query parameter to retrieve all cart components, cart lines and their components for the full view of the cart.

In OrderCloud, the RESTful API provides individual endpoints for extracting order data at more granular levels. For example the order details can be retrieved via the GET /orders/{direction}/{orderID} or GET /cart endpoint, but it won’t provide the line item details, which can be retrieved in bulk using GET /orders/{direction}/{orderID}/lineitems or GET /cart/lineitems, or individually via GET /orders/{direction}/{orderID}/lineitems/{lineitemID} or GET /cart/lineitems/{lineitemID}.

Alternately, OrderCloud also provides GET /orders/{direction}/{orderID}/worksheet and GET /cart/worksheet endpoints, which return the order object along with all line items and all responses from integration events. providing a more complete view, however some objects such as price schedule details will still require additional requests from the appropriate resources, which are typically only retrieved on demand as required.

Cart vs Order Totals

In the table below, we see a comparison between the cart line totals side by side with the equivalent line item totals. The notable differences are as follows:

  • XC Adjustments may include taxes, fulfillment fees, and promotion discounts, whereas OrderCloud breaks out the each adjustment classification at the order level.
  • As calculations with adjustments are calculated differently at the line-level and cart/order level, calculating the GrandTotal/Total may result in differently between the platforms.
  • The PaymentsTotal is not available on the order, however the payments total can be retrieved and calculated by the middleware, using OrderCloud’s GET /orders/{direction}/{orderID}/payments or GET /cart/payments endpoint.
Cart (XC)CalculationOrder (OC)CalculationMatch
SubTotalSum of all line-level SubTotals.SubtotalSum of all LineItem.LineSubtotals.Yes
AdjustmentsTotalSum of all cart-level Adjustments.ShippingCostHandled by middleware via OrderCalculate integration event.No
TaxCostHandled by middleware via OrderCalculate integration event.No
PromotionDiscountSum of all order-level and line item-level promotion discount amounts applied.No
GrandTotalSubTotal + sum of all cart-level adjustments flagged with IncludeInGrandTotal being true + sum of all line-level AdjustmentsTotalsTotalSubtotal + TaxCost + ShippingCostPromotionDiscount.No
PaymentsTotalSum of all PaymentComponent Amounts.N/A

Cart Lines vs Line Items

Adding a Cart Line vs Line Item

From an API perspective, to add a cart lines in XC, the request requires the cartId, quantity, and itemId, consisting of catalogId, sellableItemId, and variationId.

The catalogId is intended to resolve pricing and promotions for sellable items and their variants, based on the catalog associations to price books and promotion books as per the XC architecture.

POST https://authoring.engine.dev/api/AddCartLine HTTP/1.1

{
  "cartId": "{orderId}",
  "itemId": "{catalogId}|{sellableItemId}|{variantId}",
  "quantity": 1
}

Adding a line item in OrderCloud is much the same as seen in the example request below. orderId parameter replaces the cartId, while the ProductId equates to the sellableItemId. The catalogId however, is not required as pricing and promotions are not dependent on catalog assignments, and rather than passing the variantId, the individual product specs with OptionIDs are specified, ultimately resolving to variant equivalent, but also caters for specialised open text specs that OrderCloud supports.

POST https://sandboxapi.ordercloud.io/v1/orders/outgoing/{orderId}/lineitems HTTP/1.1

{
  "ProductID": "{productId}",
  "Specs": [
    {
      "SpecID": "{specId}",
      "OptionID": "{specOptionId}"
    },
    {
      "SpecID": "{specId2}",
      "OptionID": "{specOptionId2}"
    }
  ]
}

Cart Line Rollup

In the SXA storefront, when adding a sellable item/variation to the cart that has already been added, the quantity will be updated to reflect the initial cart’s quantity plus the quantity added. This is known as cart line rollup and is controlled by the RollupCartLinesPolicy.Rollup property in the Commerce Engine’s environment role configuration.
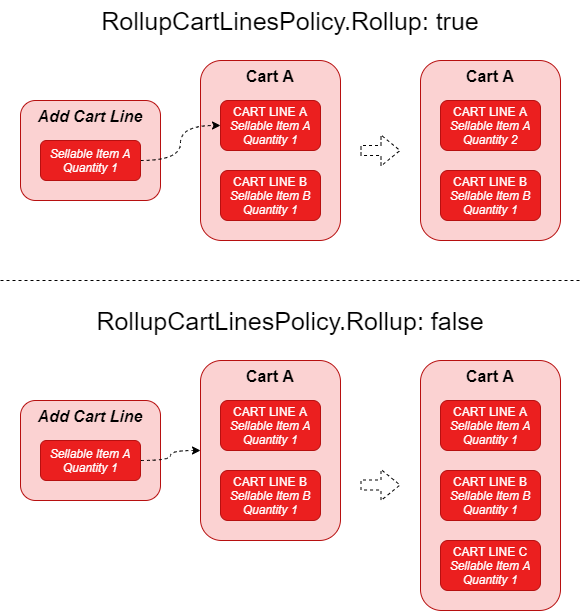
Figure 6: Add cart line functionality.

As line rollup is not a native feature of OrderCloud’s RESTful API, this functionality could be implemented in the middleware. Instead adding line items will create a new line item in the order, in the same manner that XC will with rollup disabled.
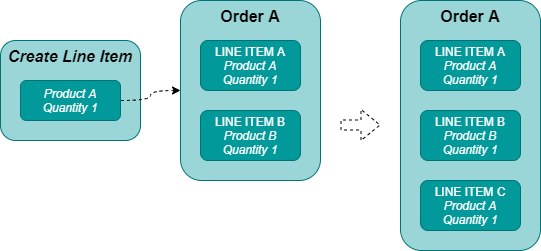
Figure 7: Create line item functionality.

Line-Level Pricing

XC’s cart lines contain the UnitListPrice and the SellPrice on the PurchaseOptionMoneyPolicy, which can be thought of as “was” and “now” pricing respectively.

The SellPrice can evaluate to the same value as the UnitListPrice, to which the SXA storefront will treat this as a standard price.

"Policies": [
    {
        "@odata.type": "#Sitecore.Commerce.Plugin.Pricing.PurchaseOptionMoneyPolicy",
        "PolicyId": "5e6c1f42c7c94bc4b79696e716b6cda5",
        "Models": [],
        "Expires": "2019-04-22T13:13:18.8117816Z",
        "SellPrice": {
            "CurrencyCode": "USD",
            "Amount": 6
        },
        "FixedSellPrice": false
    }
],
"UnitListPrice": {
    "CurrencyCode": "USD",
    "Amount": 2429.99
}

The MessagesComponent, also shows the audit trail detailing how the cart line’s unit list price and sell price were resolved, which are evaluated from ListPrices and Price Card Snapshots at the sellable item and item variation levels.

Cart Line MessageComponent Snippet

{
	"@odata.type": "#Sitecore.Commerce.Core.MessagesComponent",
	"Id": "7e6bc27965ef4f3a954e6fcdadb96fa5",
	"Name": "",
	"Comments": "",
	"Policies": [],
	"Messages": [
		{
			"Code": "Pricing",
			"Text": "SellPrice<=PriceCard.Snapshot: Price=$10.00|Qty=1.0|PriceCard=Habitat_PriceCard"
		},
		{
			"Code": "Pricing",
			"Text": "ListPrice<=PricingPolicy: Price=$1,919.69"
		},
		{
			"Code": "Pricing",
			"Text": "Variation.SellPrice<=Variation.PriceCard.Snapshot: Price=$9.00|Qty=1.0|Variation=56042567|PriceCard=Habitat_VariantsPriceCard"
		},
		{
			"Code": "Pricing",
			"Text": "Variation.ListPrice<=Variation.PricePolicy: Variation=56042567|Price=$2,429.99"
		},
		{
			"Code": "Pricing",
			"Text": "CartItem.SellPrice<=PriceCard.ActiveSnapshot: Price=$6.00|Qty=5.0"
		},
		{
			"Code": "Pricing",
			"Text": "CartItem.ListPrice<=SellableItem.Variation.ListPrice: Price=$2,429.99"
		}
	],
	"ChildComponents": []
}

OrderCloud stores the resolved UnitPrice on the line item from the respective PriceBreak, prioritising the SalePrice over Price.

For orders in an unsubmitted state, the /products/ resource may be used to retrieve the product information will return the the current active snapshot, however once the order has been placed the product and price schedules resources are no longer considered the source of truth. If price schedule information, e.g. price breaks, sale start/end dates, etc. is required for historical and reconciliation purposes, a webhook can be created on the order submit endpoint to persist the information on the line items’ xp.

The other aspect of note is that the Currency is set at the order level, which applies to all monetary values on the order and line items.

"Order": {
  "ID": "MyOrder"
  ...
  "Currency": "USD"
  ...
},
"LineItems": [
  {
    "ID": "MyLineItem",
    ...
    "UnitPrice": 2429.99,
    ...
  }
]

Cart Line vs Line Item Totals

In the table below, we see a comparison between the cart line totals side by side with the equivalent line item totals. The notable differences are as follows:

  • XC Adjustments may include taxes, fulfillment fees, and promotion discounts, whereas OrderCloud only includes PromotionDiscount. Extended properties (xp) can be leveraged to persist taxes and fulfillments.
  • XC inverts the promotion discount adjustments so a $20 discount will be represented as -$20 in XC, so calculation of the GrandTotal is valid.
  • XC’s GrandTotal effectively matches the OrderCloud’s LineTotal as taxes and fulfillment fees aren’t flagged with IncludeInGrandTotal.
CartLine (XC)CalculationLineItem (OC)CalculationMatch
SubTotalSellPrice * QuantityLineSubtotalUnitPrice * QuantityYes
AdjustmentsTotalSum of all line-level Adjustments.PromotionDiscountSum of all line item-level promotion discount amounts applied for the current line item.No
GrandTotalSubTotal + sum of line-level adjustments, where adjustments are flagged with IncludeInGrandTotal being true.LineTotalLineSubtotalPromotionDiscountYes
PaymentsTotalPayments not considered at line-level without customisation.N/A

Extending the Cart and Cart Lines vs Order and Line Items

Those familiar with the SXA storefront and the Commerce Engine will be pleased with the significantly reduced development efforts involved in extending the order and order line items. Gone are the days of the plumbing extended strongly-typed model classes through several application layers in strongly-typed classes and dependency injection. And that’s just the storefront. The Commerce Engine would typically require creating new endpoints and replacing several more classes.

OrderCloud’s extended properties (xp) is not only a dynamically built object in OrderCloud, but the OrderCloud .NET and JavaScript SDKs also represent xp as a dynamic type, meaning you can write to a new property within the xp in one class and read from it in another class without any plumbing.

var order = new Order();
order.xp.MyNewProperty = "My New Property Value";

var lineitem = new LineItem();
line.xp.MyLineItemProperty = true;

Merge Carts vs Transfer Order

A typical ecommerce feature is retaining a cart/unsubmitted order of a guest/anonymous user as they log in or register to the storefront. In the SXA storefront, the register component will essentially transfer ownership to the newly registered user, while the login component will merge the anonymous cart with registered user’s cart, if it exists, by copying across all cart lines. If Cart Line Rollup is enabled, quantities will be updated where appropriate instead of copying over the cart line.
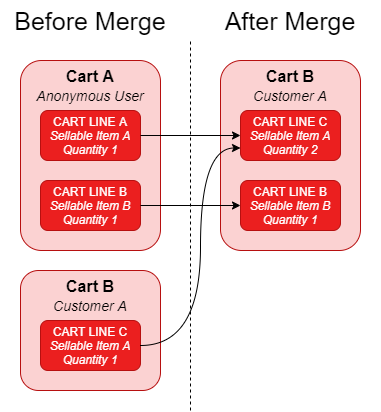
Figure 8: XC merges the anonymous cart with the existing customer cart on log in (rollup enabled).

OrderCloud contains similar functionality in allowing ownership an order from an anonymous user to be transferred to a profiled (registered) user. For registration, the order will need to be explicitly transferred.

Where a profiled user logs in, the difference between transferring an order and XC’s merging of carts, is that the buyer user may now have two active unsubmitted orders. The implementor would need to manage merging the orders together and either explictly deleting the second order or let OrderCloud’s unsubmitted order cleanup process delete it.
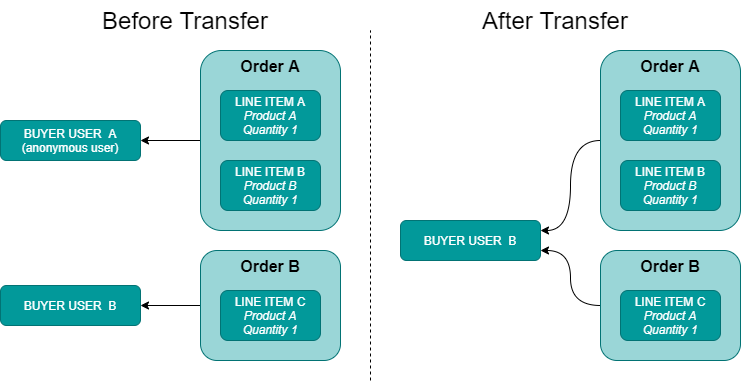
Figure 9: OrderCloud transfers an anonymous order to an authenticated registered user.

Abandoned Cart/Order Cleanup

The Commerce Engine’s minions role is responsible for cleaning up abandoned and empty carts. As seen below the PurgeCartsMinion runs daily, removing empty carts that are more than 2 days old and carts that have not been updated for more than 14 days. Both the minion and purge carts policies are configurable.

{
  "$type": "Sitecore.Commerce.Core.MinionPolicy, Sitecore.Commerce.Core",
  "WakeupInterval": "01.00:00:00",
  "ListsToWatch": [
    "Carts"
  ],
  "FullyQualifiedName": "Sitecore.Commerce.Plugin.Carts.PurgeCartsMinion, Sitecore.Commerce.Plugin.Carts",
  "ItemsPerBatch": 10,
  "SleepBetweenBatches": 500
}
{
  "$type": "Sitecore.Commerce.Plugin.Carts.PurgeCartsPolicy, Sitecore.Commerce.Plugin.Carts",
  "AbandonedCartsThreshold": 14,
  "EmptyCartsThreshold": 2
}

In OrderCloud, unsubmitted order cleanup is an internal automated process with the rules outlined below, which are not configurable.

User TypeHas Line Items?Retention Policy
AllNo24 hours
AnonymousYes7 days
ProfiledYes90 days from LastUpdated date

Data Mapping

With the conceptual analysis above, we will now review what data mapping would look like for migration and from a comparison standpoint.

In the XC Entity/Component column, components are assumed to live on the primary XC entity being mapped.

OrderCloud IDs do not allow spaces. It is important that the IDs are parsed to remove/replace invalid characters consistently.

Orders

POST /orders/{direction}

In the Architecture Overview, we note that the cart equivalent in OrderCloud is an unsubmitted order. While no direct data mapping required, the following table details the alignment with XC.

OC PropertyData TypeRequiredNotes
directionstringYesIs a resource parameter, not body property.
Set to Outgoing for buyer users.
IDstringNoAllowing the ID to be generated by the platform effectively matches XC order behaviour.
FromCompanyIDstringNoThis value will default to the buyer, which effectively matches XC.
ToCompanyIDstringNoThis value will default to the marketplace owner, which effectively matches XC.
FromUserIDstringNoDefaults to the current user context.
BillingAddressIDstringNoNot required at the time of creation.
ShippingAddressIDstringNoNot required at the time of creation.
CommentsstringNo
ShippingCostnumberNoNot required at the time of creation.
TaxCostnumberNoNot required at the time of creation.
xpobjectNoAny custom components required for the initial state can be added to xp.

Line Items

POST /orders/{direction}/{orderID}/lineitems

Adding a Cart Line vs Line Item has covered how to align the create line ltem request to align with XC. The following table covers the full view of the request.

OC PropertyData TypeRequiredXC PropertyNotes
directionstringYesIs a resource parameter, not body property.
Set to Outgoing for buyer users.
orderIDstringYesIs a resource parameter, not body property.
OrderCloud’s order.ID
IDstringNoBoth XC and OrderCloud generate this ID by default.
ProductIDstringYesItemIdOnly the SellableItemId portion of the ItemId is required.
QuantitystringYesQuantityThis value will default to the marketplace owner, which is effectively matches XC.
UnitPricestringNoWill be resolved from the PriceSchedule assignment of the current user context.
CostCenterstringNo
DateNeededstringNo
ShippingAccountstringNo
ShippingAddressIDstringNo
ShipFromAddressIDstringNo
InventoryRecordIDstringNo
SpecsobjectNoItemIdUsed over variant ID. All spec IDs and specOptionIDs that represent the variant product will need to be specified.
xpobjectNoCustom components can be added to xp as needed.

References

Continue the Series

  1. Transitioning from Sitecore Experience Commerce to OrderCloud: Customers to Buyer Users
  2. Transitioning from Sitecore Experience Commerce to OrderCloud: Customers and Buyers – API Access
  3. Transitioning from Sitecore Experience Commerce to OrderCloud: Catalogs and Categories
  4. Transitioning from Sitecore Experience Commerce to OrderCloud: Sellable Items To Products
  5. Transitioning from Sitecore Experience Commerce to OrderCloud: Inventory and Pricing
  6. Transitioning from Sitecore Experience Commerce to OrderCloud: Carts to Unsubmitted Orders and Carts
  7. Transitioning from Sitecore Experience Commerce to OrderCloud: Fulfillments to Shipping
  8. Transitioning from Sitecore Experience Commerce to OrderCloud: Tax and Payments
  9. Transitioning from Sitecore Experience Commerce to OrderCloud: Orders
  10. Transitioning from Sitecore Experience Commerce to OrderCloud: Order Workflow and Minions
  11. Transitioning from Sitecore Experience Commerce to OrderCloud: Promotions

OrderCloud: Debugging Integration Events and Webhooks using ngrok

Reading Time: 3 minutes

In this article, we will review how we can redirect traffic from OrderCloud’s integration events and webhooks to our local web server to assist debugging efforts in local development.

The OrderCloud Headstart application will be referenced in this example, which may differ slightly from your integration service/middleware application.

Introduction

As OrderCloud’s integration events and webhooks require public urls to be available for testing and having complete functionality available, the question quickly arises as to how developers will be able to develop and debug the respective middleware endpoints in a local environment. One solution we will review is to use ngrok, a free service, which allows us to expose a web server running on our local machine to the internet.

Installation, Configuration, and Testing

High-level steps are provided below, however steps may vary based on operating systems and command tools. See ngrok: Getting Started > Setup & Installation, and register or log in to a free account, for alternative setup steps.

Preparing ngrok

Using Powershell, install ngrok using choco.

choco install ngrok

Add the authtoken, available from ngrok: Getting Started > Your Authtoken once signed up for a free account.

ngrok authtoken <auth token>

Exposing the Secure Web Server with ngrok

Moving over to the local imiddleware, we will need to obtain the port number used, e.g. the HTTPS url from the applicationUrl in the Local profile.

{
  "profiles": {
    "Local": {
      "commandName": "Project",
      "environmentVariables": {
        "APP_CONFIG_CONNECTION": "<app config connection>",
        "ASPNETCORE_ENVIRONMENT": "Development"
      },
      "applicationUrl": "https://localhost:5001;http://localhost:5000"
    }
  }
}

Now we can start HTTP tunnel forwarding to our local middleware.

ngrok http https://localhost:<port number>

The tunnel will then be created with a random URL, which we need to take note of for our OrderCloud configurations.

Figure 1: Randomly generated URL from grok.

Configuring OrderCloud’s Integration Events

In OrderCloud, we can create or update an integration event using the generated URL from ngrok as the CustomImplementationUrl. The HashKey will also need to be configured to match the OrderCloudSettings:WebhookHashKey appsettings in HeadStart.

As ngrok does generate a random URL each time when using free accounts, the CustomImplementationUrl will need to be patched each time you expose the local web server.

{
  "ID": "Middleware",
  "Name": "Middleware",
  "ElevatedRoles": [
    "FullAccess"
  ],
  "EventType": "OrderCheckout",
  "HashKey": "samplehash",
  "CustomImplementationUrl": "https://8f79-125-253-105-232.ngrok.io"
}

If the integration event has been newly created, don’t forget to assign it to the API client’s OrderCheckoutIntegrationEventID so that the integration event can trigger the endpoints of the middleware.

{
  "ID": <api client id>,
  "ClientSecret": null,
  "AccessTokenDuration": 600,
  "Active": true,
  "AppName": "Storefront",
  "RefreshTokenDuration": 0,
  "DefaultContextUserName": "Storefront-anonymous-user",
  "xp": {},
  "AllowAnyBuyer": true,
  "AllowAnySupplier": false,
  "AllowSeller": false,
  "IsAnonBuyer": true,
  "AssignedBuyerCount": 0,
  "AssignedSupplierCount": 0,
  "OrderCheckoutIntegrationEventID": "Middleware",
  "OrderCheckoutIntegrationEventName": "Middleware",
  "MinimumRequiredRoles": [],
  "MinimumRequiredCustomRoles": [],
  "MaximumGrantedRoles": [],
  "MaximumGrantedCustomRoles": []
}

Configuring OrderCloud’s Webhooks

When configuring webhooks, the Url will require the complete application service/middleware application endpoint to be defined, along with the HashKey, which should be configured to match the OrderCloudSettings:WebhookHashKey appsettings in HeadStart.

Webhooks also require the ApiClientIDs to be assigned on the resource itself rather that the API client and the WebhooksRoutes need to be specified in order for the OrderCloud API to trigger the webhook, which should then be redirected from ngrok through to the local web server.

{
  "ID": "MyWebhook",
  "Name": "MyWebhook",
  "Url": "https://8f79-125-253-105-232.ngrok.io/mywebhook",
  "HashKey": "samplehash",
  "ElevatedRoles": [
    "BuyerAdmin"
  ],
  "ApiClientIDs": [
    <api client id>
  ],
  "WebhookRoutes": [
    {
      "Route": "v1/buyers",
      "Verb": "POST"
    }
  ]
}

Testing the Endpoints in the Middleware

With Visual Studio’s debugger attached to the local IIS site or is being debugged directly, when an integration event or webhook endpoint is requested via an appropriate API client, ngrok will redirect the request to the local web server and the debugger will be able to capture the traffic for local debugging.

Figure 2: Visual Studio’s debugger successfully triggered from OrderCloud’s estimateshipping endpoint redirected to a localwebserver using grok.

Troubleshooting

An attempt was made to access a socket in a way forbidden by its access permissions

When attempting to run ngrok, if the response “An attempt was made to access a socket in a way forbidden by its access permissions” is received, restarting the Host Network Services Windows service should resolve this issue.

References

Transitioning from Sitecore Experience Commerce to OrderCloud: Sellable Items To Products

Reading Time: 8 minutes

In this article, we will review and compare Sitecore Experience Commerce sellable items and OrderCloud products to facilitate developers looking to transition from XC to OrderCloud as well as identify a path for migration of existing XC solutions to OrderCloud.

We will look at a high-level comparison of architecture, functionality, and data models, with greater focus on transitioning from Sitecore Experience Commerce, meaning identifying a close path to parity in OrderCloud, using the Habitat catalog and SXA Storefront.

Conceptual Architecture and Features

Physical vs Digital Sellable Items

In XC, a sellable item is considered digital if it contains a tag that is also registered to the DigitalItemTagsPolicy. Digital products will not track inventory and will modify the delivery step of the checkout flow to collect information relevant to digital items, such as an email address and custom messaging, rather than a delivery address and shipping provider information, which is relevant for physical items.

As OrderCloud is impartial to the nature of the products, using existing platform functionality and extended properties xp, a solution can opt into tracking product types and apply custom behaviour the achieve bespoke business requirements. For example, to model products as digital as per XC, we can disable inventory tracking at the product level and copy the tags to the product’s extended properties. The middleware and storefront applications can then identify products with this information as representing digital items and provide custom behaviour throughout the storefront to match that of the SXA storefront.

{
  "Name": "MyDigitalProduct",
  "Inventory": {
    "Enabled": false
  },
  "xp": {
    "tags": "subscription"
  }
}

Sellable Items vs Products

In XC, sellable items can be represented as standalone products, which are sellable items without variations, or as a product family, which consists of a number of item variations each representing an individual product that share mostly similar properties to the other item variations.

OrderCloud can also represent products as both standalone product or a product with variants.

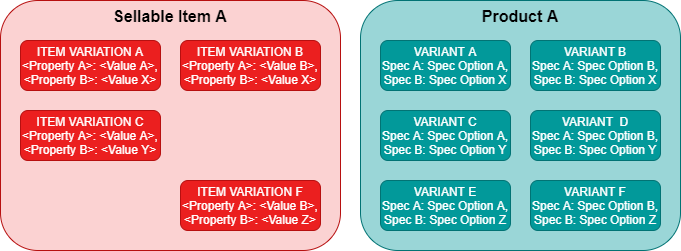
Figure 1: Sellable items with and without item variations vs products with and without variants

Item Variations vs Variants

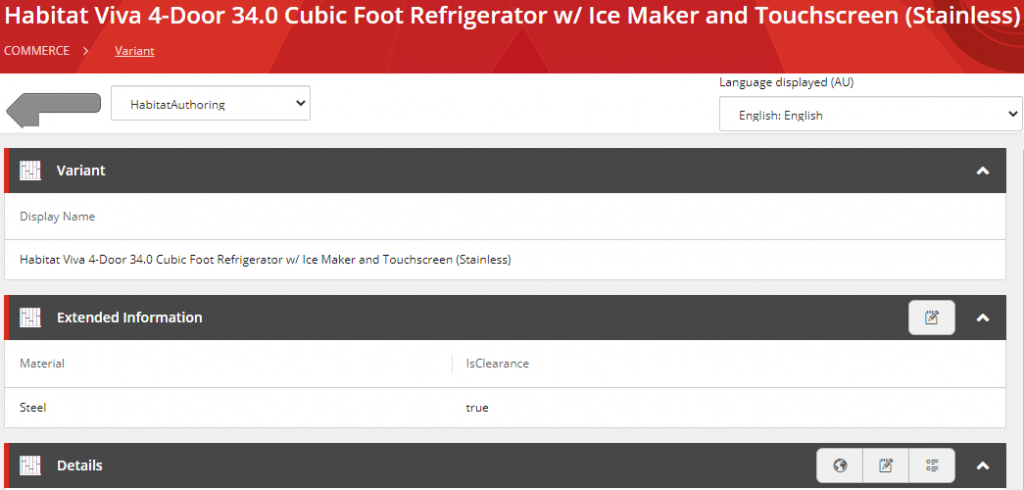
In XC, the item variations are created within a sellable item entity, each representing its own unique product.

Variation properties are defined in the environment role configuration under VariationPropertyPolicy and sellable item families are expected to use a subset of these properties to create unique combinations.

In OrderCloud, the architecture of product families have the same intention, however there is enforcement around creating only unique variations using specs and spec options. A spec closely relates to the VariationPropertyPolicy in that it specifies the property that will break down the product into a variant, while the spec option specifies all of the values that will be assigned to the spec. A product can have multiple specs assigned, e.g. the first spec could represent colors while the second could represent sizes.

While specs can then be assigned to more than one product, there’s more control in creating specs that are unique to products even if they do represent the same property type, such as size, as this will reduce the long term maintenance.

Figure 2: The product-spec assignment overview.

OrderCloud then provides the endpoint, POST /products/{productID}/variants/generate, to generate variants from all possible combinations of the assigned specs. Referencing figure 3 it can be noted that when migrating sellable items from XC there will be instances where not all combinations are required, however any unwanted variants can be disabled.

Figure 3: An example of a sellable item with item variations vs a product with generated variants.
Item Variation Corruption

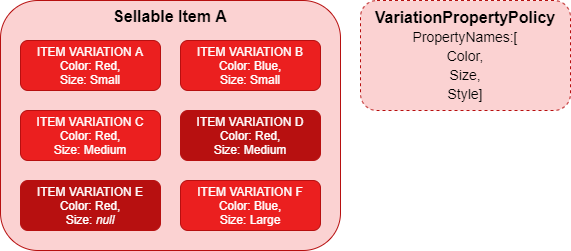
While the SXA storefront and commerce data provider will utilise the VariationPropertyPolicy configuration for the item variation controls on the product details page in the storefront, there is no validation during item variation creation. This means that is is possible to corrupt sellable item families in the following ways:

  1. Two or more varations share the same values across all of their variation properties. In figure 4, the product family utilises variation properties color and size, however item variations C and D are both configured with same color and size. In this instance, duplication may have been unintentional or a third variation property is missing that could make the variation unique. The Style property could be added in this instance to all item variations assuming the values between item variations C and D would be different.
  2. The subset of variation properties are not all populated with values. In figure 4, the Color and Size properties are filled out for all item variations, except for item variation E which has a null value for Size.
Figure 4: Examples of how item variations can be inadvertently corrupted.

In figure 4, the Style property is null for all item variations.

Folding Sellable Items with Variations into Standalone Products

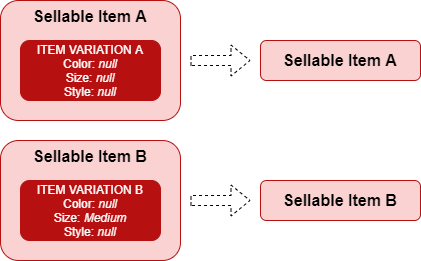
During sellable item migration there are two more scenarios that may come up, specifically in relation to sellable items with a single item variation. The first is in noting point 2 of the item variation corruption, a sellable item is flagged as corrupted as no variation properties of the item variation have values, which can be easily folded into a standalone sellable item.

The second scenario is where the single item variation does contain values for one or more variation properties. Here, is where further consideration may be required as to whether this item variation should be folded back into a standalone sellable item. The reason for this consideration is because the Commerce Engine sets a global set of variation properties, however this may not necessary apply to the sellable item in question, but was designed this way because the global configuration in the VariationPropertyPolicy.

Figure 5: Opportunities to fold sellable items with variations into standalone sellable items.

Static and Dynamic Bundles

XC has special product types called static bundles and dynamic bundles, which are configurations of sellable items that are sold together. These bundles can either represent a fixed group of sellable items or a list of sellable items with alternate sellable items, which can be substituted out by the user, and/or be an optional extra into the bundle.

OrderCloud currently does not currently support product bundling natively, however by leveraging the product’s xp it is possible to model product bundles and have functionality be controlled by middleware and buyer and seller applications.

Workshopping product bundle models and behaviour is outside of the scope of this analysis.

Extended Properties

In XC, a sellable item can have its properties extended via composer templates or programatically with custom components, while item variations only be extended programatically. These can be generally be translated over to OrderCloud using its eXtended Properties (xp), however considerations will be required around non-standard data types.

Images

XC leverages Sitecore’s media library for hosting images and stores the Sitecore Id of the image on the ImagesComponent of the sellable item or variant it’s associated to.

Over in OrderCloud, products don’t have an explicit property for images as it relies on external systems, such as DAMs or CDNs, to host imagery instead. In addition, the OrderCloud philosphy is that as there is no one-size-fits-all solution when it comes to working with product images, so the absence of a dedicated property provides the flexibility of allowing a bespoke data model to be added to the product’s xp to best represent the client’s business requirements. Examples of potential requirements include, a single array of images (image urls), image sets representing different views or components of a product, image sets representing varying quaility or sizing for omni-channel optimisation. etc.

Relationship Definitions

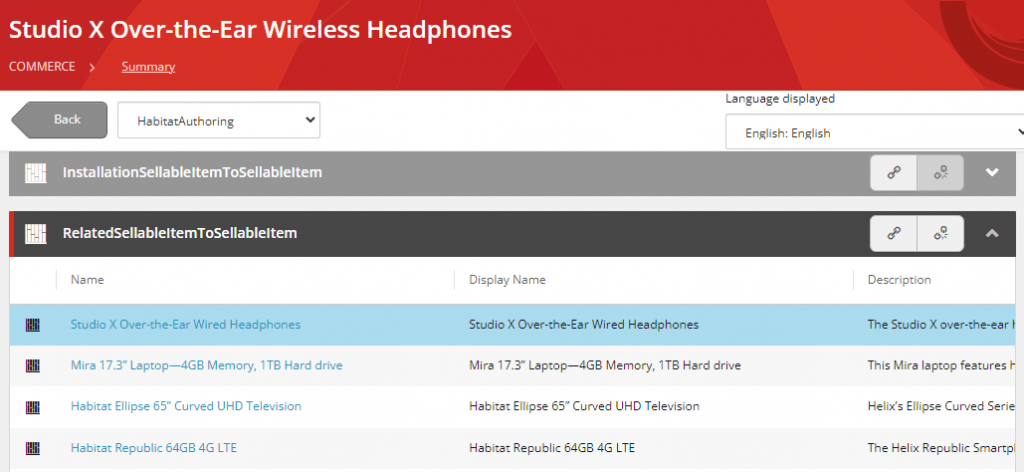
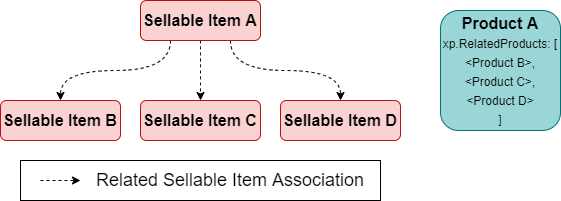
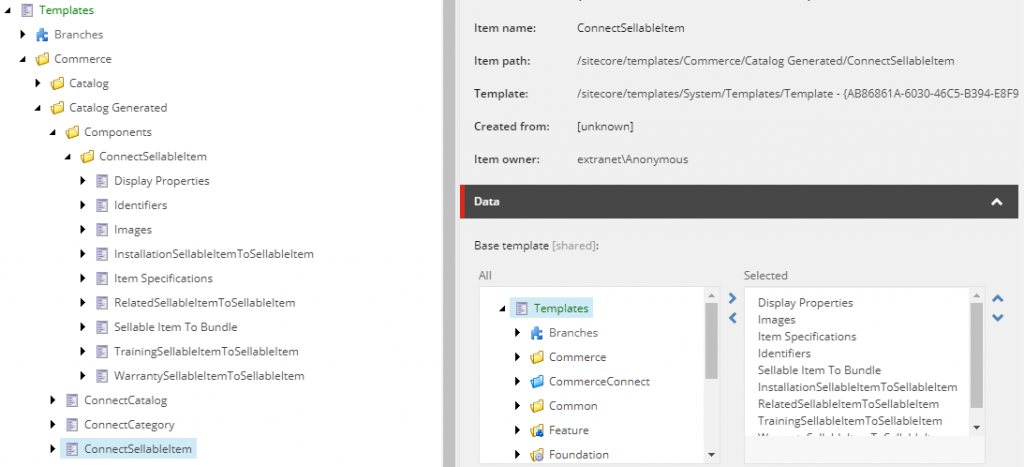
XC has a concept of relationship definitions, which allows sellable items to have a relation to another sellable item with a given context. For example, the Habitat catalog relationship definitions for associated sellable items for installation, training, warranty, and most notably related sellable items.

Figure 6: Related sellable items relationship

The Commerce Engine and BizFx application provides an interface for creating these relationships and applies validation to ensure that the related products exist and are not duplicated. The Commerce Engine also includes smarts to filter out invalid sellable items for a given context, e.g. inactive sellable items, sellable items that are not associated to the current catalog, etc.

In OrderCloud, custom product to product assignments are not native in the platform, however a list of associated products can be added to the product’s xp, e.g. xp.RelatedProducts, to represent the relationship. To retrieve the products, a filtered product search, under the me resource, can be queried using the product’s IDs, which will automatically exclude products that don’t exist, are inactive, or are not assigned to the user, e.g. /me/products?ID=<Product B>|<Product C>|<Product D>.

Figure 7: XC related products association architecture vs. a sample approach using xp in OrderCloud.

Inventory and Pricing

The topics of inventory and pricing comparisons between XC and OrderCloud can be found in their dedicated article in Transitioning from Sitecore Experience Commerce to OrderCloud: Inventory and Pricing.

Other Considerations

Entity Versioning and Workflow

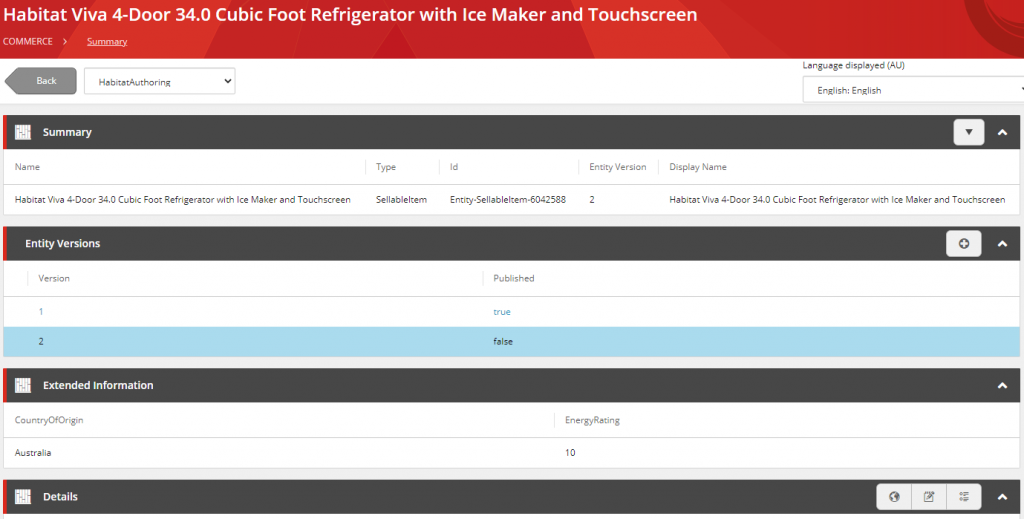
As OrderCloud has no concept of entity versioning, one approach towards migration is to only migrate the latest published versions of sellable items. In a similar manner the publishing workflow that applies to sellable items may see a project consider the latest entity version as the source of truth regardless of its published state. Considerations would need to be made on project by project basis, which may entail a level of data cleansing prior to migration.

Property Localisation

XC allows entity properties to be localisable for content that can be displayed in multiple languages. OrderCloud does not explicitly support property localisation, however localisation can be achieved by creating locale-specific entities as documented in How to Globalize your eCommerce.

Data Mapping

With the conceptual analysis above, we will now review what data mapping would look like for migration and from a comparison standpoint.

In the XC Entity/Component column, components are assumed to live on the primary XC entity being mapped.

OrderCloud IDs do not allow spaces. It is important that the IDs are parsed to remove/replace invalid characters consistently.

Products

OC PropertyData TypeRequiredXC Entity/ComponentXC PropertyData TypeNotes
OwnerIDstringNoN/AN/AN/A
DefaultPriceScheduleIDstringNoSellableItemListPriceMoneyPriceSchedule will be created from the SellableItem’s ListPrice, using the Product.ID as the Price Schedule’s ID.
AutoForwardboolNoN/AN/AN/A
IDstringNoSellableItemFriendlyIdstring
NamestringYesSellableItemDisplayNamestring
DescriptionstringNoN/AN/AN/A
QuantityMultiplierintNoN/AN/AN/A
ShipWeightfloatNo[ItemSpecificationsComponent]Weightdouble
ShipHeightfloatNo[ItemSpecificationsComponent]Heightdouble
ShipWidthfloatNo[ItemSpecificationsComponent]Widthdouble
ShipLengthfloatNo[ItemSpecificationsComponent]Lengthdouble
ActivebooleanNoSellableItemPublishedbooleanThis assumes only the latest published entity version is being migrated.
ShipFromAddressIDstringNoN/AN/AN/A
Inventory.EnabledbooleanNoN/AN/AN/AVirtual products won’t have inventory in either XC or OrderCloud. This should be set to disabled if any of the XC tags contain a value representing an XC virtual product.
Inventory.NotificationPointintNoN/AN/AN/A
Inventory.VariantLevelTrackingbooleanNoN/AN/AN/A
Inventory.OrderCanExceedbooleanNoN/AN/AN/A
Inventory.QuantityAvailableintNoInventoryInformationQuantityintIf transitioning a single inventory set/ record per product.
DefaultSupplierIDstringNoN/AN/AN/A
AllSuppliersCanSellbooleanNoN/AN/AN/A
xpobjectNoN/AN/AN/AXC composer views and programatic components can be added to xp as needed.
xp.BrandstringNoSellableItemBrandstring
xp.ManufacturerstringNoSellableItemManufacturerstring
xp.TypeOfGoodstringNoSellableItemTypeOfGoodstring
xp.TagslistNoSellableItemTagslistConvert to list of string using name property only.
xp.ItemDefinitionslistNo[CatalogsComponent].[CatalogComponent]ItemDefinitionstringThe ItemDefinition of each CatalogComponent should be added to the list, excluding duplicate values.
xp.RelatedProductslistNoRelationship (Commerce List)IdstringThe relationships are stored in lists, not entities. All Ids will need to be parsed to their friendly ids.

Specs

OC PropertyData TypeRequiredXC Entity/ComponentXC PropertyData TypeNotes
IDstringNoSellableItem
ItemVariationComponent
FriendlyId
<variation property>
stringRecommended using ‘{SellableItem.FriendlyId}_<variation property name>’ to create unique name.
ListOrderintegerNoN/AN/AN/A
NamestringYesItemVariationComponent<variation property>stringThe name of the variation property, not the value of the variation property.
DefaultValuestringNoN/AN/AN/A
RequiredbooleanNoN/AN/AN/ASet to true.
AllowOpenTextbooleanNoN/AN/AN/Afalse by default.
DefaultOptionIDstringNoN/AN/AN/A
DefinesVariantbooleanNoN/AN/AN/ASet to true.
xpobjectNoN/AN/AN/A

Spec Options

OC PropertyData TypeRequiredXC Entity/ComponentXC PropertyData TypeNotes
specIDstringYesSellableItem
ItemVariationComponent
FriendlyId
<variation property>
stringSee Spec Data Mapping ID property.
IDstringNoItemVariationComponent<variation property>stringThe value of the variation property.
ValuestringYesItemVariationComponent<variation property>stringThe value of the variation property.
ListOrderintegerNoN/AN/AN/A
IsOpenTextbooleanNoN/AN/AN/Afalse by default.
PriceMarkupTypestringNoN/AN/AN/A
PriceMarkupnumberNoN/AN/AN/A
xpobjectNoN/AN/AN/A

Spec Product Assignments

OC PropertyData TypeRequiredXC Entity/ComponentXC PropertyData TypeNotes
SpecIDstringYesSellableItem
ItemVariationComponent
FriendlyId
<variation property>
stringSee Spec Data Mapping ID property.
ProductIDstringYesSellableItemFriendlyIdstring
DefaultValuestringNoN/AN/AN/A
DefaultOptionIDstringNoN/AN/AN/A

Variants

OC PropertyData TypeRequiredXC Entity/ComponentXC PropertyData TypeNotes
productIDstringYesSellableItemN/AN/A
variantIDstringYesItemVariationComponentIdstring
IDstringNoItemVariationComponentIdstring
NamestringYesItemVariationComponentDisplayNamestring
DescriptionstringNoItemVariationComponentN/AN/A
ActivebooleanNoItemVariationComponentDisabledbooleanValue to be inverted. Set to false if not a valid variant.
ShipWeightfloatNo[ItemSpecificationsComponent]Weightdouble
ShipHeightfloatNo[ItemSpecificationsComponent]Heightdouble
ShipWidthfloatNo[ItemSpecificationsComponent]Widthdouble
ShipLengthfloatNo[ItemSpecificationsComponent]Lengthdouble
Inventory.QuantityAvailableintNoInventoryInformationQuantityintIf transitioning a single inventory set/ record per product.
xpobjectNoN/AN/AN/AXC composer views and programatic components can be added to xp as needed.
xp.TagslistNoSellableItemTagslistConvert to list of string using name property only.

References

Continue the Series

  1. Transitioning from Sitecore Experience Commerce to OrderCloud: Customers to Buyer Users
  2. Transitioning from Sitecore Experience Commerce to OrderCloud: Customers and Buyers – API Access
  3. Transitioning from Sitecore Experience Commerce to OrderCloud: Catalogs and Categories
  4. Transitioning from Sitecore Experience Commerce to OrderCloud: Sellable Items To Products
  5. Transitioning from Sitecore Experience Commerce to OrderCloud: Inventory and Pricing
  6. Transitioning from Sitecore Experience Commerce to OrderCloud: Carts to Unsubmitted Orders and Carts
  7. Transitioning from Sitecore Experience Commerce to OrderCloud: Fulfillments to Shipping
  8. Transitioning from Sitecore Experience Commerce to OrderCloud: Tax and Payments
  9. Transitioning from Sitecore Experience Commerce to OrderCloud: Orders
  10. Transitioning from Sitecore Experience Commerce to OrderCloud: Order Workflow and Minions
  11. Transitioning from Sitecore Experience Commerce to OrderCloud: Promotions

Transitioning from Sitecore Experience Commerce to OrderCloud: Customers and Buyers – API Access

Reading Time: 7 minutes

In this article, we will review and compare API Access for Sitecore Experience Commerce customers and OrderCloud buyer users to facilitate developers looking to transition from XC to OrderCloud as well as identify a path for migration of existing XC solutions to OrderCloud.

We will look at a high-level comparison of architecture, functionality, and data models, with greater focus on transitioning from Sitecore Experience Commerce, meaning identifying a close path to parity in OrderCloud, using the Habitat catalog and SXA Storefront.

Conceptual Architecture and Features

Storefront API Access to the Commerce Systems

One aspect that developers tend to glaze over is how an SXA storefront interacts with the Commerce Engine. This is because the installation scripts apply the necessary configurations for the installed topology without the need for further manual intervention.

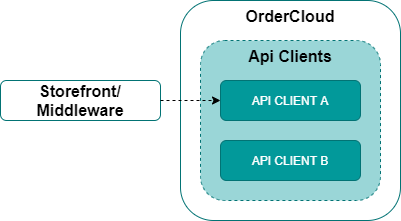
In an OrderCloud solution, the storefront will be configured to interact with the OrderCloud API server for the relevant region and environment, as documented in OrderCloud Supported Regions and Environments, that hosts the marketplace instance.

Resources

In the Commerce Engine, the CommerceODataController actions are registered to either the /api or /commerceops route, which creates the API under these two primary resources. The api route typically hosts actions that a storefront or the Commerce Business Tools (BizFx) would request, while the commerceops route hosts actions for dev ops interactions by dev ops users and the commerce data provider.

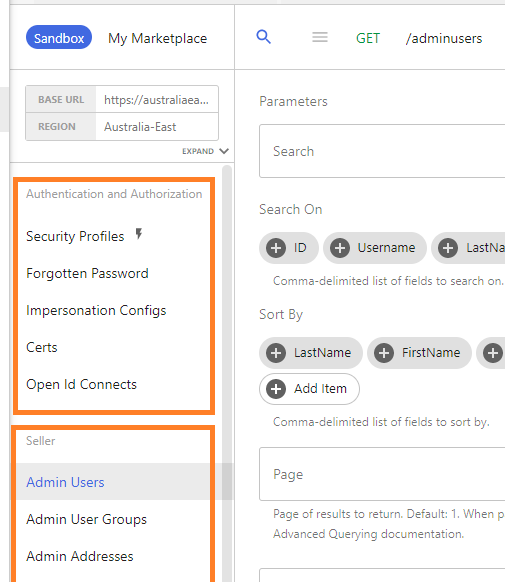
In OrderCloud, resources are not grouped up into resource buckets, however in the OrderCloud portal there is logical grouping within the UI to help navigate between related resources, as seen in figure 1.

For storefront users, the /me and /order resources will cover account management and creation of orders respectively.

Figure 1: Logical grouping of resources in the OrderCloud portal.

Authentication

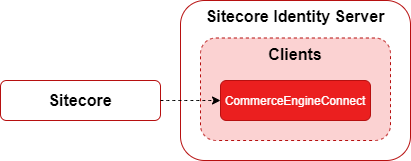
The Sitecore Identity Server provides bearer token authentication for SXA storefront requests made to the Commerce Engine using the Commerce Engine Connect client, which is configured across Sitecore, Sitecore Identity Server, and Commerce Engine applications.

Figure 2: XC Authentication of Commerce Engine Connect for SXA storefront – Commerce Engine communications.

SXA customer registration and login functionality is accomplished using the SQL authorization provider, instead of the Sitecore Identify Server. This also segregates customer authentication data stored in the security database from commerce data stored in the commerce database.

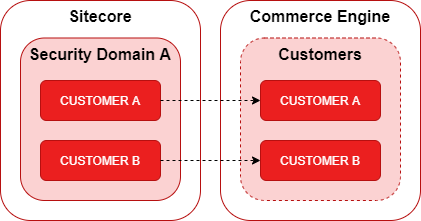
The related commerce customer entity is created in the commerce database during account creation and the commerce customer reference is stored against the customer account in the security database.

Figure 3: Storefront users are created with a corresponding commerce customer entity to segregate membership data from commerce data.

In an OrderCloud storefront implementation, authentication is handled within OrderCloud itself using API clients, in a similar fashion to Sitecore Identity Server’s clients, returning limited lifetime bearer tokens.

Figure 4: OrderCloud authentication via API client overview.

Storefront user data is stored under a single object and users are typically authenticated directly with all subsequent requests containing the context of a storefront user.

Roles and Authorisation

Requests to the Commerce Engine will see the bearer token validated, which will determine the roles of the authenticated user and compare them to the roles of the API resource, which is configured in the Commerce Engine under the ControllerMethodRolesPolicy in Global.json.

{
  "$type": "Sitecore.Commerce.Core.ControllerMethodRolesPolicy, Sitecore.Commerce.Core",
  "ControllerMethodRegularExpression": "/commerceops/",
  "AuthorizedRoles": [
    "sitecore\\Commerce Business User",
    "commerce\\runtime"
  ]
},
{
  "$type": "Sitecore.Commerce.Core.ControllerMethodRolesPolicy, Sitecore.Commerce.Core",
  "ControllerMethodRegularExpression": "/api/",
  "AuthorizedRoles": [
    "sitecore\\Commerce Business User",
    "commerce\\runtime"
  ]
}

Requests not containing an authorized role will be rejected by the Commerce Engine with the exception of the Commerce Engine Connect client being a special case in that the Commerce Engine identifies this user and appends the commerce\runtime role to the request context to effectively brute force authorisation for its requests.

In contrast, OrderCloud has predefined roles for the various resources, which is detailed further in Understanding Security Profiles, providing more granular control over the resources a user has access to.

During the authentication process the roles are resolved from the user being authenticated, based on security profile assignments at the company, user group, and user levels.

To replicate the behaviour from XC, while having considerations for the necessary restrictions to API resources that wouldn’t be utilised by a storefront user, the following roles would be assigned to a security profile for storefront users.

{
  "Roles": [
    "Shopper",
    "MeAdmin",
    "MeXpAdmin",
    "MeAddressAdmin",
    "MeCreditCardAdmin",
    "PasswordReset"
  ]
}

Anonymous and Registered Users

In the SXA storefront, the customer id of anonymous/guest users and registered customers are passed in as a request header, which the Commerce Engine then resolves to the anonymous or registered user.

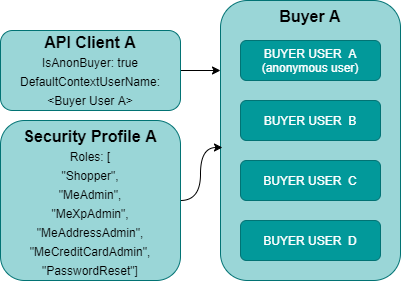
In OrderCloud, the user context needs to be resolved at the time of authentication, which will then be passed on to subsequent requests via the access token. Registered users are authenticated with username and password, while anonymous users are authenticated against an API client configured with an IsAnonBuyer flag and the default context user, which is used for resolving roles and not a user context when interacting with the OrderCloud API.

In figure 5, we see an API client configured with the IsAnonBuyer set as true and the DefaultContextUserName set to BUYER USER A. The roles configured to Security Profile A, which is assigned to Buyer A will be resolved when attempting to authenticate a registered buyer user or an anonymous user.

BUYER USER A is created for the specific purpose of being the anonymous user template as using a real user that can be modified or deleted at any time can have adverse effects on the anonymous user behaviour.

Figure 5: API client – buyer – security profile relationship and configuration example for registered and anonymous storefront users.

Service Proxy vs SDKs and Catalyst

The SXA storefront solution, including custom code, typically communicates with the Commerce Engine via the Service Proxy – an SDK containing Commerce Engine data models and strongly typed wrappers for the API. The Service Proxy simplifies custom development effort and complexity, which can also be regenerated after modifying the Commerce Engine to ensure the integrity of the library.

Figure 6: Commer Engine API access via the Service Proxy.

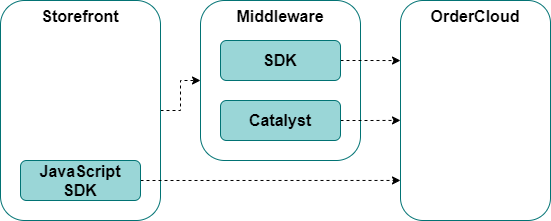
OrderCloud also provides a JavaScript and .Net SDK for the OrderCloud data models and strongly typed wrappers for all public endpoints. The JavaScript SDK allows requests to be made directly from the client browser rather than passed through middleware, whereas the .Net SDK is intended for the middleware for requests that typically require wrapped logic or even placeholder wrappers to insert logic at a later date.

The OrderCloud catalyst is another .Net library which provides additional helpers for authentication, performant bulk requests, error handling, jobs, project setup, etc.

Figure 7: OrderCloud API access via SDK and Catalyst libraries.

Data Mapping

With the conceptual analysis above, we will now review what data mapping would look like for migration and from a comparison standpoint.

In the XC Entity/Component column, components are assumed to live on the primary XC entity being mapped.

OrderCloud IDs do not allow spaces. It is important that the IDs are parsed to remove/replace invalid characters consistently.

Security Profile

The security profile mapped below represents storefront users only. The BizFx Business Tools users would have a different configuration, most notably for roles.

OC PropertyData TypeRequiredXC Entity/ComponentXC PropertyData TypeNotes
IDstringNoSite (Sitecore)Domainstring
NamestringYesSite (Sitecore)Domainstring
RolesarrayNoShopper, MeAdmin, MeXpAdmin, MeAddressAdmin, MeCreditCardAdmin, PasswordResetN/AN/A
CustomRolesarrayNoN/AN/AN/A
PasswordConfig.LimitPasswordReuseintegerNoN/AN/AN/A
PasswordConfig.MaxConsecutiveDupeCharsintegerNoN/AN/AN/A
PasswordConfig.MaximumPasswordAgeintegerNoN/AN/AN/A
PasswordConfig.MinimumPasswordAgeintegerNoN/AN/AN/A
PasswordConfig.AllowedFailedAttemptsintegerNo(web.config)
configuration/system.web/
membership/add[name=”sql”]
maxInvalidPasswordAttemptsstringSet to 5
PasswordConfig.LockoutDurationintegerNoN/AN/AN/A
PasswordConfig.UpperCaseRequiredbooleanNoN/AN/AN/A
PasswordConfig.LowerCaseRequiredbooleanNoN/AN/AN/A
PasswordConfig.SpecialCharacterRequiredbooleanNoN/AN/AN/A
PasswordConfig.NumericRequiredbooleanNoN/AN/AN/A
PasswordConfig.MinimumCharacterCountintegerNo(Commerce.XA) Registration.cshtml
RegistrationUserInputModel.cs
data_val_length_min
MinimumLength
string
integer
Sitecore’s default value is 6, while OrderCloud has a minimum value of 10.

Security Profile Assignment

OC PropertyData TypeRequiredXC Entity/ComponentXC PropertyData TypeNotes
SecurityProfileIDstringYesSite (Sitecore)Domainstring
BuyerIDstringNoSite (Sitecore)Domainstring
SupplierIDstringNoN/AN/AN/A
UserIDstringNoN/AN/AN/A
UserGroupIDstringNoN/AN/AN/A

Buyer User (Anonymous User)

The anonymous buyer user is created to represent an instance of an anonymous user. This user is fleshed out with hard-coded values for mandatory properties.

OC PropertyData TypeRequiredXC Entity/ComponentXC PropertyData TypeNotes
buyerIDstringYesSite (Sitecore)DomainstringIs a resource parameter, not body property.
IDstringNoN/AN/Astring“anonymous-user”
UsernamestringYesN/AN/Astring“{buyerId}-anonymous-user”
PasswordstringNoN/AN/AN/A
FirstNamestringYesN/AN/AN/A“Anonymous”
LastNamestringYesN/AN/AN/A“User”
EmailstringYesN/AN/AN/A“anonymous@user.com”
PhonestringNoN/AN/AN/A
TermsAcceptedstringNoN/AN/AN/A
ActivebooleanYesN/AN/AN/ASet to true
xpobjectNoN/AN/AN/A

API Client

OC PropertyData TypeRequiredXC Entity/ComponentXC PropertyData TypeNotes
ClientSecretstringNoN/AN/AN/A
AccessTokenDurationintegerYesN/AN/AN/ASet to 600 (maximum)
ActivebooleanNoN/AN/AN/ASet to true
AppNamestringYesSite (Sitecore)Domainstring
RefreshTokenDurationintegerNoN/AN/AN/A
DefaultContextUserNamestringNoAnonymous Buyer User (OrderCloud)Usernamestring
AllowAnyBuyerbooleanNoN/AN/AN/A
AllowAnySupplierbooleanNoN/AN/AN/A
AllowSellerbooleanNoN/AN/AN/A
IsAnonBuyerbooleanNoN/AN/AN/ASet to true
OrderCheckoutIntegrationEventIDstringNoN/AN/AN/A
MinimumRequiredRolesarrayNoN/AN/AN/A
MinimumRequiredCustomRolesarrayNoN/AN/AN/A
MaximumGrantedRolesarrayNoN/AN/AN/A
MaximumGrantedCustomRolesarrayNoN/AN/AN/A
xpobjectNoN/AN/AN/A

API Client Assignment

Technically, the API client assignment can be skipped and the AllowAnyBuyer property on the API client can be set to true instead, however this example creates an API client per storefront, which may be preferrable to allow the API client configuration to be modified later without affecting the other storefronts.

OC PropertyData TypeRequiredXC Entity/ComponentXC PropertyData TypeNotes
ApiClientIDstringYesApi Client (OrderCloud)IDstring
BuyerIDstringNoSite (Sitecore)Domainstring
SupplierIDstringNoN/AN/AN/A

References

Continue the Series

  1. Transitioning from Sitecore Experience Commerce to OrderCloud: Customers to Buyer Users
  2. Transitioning from Sitecore Experience Commerce to OrderCloud: Customers and Buyers – API Access
  3. Transitioning from Sitecore Experience Commerce to OrderCloud: Catalogs and Categories
  4. Transitioning from Sitecore Experience Commerce to OrderCloud: Sellable Items To Products
  5. Transitioning from Sitecore Experience Commerce to OrderCloud: Inventory and Pricing
  6. Transitioning from Sitecore Experience Commerce to OrderCloud: Carts to Unsubmitted Orders and Carts
  7. Transitioning from Sitecore Experience Commerce to OrderCloud: Fulfillments to Shipping
  8. Transitioning from Sitecore Experience Commerce to OrderCloud: Tax and Payments
  9. Transitioning from Sitecore Experience Commerce to OrderCloud: Orders
  10. Transitioning from Sitecore Experience Commerce to OrderCloud: Order Workflow and Minions
  11. Transitioning from Sitecore Experience Commerce to OrderCloud: Promotions

Transitioning from Sitecore Experience Commerce to OrderCloud: Catalogs and Categories

Reading Time: 6 minutes

In this article, we will review and compare catalogs and categories between Sitecore Experience Commerce and OrderCloud to facilitate developers looking to transition from XC to OrderCloud as well as identify a path for migration of existing XC solutions to OrderCloud.

We will look at a high-level comparison of architecture, functionality, and data models, with greater focus on transitioning from Sitecore Experience Commerce, meaning identifying a close path to parity in OrderCloud, using the Habitat catalog and SXA Storefront.

Conceptual Architecture and Features

Catalogs and Categories

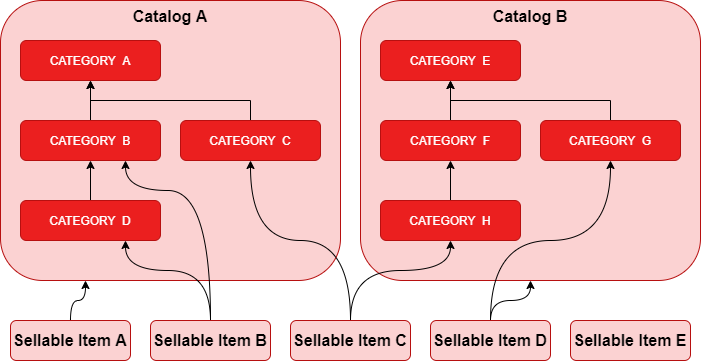
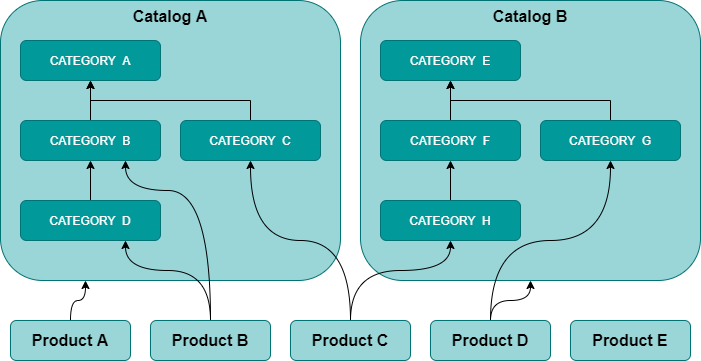
In XC, the structure of catalogs, categories, and sellable items/products can be recreated in OrderCloud. In a nutshell, categories are tied to their catalogs and can only have one parent, either another category or the catalog itself, while sellable items or products are separate to the catalog and can be assigned to one or more catalogs and/or categories.

In earlier versions of XC categories were allowed to have multiple parents, but support was subsequently removed. If an XC solution still contains categories with multiple parents this would be a consideration for pre-migration cleansing.

Figure 1: XC relationships between catalogs, categories, and sellable items.
Figure 2: OrderCloud relationships between catalogs, categories, and products.

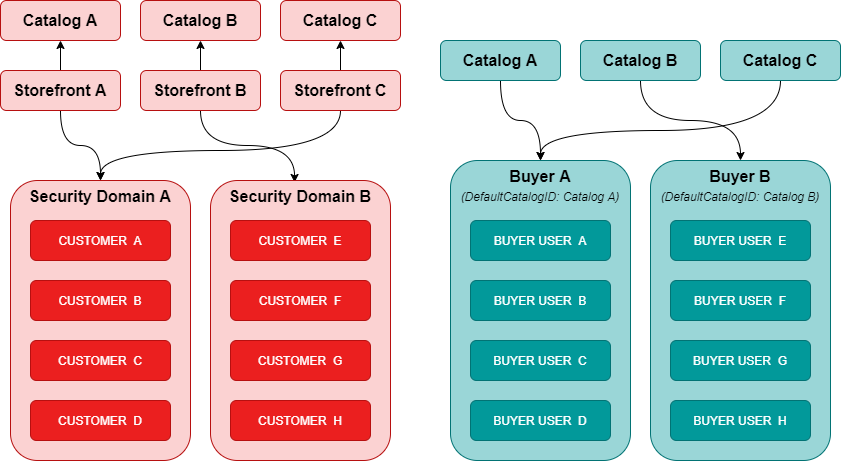
The Storefront to Catalog Association

In Customer to Buyer Users we discussed that in XC, a storefront was required in order to associate a customer to a catalog. while OrderCloud has a direct assignment between buyers and catalogs. We will now revisit this to complete the context for catalogs.

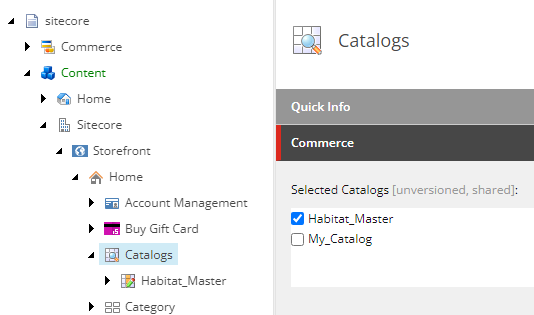
In the SXA storefront, only a single catalog can be associated to the storefront, which is configured in the Content Editor under /sitecore/content/<tenant>/<site>/Home/Catalogs.

Figure 3: An example catalog configuration for a storefront.

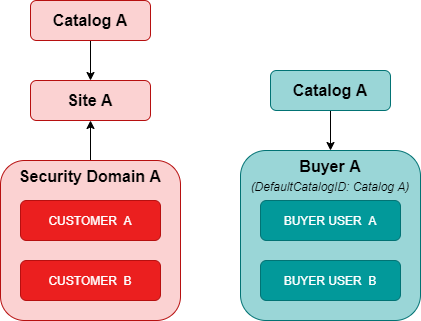
Over in OrderCloud, a catalog assignment creates a link between a catalog and a buyer, bypassing the need for a storefront.

Figure 4: XC associates a catalog to a site while OrderCloud assigns catalogs directly to a buyer

The catalog assignment also contains two additional boolean properties in ViewAllCategories and ViewAllProducts, which as the names suggest allow all categories and products to be viewed by buyer users via the /me/products resource. These properties are important when understanding how XC customers can view sellable items vs OrderCloud buyers viewing products, which we cover in the next section SXA Scope Query vs Product Visibility.

SXA Scope Query vs Product Visibility

Now that we have established that the catalog structure can be identical between XC and OrderCloud, how do both systems handle product search functionality?

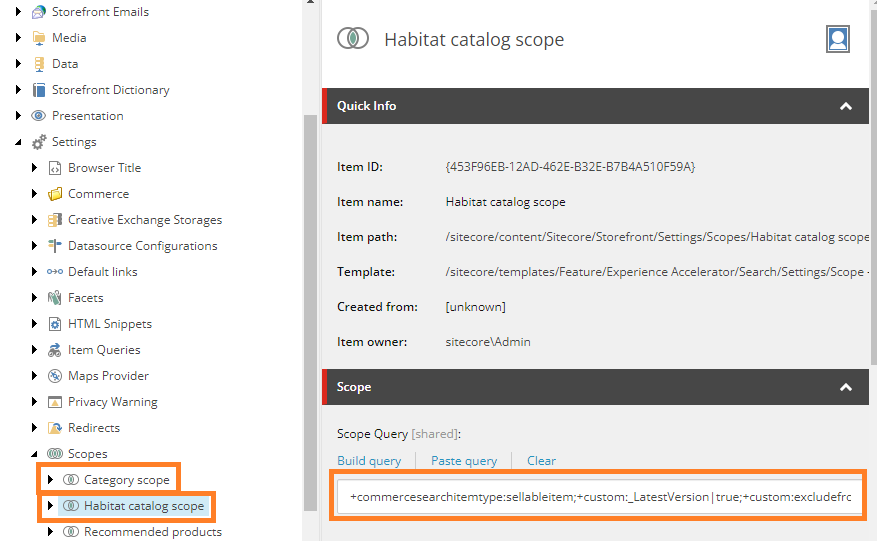
In an SXA storefront, there are two primary search scopes that are used for searching sellable items; the catalog scope and the category scope. These scopes are defined in the Content Editor under /sitecore/content/<tenant>/<site>/Settings/Scopes.

Figure 5: The catalog and category scopes in an SXA storefront.
Catalog Scope

The catalog scope is used by the global site search component, and will perform a search query returning all active sellable items associated to the catalog. An optional search term can be provided by the storefront user to further filter the results.

Referencing OrderCloud’s documentation, Product Visibility Requirements, we see Scenario 3 replicates the XC and the SXA storefront visibility rules for the catalog scope, excluding the search term filter. “When I assign a catalog to a buyer organization, I just want everybody in that organization to see everything in the catalog.” In short the ViewAllCategories and ViewAllProducts of a catalog assignment should be set to true.

Category Scope

The category scope is used for the category search results page and is just a more refined scope than the catalog scope in that it will return all active sellable items associated to a specific defined category. Again, an optional search term is available for further filtering.

The Search Term Filter

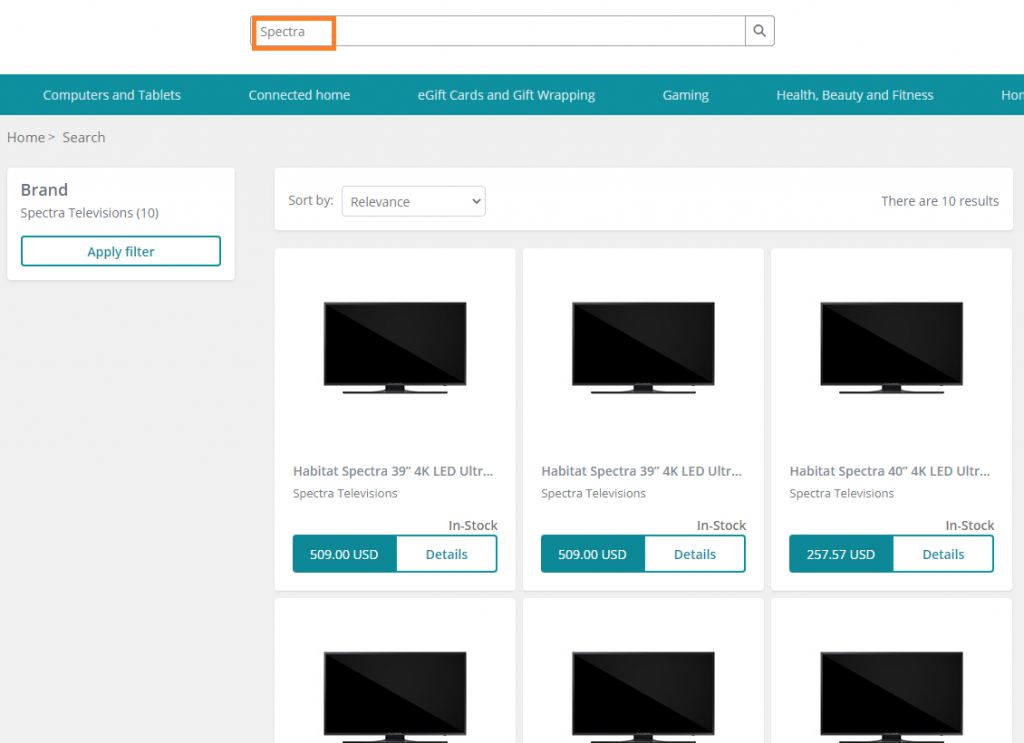
For the search term filter, the SXA query builder appends a comparison between the search term appends a fuzzy query against the sxacontent index field, which is an array consisting of the following sellable item properties:

  • Tags
  • ProductId
  • Name
  • DisplayName
  • ItemDefinition
  • Brand

The resulting query for a global search will look something like the following, with the highlighted section representing the example search term of “Spectra”.

In OrderCloud, we can achieve an equivalent query using the /me/products resource and applying a filter that allows us to filter on multiple fields with logical “OR” syntax to query each of the raw OrderCloud properties that make up the XC sxacontent index field.

  • Catalog scope: /me/products?catalogID=Habitat_Catalog&ID|Name|xp.Tags|xp.ItemDefinitions|xp.Brand=*Spectra*
  • Category scope: /me/products?catalogID=Habitat_Catalog&categoryID=Televisions&ID|Name|xp.Tags|xp.ItemDefinitions|xp.Brand=*Spectra*

As we will review in an upcoming article, the Name property tends to be a duplicate of the DisplayName, so we won’t bloat the product’s xp in OrderCloud with redundant data, however you can choose to include the Name property and amend the /me/products queries as necessary.

Catalog – Item Definitions

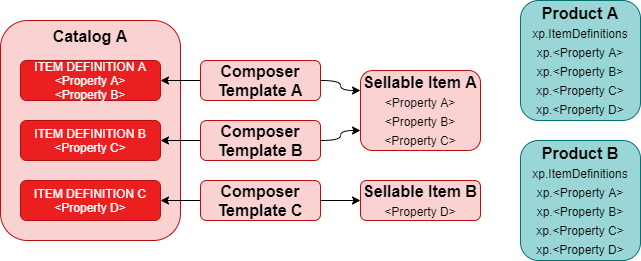
Item definitions allow composer templates to be associated with sellable items to create extended properties on the sellable items. The name of the item definition is also used in storefront search indexes for search components

From an OrderCloud perspective, extended properties (XP) can be used to represent an equivalent result. As represented in figure 6, all item definition properties are merged into a consistent xp schema along with the item definitions as its own xp, which will be indexed and available for search queries, product facets, etc.

Figure 6: The XC architecture for item definitions vs a sample architecture approach in OrderCloud.

Other Considerations

Entity Versioning and Workflow

In lieu of entity versioning in OrderCloud, one approach towards migration is to only migrate the latest published versions of catalogs and categories. In a similar manner the publishing workflow that applies to catalogs and categories may see a project consider the latest entity version as the source of truth regardless of its published state. Considerations would need to be made on project by project basis, which may entail a level of data cleansing.

Catalogs and Categories Pending Purge

A gotcha in migrating catalogs and categories is that the entities can still exist if they are pending purge, which is represented on the entity with an instance of PurgeCatalogsComponent or PurgeCategoriesComponent. These entities can be safely ignored during migration.

Property Localisation

XC provides entity properties to be localisable for content that can be displayed in multiple languages. OrderCloud does not explicitly support property localisation, however localisation can be achieved by creating locale-specific entities as documented in How to Globalize your eCommerce.

Data Mapping

With the conceptual analysis above, we will now review what data mapping would look like for migration and from a comparison standpoint.

In the XC Entity/Component column, components are assumed to live on the primary XC entity being mapped.

OrderCloud IDs do not allow spaces. It is important that the IDs are parsed to remove/replace invalid characters consistently.

Catalogs

Catalog mapping is fairly basic as there aren’t many properties on the catalogs of either system

OC PropertyData TypeRequiredXC Entity/ComponentXC PropertyData TypeNotes
IDstringYesCatalogFriendlyIdstring
OwnerIDstringNoN/AN/AN/A
NamestringYesCatalogDisplayNamestring
DescriptionstringNoN/AN/AN/A
ActivebooleanNoCatalogPublishedbooleanThis assumes only the latest published entity version is being migrated.
xpobjectNoN/AN/AN/AXC composer views and programatic components can be added to xp as needed.

Catalog Assignments

Catalog assignments are simply a relational mapping with the added control over category and product visibility.

OC PropertyData TypeRequiredXC Entity/ComponentXC PropertyData TypeNotes
CatalogIDstringYesCatalogFriendlyIdstring
BuyerIDstringNoN/AN/AN/AThe Sitecore Domain taken from the Storefront with the associated catalog.
ViewAllCategoriesbooleanNoN/AN/AN/ASet to true.
ViewAllProductsbooleanNoN/AN/AN/ASet to true.

Categories

XC orders categories alphabetically using list ids, while OrderCloud generates the ListOrder property, so this may result in different ordering between the two systems.

OC PropertyData TypeRequiredXC Entity/ComponentXC PropertyData TypeNotes
catalogIDstringYesCategoryFriendlyIdstringIs a resource parameter, not body property.
IDstringNoCategoryFriendlyIdstring
NamestringYesCategoryDisplayNamestring
DescriptionstringNoCategoryDescriptionN/A
ListOrderstringNoN/AN/AN/AListOrder will be generated (auto-increment) when creating categories.
ActivebooleanNoCategoryPublishedbooleanThis assumes only the latest published entity version is being migrated.
xpobjectNoN/AN/AN/AXC composer views and programatic components can be added to xp as needed.

References

Continue the Series

  1. Transitioning from Sitecore Experience Commerce to OrderCloud: Customers to Buyer Users
  2. Transitioning from Sitecore Experience Commerce to OrderCloud: Customers and Buyers – API Access
  3. Transitioning from Sitecore Experience Commerce to OrderCloud: Catalogs and Categories
  4. Transitioning from Sitecore Experience Commerce to OrderCloud: Sellable Items To Products
  5. Transitioning from Sitecore Experience Commerce to OrderCloud: Inventory and Pricing
  6. Transitioning from Sitecore Experience Commerce to OrderCloud: Carts to Unsubmitted Orders and Carts
  7. Transitioning from Sitecore Experience Commerce to OrderCloud: Fulfillments to Shipping
  8. Transitioning from Sitecore Experience Commerce to OrderCloud: Tax and Payments
  9. Transitioning from Sitecore Experience Commerce to OrderCloud: Orders
  10. Transitioning from Sitecore Experience Commerce to OrderCloud: Order Workflow and Minions
  11. Transitioning from Sitecore Experience Commerce to OrderCloud: Promotions

Transitioning from Sitecore Experience Commerce to OrderCloud: Inventory and Pricing

Reading Time: 9 minutes

In this article, we will review and compare Sitecore Experience Commerce inventory and pricing entities against OrderCloud’s inventory and pricing to facilitate developers looking to transition from XC to OrderCloud as well as identify a path for migration of existing XC solutions to OrderCloud.

We will look at a high-level comparison of architecture, functionality, and data models, with greater focus on transitioning from Sitecore Experience Commerce, meaning identifying the closest path to parity as possible in OrderCloud, using the Habitat catalog and SXA Storefront.

Conceptual Architecture and Features

Inventory

Single Inventory Approach

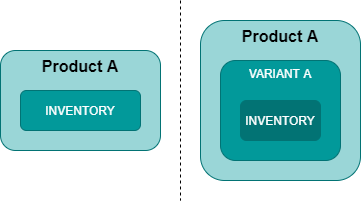
When it comes to inventory management, in its most basic form, a sellable item or item variation will contain inventory information on an associated entity within an inventory set. To be able to resolve the inventory, the sellable item must be associated to a catalog (or category within a catalog) and the catalog must be associated to the inventory set.

Figure 1: The sellable item and item variation relationship to inventory information.

In a more simplified comparison, OrderCloud also has a separate underlying inventory object assigned to a product or variant, however it’s represented and managed as a sub-object of the product/variant. No relationship to a catalog or inventory set equivalent is required.

Figure 2: The product and variant relationship to inventory, equivalent to XC’s standard inventory architecture for single inventory management.

Multi-Inventory Approach

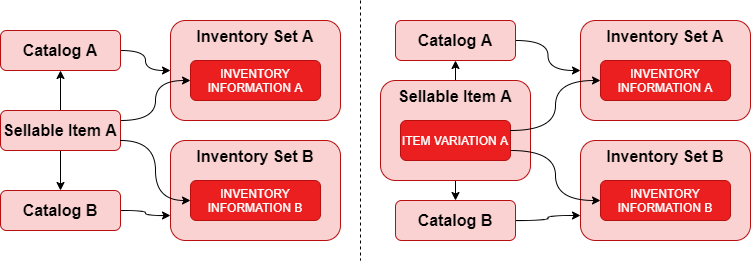
When it comes to dealing with multiple catalogs in XC, the approach has a new layer of complexity; catalogs may have different associated inventory sets, which means that the inventory information entity the commerce engine resolves to is based on catalog-inventory set association.

Figure 3: Sellable item vs item variation inventory management in XC.

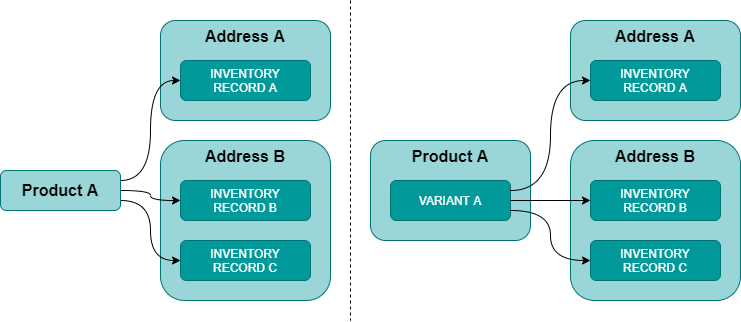
In OrderCloud, it is also possible to store multiple sets of inventory data using inventory records, providing two paths for inventory management. For implementations where single sets of inventory data will only ever be required, the traditional inventory management approach in figure 2 can be used. Where multi-inventory management is required, inventory records can be leveraged.

In OrderCloud’s multi-inventory management approach, admin addresses are effectively the inventory set equivalent in creating a logical grouping of inventory records; catalog assignments are still not required to resolve inventory.

Multiple inventory records can be assigned to an address, and although it’s not required in the XC to OrderCloud migration, it’s mentioned simply for a more complete understanding of the OrderCloud architecture.

Figure 4: OrderCloud’s inventory record approach for both single and multi-inventory support.

The most notable difference between the two systems is the Commerce Engine controls the logic to resolve the appropriate inventory information entity, while the middleware application of an OrderCloud implementation would be responsible for resolving applicable inventory records.

Inventory sets can represent the grouping of inventory information entities, typically for source or purpose, e.g. warehouse stock or reserved inventory for online sales. These are used in common customisations, such as click and collect, where more than one inventory set is utilised in a storefront. Using inventory records in OrderCloud can achieve the same result.

Inventory Properties

Apart from the expected quantity property, XC’s inventory information also contains information such as invoice unit price and currency, preorderable and backorderable details. While the commerce engine does perform some logic for decrementing backorder and preorder inventory quantities, the implementation is not complete, therefore we won’t treat this as a functional gap between the two systems and simply adding them to OrderCloud’s extended properties (xp) will suffice from the data migration perspective.

Inventory records have the additional benefit of owning their xp. This means that additional properties such as preorderable and backorderable details better fit the context in the inventory record xp, over the product xp, which would be required when using the traditional product inventory approach.

Pricing

When directly comparing the pricing architecture of XC and OrderCloud, there are some notable differences in how pricing is resolved for at both the sellable item/product level and the item variation/variant level.

List Pricing Approach – Sellable Item Level

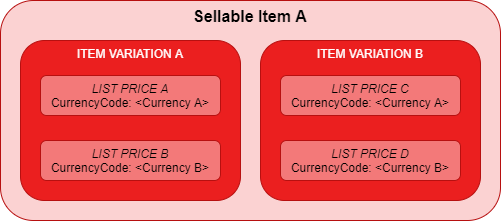
Starting with the most basic approach to pricing migration, sellable items have a list price policy that stores a list of multi-currency pricing. Note that item variations do not have list pricing in this example and will inherit from the sellable item. Also leaving the price card architecture out of the equation, the list pricing approach is represented in figure 5.

Figure 5: XC list pricing for sellable items and item variations.

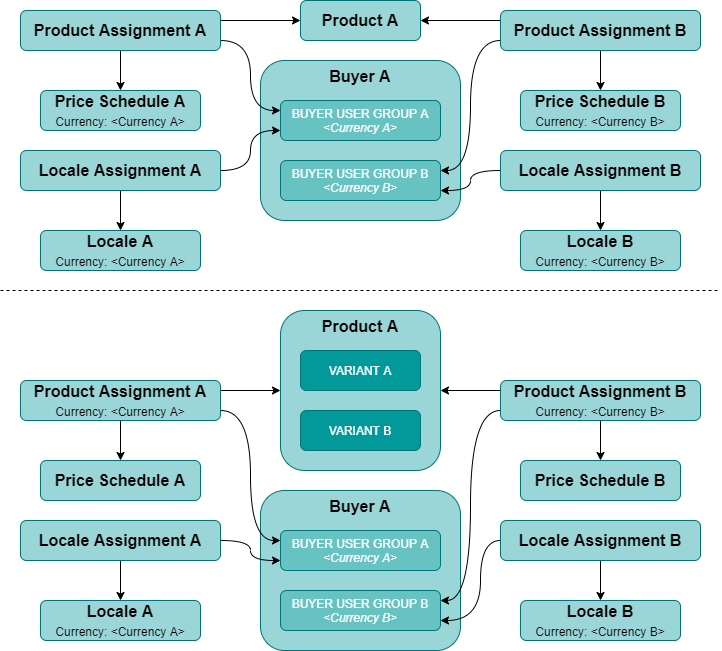
In OrderCloud, pricing is managed via price schedule objects that are assigned to products. In order to replicate the XC architecture, individual price schedules will represent the list price for each currency, then a product assignment is used to create the relationship between the product, the price schedule, and a buyer user group. Locale assignments between locale and buyer user group are used to resolve the currency when creating orders.

To switch between active currencies, the buyer user will need to be moved to the respective buyer group representing the desired currency configuration.

Multi-currency can also be achieved for anonymous/guest shoppers via multiple API clients configured appropriately. See OrderCloud: How to Globalize your eCommerce for more information.

Figure 6: A multi-currency approach for profiled users.

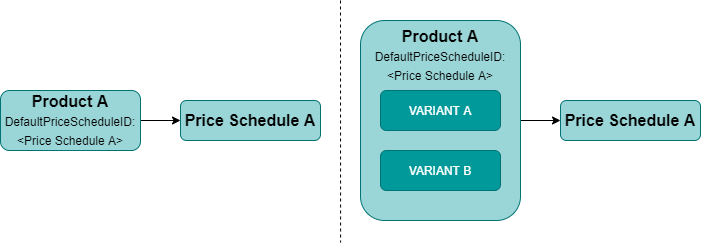
If we only need to support a single currency then we can take advantage of a more simplified approach using just the product and price schedule, using the DefaultPriceScheduleID.

Figure 7: OrderCloud single price approach for products and products with variants.

List Pricing Approach – Item Variation Level

XC also allows for list prices to be set at the item variation level, which includes fallback to the sellable item list pricing if not supplied. Excluding the fallback pricing, we see the following representation of a sellable item with list pricing configured against the item variations in figure 8.

Figure 8: XC list pricing at the variant level.

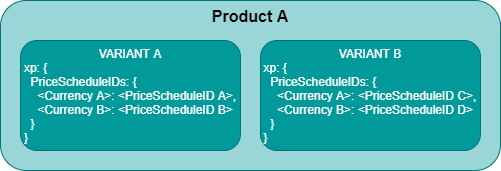
To replicate XC price resolution at the variant level in OrderCloud, the variant’s xp could be used to host price schedule assignments, while the middleware solution can resolve the price schedule as needed. For example, during the order calculate integration event the order’s line item UnitPrice property can be overridden via LineItemOverrides model.

For further information regarding the order calculate integration event, see Order Checkout Integration Event > Implementation > /OrderCalculate.

Figure 9: An XC list pricing equivalent approach for variants in OrderCloud.
{
  "LineItemOverrides": [
    {
      "LineItemID": "LineItemWithVariantA", // Line Item ID containing variant A
      "UnitPrice": 6.00 // Price resolved from Price Schedule A
    }
  ]
}

Price Card Approach

Associations

In XC, a price book can be associated to multiple catalogs, which represents the price book that the catalog will attempt to resolve price cards from for a given sellable item.

Figure 10: Price Books can be associated to more than one catalog.

Price cards can be resolved, by name or by tag association, to more than one price card across multiple price books. The Commerce Engine contains some additional logic to identify the eligible price cards, prioritise them, and determine the winning price card.

Figure 11: Sellable items are resolved back to a price book based on catalog-price book associations, however multiple price cards may also be resolved. Associations may be resolved by price card name or by tag.
Scheduled Pricing

Taking a step back to look at the minimal configuration of a single price card associated to a sellable item, the price snapshots on the price card represent scheduled pricing. Each snapshot supports multi-currency tiered pricing, and also has approval workflow to prevent new pricing from accidently going live.

Figure 12: Resolving a price from a single price card association in XC.

In OrderCloud, the price schedule contains PriceBreaks, allowing for tier pricing for a single currency. The SaleStart and SaleEnd date/time properties dictate the timeframe when the SalePrice values are active, which is also flagged by the calculated property IsOnSale.

PriceSchedule assignments support price scheduling without needing to differ from the assignment architecture shown in figure 6 and figure 7.

"PriceBreaks": [
  {
    "Quantity": 1,
    "Price": 3.99,
    "SalePrice": null
  },
  {
    "Quantity": 5,
    "Price": 3.49,
    "SalePrice": 2.99
  }
],
"Currency": "USD",
"SaleStart": "2022-03-03T00:00:00+00:00",
"SaleEnd": "2022-04-03T00:00:00+00:00",
"IsOnSale": true
Other Considerations

In migrating from XC’s price card architecture to OrderCloud’s price schedule architecture, the following table highlights additional aspects of XC with high level approaches to implementing them in an OrderCloud solution.

XCOrderCloud
A sellable item can resolve to multiple price cards, which has logic to prioritise and resolve a single price card.OrderCloud supports multiple price schedule assignments to products via assignments allowing for dynamic resolution of a price schedule relevant to the customer. For more complex scenarios, the product’s xp can be utilised to have the middleware resolve the price schedule using custom logic and can override the unit price for calculating orders via the order calculate integration event.
For more information, see OrderCloud: Same Product, Multiple Price Schedules and Order Checkout Integration Event > Implementation > /OrderCalculate
Price cards are grouped into price books, which can be resolved by the price book association of the catalog.Price schedules can be assigned to a specific buyers or buyer groups, which is typically sufficient for resolving price schedules for the majority of business requirements.
For more information, see OrderCloud: Same Product, Multiple Price Schedules.
Price cards may contain multiple price snapshots for scheduled pricing support.Price schedules allow for sale pricing, based on a specific date and time, while future sale pricing can be achieved through creating scheduled tasks, e.g. a timer triggered function app in Azure, to update price schedules accordingly.
Using price cards without list pricing allows standard pricing to be scheduled.Standard pricing can be achieved through creating scheduled tasks, e.g. a timer triggered function app in Azure, to update price schedules accordingly.
XC Price Snapshots have approval workflow.Approval workflow can be implemented via middleware customisation.

Data Mapping

With the conceptual analysis above, we will now review what data mapping would look like for migration and from a comparison standpoint.

In the XC Entity/Component column, components are assumed to live on the primary XC entity being mapped.

OrderCloud IDs do not allow spaces. It is important that the IDs are parsed to remove/replace invalid characters consistently.

Admin Addresses

While admin addresses are a representation of inventory sets, there are a number of mandatory fields for address details that do not exist in XC. These fields can either be filled out with dummy data or enriched with the appropriate values.

OC PropertyData TypeRequiredXC Entity/ComponentXC PropertyData TypeNotes
IDstringNoInventorySetFriendlyIdstring
CompanyNamestringNoN/AN/AN/A
FirstNamestringYesN/AN/AN/A
LastNamestringNoN/AN/AN/A
Street1stringYesN/AN/AN/ASample data will need to be supplied.
Street2stringNoN/AN/AN/A
CitystringYesN/AN/AN/ASample data will need to be supplied.
StatestringYesN/AN/AN/ASample data will need to be supplied.
ZipstringYesN/AN/AN/ASample data will need to be supplied.
CountrystringYesN/AN/AN/ASample data will need to be supplied.
PhonestringNoN/AN/AN/A
AddressNamestringNoInventorySetDisplayNamestring
xpobjectNoN/AN/AN/A
xp.DescriptionstringNoInventorySetDescriptionstring

Inventory Records

The xp in inventory records should only be mapped if they are being used in the XC implementation to avoid unnecessary bloating of the xp. The xp mapping can also be used on the product for the traditional inventory management approach.

OC PropertyData TypeRequiredXC Entity/ComponentXC PropertyData TypeNotes
productIDstringYesSellableItemFriendlyIdstring
IDstringNoInventoryInformationFriendlyIdstring
OwnerIDstringNoN/AN/AN/A
AddressIDstringNoInventorySetFriendlyIdstring
OrderCanExceedbooleanNoN/AN/AN/A
QuantityAvailableintegerNoInventoryInformationQuantityinteger
xpobjectNoN/AN/AN/A
xp.InvoiceUnitAmountdecimalNoInventoryInformationInvoiceUnitPrice.Amountdecimal
xp.InvoiceUnitCurrencystringNoInventoryInformationInvoiceUnitPrice.CurrencyCodestring
xp.PreorderablebooleanNo[PreorderableComponent]Preorderableboolean
xp.PreorderAvailabilityDatedatetimeoffsetNo[PreorderableComponent]PreorderAvailabilityDatedatetimeoffset
xp.PreorderedQuantityintegerNo[PreorderableComponent]PreorderedQuantityinteger
xp.PreorderLimitintegerNo[PreorderableComponent]PreorderLimitinteger
xp.BackorderablebooleanNo[BackorderableComponent]Backorderableboolean
xp.BackorderAvailabilityDatedatetimeoffsetNo[BackorderableComponent]BackorderAvailabilityDatedatetimeoffset
xp.BackorderedQuantityintegerNo[BackorderableComponent]BackorderedQuantityinteger
xp.BackorderLimitintegerNo[BackorderableComponent]BackorderLimitinteger

Price Schedules

As price schedules only support the equivalent of static list pricing of XC’s sellable items, this data mapping only covers this scenario.

OC PropertyData TypeRequiredXC Entity/ComponentXC PropertyData TypeNotes
OwnerIDstringNoN/AN/AN/A
IDstringNoSellableItem
[ListPricePolicy].Prices
FriendlyId
CurrencyCode
string
string
NamestringYesSellableItem
[ListPricePolicy].Prices
FriendlyId
CurrencyCode
string
string
ApplyTaxstringNoN/AN/AN/A
ApplyShippingbooleanNoN/AN/AN/A
MinQuantityintegerNoN/AN/AN/A
MaxQuantityintegerNo~[LineQuantityPolicy]MaximumdecimalXC stores this in the environment policies.
UseCumulativeQuantitybooleanNo~[RollupCartLinesPolicy]RollupbooleanXC stores this in the environment policies.
RestrictedQuantitybooleanNoN/AN/AN/A
PriceBreaksarrayNoN/AN/AN/A
PriceBreaks.QuantityintegerNoN/AN/AN/ASet to 1.
PriceBreaks.PricefloatNo[ListPricePolicy].PricesAmountdecimalFor a given price in the [ListPricePolicy].Prices array.
CurrencystringNo[ListPricePolicy].PricesCurrencyCodestringFor a given price in the [ListPricePolicy].Prices array.
xpobjectNoN/AN/AN/A

References

Continue the Series

  1. Transitioning from Sitecore Experience Commerce to OrderCloud: Customers to Buyer Users
  2. Transitioning from Sitecore Experience Commerce to OrderCloud: Customers and Buyers – API Access
  3. Transitioning from Sitecore Experience Commerce to OrderCloud: Catalogs and Categories
  4. Transitioning from Sitecore Experience Commerce to OrderCloud: Sellable Items To Products
  5. Transitioning from Sitecore Experience Commerce to OrderCloud: Inventory and Pricing
  6. Transitioning from Sitecore Experience Commerce to OrderCloud: Carts to Unsubmitted Orders and Carts
  7. Transitioning from Sitecore Experience Commerce to OrderCloud: Fulfillments to Shipping
  8. Transitioning from Sitecore Experience Commerce to OrderCloud: Tax and Payments
  9. Transitioning from Sitecore Experience Commerce to OrderCloud: Orders
  10. Transitioning from Sitecore Experience Commerce to OrderCloud: Order Workflow and Minions
  11. Transitioning from Sitecore Experience Commerce to OrderCloud: Promotions
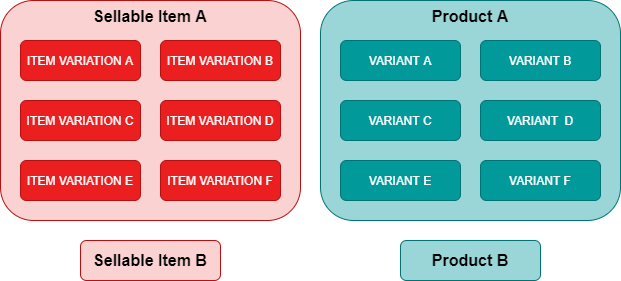
Transitioning from Sitecore Experience Commerce to OrderCloud: Customers to Buyer Users

Reading Time: 5 minutes

In this article, we will review and compare Sitecore Experience Commerce customers and OrderCloud buyer users to facilitate developers looking to transition from XC to OrderCloud as well as identify a path for migration of existing XC solutions to OrderCloud.

We will look at a high-level comparison of architecture, functionality, and data models, with greater focus on transitioning from Sitecore Experience Commerce, meaning identifying a close path to parity in OrderCloud, using the Habitat catalog and SXA Storefront.

Customers

The Customer to Storefront Association

In an XC SXA implementation, customer accounts are registered under a security domain, which can be configured in the Content Editor on the /sitecore/Content/<tenant>/<site>/Settings/Site Grouping/<storefront> item.

Figure 1: An example domain configuration for a storefront.

Customers can only be registered to a single security domain and will not be accessible in storefronts configured to a different domain. A separate customer account would need to be created under the other security domains, but it would have no knowledge or relationship to accounts across domains. However, a security domain can be registered to multiple storefronts allowing a customer to share an account across storefronts.

Figure 2: XC Security Domains have a zero to many relationship with Storefronts.

In OrderCloud, customers can be represented as buyer users, which are registered under buyer companies, and can only belong to a single buyer company. This can be compared directly to the relationship between security domains and customers.

The relationship of a buyer to an OrderCloud storefront is not tightly coupled like the SXA storefront. Access to an OrderCloud storefront is managed through API clients, security profiles and their assignments to buyers. See Getting Started > Establishing API Access for more information.

Figure 3: The basic structure comparison between customers to users.

The Customer to Catalog Association

Buyers also contain a DefaultCatalogID property, which will create an associated catalog with an ID matching the buyer ID if not specified during the creation of a buyer. While it may seem like this limits Buyer A to a single catalog (Catalog A), multiple catalogs can be assigned via OrderCloud’s catalog assignments, which matches XC’s equivalent in supporting both Catalog A and Catalog C associations to Security Domain A via storefronts (figure 4).

The DefaultCatalogID property will be utilised in certain APIs when a catalogID is not supplied in their request, however this can be overridden. For now, it is only important to understand that this is not a limiting factor in OrderCloud functionality for migration of data or functionality.

Figure 4: XC relationship between customers and catalogs vs. OrderCloud’s relationship between buyer users and catalogs.

OrderCloud User Groups

OrderCloud also allows buyer users to be assigned to one or more buyer user groups, which can be used to supersede assignments to buyer users in bulk, e.g. provide access to special pricing for VIP buyer users.

Figure 5: OrderCloud can group buyer users in buyer user groups.

Over in XC, a common customisation is an implementation of customer groups to assign customers in order to provide customer-group specific pricing, promotions, etc. While the implementation details may have the customer group represented as a separate custom entity or a property on a customer, conceptually both approaches achieve the same outcome (figure 6) and are on par with OrderCloud’s architecture (figure 5), allowing a seamless transition path to OrderCloud.

Figure 6: Customer groups are a common customisation in XC, which can be thought of in a simliar respect to OrderCloud’s buyer user groups, however it is not part of the default ecosystem.

Customer Addresses

In XC, customers have explicit addresses associations as the address component lives on the customer entity. The IsPrimary flag is used to allow a default address selection in implementations.

Figure 7: Customer addresses in XC.

To bring across customer addresses into OrderCloud, figure 8 shows that we can create buyer user addresses, via the /me/addresses resource, creating a custom IsPrimary flag in the buyer address xp.

Figure 8: Buyer user address architecture in OrderCloud.

Buyer user addresses, also contain Shipping and Billing properties, which can facilitate filtering addresses for the purpose of being retrieving and setting for an order’s shipping address or billing address respectively. As the SXA Storefront allows customer addresses to be used for both of these addresses, these flags should also be set to true.

Data Mapping

With the conceptual analysis above, we will now review what data mapping would look like for migration and from a comparison standpoint.

In the XC Entity/Component column, components are assumed to live on the primary XC entity being mapped.

OrderCloud IDs do not allow spaces. It is important that the IDs are parsed to remove/replace invalid characters consistently.

Buyers

The DefaultCatalogID property will be reviewed further during the catalog analysis article.

OC PropertyData TypeRequiredXC Entity/ComponentXC PropertyData TypeNotes
IDstringNoCustomerDomainstring
ActivestringYesN/AN/AN/ASet to true by default.
NamestringNoCustomerDomainstring
DefaultCatalogIDstringYesN/AN/AN/AAssign to an existing catalog or PATCH later.
xpobjectNoN/AN/AN/AAny custom fields can be mapped to xp.

Buyer Users

There are a few properties in OrderCloud are required while not mandatory in the SXA Storefront, so considerations for handling these properties will need to be made in these instances, e.g. applying fallback values.

OC PropertyData TypeRequiredXC Entity/ComponentXC PropertyData TypeNotes
buyerIDstringYesCustomerDomainstringIs a resource parameter, not body property.
IDstringNoCustomerFriendlyIdstring
UsernamestringYesCustomerLoginNamestring
PasswordstringNoN/AN/AN/APassword should not be migrated.
FirstNamestringYesCustomerFirstNamestringNot a mandatory field in SXA, so a fallback value will need to be populated.
LastNamestringYesCustomerLastNamestringNot a mandatory field in SXA, so a fallback value will need to be populated.
EmailstringYesCustomerEmailstring
PhonestringNoCustomerDetailsComponentPhoneNumberstringThe XC PhoneNumber exists under an entity view of the CustomerDetailsComponent, so consider this a rough mapping.
TermsAcceptedstringNoN/AN/AN/A
ActivebooleanYesCustomerAccountStatusstringSet to true where AccountStatus == "ActiveAccount"
xpobjectNoN/AN/AN/AAny custom fields can be mapped to xp.

Buyer User Addresses

OrderCloud only stores the ISO 3166-1 alpha-2 2-letter country code. Retrieving additional country details, such as country name, would best be handled by custom middleware, outside of OrderCloud.

OC PropertyData TypeRequiredXC Entity/ComponentXC PropertyData TypeNotes
ShippingbooleanNoN/AN/AN/ASet to true
BillingbooleanNoN/AN/AN/ASet to true
FirstNamestringNoAddressComponentFirstNamestringSXA Storefront does not capture FirstName. May wish to use Customer.FirstName instead.
LastNamestringYesAddressComponentLastNamestringSXA Storefront does not capture LastName. May wish to use Customer.LastName instead.
Street1stringYesAddressComponentParty.Address1string
Street2stringNoAddressComponentParty.Address2string
CitystringYesAddressComponentParty.Citystring
StatestringYesAddressComponentParty.StateCodestringCan also use Party.State for full state name, depending on requirement.
ZipstringYesAddressComponentParty.ZipPostalCodestring
CountrystringYesAddressComponentParty.CountryCodestring
PhonestringNoAddressComponentParty.PhoneNumberstringWill be empty in SXA Storefront default implementation. May wish to use Customer.[CustomerDetailsComponent].PhoneNumber instead.
AddressNamestringNoAddressComponentParty.AddressNamestring
xpobjectNoN/AN/AN/AAny custom fields can be mapped to xp.
xp.IsPrimaryobjectNoAddressComponentParty.IsPrimaryboolean

References

Continue the Series

  1. Transitioning from Sitecore Experience Commerce to OrderCloud: Customers to Buyer Users
  2. Transitioning from Sitecore Experience Commerce to OrderCloud: Customers and Buyers – API Access
  3. Transitioning from Sitecore Experience Commerce to OrderCloud: Catalogs and Categories
  4. Transitioning from Sitecore Experience Commerce to OrderCloud: Sellable Items To Products
  5. Transitioning from Sitecore Experience Commerce to OrderCloud: Inventory and Pricing
  6. Transitioning from Sitecore Experience Commerce to OrderCloud: Carts to Unsubmitted Orders and Carts
  7. Transitioning from Sitecore Experience Commerce to OrderCloud: Fulfillments to Shipping
  8. Transitioning from Sitecore Experience Commerce to OrderCloud: Tax and Payments
  9. Transitioning from Sitecore Experience Commerce to OrderCloud: Orders
  10. Transitioning from Sitecore Experience Commerce to OrderCloud: Order Workflow and Minions
  11. Transitioning from Sitecore Experience Commerce to OrderCloud: Promotions
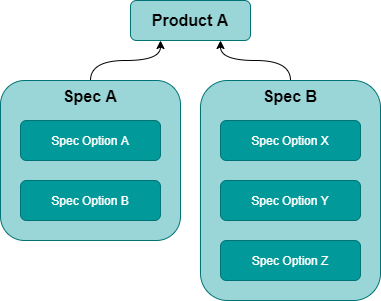
Sitecore Experience Commerce: Extending CatalogItemBase Entities with Components

Reading Time: 11 minutes

In this article, we will review how to extend the schema of catalog, category, and sellable item (including its variants), entities by programatically creating and assigning components to them, render the components to their respective entity page in the BizFx, and allow the CommerceConnect dataprovider to consume the component data when syncing the catalog items to Sitecore.

The usage of the term ‘catalog items‘ throughout this article is a collective term referring to catalog, category and sellable item commerce entities as well as variants, a.k.a. item variation components.

Implementation Details

Components can be used as a programmatic alternative to composer templates to extend catalog items. Components can be more powerful than composer templates as developers have more control over the implementation of custom components, although the trade off requires additional development effort. Some additional highlights of differences between composer templates and components are listed below.

  • Composer templates cannot be utilised to extend variants, only the sellable items themselves, therefore components are required to extend variants.
  • Components do not require developers to create a migration plan to move composer templates between deployment environments.
  • Composer templates are restricted to a specific set of data types for custom properties, while components can utilise a larger set of data types and UI Types for improved business user experience.
  • Components require get view blocks, populate view action blocks, and do action blocks to allow business users to view and edit component properties within the Commerce Tools, whereas the composer templates requires configuration, which can be completed controlled by a business user.

Creating New Components

We first create our components that will extend our catalog items and add our custom properties.

For extending our catalog items, only samples for sellable items and variants will be provided, however to extend categories and catalogs, this would be achieved by following the sellable item samples and substituting sellable item references with that of category or catalog references.

public class SellableItemExtensionComponent : Component
{
    public string CountryOfOrigin { get; set; } = "Australia";
    public int EnergyRating { get; set; } = 10;
}
public class VariationExtensionComponent : Component
{
    public string Material { get; set; } = "Steel";
    public bool IsClearance{ get; set; } = true;
}

Default values for properties are usually omitted in implementations, however values have been assigned here to demonstrate reading these values for the get view blocks in the next step.

Rendering Components in BizFx Using Get View Blocks

To render the properties in the Commerce Tools, we add entity views to the appropriate Merchandising pages using get view blocks and registering them to IGetEntityViewPipeline.

Important: Ensure component property names match view property names.
When translating components to entity views, it is not only good practice to assign the name of the view property with the corresponding name of component property, but it is crucial for Commerce Connect data provider to populate the values of the Sitecore catalog items. The data provider effectively maps properties by matching names if the Sitecore catalog item field names to the commerce entity properties from its representation within a JToken.

public class GetSellableItemExtensionViewBlock : SyncPipelineBlock<EntityView, EntityView, CommercePipelineExecutionContext>
{
    public override EntityView Run(EntityView entityView, CommercePipelineExecutionContext context)
    {
        // Ensure parameters are provided
        Condition.Requires(entityView, nameof(entityView)).IsNotNull();
        Condition.Requires(context, nameof(context)).IsNotNull();

        var viewsPolicy = context.GetPolicy<KnownCatalogViewsPolicy>();
        var request = context.CommerceContext.GetObject<EntityViewArgument>();

        // Validate that the page entity is a sellable item
        // Validate the view name matches the requested page
        if (!(request?.Entity is SellableItem) ||
            !request.ViewName.EqualsOrdinalIgnoreCase(viewsPolicy.Master))
        {
            return entityView;
        }

        var sellableItem = request.Entity as SellableItem;
        var extensionComponent = sellableItem.GetComponent<SellableItemExtensionComponent>();

        // Create an entity view to hold the component properties
        var propertiesEntityView = new EntityView
        {
            DisplayName = "Extended Information",
            Name = "Extended Information",
            EntityId = entityView.EntityId,
            EntityVersion = entityView.EntityVersion,
            ItemId = entityView.ItemId
        };

        // Add the entity view as a child of the page entity view
        entityView.ChildViews.Add(propertiesEntityView);

        // Add the component properties to the entity view
        propertiesEntityView.Properties = new List<ViewProperty>
        {
            CreateViewProperty(nameof(extensionComponent.CountryOfOrigin), extensionComponent.CountryOfOrigin),
            CreateViewProperty(nameof(extensionComponent.EnergyRating), extensionComponent.EnergyRating)
        };

        return entityView;
    }

    /// Helper method to simplify ViewProperty creation
    private ViewProperty CreateViewProperty(string name, object value, string uiType = "")
    {
        return new ViewProperty
        {
            Name = name,
            RawValue = value,
            UiType = uiType
        };
    }
}
public class GetVariationExtensionViewBlock : SyncPipelineBlock<EntityView, EntityView, CommercePipelineExecutionContext>
{
    public override EntityView Run(EntityView entityView, CommercePipelineExecutionContext context)
    {
        // Ensure parameters are provided
        Condition.Requires(entityView, nameof(entityView)).IsNotNull();
        Condition.Requires(context, nameof(context)).IsNotNull();

        var viewsPolicy = context.GetPolicy<KnownCatalogViewsPolicy>();
        var request = context.CommerceContext.GetObject<EntityViewArgument>();

        // Validate that the page entity is a sellable item
        // Validate the view name matches the requested page
        if (!(request?.Entity is SellableItem) ||
            !request.ViewName.EqualsOrdinalIgnoreCase(viewsPolicy.Variant))
        {
            return entityView;
        }

        var sellableItem = request.Entity as SellableItem;
        // Get the component from the sellable items variant (ItemId) and do not inherit from the sellable item if not present on the variant
        var extensionComponent = sellableItem.GetComponent<VariationExtensionComponent>(entityView.ItemId, false);

        // Create an entity view to hold the component properties
        var propertiesEntityView = new EntityView
        {
            DisplayName = "Extended Information",
            Name = "Extended Information",
            EntityId = entityView.EntityId,
            EntityVersion = entityView.EntityVersion,
            ItemId = entityView.ItemId
        };

        entityView.ChildViews.Add(propertiesEntityView);

        // Add the entity view as a child of the page entity view
        propertiesEntityView.Properties = new List<ViewProperty>
        {
            CreateViewProperty(nameof(extensionComponent.Material), extensionComponent.Material),
            CreateViewProperty(nameof(extensionComponent.IsClearance), extensionComponent.IsClearance)
        };

        return entityView;
    }

    /// Helper method to simplify ViewProperty creation
    private ViewProperty CreateViewProperty(string name, object value, string uiType = "")
    {
        return new ViewProperty
        {
            Name = name,
            RawValue = value,
            UiType = uiType
        };
    }
}

The get view blocks are registered to IGetEntityViewPipeline in the pipeline configuration.

public class ConfigureSitecore : IConfigureSitecore
{
    public void ConfigureServices(IServiceCollection services)
    {
        var assembly = Assembly.GetExecutingAssembly();

        services.RegisterAllPipelineBlocks(assembly);
        services.RegisterAllCommands(assembly);
        services.Sitecore().Rules(config => config.Registry(registry => registry.RegisterAssembly(assembly)));
        services.Sitecore().Pipelines(pipelines => pipelines

            .ConfigurePipeline<IGetEntityViewPipeline>(pipeline => pipeline
                .Add<Pipelines.Blocks.GetSellableItemExtensionViewBlock>().After<PopulateEntityVersionBlock>()
                .Add<Pipelines.Blocks.GetVariationExtensionViewBlock>().After<PopulateEntityVersionBlock>()
            )

        );
    }
}

Upon deployment, we can see the new entity views appear on the Sellable Item and Variant pages with our default values.

SellableItemExtensionComponent rendered as Extended Information on the Sellable Item Details Page.
VariationExtensionComponent rendered as Extended Information on the Variant Details Page.

View property display names can be managed via Commerce terms under the Commerce Control Panel in the Sitecore Content Editor, allowing language specific user-friendly names to be configured for the property names rendered in the entity views.

Registering Components for Sitecore Catalog Item Templates

With components translated to entity views and rendered on our Merchandising pages, we need to register our component properties so that the Commerce Connect data provider can updating the commerce data templates in Sitecore.

In the screenshot below, registered components can be seen under /sitecore/templates/Commerce/Catalog Generated/Components/ConnectSellableItem, which are registered by the data provider to the ConnectSellableItem template.

Both sellable items and variants share the same template. This means that properties registered to a sellable item will appear on the variant and vice versa.

To register our components, we simply need to include an additional view name in the validation section of our get view blocks. This view name would be either ConnectCatalog, ConnectCategory, or ConnectSellableItem, depending of the entity context.

if (!(request?.Entity is SellableItem) ||
    (!request.ViewName.EqualsOrdinalIgnoreCase(viewsPolicy.Master) &&
    !request.ViewName.EqualsOrdinalIgnoreCase(viewsPolicy.ConnectSellableItem)))
{
    return entityView;
}
if (!(request?.Entity is SellableItem) ||
    (!request.ViewName.EqualsOrdinalIgnoreCase(viewsPolicy.Variant) &&
    !request.ViewName.EqualsOrdinalIgnoreCase(viewsPolicy.ConnectSellableItem)))
{
    return entityView;
}

We should now see our components registered as templates in Sitecore.

Once the changes have been deployed, if the changes are not reflected in Sitecore, run the Update Data Templates command from the Commerce ribbon menu.

As we have created the entity view with the name ‘Extended Information’ for both sellable items and variants, properties are merged into a single template.

Populating Component Property Values on Sitecore Items

Our templates have been generated in Sitecore, however if we look at a sellable item or variant Sitecore item, we will find that the values have not been populated. This is because the data provider uses different Commerce Engine APIs to generate the templates and populate the Sitecore catalog item property values.

In our get view block examples, GetComponent<SellableItemExtensionComponent>() is creating a new component, but is not persisted to the sellable item and its variants. The data provider populates Sitecore items from each instance of the commerce entity, rather than our entity view representation of the commerce entity, which is why no values are populated at this time.

Important: Ensure component properties are unique across the commerce entity.
The data provider essentially flattens the commerce entity when populating the Sitecore catalog items. This means that if a property with the same name exists multiple times across the commerce entity and its nested component properties, the data provider will use the first instance to populate the Sitecore catalog items.

Sitecore Content Editor: Extended Information values have not been populated

In order for us to populate the values, we need to take a step back to populate and persist property values to the catalog items in the Commerce Engine.

First, we will register populate view actions blocks, containing an edit action, to the Extended Information entity views in the Merchandising pages.
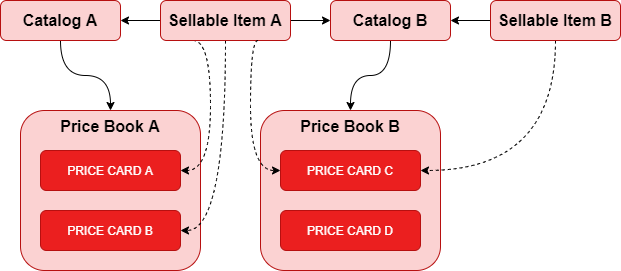
public class PopulateSellableItemExtensionViewActionsBlock : SyncPipelineBlock<EntityView, EntityView, CommercePipelineExecutionContext>
{
    public override EntityView Run(EntityView entityView, CommercePipelineExecutionContext context)
    {
        // Ensure parameters are provided
        Condition.Requires(entityView, nameof(entityView)).IsNotNull();

        var viewsPolicy = context.GetPolicy<KnownCatalogViewsPolicy>();
        var request = context.CommerceContext.GetObject<EntityViewArgument>();

        // Validate the context of the request, i.e. entity, view name, and action name
        if (!(request?.Entity is SellableItem) ||
            !request.ViewName.EqualsOrdinalIgnoreCase(viewsPolicy.Master) ||
            !entityView.Name.EqualsOrdinalIgnoreCase("Extended Information") ||
            !string.IsNullOrEmpty(request.ForAction))
        {
            return entityView;
        }

        // Add action to entity view
        var actionPolicy = entityView.GetPolicy<ActionsPolicy>();
        actionPolicy.Actions.Add(
            new EntityActionView
            {
                Name = "EditExtensionProperties",
                DisplayName = "Edit Extension Properties",
                Description = "Edit Extension Properties",
                IsEnabled = true,
                EntityView = "ExtensionProperties",
                Icon = "edit"
            });
                

        return entityView;
    }
}
public class PopulateVariationExtensionViewActionsBlock : SyncPipelineBlock<EntityView, EntityView, CommercePipelineExecutionContext>
{
    /// <summary>Executes the pipeline block's code logic.</summary>
    /// <param name="entityView">The entity view.</param>
    /// <param name="context">The context.</param>
    /// <returns>The <see cref="EntityView"/>.</returns>
    public override EntityView Run(EntityView entityView, CommercePipelineExecutionContext context)
    {
        // Ensure parameters are provided
        Condition.Requires(entityView, nameof(entityView)).IsNotNull();

        var viewsPolicy = context.GetPolicy<KnownCatalogViewsPolicy>();
        var request = context.CommerceContext.GetObject<EntityViewArgument>();

        // Validate the context of the request, i.e. entity, view name, and action name
        if (!(request?.Entity is SellableItem) ||
            !request.ViewName.EqualsOrdinalIgnoreCase(viewsPolicy.Variant) ||
            !entityView.Name.EqualsOrdinalIgnoreCase("Extended Information") ||
            !string.IsNullOrEmpty(request.ForAction))
        {
            return entityView;
        }

        // Add action to entity view
        var actionPolicy = entityView.GetPolicy<ActionsPolicy>();
        actionPolicy.Actions.Add(
            new EntityActionView
            {
                Name = "EditExtensionProperties",
                DisplayName = "Edit Extension Properties",
                Description = "Edit Extension Properties",
                IsEnabled = true,
                EntityView = "ExtensionProperties",
                Icon = "edit"
            });
                

        return entityView;
    }
}
services.Sitecore().Pipelines(pipelines => pipelines

    .ConfigurePipeline<IPopulateEntityViewActionsPipeline>(pipeline => pipeline
        .Add<Pipelines.Blocks.PopulateSellableItemExtensionViewActionsBlock>().After<InitializeEntityViewActionsBlock>()
        .Add<Pipelines.Blocks.PopulateVariationExtensionViewActionsBlock>().After<InitializeEntityViewActionsBlock>()
    )

);

The get view blocks created earlier are then amended and refactored to include support for the create/edit action, which will render the entity view in the modal.

public override EntityView Run(EntityView entityView, CommercePipelineExecutionContext context)
{
    // Ensure parameters are provided
    Condition.Requires(entityView, nameof(entityView)).IsNotNull();
    Condition.Requires(context, nameof(context)).IsNotNull();

    var viewsPolicy = context.GetPolicy<KnownCatalogViewsPolicy>();
    var request = context.CommerceContext.GetObject<EntityViewArgument>();

    // Determine the context of rendering the entity view, e.g. create/edit or view (page or via commerce context)
    var isViewAction = (request.ViewName.EqualsOrdinalIgnoreCase(viewsPolicy.Master) ||
        request.ViewName.EqualsOrdinalIgnoreCase(viewsPolicy.ConnectSellableItem)) &&
        string.IsNullOrWhiteSpace(request.ForAction);
    var isEditAction = request.ViewName.EqualsOrdinalIgnoreCase("ExtensionProperties") && request.ForAction.EqualsOrdinalIgnoreCase("EditExtensionProperties");

    // Validate the context of the request, i.e. entity, view name, and action name
    if (!(request?.Entity is SellableItem) ||
        (!isViewAction &&
        !isEditAction))
    {
        return entityView;
    }

    var sellableItem = request.Entity as SellableItem;
    var extensionComponent = sellableItem.GetComponent<SellableItemExtensionComponent>();

    var propertiesEntityView = entityView;
    if (isViewAction)
    {
        // Create an entity view to host the component properties
        propertiesEntityView = new EntityView
        {
            DisplayName = "Extended Information",
            Name = "Extended Information",
            EntityId = entityView.EntityId,
            EntityVersion = entityView.EntityVersion,
            ItemId = entityView.ItemId
        };

        // Add the entity view as a child of the current entity view
        entityView.ChildViews.Add(propertiesEntityView);
    }
            
    // Add the component properties to the entity view
    propertiesEntityView.Properties = new List<ViewProperty>
    {
        CreateViewProperty(nameof(extensionComponent.CountryOfOrigin), extensionComponent.CountryOfOrigin),
        CreateViewProperty(nameof(extensionComponent.EnergyRating), extensionComponent.EnergyRating)
    };

    return entityView;
}
public override EntityView Run(EntityView entityView, CommercePipelineExecutionContext context)
{
    // Ensure parameters are provided
    Condition.Requires(entityView, nameof(entityView)).IsNotNull();
    Condition.Requires(context, nameof(context)).IsNotNull();

    var viewsPolicy = context.GetPolicy<KnownCatalogViewsPolicy>();
    var request = context.CommerceContext.GetObject<EntityViewArgument>();

    // Determine the context of rendering the entity view, e.g. create/edit or view (page or via commerce context)
    var isViewAction = (request.ViewName.EqualsOrdinalIgnoreCase(viewsPolicy.Variant) ||
        request.ViewName.EqualsOrdinalIgnoreCase(viewsPolicy.ConnectSellableItem)) &&
        string.IsNullOrWhiteSpace(request.ForAction);
    var isEditAction = request.ViewName.EqualsOrdinalIgnoreCase("ExtensionProperties") && request.ForAction.EqualsOrdinalIgnoreCase("EditExtensionProperties");

    // Validate the context of the request, i.e. entity, view name, and action name
    if (!(request?.Entity is SellableItem) ||
        (!isViewAction &&
        !isEditAction))
    {
        return entityView;
    }

    var sellableItem = request.Entity as SellableItem;
    // Get the component from the sellable items variant (ItemId) and do not inherit from the sellable item if not present on the variant
    var extensionComponent = sellableItem.GetComponent<VariationExtensionComponent>(entityView.ItemId, false);

    var propertiesEntityView = entityView;
    if (isViewAction)
    {
        // Create an entity view to hold the component properties
        propertiesEntityView = new EntityView
        {
            DisplayName = "Extended Information",
            Name = "Extended Information",
            EntityId = entityView.EntityId,
            EntityVersion = entityView.EntityVersion,
            ItemId = entityView.ItemId
        };

        // Add the entity view as a child of the current entity view
        entityView.ChildViews.Add(propertiesEntityView);
    }

    // Add the component properties to the entity view
    propertiesEntityView.Properties = new List<ViewProperty>
    {
        CreateViewProperty(nameof(extensionComponent.Material), extensionComponent.Material),
        CreateViewProperty(nameof(extensionComponent.ReleaseDate), extensionComponent.ReleaseDate, "FullDateTime")
    };

    return entityView;
}

The default values from the components are also removed to provide a true representation of the catalog item property values that are persisted to the database.

public class SellableItemExtensionComponent : Component
{
    public string CountryOfOrigin { get; set; }
    public int EnergyRating { get; set; }
}
public class VariationExtensionComponent : Component
{
    public string Material { get; set; }
    public bool isClearance { get; set; }
}

To persist the changes made to the Edit Extension Properties entity view, do action blocks are responsibile for processing the entity view submission action, which in this case is translating the entity view properties back to the component on the commerce entity and then persisting it.

public class DoActionEditSellableItemExtensionViewBlock : AsyncPipelineBlock<EntityView, EntityView, CommercePipelineExecutionContext>
{
    protected CommerceCommander Commander { get; set; }

    public DoActionEditSellableItemExtensionViewBlock(CommerceCommander commander)
    {
        this.Commander = commander;
    }

    public override async Task<EntityView> RunAsync(EntityView entityView, CommercePipelineExecutionContext context)
    {
        // Ensure parameters are provided
        Condition.Requires(entityView, nameof(entityView)).IsNotNull();

        var viewsPolicy = context.GetPolicy<KnownCatalogViewsPolicy>();

        // Validate the context of the request, i.e. entity, view name, and action name
        var entity = context.CommerceContext.GetObject<CommerceEntity>(p => p.Id.EqualsOrdinalIgnoreCase(entityView.EntityId));
        if (!(entity is SellableItem) ||
            !entityView.Name.EqualsOrdinalIgnoreCase("ExtensionProperties") ||
            !entityView.Action.EqualsOrdinalIgnoreCase("EditExtensionProperties") ||
            !string.IsNullOrWhiteSpace(entityView.ItemId))
        {
            return entityView;
        }

        var sellableItem = entity as SellableItem;
        var extensionComponent = sellableItem.GetComponent<SellableItemExtensionComponent>();

        // Assign component property values from the entity view property values
        extensionComponent.CountryOfOrigin = entityView.GetPropertyValueByName(nameof(extensionComponent.CountryOfOrigin));
        extensionComponent.EnergyRating = int.Parse(entityView.GetPropertyValueByName(nameof(extensionComponent.EnergyRating)));

        // Persist the changes to the sellable item
        await Commander.PersistEntity(context.CommerceContext, sellableItem).ConfigureAwait(false);

        return entityView;
    }
}
public class DoActionEditVariationExtensionViewBlock : AsyncPipelineBlock<EntityView, EntityView, CommercePipelineExecutionContext>
{
    protected CommerceCommander Commander { get; set; }

    public DoActionEditVariationExtensionViewBlock(CommerceCommander commander)
    {
        this.Commander = commander;
    }

    public override async Task<EntityView> RunAsync(EntityView entityView, CommercePipelineExecutionContext context)
    {
        // Ensure parameters are provided
        Condition.Requires(entityView, nameof(entityView)).IsNotNull();

        var viewsPolicy = context.GetPolicy<KnownCatalogViewsPolicy>();

        // Validate the context of the request, i.e. entity, view name, and action name
        var entity = context.CommerceContext.GetObject<CommerceEntity>(p => p.Id.EqualsOrdinalIgnoreCase(entityView.EntityId));
        if (!(entity is SellableItem) ||
            !entityView.Name.EqualsOrdinalIgnoreCase("ExtensionProperties") ||
            !entityView.Action.EqualsOrdinalIgnoreCase("EditExtensionProperties") ||
            string.IsNullOrWhiteSpace(entityView.ItemId))
        {
            return entityView;
        }

        var sellableItem = entity as SellableItem;
        var extensionComponent = sellableItem.GetComponent<VariationExtensionComponent>(entityView.ItemId, false);

        // Assign component property values from the entity view property values
        extensionComponent.Material = entityView.GetPropertyValueByName(nameof(extensionComponent.Material));
        extensionComponent.IsClearance = bool.Parse(entityView.GetPropertyValueByName(nameof(extensionComponent.IsClearance)));

        // Persist the changes to the sellable item
        await Commander.PersistEntity(context.CommerceContext, sellableItem).ConfigureAwait(false);

        return entityView;
    }
}
services.Sitecore().Pipelines(pipelines => pipelines

    .ConfigurePipeline<IDoActionPipeline>(pipeline => pipeline
        .Add<Pipelines.Blocks.DoActionEditSellableItemExtensionViewBlock>().After<ValidateEntityVersionBlock>()
        .Add<Pipelines.Blocks.DoActionEditVariationExtensionViewBlock>().After<ValidateEntityVersionBlock>()
    )

);

Now we should see our persisted values render in the Extended Infomation entity views of the Merchandising pages and against their respective catalog items in the Sitecore Content Editor.

If the property values are not reflected in Sitecore, run the Refresh Commerce Cache command from the Commerce ribbon menu.

Extended Information populated on sellable item Sitecore item.
Extended Information populated on variant Sitecore item.

Variants will have sellable item properties populated, while sellable items will not have variant properties populated as variants represent a specialised form of the sellable item, while the sellable item should not know the specifics of any one variant.

Summary

Implementation Highlights

The following bullet points can be utilised as a checklist to ensure that all bases have been covered :

  • Create components to house custom properties.
  • Create get view blocks to retrieve components properties for BizFx pages (view), BizFx modals (create and edit actions) and CommerceConnect (generate catalog item template).
  • Create populate view actions blocks to allow business user to trigger actions, e.g. create, edit, delete.
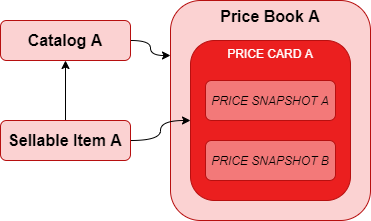
  • Create do action blocks to persist create, edit, delete actions to commerce entities.
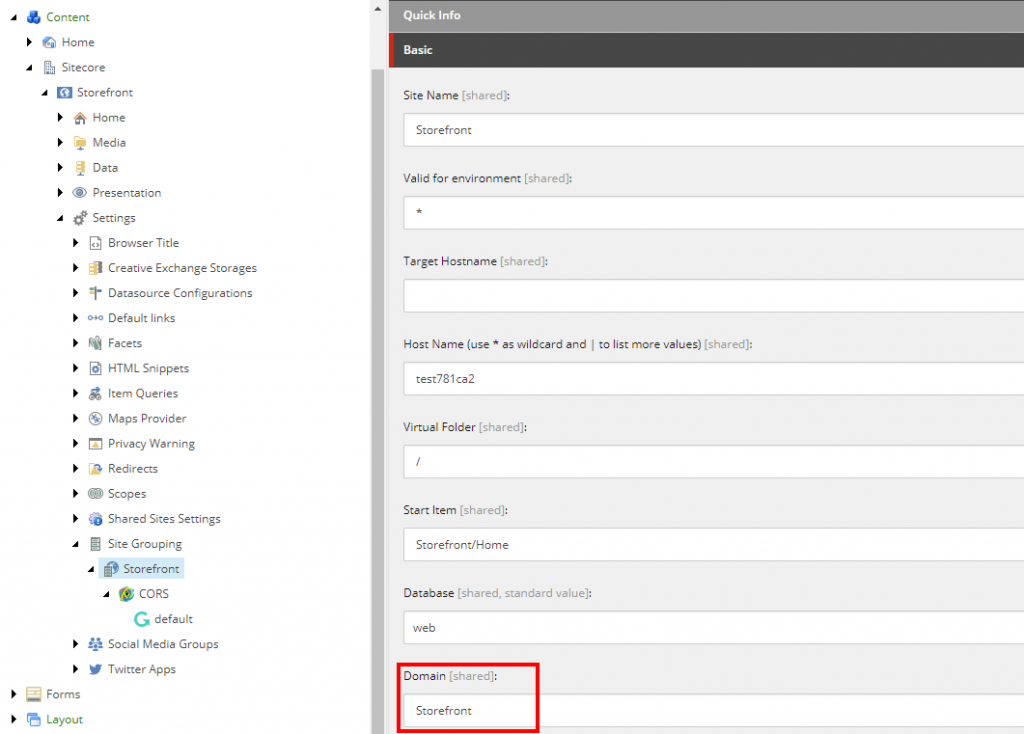
Considerations for Extending Catalog Items
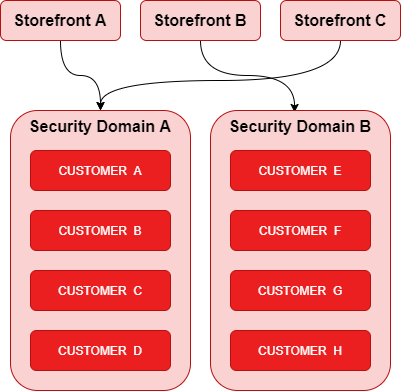
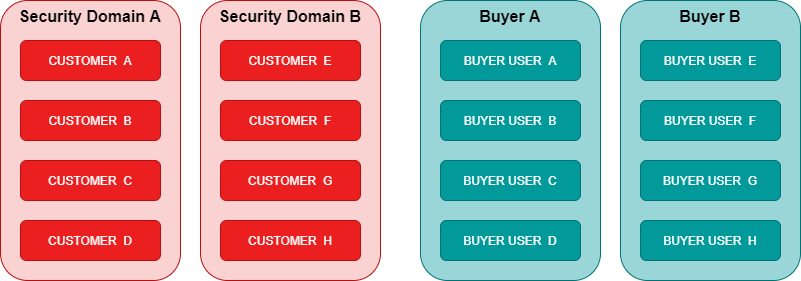
  • Logically group properties into multiple components over using a catch all component. This could mean grouping related properties, grouping only properties that will be mapped to the Sitecore catalog items, or grouping properties into a component that will be utilised to extend cart lines.
  • View property names should match their component property names in order for the values to be mapped from the commerce entity to the Sitecore catalog item properties.
  • Property names must be unique for the catalog item commerce entity, otherwise this can cause a conflict in mapping values; properties are resolved by mapping the first instance of a property with the given name on the commerce entity.
  • Sellable items and variants Sitecore items inherit the same catalog generated templates.
    • Sellable items will host the variant properties on their Sitecore items, however these values will not be populated.
    • Variants will host the sellable item properties on their Sitecore items and these properties will be populated with the sellable item property values.

References

Sitecore KB article: How to extend Catalog system entities schema in Sitecore Experience Commerce

Source Code

Sitecore Commerce Catalog Component Extension Sample project repository

Sitecore Experience Commerce: Working with Environment Variables

Reading Time: 3 minutes

In this article, we will review how environment variables are utilised in the Commerce Engine solution. These are findings that provide some more context on top of Commerce Developer Reference: Configuring the Commerce Engine using environment variables, which will allow us to work with them more effectively.

Introduction

Environment variables are primarily utilised in 3 areas of the Commerce Engine and each area has nuances that we need to be aware of. The first area is in the Commerce Engine configuration file, config.json. The second is the global environment configuration, global.json. The third are is made up of the role environment and policy set configurations.

Environment variables will only be consumed into the Commerce Engine’s configuration builder if they are prefixed with "COMMERCEENGINE_".

Environment Variable Usage in Configuration Files

The Commerce Engine Configuration File (config.json)

Using the environment variable configuration provider, the config.json is updated without the need for placeholders or data type specification.

Updating a property value simply requires adding an environment variable that represents the path of the property to be overridden.

For example, adding the environment variable, COMMERCEENGINE_Serilog__MinimumLevel__Default: Information, will override the corresponding configuration property by resolving it to the structure of the configuration.

{
  "AppSettings": { ... },
  "Serilog": {
    ...
    "MinimumLevel": {
      "Default": "Warning",
      ...
    }
  },
  ...
}

While the placeholder values aren’t relevant to the overrides themselves, the Commerce Engine is distributed with ‘PlaceholderFor<property>’ values in config.json. Consider these flags to ensure that environment variables are not omitted. When replacing other properties in the Commerce Engine configuration, placeholders are not required.

The Global Environment Configuration File (global.json)

Similar to the config.json, the global environment configuration file, global.json, is loaded during the start up process of the Commerce Engine. However, while the Commerce Engine leverages the environment variables for this configuration, the replacement strategy differs from the environment variable configuration provider in that instead of resolving variables to the structure of the configuration file it instead resolves via placedholder matches.

For example, the environment variable COMMERCEENGINE_GlobalDatabaseUserName: sa will override the corresponding configuration property by resolving it to the placeholder.

{
  ...
  "Name": "GlobalEnvironment",
  "Policies: {
    "$type": "System.Collections.ObjectModel.ReadOnlyCollection`1[[Sitecore.Commerce.Core.Policy, Sitecore.Commerce.Core]], mscorlib",
    "$values": [
      ...
      {
        "$type": "Sitecore.Commerce.Plugin.SQL.EntityStoreSqlPolicy, Sitecore.Commerce.Plugin.SQL",
        ...
        "UserName": "PlaceholderForGlobalDatabaseUserName",
        ...
      },
      ...
    ]
  }
}

Role Environment and Policy Set Configuration Files

For environment variables used in role environment and policy set configurations, the Commerce Engine also uses the same strategy as per the global.json (placeholder matching over structure resolution), however the replacement is performed at the time of bootstrapping the Commerce Engine, not during the start up process of the Commerce Engine.

This means that while the role environment and policy set configurations will retain the ‘PlaceholderFor…’ values on disk, the engine startup will still load configurations from the commerce global database. Therefore, the Commerce Engine role will not resolve changes during the start up process with updated variables (e.g. running docker-compose up for containers).

Changing environment variables used in role environment and policy set configuration files, should be thought the same as making changes to the configuration files themselves, where bootstrapping the Commerce Engine is required to consume the changes.

Supported Data Types in Placeholders

In Commerce Developer Reference: Configuring the Commerce Engine using environment variables, it 3 mentions supported data types for placeholders, where string is the implicit (default) type, and boolean and integer values can be represented by appending ‘|bool’ and ‘|int’ to placeholder names respectively.

The reality is that under the hood all that is happening is identifying whether the value should be wrapped with quotation marks or not. This means that we can actually support other data types, such as decimals by appending either ‘|bool’ or ‘|int’ to the placeholder.

Data types apply to placeholders in the global environment, role environment and policy set configuration files. They do not apply to placeholders in the Commerce Engine configuration file (config.json).

PlaceholderValuesResults
“PlaceholderForMyVariable”dev.sitecore.com
true
“dev.sitecore.com”
“true”
“PlaceholderForMyVariable|bool” or
“PlaceholderForMyVariable|int”
dev.sitecore.com
true
3
1.2 (decimal)
dev.sitecore.com
true
3
1.2

Summary

The following table summarises how environment variables are utilised in the various configuration files of the Commerce Engine.

Configuration File(s)Property ResolverAllows Fallback / Default Value*AppliesApplied ByRequires Bootstrap
config.jsonStructureYesDuring start upEnvironment variable configuration provider (.Net Core)No
global.jsonPlaceholderNoDuring start upCommerce EngineNo
Environment/Policy Set ConfigurationsPlaceholderNoDuring BootstrapCommerce EngineYes
*Where environment variable not provided.

References

Sitecore Experience Commerce: Customising Commerce Content in the Sitecore Indexes for Storefront Search Results

Reading Time: 4 minutes

In this article, we will look at how to control the storefront search results by customising the commerce content that is indexed in the Sitecore master and web indexes.

If you are looking for how to add new fields for faceting and other purposes, see Adding a property field to an index.

How Storefront Search Works

The SXA Search component creates a solr query based on a number of criteria, however focusing on how the search term is involved in the query, we see that the sxacontent field is our culprit for this customisation. This can be seen highlighted below in our storefront and in our search log.

From XC 9.3 onwards, the commerce portion of the Sitecore indexes were migrated over to the Commerce Engine for indexing performance improvements. There are a number of handlers utilised for populating the indexes with catalog data, however for managing the content related to the storefront search component we will look at the SxaContentFieldHandler.

See Catalog Search Field Handlers for a full list of handlers provided with XC, which are utilised when registering index fields in Plugin.Search.Solr.PolicySet-1.0.0.json.

The SxaContentFieldHandler Class

By default, the sellable item properties that are added to the sxacontent field consist of the following entries:

  • Tags
  • ProductId
  • Name
  • DisplayName
  • ItemDefinition
  • Brand

As we can see from the sitecore_web_index in Solr, a query for a specific ‘Spectra’ product, productid_t:6042260, shows that these properties are indexed against the sellable item.

{
  "sxacontent_txm":["39inch|4k|uhd|television|spectra",
    "6042260",
    "Habitat Spectra 39” 4K LED Ultra HD Television",
    "Habitat Spectra 39” 4K LED Ultra HD Television",
    "Product",
    "Spectra Televisions"],
  "productid_t":"6042260",
  ...
}

A common property that I have seen often requested to be included for searching is the sellable item’s description, so we will use this property as well as a generic property from a custom component for demonstration purposes.

In the sample code below, we see that we inherit from the default SxaContentFieldHandler and execute the base ComposeValue method, which will populate the default fields listed above. We then simply add the properties to the sxaContent reponse object, which in this case is a list of strings.

You may have noticed that we are only adding the properties to sxacontent if a value is present. This is to minimise the bloat of empty entries and may lead to performance improvement however insignificant it may be. You may prefer to leave empty entries in the index to simplfy troubleshooting in mapping each entry back to its source property, so choose an approach that best suits you.

public class MySxaContentFieldHandler : Sitecore.Commerce.Plugin.Catalog.SxaContentFieldHandler
{
    public override object ComposeValue(object source, ConcurrentDictionary<string, object> context)
    {
        var sxaContent= base.ComposeValue(source, context) as List<string>;
        if (!(source is SellableItem) || sxaContent == null || sxaContent.Count() == 0)
        {
            return sxaContent;
        }

        var sellableItem = source as SellableItem;

        if (!string.IsNullOrWhiteSpace(sellableItem.Description))
        {
            sxaContent.Add(sellableItem.Description);
        }

        var myProperty = sellableItem.GetComponent<MyCustomComponent>().MyCustomProperty;
        if (!string.IsNullOrWhiteSpace(myProperty))
        {
            sxaContent.Add(myProperty);
        }

        return sxaContent;
    }
}

Now that we have created our modified SxaContentFieldHandler class, we register it in Plugin.Search.Solr.PolicySet-1.0.0.json for both the master and web indexes.

{
  "$type": "Sitecore.Commerce.Plugin.Search.ItemIndexablePolicy, Sitecore.Commerce.Plugin.Search",
  "IndexName": "sitecore_web_index",
  "FieldTypeMappers": [ ... ],
  "Fields": [
    {
      "$type": "Sitecore.Commerce.Plugin.Search.Solr.SolrIndexFieldConfiguration, Sitecore.Commerce.Plugin.Search.Solr",
      "Name": "sxacontent",
      "Type": "System.Collections.Generic.List`1[System.String]",
      "TypeHint": "textCollection",
      "Handler": {
        "$type": "Sitecore.Commerce.Engine.Search.MySxaContentFieldHandler, Sitecore.Commerce.Engine"
      }
    },
    ...
  ]
}

After deploying our customisation, boostrapping, and reindexing, we can see our custom entries in the sxacontent field.

{
  "sxacontent_txm":["39inch|4k|uhd|television|spectra",
    "6042260",
    "Habitat Spectra 39” 4K LED Ultra HD Television",
    "Habitat Spectra 39” 4K LED Ultra HD Television",
    "Product",
    "Spectra Televisions",
    "Enjoy incredible picture and dramatic detail with 4X the resolution of full HD. Enjoy incredible hues of color with technology that blends digital color for near-perfect representation. Experience Ultra HD picture quality with enhanced detail in every way.",
    "mycustomproperty"],
  "productid_t":"6042260",
  ...
}

And by performing a search in the storefront our search results now return our product from our custom search entries.

Development Considerations

Field Handlers are Synchronous

At this time, field handlers have been implemented synchronously and expect the information you require to be available on the provided source entity, e.g. sellable item in this case, therefore if you are looking at sourcing data externally it may be worth further consideration.

Following Helix Priniciples

Whether upgrading from a pre XC 9.3 solution or introducing existing component properties into the search index, by implementing the custom SxaContentFieldHandler you may be faced with having to break helix principles, i.e. housing your custom SxaContentFieldHandler in a feature project while referencing another feature project to retrieve the desired properties/content. As feature projects should not reference each other, I reluctantly chose to add MySxaContentFieldHandler to the Commerce Engine project in this instance.

References