In this article, we will look at the foundational pipeline block types that are used to construct pipelines within the Commerce Engine plugins and custom solutions.
Asynchronous vs Synchronous Pipeline Blocks
From XC 10.0, the PipelineBlock class has been split into AsyncPipelineBlock and SyncPipelineBlock classes for improved performance and stability, with the primary implementation difference being whether to call the pipeline block asynchronously or not during pipeline execution.
A notable change to the AsyncPipelineBlock is that it uses the RunAsync method instead of the Run method to enforce that the return type is a Task<TOutput> and as an added reminder that the pipeline block is in fact asynchronously executed.
How Async and Sync Pipeline Blocks Work in the Same Pipeline
The initial questions I had when seeing the pipeline split were “how does this affect registering pipeline blocks to pipelines?” and “how does this affect the way in which pipelines are executed?”. The good news here is that is doesn’t affect either from an implementation standpoint.
From the registration perspective, both async and sync pipelines are registered as per XC 9.X registration mechanisms.
From the async/sync execution perspective, async pipeline blocks are awaited before continuing on to the following pipeline block, which ensures the output of a pipeline block is the input of the following pipeline block.
Specialised Pipeline Blocks
You may have seen a few types of enhanced pipeline blocks in XC 9.X+, being ConditionalPipelineBlock and PolicyTriggerConditionalPipelineBlock, which may have been better suited to your custom implementations over adding conditional statements to the begining of your Run/RunAsync method.
Conditional Pipeline Blocks
As indicated by their names, the ConditionalPipelineBlock and AsyncConditionalPipelineBlock classes will be conditionally executed. This is achieved by defining the BlockCondition predicate to be evaluated to determine if the Run/RunAsync method should be called.
Where the evaluated BlockCondition returns false, an alternate method called ContinueTask is executed instead of Run/RunAsync and is intended to simply return the arg or null.
Returning arg from ContinueTask considers the pipeline block as optional whereas returning null may consider the pipeline block as mandatory depending on how this output is handled in subsequent pipeline blocks or the pipeline itself.
Warning: Using the ContinueTask method to run alternate code logic may be a sign of a bad code smell, such as breaking the separation of concerns rule. Having 2 separate pipeline blocks with inverted predicates is the recommended approach.
public class MyConditionalPipelineBlock : ConditionalPipelineBlock<MyArgument, MyArgument, CommercePipelineExecutionContext>
{
    public MyConditionalPipelineBlock()
    {
        BlockCondition = obj => ((CommercePipelineExecutionContext)obj).CommerceContext.HasPolicy<MyCustomPolicy>();
    }

    public override MyArgument Run(MyArgument arg, CommercePipelineExecutionContext context)
    {
        Condition.Requires(arg, nameof(arg)).IsNotNull();

        // My code logic

        return arg;
    }

    public override MyArgument ContinueTask(MyArgument arg, CommercePipelineExecutionContext context)
    {
        return arg;
    }
}
Policy Trigger Conditional Pipeline Blocks
Another more specialised form of conditional pipeline blocks are the PolicyTriggerConditionalPipelineBlock and AsyncPolicyTriggerConditionalPipelineBlock. These blocks actually have somewhat inverted logic to their name as you will need to specify the name of a policy in the ShouldNotRunPolicyTrigger property which will ensure the pipeline is not executed.
When the policy name is present in the request header’s PolicyKeys value the pipeline block will execute the ContinueTask method over the Run/RunAsync method (See Conditional Pipeline Blocks for more details).
A full set of existing policy keys and their usages can be found in Commerce Developer Reference: Policy keys. It is recommended that the Commerce Engine policy keys be avoided when creating custom policy trigger conditional pipeline blocks.
The BlockCondition predicate is already implemented to manage the conditional logic as mentioned above and the ContinueTask method will return the arg as policy trigger conditional pipeline blocks should be considered optional and not mandatory.
public class MyPolicyTriggerConditionalPipelineBlock : PolicyTriggerConditionalPipelineBlock<MyArgument, MyArgument, CommercePipelineExecutionContext>
{
    public override string ShouldNotRunPolicyTrigger => "IgnoreMyPipelineBlock";

    public override MyArgument Run(MyArgument arg, CommercePipelineExecutionContext context)
    {
        Condition.Requires(arg, nameof(arg)).IsNotNull();

        // My code logic

        return arg;
    }
}
In this article, we will review how to attach a running Commerce Engine instance to the Visual Studio Debugger for local debugging.
Introduction
In Sitecore Experience Commerce 9.X.Y, the Commerce Engine was built on .NET Core 2.2 or lower, which either only supported the out-of-process hosting or is the default configuration. This meant that IIS was essentially being used as a proxy to forward requests to the Commerce Engine application, which is why you are probably familiar with attaching the debugger to a process named Sitecore.Commerce.Engine.exe. By hovering over the process, the source Commerce Engine could easily be identified when attaching the process to Visual Studio.
Sitecore Experience Commerce 10 now leverages .Net Core 3.1, which uses in-process hosting, meaning the Commerce Engine instance run in the same process as its IIS worker process. Overall, the in-process hosting provides improved performanced as requests aren’t being proxied over the loopback adapter.
Now that we have a better understanding of the switch from out-of-process to in-process hosting in XC 10, it should be apparent as to why we need to amend how we attach the Commerce Engine to Visual Studio’s debugger.
Attaching the Commerce Engine instance to the Visual Studio Debugger
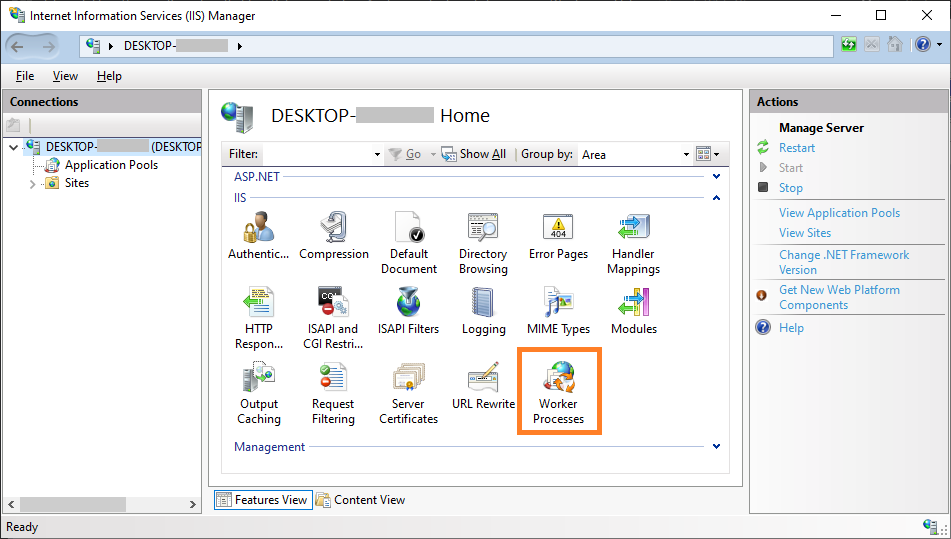
First thing we will need to do is to retrieve the process Id to verfiy that we are attaching the correct process in Visual Studio. To do this, open IIS and navigate to the Worker Processes view.
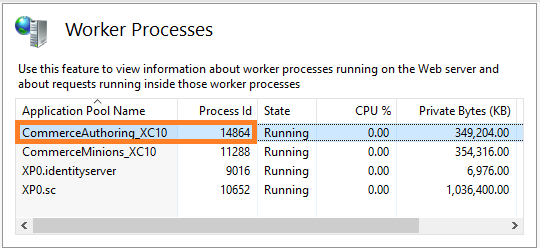
In the Worker Processes view, look for the application pool name containing the name of the application pool configured for the Commerce Engine instance and note the Process Id.
If the application pool does not show the Commerce Engine instance, it has likely not started, or shut down due to inactivity. Execute a request to the Commerce Engine instance and refresh the Worker Processes view in IIS.
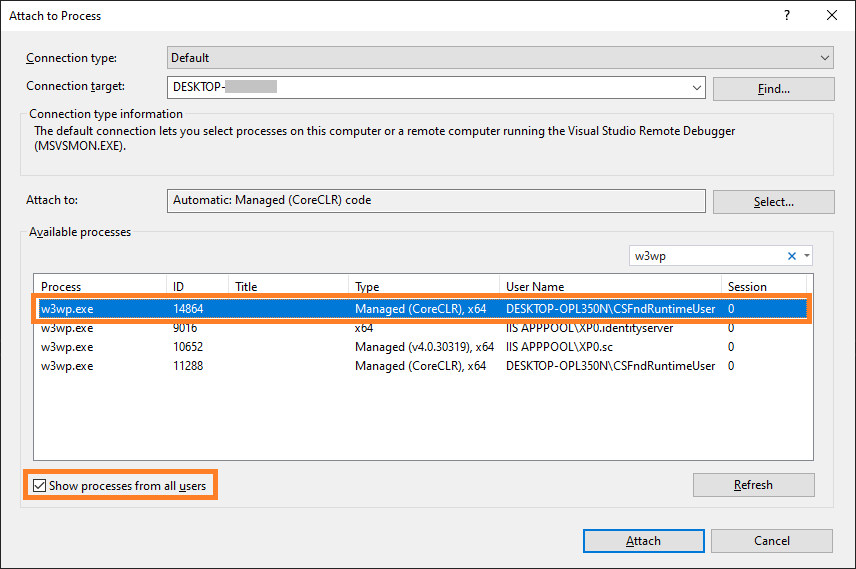
Over in Visual Studio, open the Attach to Process dialog, select the Show processes from all users as you will likely be running the Commerce Engine under a dedicated user profile, and locate the ID that we identified from the Worker Proccesses view in IIS. The ‘w3wp’ can also be applied to the process filters to more easily locate the process.
In this article, we will review the breaking changes to promotions that have been introduced in XC 10, considerations for upgrading from a XC 9.X solution, and the updated business logic that the Commerce Engine utilises to evaluate and apply promotions.
Note: References to date will indicate both date and time throughout this article.
Introduction
Previously in Sitecore Experience Commerce: Promotion Evaluation and Application Logic, we had identified that promotions calculations were broken down into cart line level and cart level promotions, of which cart line level promotions were calculated and applied prior to cart level promotions.
In Sitecore Commerce 10, there are 3 key changes that are important to understand, especially when upgrading solutions to XC 10, as the changes to rules for promotion application means that cart line and cart subtotal and total calculations may differ.
Exclusive promotions are now exclusive across the cart line level and cart level promotions.
Promotion Priority indexes have been introduced, allowing business users to specify a priority level that will take precedence in the initial ordering of promotions during evaluation. The lower the promotion priority value, the higher the promotion is evaluated (let it sink in for a minute).
For exclusive promotion application, automatic promotions are addressed prior to coupon promotions, then Promotion Priority is the decider for determining the exclusive promotion within the group regardless of whether it’s a cart line level or cart level promotion.
For applying multiple non-exclusive promotions, cart line level promotions, still take precedence over cart level promotions, while the Promotion Priority is a secondary factor.
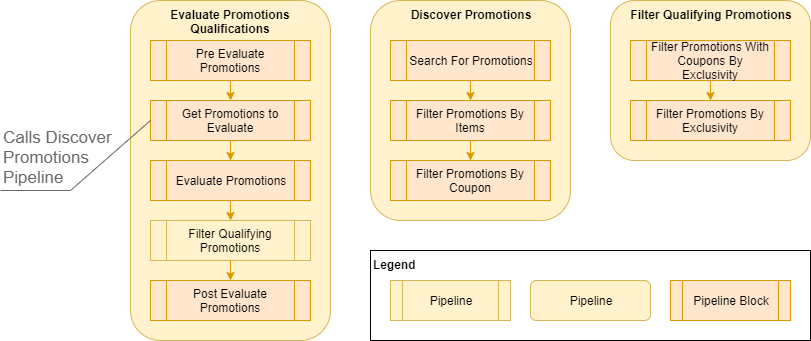
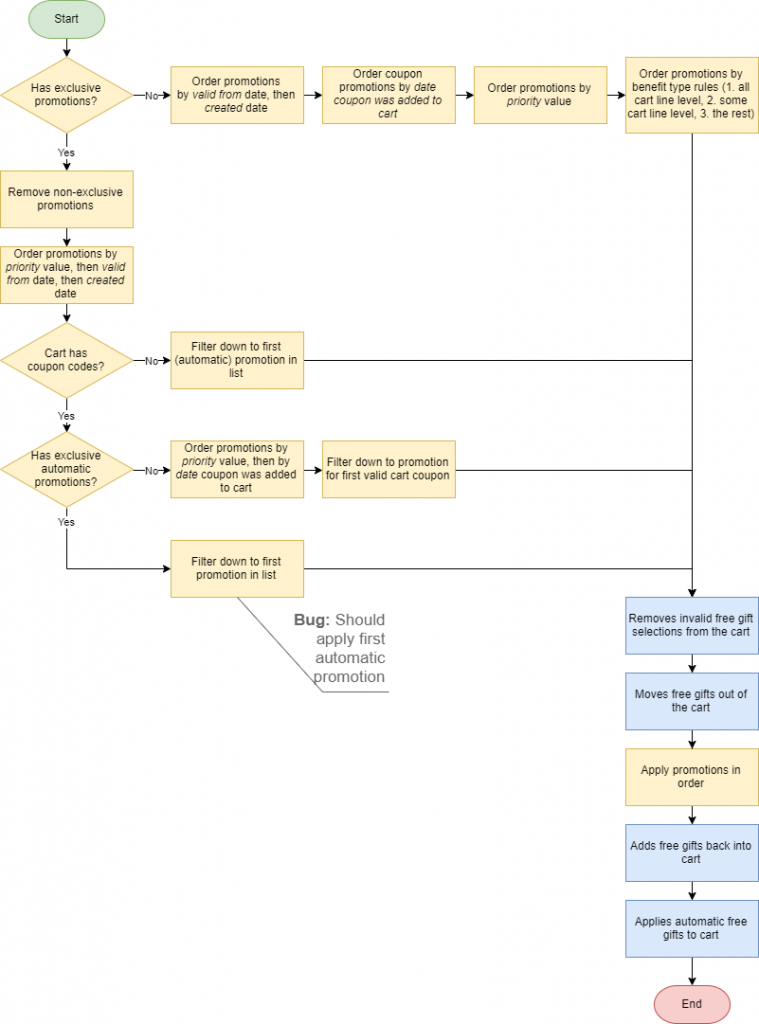
The following diagram shows the pipelines and pipeline blocks that are called during the process of evaluating the applicable promotions and additional filtering for exclusive promotion evaluation.
The following steps make up the evaluation process:
Pre-Evaluate Promotions: Removes any previous selected free gift cart lines from the cart and adds them as a unique object by type to the commerce context. This is too ensure that these cart lines are not utilised when evaluating applicable promotions.
Search For Promotions: Performs a search on the promotions index and retrieves the promotion entities from the commerce database:
Index Search Filters:
By Promotion Entity Type: Filters down to the promotion entity type, i.e. excludes promotion book indexes.
By Valid Date: Filters out promotions that do not fall within the Valid From/To dates based on effective date.
By Catalogs: Filters out promotions where the associated catalog does not match any of the catalogs that are associated to any of the cart line items.
Post-Search Filters on Entity List:
Filter Not Approved Promotions: Removes promotions that are not approved and, if the promotion is disabled, where the effective date is prior to the updated date (the date the promotion was disabled). The latter rule is to allow the promotion to be active when reviewed the storefront at a previous point in time.
Filter Promotions By Items: Removes promotions where the cart contains no sellable items marked as included in the ItemsCollection qualification or where the cart contains any of the sellable items marked as excluded in the ItemsCollection qualification.
Filter Promotions By Coupon: Removes promotions that require a coupon that has not been applied to the cart.
Evaluate Promotions: Filters out promotions where promotion qualification and benefit rules are not applicable to the current cart.
Filter Promotions With Coupons By Exclusivity: If exclusive coupon promotions are present in the promotions list, the list will be filtered down to a single exclusive coupon promotion. The exclusive promotion will be determined with the lowest Promotion Priority value, followed by the Addeddate that their corresponding coupons were applied to the cart, in the event of a tie breaker.
Filter Promotions By Exclusivity: If exclusive automatic promotions are present in the promotions list, the list will be filtered down to a single exclusive automatic promotion. The promotion will be determined by the lowest Promotion Priority value, followed by the earliest (oldest) Valid From date, and in the event of multiple promotions sharing the same lowest Promotion Priority value and earliest Valid From date the promotion that was created earliest will take win.
Post-Evaluate Promotions: Adds the previously selected free gift cart lines back to the cart; retrieved from the commerce context.
Promotion Priorisation Rules
While the previous section covered how promotions are evaluated, and also provided some insight into promotion priorisation, we will now cover the prioritisation rules.
The following diagram shows the logic used to determine which promotion(s) to apply to the cart.
Figure 2. Flow chart of promotion application logic
The blue boxes represent logic for maintaining free gift selections and don’t impact the application of the promotions, however this shows where this logic is handled.
There are essentially 3 steps that make up the promotion application process:
Apply a single exclusive automaticpromotion.
The promotion will be determined by the lowest Promotion Priority value, which will fallback to the earliest (oldest) Valid From date, and then the earliest Created date the promotion that was created, in the result of tied values.
If a promotion is applied here, no further promotions are applied.
Apply a single exclusive coupon promotion.
The promotion will be determined by the lowest PromotionPriority value, with the Addeddate that their corresponding coupons were applied to the cart as a fallback to manage tied values.
If a promotion is applied here, no further promotions are applied.
Apply all non-exclusive promotions.
The promotion order will be determined by cart line level promotions being applied first and cart level promotions applied second, both ordered by ascending Promotion Priority value. Where Promotion Priority values are equal, promotions are furthered ordered as follows:
Automatic promotions, ordered by earliest (oldest) Valid From date, and in the event of multiple promotions sharing the same earliest Valid From date the promotion that was created earliest will win.
Coupon promotions, ordered by earliest Addeddate that their corresponding coupons were applied to the cart.
Can Promotions Be Configured to XC 9.X Logic?
If Promotion Priorities are not utilised, the promotion logic remains largely the same as cart line level promotions are still applied before cart level promotions. The key difference is the promotion logic now ensures a sole exclusive promotion, which cannot be reverted by configuration and will require customisation.
In this article, we will look at the steps in creating a custom plugin project for the Commerce Engine solution using the current developer experience in XC 10.
Introduction
With XC 10, creating a Sitecore Commerce plugin project is currently not available as a Visual Studio extension project template and has been migrated to the .Net Core CLI as a static project template.
As per previous versions of the the Sitecore Commerce plugin project, this is intended as a reference project representing a loose end-to-end implementation with sample classes. It is also commonly utilised as the starting template for your project, where you will remove the sample classes and utilise the csproj file and the project’s folder structure as the skeleton for your plugins.
Installing the Sitecore.Commerce.Plugin.Template
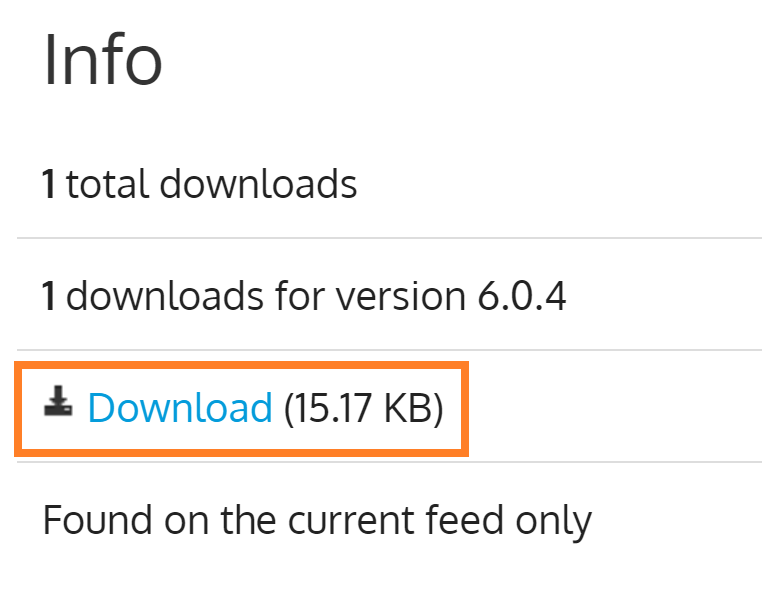
The plugin project template is no longer distributed via the Commerce Engine SDK and is now available via the Sitecore Commerce Official NuGet Feed. To download the project template, search for Sitecore.Commerce.Plugin.Template and navigate to the package details page.
On the package details page, scroll down and download the package from right panel under the Info section.
The plugin project template can now be installed via the .Net Core CLI. Open PowerShell and run the following command, dotnet new -i <full path to Sitecore.Commerce.Plugin.Template.*.*.*.nupkg>.
dotnet new -i C:\Projects\Sitecore.Commerce.Plugin.Template.6.0.4.nupkg
Now if we run the dotnet new command in PowerShell, we can see the installed plugin project template.
Creating a new Sitecore Commerce Plugin Project
Now with the plugin project tempate installed, we can create a new project using the template.
Using you Commerce Engine solution’s root directory, the following command will create the plugin project in the desired directory, dotnet new pluginsample -o <relative path to project directory>/<project name>.
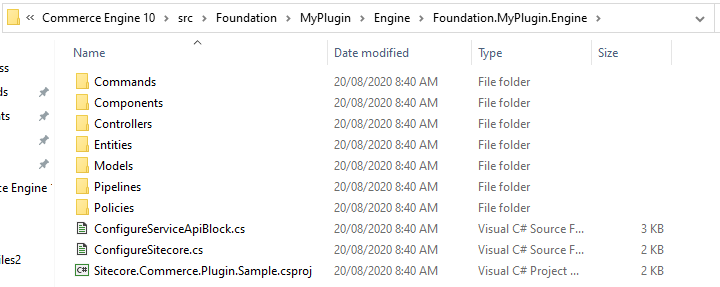
dotnet new pluginsample -o src/Foundation/MyPlugin/Engine/Foundation.MyPlugin.Engine
Note: The project name has not been configured at this time, so we will perform some post project creation steps to resolve this.
After creating the project, navigate to the folder where the project was created and rename Sitecore.Commerce.Plugin.Sample.csproj to your project name, e.g. Foundation.MyPlugin.Engine.csproj
To resolve namespaces within the project, you can use a tool, such as Notepad++, to replace all references of ‘Sitecore.Commerce.Plugin.Sample’ to <your project name>, e.g. Foundation.MyPlugin.Engine.
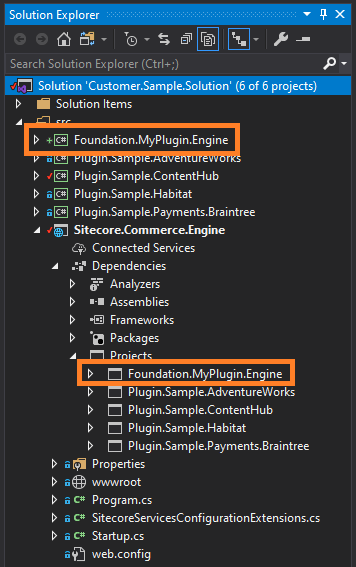
Adding the Plugin to the Commerce Engine Solution
With our new project created, we can add it the Commerce Engine solution by right-clicking a solution folder, selecting the Add Existing Project command, and adding the project from its location.
Finally add the project to the Commerce Engine by adding the project reference to the Sitecore.Commerce.Engine project.
In this article, we will look at multi-step actions and how we can implement them for customising the Sitecore Commerce Business Tools.
What is a Multi-Step Action?
The multi-step action is the approach to building out entity view modals to act as a kind of wizard, where inputs from each step can affect the subsequent steps.
Adding a qualification/condition to a promotion – step 1.Adding a qualification/condition to a promotion – step 2.
A Dive into the Multi-Step Action Implementation
We will take a dive into the pieces that make up the multi-step action implementation to see just how we should be building our custom multi-step modal, using the Add Qualification modal for promotions as our working example.
This section is focused on explaining what will be found in the current platform implementation, which can be useful if looking to extend the BizFx and Commerce Engine functionality, but can be skipped if you are only after Implementing Custom Multi-Step Actions as quick as possible.
MultiStepActionPolicy
The MultiStepActionPolicy houses a single property, FirstStep, which will contain the EntityActionView that will be populated in the modal entity view.
public MultiStepActionPolicy()
{
    this.FirstStep = new EntityActionView();
}

public EntityActionView FirstStep { get; set; }
In the following code snippet, we see that the MultiStepActionPolicy is added to the EntityActionView, in which the QualificationsDetails that is assigned to the EntityView will use to populate the first step of the add qualification modal.
Line 18 highlights the Name of the entity view action, which will be resolved to its localised value from the …/Commerce Terms/BusinessTools/ViewActionNames/AddQualification, and populates modal’s title.
var actionPolicy = arg.GetPolicy<ActionsPolicy>();
actionPolicy.Actions.Add(
        new EntityActionView(new List<Policy>
        {
            new MultiStepActionPolicy
            {
                FirstStep = new EntityActionView
                {
                    Name = context.GetPolicy<KnownPromotionsActionsPolicy>().SelectQualification,
                    DisplayName = "Select Qualification",
                    Description = "Selects a Qualification",
                    IsEnabled = isEnabled,
                    EntityView = context.GetPolicy<KnownPromotionsViewsPolicy>().QualificationDetails
                }
            }
        })
        {
            Name = context.GetPolicy<KnownPromotionsActionsPolicy>().AddQualification,
            DisplayName = "Add Qualification",
            Description = "Adds a Qualification",
            IsEnabled = isEnabled,
            EntityView = string.Empty,
            Icon = "add"
        });
The entity view populated in the first step, of the Add Qualification modal, is resolved from the entity view action name of the EntityActionView, assigned to the MultiStepActionPolicy’s FirstStep, which in this case is the SelectQualification action.
LocalizeEntityViewBlock
In the LocalizeEntityViewBlock, we find that the SelectQualificationaction name is being populated with the localised term, however as mentioned above, the modal utilises the AddQualification localised term instead, therefore we don’t need to be concerned with this.
if (!action.HasPolicy<MultiStepActionPolicy>())
{
    continue;
}

var firstStepAction = action.GetPolicy<MultiStepActionPolicy>().FirstStep;
await SetActionLocalizedTerms(firstStepAction, context).ConfigureAwait(false);
MultiStepActionModel
This model is quite simple. The NextStep represents the name of the action to be executed when the modal form is submitted.
public MultiStepActionModel(string nextStep)
{
    this.NextStep = nextStep;
}

public string NextStep { get; set; }
In the following extract of DoActionSelectQualificationBlock, I have substituted out most of the code with comments, explaining the original code logic, to reduce the noise and keep focus on the multi-step implementation functionality.
In line 11, we see that the original condition property has been made readonly as we don’t want the user to change their mind at this stage, however we don’t want to hide the property as the user still needs to have context of what was previously selected.
Updating the readonly status of submitted view properties is considered a recommended practice.
Line 15 we have a comment that tells us that this is where the next step’s view properties are added to the current entity view, building out the modal form.
This also means that the Do Action Blocks acts a pseudo Get Entity View Block as the initial modal’s entity view is populated via the GetEntityView() API, utilising the IGetEntityViewPipeline under the hood, while subsequent updates in the multi-step implementation are triggered as the DoUxAction() API calls the IDoActionPipeline to process requests.
Finally, line 17 has the original entity view action name, ‘AddQualification’, added to the MultiStepActionModel as the NextStep and applied to the commerce context.
With the knowledge that adding the MultiStepActionModel to the context effectively creates the next step in the modal, there is no limit to how many steps we can add to a multi-step modal.
public override async Task<EntityView> Run(EntityView entityView, CommercePipelineExecutionContext context)
{
    /* validate action */

    /* validate promotion */

    var selectedCondition = entityView.Properties.FirstOrDefault(p => p.Name.Equals("Condition", StringComparison.OrdinalIgnoreCase));

    /* validate condition */

    selectedCondition.IsReadOnly = true;

    /* add and/or conditional operator. hide if no qualifications have been applied to the promotion so far */

    /* add new view properties for selected condition */

    context.CommerceContext.AddModel(new MultiStepActionModel(context.GetPolicy<KnownPromotionsActionsPolicy>().AddQualification));

    return entityView;
}
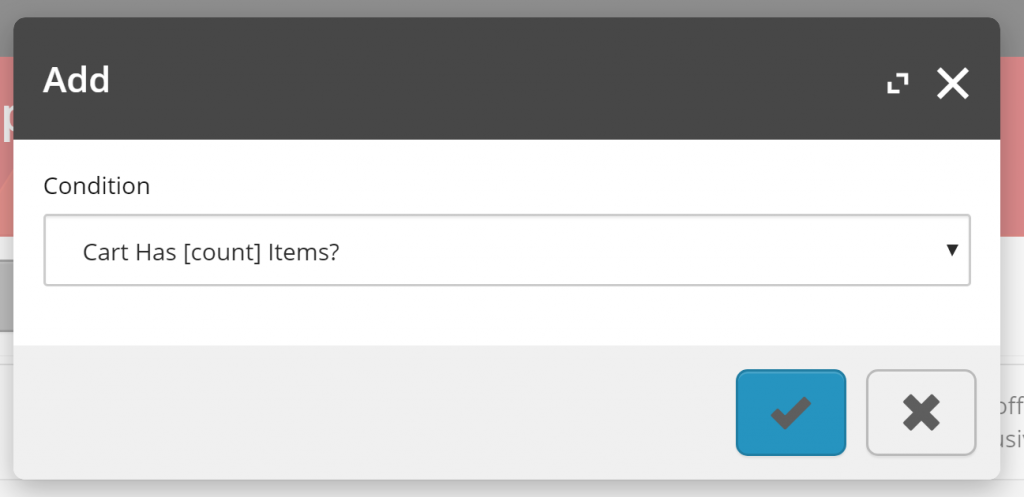
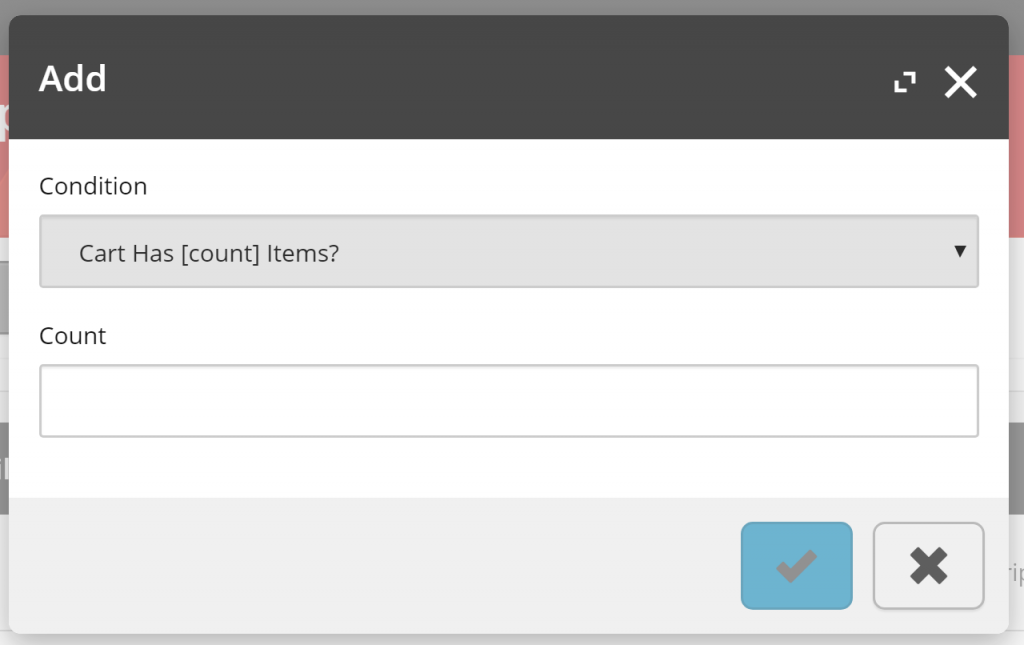
DoActionSelectQualificationBlock validates the Condition selection and updates the entity view to contain the remaining view properties required for configuring the ‘Cart Has [count] Items?’ qualification as the second step of this multi-step action modal.
CheckForMultiStepActionBlock
From the following snippet from CheckForMultiStepActionBlock, we see that it updates the current entity views action, removes the MultiStepActionModel from the commerce context, and adds the entity view to the commerce context.
In short, this logic is more of a helper, and we could get the same result by omitting the registration of the MultiStepActionModel, updating the entity view action, and add the entity view directly in the Do Action Block instead.
var multiAction = context.CommerceContext.GetModels<MultiStepActionModel>().FirstOrDefault();
if (string.IsNullOrEmpty(multiAction?.NextStep))
{
    return Task.FromResult(arg);
}

entityView.Action = multiAction.NextStep;
context.CommerceContext.RemoveModel(multiAction);
context.CommerceContext.AddModel(entityView);
The DoUxAction API
The last piece of the puzzle comes with BizFx’s handling of the response of the DoUxAction API when we submit the modal dialog.
If an entity view object is returned in the API response object, BizFx will render the modal with the updated view instead of closing the modal and refreshing the current page view.
If we were to change the modal’s entity view name during any of the steps it will not be reflected in the modal’s title as there is no handling for this implemented by default in BizFx.
Summary
Let’s review what we have learnt about multi-step actions.
Adding the MultiStepActionPolicy to an EntityActionView basically swaps out the intended action from being executed in the initial GetEntityView() request, however the modal’s title will reflect the initial EntityActionView‘s localised name.
The LocalizeEntityViewBlock application to the EntityActionView in the MultiStepActionPolicy’s FirstStep is superfluous and does not impact the multi-step implementation.
Do Action Blocks act as pseudo Get Entity View Block for updating the modal’s entity view.
When updating entity views with multi-step actions, previously input view properties should be set to readonly as a recommended practice.
The usage of the MultiStepActionModel is more of a helper model in CheckForMultiStepActionBlock, rather than a dependent piece of the implementation.
There is no limit to how many steps we can add to a multi-step action modal.
The modal title is not updated with an updated entity view.
When the Commerce Engine’s DoUxAction() API returns an entity view in the response model, BizFx will render it in the current modal view.
Implementing Custom Multi-Step Actions
For implementing custom multi-step actions we will skip the details about how to build out the pre-requisites, being the initial Populate View Actions Block to create the entity view action that will trigger the modal, and the Get Entity View Block that will populate the initial entity view that is rendered in the modal, and instead focus on the Do Action Block that will allow us to add the additional steps to the modal.
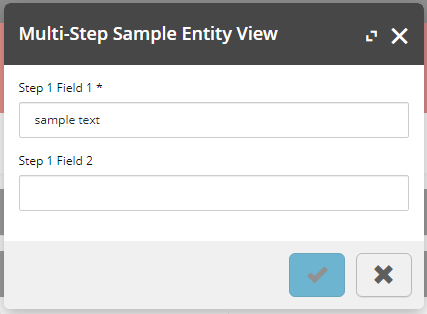
The multi-step sample show the initial entity view that we will create the second step for.
Essentially, we can implement multi-step actions without using any of the MultiStep classes, simply by adding the new entity view to the commerce context during a Do Action Block, however providing a more complete sample, the following code logic would be applied to our custom Do Action Block.
Validate action
Validate entity (if applicable)
Validate current view properties
Set current view properties to read only
Add new view properties to entity view for next step
Update entity view action with action to perform on the next time the modal is submitted
Add entity view to the commerce context
public override async Task<EntityView> Run(EntityView entityView, CommercePipelineExecutionContext context)
{
    Condition.Requires(entityView).IsNotNull($"{Name}: The argument cannot be null");

    /* 1. Validate action */
    if (string.IsNullOrEmpty(entityView?.Action)
        || !entityView.Action.Equals("FirstAction", StringComparison.OrdinalIgnoreCase))
    {
        return await Task.FromResult(entityView).ConfigureAwait(false);
    }

    /* 2. Validate entity (if applicable) */
    // Not applicable

    /* Validate current view properties */
    // Not critical for sample implementation

    /* Set current view properties to read only */
    foreach (var property in entityView.Properties)
    {
        property.IsReadOnly = true;
    }

    /* Add new view properties to entity view for next step */
    entityView.Properties.Add(new ViewProperty
    {
        Name = "Step 2 Field 1"
    });

    entityView.Properties.Add(new ViewProperty
    {
        Name = "Step 2 Field 2",
        IsRequired = false
    });

    /* Update entity view action with action to perform on the next time the modal is submitted */
    entityView.Action = "SecondAction";

    /* Add entity view to the commerce context */
    context.CommerceContext.AddModel(entityView);

    return await Task.FromResult(entityView).ConfigureAwait(false);
}
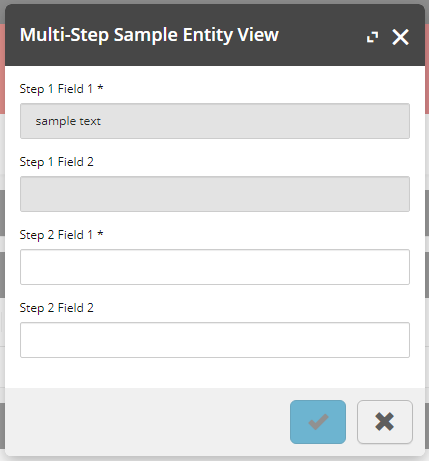
Our multi-step sample entity view after the modal has been submitted, creating the second step view for completing data input.
In this article, we will look at how the locale can be changed in BizFx to support a desired locale type and the steps required to add support for locales that haven’t been configured in the BizFx solution.
Working in Australia, a common customisation required is to add the ‘en-AU’ locale, primarily to support date/time formatting in BizFx.
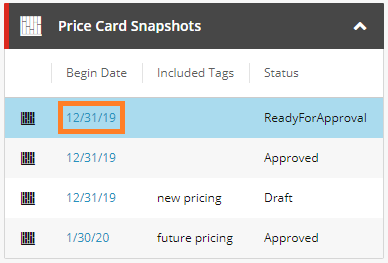
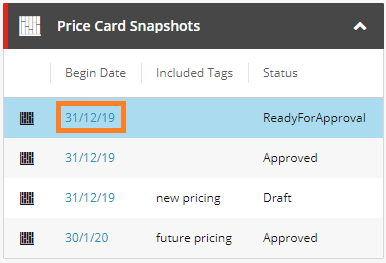
A sample date using the default ‘en’ locale configuration.The same sample date using the ‘en-AU’ locale.
Adding Support for a Locale
To add support for a locale that has not been registered to BizFx, the process is quite simple.
If you are looking to configure BizFx with any of the following locales, then this step will not be required. Default Locales:‘en’ (‘en-US’), ‘fr-FR’, ‘de-DE’, and ‘Ja-JP’.
In the BizFx solution, open src\app\app.module.ts , import the locale and advanced formatting options from the extra dataset and register the locale via the registerLocaleData function.
The locales are already provided with the BizFx SDK, under src\locales.
/* Locales */
import localeFr from '../locales/fr';
import localeFrExtra from '../locales/extra/fr';
import localeJa from '../locales/ja';
import localeJaExtra from '../locales/extra/ja';
import localeDe from '../locales/de';
import localeDeExtra from '../locales/extra/de';
import localeEnAu from '../locales/en-AU';
import localeEnAuExtra from '../locales/extra/en-AU';

registerLocaleData(localeFr, 'fr-FR', localeFrExtra);
registerLocaleData(localeDe, 'de-DE', localeDeExtra);
registerLocaleData(localeJa, 'Ja-JP', localeJaExtra);
registerLocaleData(localeEnAu, 'en-AU', localeEnAuExtra);
Once we have registered the locale, if we were to configure the locale at this point we would find that there is some messaging in that is not rendered quite right. This is because there are also a handful of text overrides that are stored in the internationalisation folder of BizFx (‘src\assets\i18n\’) that also need to be added to override the default messaging in BizFx.
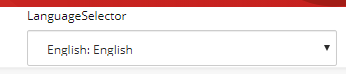
The LanguageSelector display text has not been configured.
Copy an existing locale file fom the internationalisation folder and update the messaging accordingly.
{
    "ValidationErrors": {
        "IsRequired": "{{DisplayName}} is required.",
        "IncorrectDecimalValue": "{{DisplayName}} has an incorrect decimal value.",
        "IncorrectDateValue": "{{DisplayName}} has an incorrect date value."
    },
    "ActionExecuted": "{{DisplayName}} executed.",
    "Back": "Back",
    "Logout": "Log out",
    "LanguageSelector": "Language displayed",
    "NoSearchResults": "No results matching your search were found.",
    "Searching": "Searching..."
}
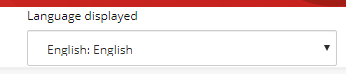
The LanguageSelector display text when configured for ‘en-AU’.
Configuring the Locale for BizFx
Now that the locale has been registered to the BizFx solution, the next step is to update the BizFx configuration to use it.
Open src\assets\config.json and set the Language to the newly registered locale.
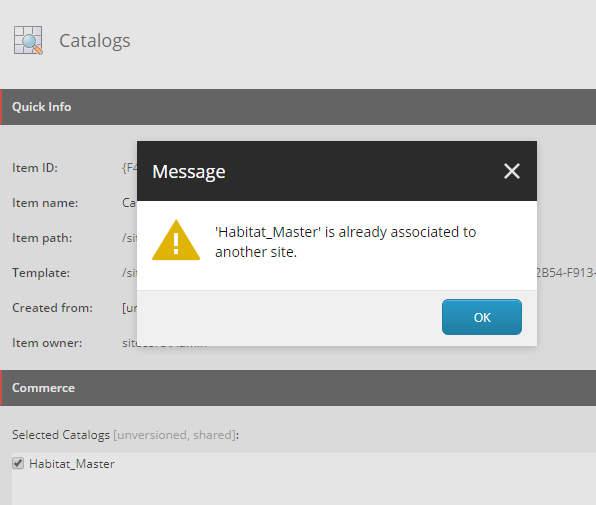
In this article, we look at how to fix the “‘<catalog>’ is already associated to another site.” error message that can occur when attempting to save the catalog association to a site, although no other sites have an association to this catalog at the time.
Note: This solution is only intended for local development and not recommended for production instances.
Background
Over in Sitecore Commerce, the category and sellable item entities contain a ParentCatalogList property that houses the Sitecore ids of the associated catalog entities. For catalog entities however, the ParentCatalogList is being repurposed for the site association Sitecore id and acts as a lock, preventing the catalog from being associated to other sites.
If you happen to have deleted a site that had a existing catalog association, the catalog commerce entity will not be updated to release the lock. Similar scenarios may also be seen if the commerce shared database is restored to an environment that has conflicting sitecore ids with existing sites, as often can be seen during development across teams that do not sync their Sitecore and Commerce data.
Solution
Removing the lock can be achieved by executing the following script against the commerce shared database.
Update the database name and catalog friendly id values, in the highlighted lines, as appropriate.
USE SitecoreCommerce9_SharedEnvironments
GO

DECLARE @catalogEntityId VARCHAR(MAX) = 'Habitat_Master';
DECLARE @uniqueId VARCHAR(MAX);
DECLARE @entity VARCHAR(MAX);
DECLARE @modifiedEntity VARCHAR(MAX);

SELECT @entity = Entity,
       @uniqueId = Entities.UniqueId
FROM   sitecore_commerce_storage.CatalogEntities AS Entities
       INNER JOIN sitecore_commerce_storage.CatalogEntity AS Entity
               ON Entities.UniqueId = Entity.UniqueId
WHERE  Id = 'Entity-Catalog-' + @catalogEntityId

UPDATE sitecore_commerce_storage.CatalogEntity
SET    Entity = JSON_MODIFY(@entity, '$.ParentCatalogList', '')
WHERE  UniqueId = @uniqueId
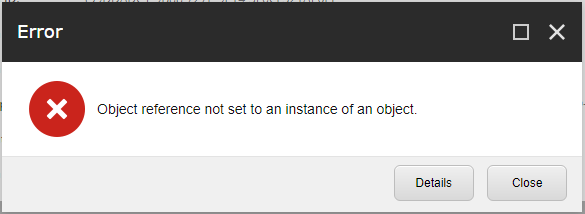
Now that we have released the lock, we can associate the catalog to our site, however we may still encounter issues navigating through the catalog structure in the content editor and attempting to publish the site may throw null reference exceptions.
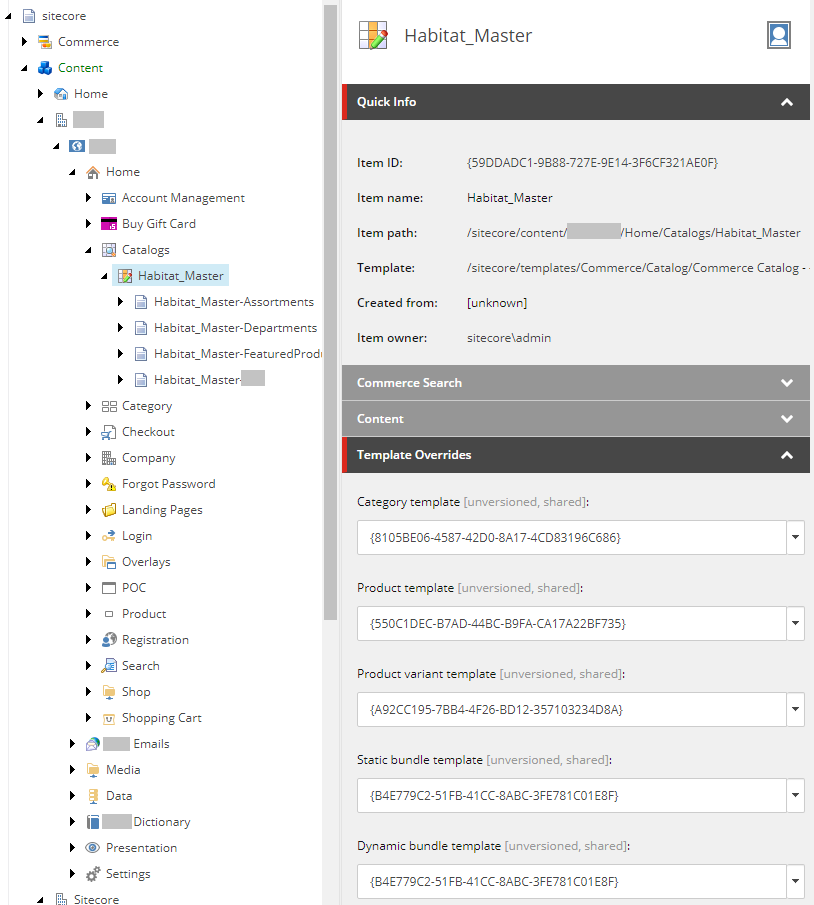
Error message when trying to navigate to category under catalog in the Content Editor.
Site Publish Error Message Job started: Publish to ‘web’|#Exception: System.Reflection.TargetInvocationException: Exception has been thrown by the target of an invocation. —> System.NullReferenceException: Object reference not set to an instance of an object. at Sitecore.Commerce.Engine.Connect.DataProvider.ReadOnlyCatalogDataProvider.GetChildIDs(ItemDefinition parentItem, CallContext context) …
These issues are caused by the catalog’s Template Overrides, which are configured to templates that don’t exist in this Sitecore instance.
Updating the Template Overrides to valid templates for the site will resolve these issues and you should be up and running again.
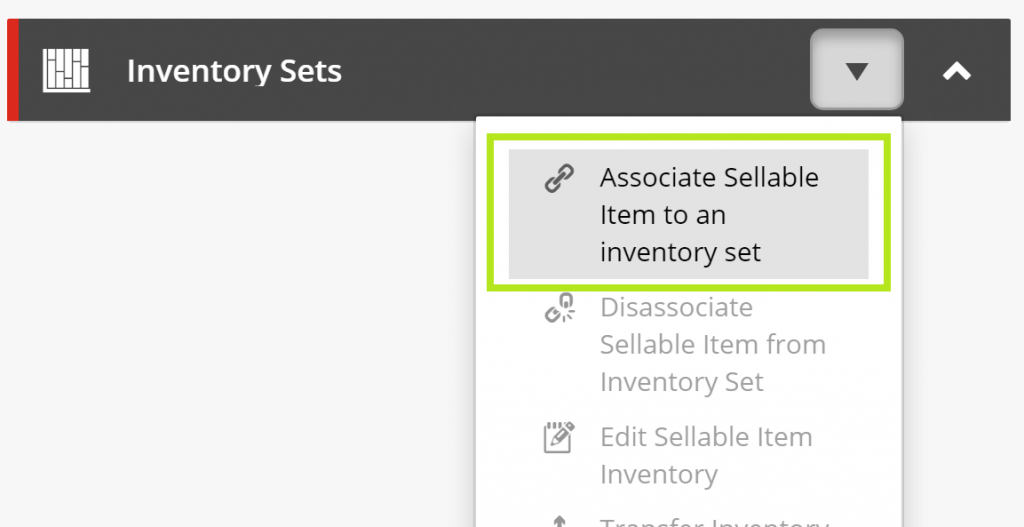
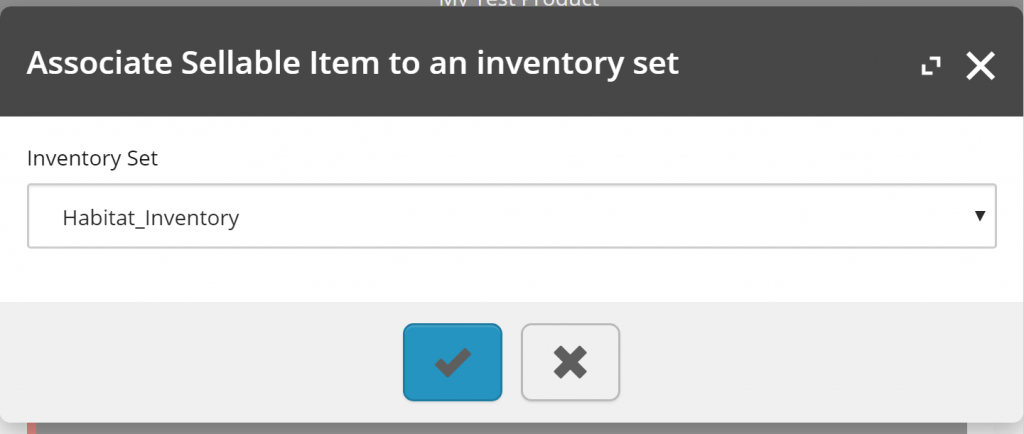
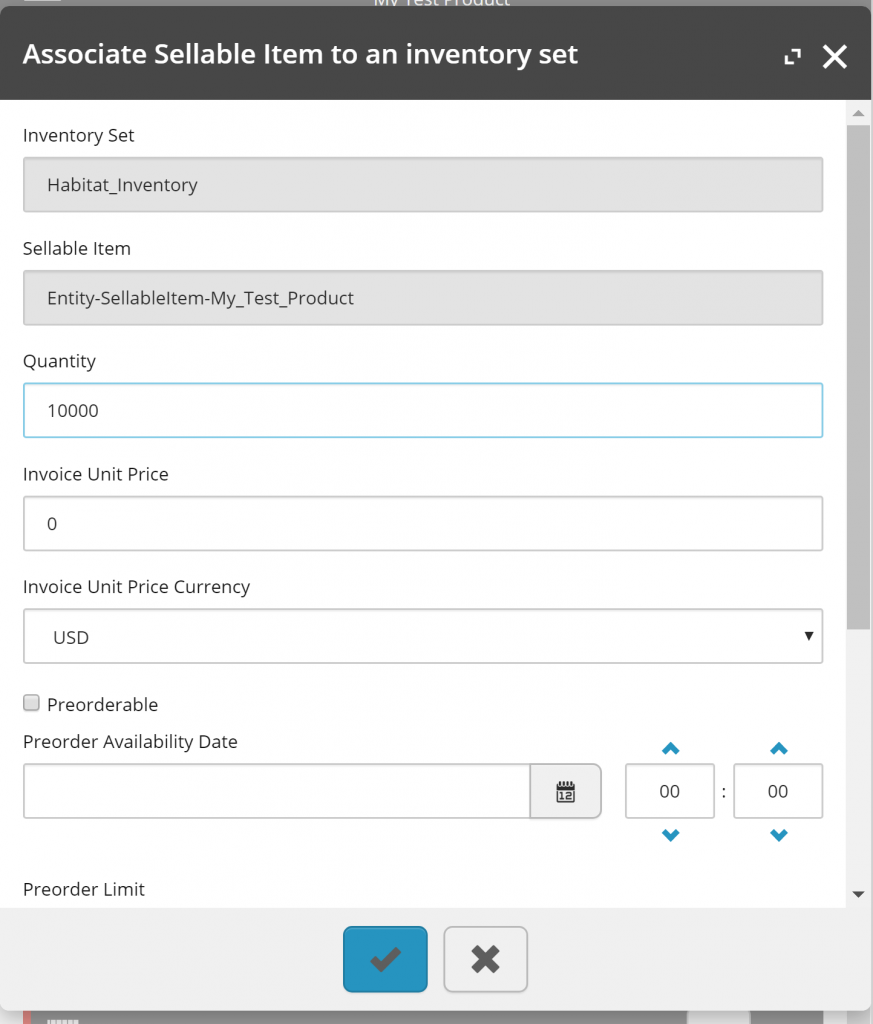
In this article, we introduce a small custom plugin for Sitecore Commerce Business Tools that enables the inventory association for sellable items and variants directly from the Merchandising Manager pages.
Establishing inventory information associations is an action hosted within the Inventory Manager. Prior to the introduction of inventory indexes in XC 9.3, locating an existing inventory information record for large catalogs via the Inventory Manager can be quite a tedious task with the pagination controls being the only form of search.
The custom plugin adds the Associate Sellable Item to an inventory set action to the Inventory Sets entity view for the Sellable Item and Variant merchanding pages.
A transitional step to select the Inventory Set is added to the modal view, which in the Inventory Manager is driven by the inventory set being viewed.
The final step locks the Inventory Set and Sellable Item fields, as they have already been identified, and if the sellable item already had been associated to the selected inventory set then this would behave like an edit view, keeping the UX at the forefront of this implementation.
Managing existing inventory information records can also be more achieved via the Sellable Item and Variant pages in the Inventory Sets entity view actions, however prior to XC 9.3 a business was required to create a new entity version to enable these controls, unless the EntityVersionsActionsPolicy had been updated to allow these actions to bypass the entity version (as they should). This process was also documented in Enabling Disassociate, Edit, and Transfer Inventory Actions for Published Sellable Items and Variants.
In this article, we will review how to change the authentication token timeout values that force us to log back in to Sitecore or request a new token from Postman. If you are like me, generally working with Sitecore/Sitecore Commerce 10+ hours per day, 6 days a week, it can seem like you are kicked out every 5 minutes. Personally, I set these timeouts to a week (604800 seconds).
Changing the timeouts are not recommended for production instances.
Changing the Timeouts in Sitecore Identity Server
Sitecore Identity Server was first introduced with Sitecore Commerce 9.0.0 and with the release of Sitecore 9.1, Sitecore Identity Server was added to Sitecore authentication process.
Updating the Token Lifetimes in 9.0.X
Open <Sitecore Identity Server root>\wwwroot\appsettings.json.
Under AppSettings.Clients, update the CommerceBusinessToolsand Postman APIclients for BizFx and Postman applications respectively :-
Update the AccessTokenLifetimeInSeconds and IdentityTokenLifetimeInSeconds from the default 3600 (seconds) to the desired timespan, in seconds.
Save the configuration.
Restart the Sitecore Identity Server so that the updated configuration is consumed on startup.
Updating the Token Lifetimes in 9.3
Open <Sitecore Identity Server root>\Config\production\Sitecore.Commerce.IdentityServer.Host.xml.
Under /Settings/Sitecore/IdentityServer/Clients, update the CommerceClientand PostmanClientfor BizFx and Postman applications respectively:-
Update the AccessTokenLifetimeInSeconds and IdentityTokenLifetimeInSeconds from the default 3600 (seconds) to the desired timespan, in seconds.
Save the configuration.
Restart the Sitecore Identity Server so that the updated configuration is consumed on startup.
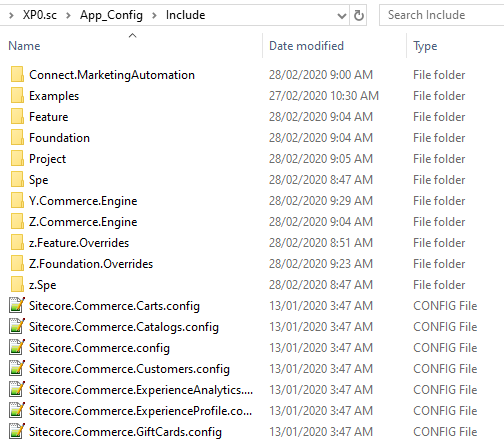
In this article, we will look at creating our own custom include folder in Sitecore to avoid the ugliness of the folder/file structure that comes with a Sitecore installation and all of its modules.
Include folder contents from default installation of Sitecore with Sitecore XC 9.3
Previously, I covered Managing Commerce Configuration to Align with Helix Principles, however this approach was overly complex and not really developer friendly. Since then I have concluded that the simpler approach would be leave the “custom” folder for the Sitecore integrations and create a dedicated custom folder outside of the “custom” for solution specific custom configurations.
Added benefits to this approach include:
When performing an upgrade, a new or updated configuration will not override your custom configurations based on load order.
You won’t need to revisit the Layers.config file as potentially required with my previously documented approach.
For local development, you can comfortablely delete the dedicated custom folder and redeploy, avoiding any stale custom configurations from your current build.
Configuring Layers.config
As the order of the layer nodes in the Layers.confg defines the order in which they load at runtime, all that is required for this approach is to add the new custom folder to Layers.config after the “Custom” layer and ensure your custom solution configuration files are placed in the App_Config/Custom_Include folder within the projects.
Add the custom folder after the “Custom” layer entry and include the “Foundation”, “Feature”, and “Project” folders to manage configuration files using Helix principles.
Custom Include folder contents segregated from the Include folder of the default installation of Sitecore with Sitecore XC 9.3
Summary
No longer will you need to fight for configuration priority over the platform’s standard configuration files or soil your solution with ‘zzz’ prefixed patch files.