Sitecore Experience Commerce: Adding Custom Properties to Search in BizFx

Reading Time: 8 minutes

In this article, we will review how we can extend the search components in Business Tools (BizFx) to support search functionality using custom properties for its results.

This article will not consider locale-support.

Introduction

As the search functionality in BizFx is fairly primitive, from a business user perspective, and a common request is to provide customisation guidance for the search functionality in the Business Tools, we will use the Search component from the Merchandising dashboard for our example in extending the search functionality.
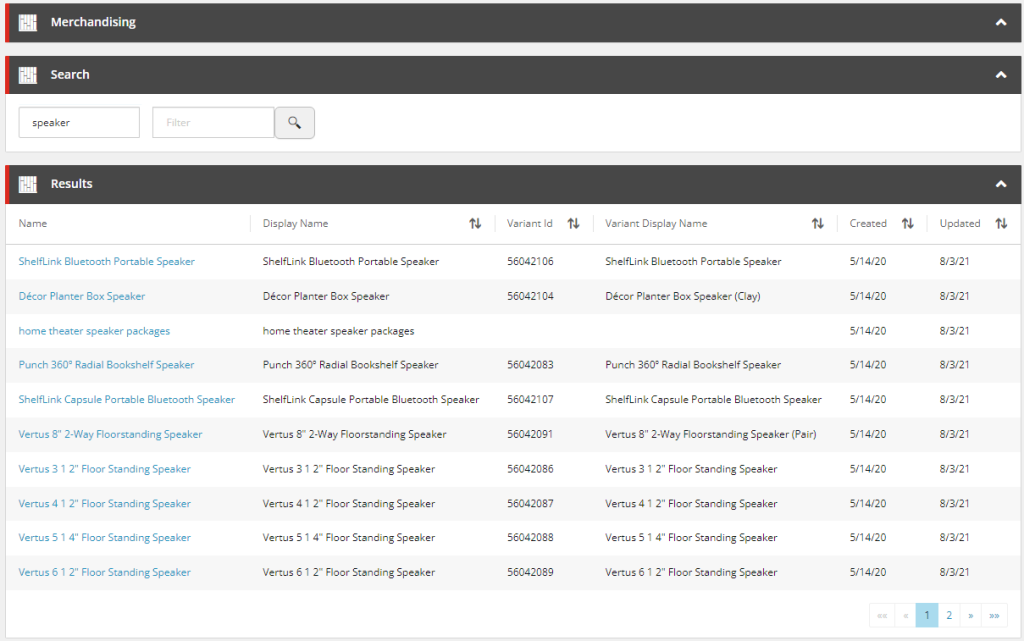
Figure 1: Search component in the Merchandising Dashboard.

This implementation will assume the sellable items that have custom properties added via composer templates, however you will be able to adapt the solution where properties have been added programatically with components or policies.
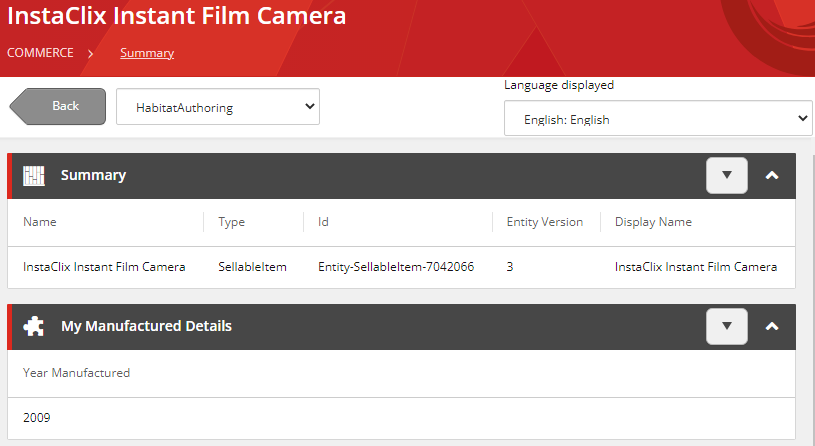
Figure 2: A sellable item extended with a composer template.

Implementation and Configuration

Updating the Solr Schema

We first need to add our custom property to the managed schema of our Solr cores related to our search scopes. These schemas are found in the file system where Solr is deployed, under server/solr/<search scope>/conf/managed-schema.

The commerce engine uses switch on rebuild so we need to update the managed schema for both CatalogItemsScope and CatalogItemsScope-Rebuild for this instance.

    <!-- CommerceEngine Catalog -->
    <field name="displayname" type="string" indexed="true" stored="true"/>
    <field name="datecreated" type="pdate" indexed="true" stored="true"/>
    <field name="dateupdated" type="pdate" indexed="true" stored="true"/>
    <field name="artifactstoreid" type="string" indexed="true" stored="true"/>
    <field name="parentcataloglist" type="string" indexed="true" stored="true" multivalued="true"/>
    <field name="variantid" type="string" indexed="true" stored="true"/>
    <field name="variantdisplayname" type="string" indexed="true" stored="true"/>
    <field name="inventorysetids" type="string" indexed="true" stored="true"/>
    <field name="productid" type="string" indexed="true" stored="true"/>
    <field name="name" type="string" indexed="true" stored="true"/>
    <field name="yearmanufactured" type="string" indexed="true" stored="true"/>

The managed-schema that would be created with the XC instance will be organised to easily identify the commerce entity fields. While fields can be added via Solr, the managed-schema will be regenerated in a less XC friendly manner and make long-term mainentance more difficult.

With our Solr schema updated, if we are working locally, we will need to restart the Solr service, otherwise you will need to manage the deployment of the schema to your deployment environments.

Populating the Index’ Custom Fields

The commerce indexes are created and updated by both the FullIndexMinion and the IncrementalIndexMinion. It is within these minions that we can inject our custom code to populate the new custom fields with our commerce entity properties.

We’ll create a new pipeline block, called InitializeExtendedSellableItemIndexingViewBlock, which we can see the Run() method in the following snippet. We perform the necessary validation and copy our entity properties to custom index fields.

public override EntityView Run(EntityView arg, CommercePipelineExecutionContext context)
{
    // 1. Validation
    Condition.Requires(arg, nameof(arg)).IsNotNull();
    Condition.Requires(context, nameof(context)).IsNotNull();

    var argument = context.CommerceContext.GetObjects<SearchIndexMinionArgument>().FirstOrDefault();
    if (string.IsNullOrEmpty(argument?.Policy?.Name))
    {
        return arg;
    }

    // 2. Prepare Entities
    var entityItems = argument.Entities?.OfType<SellableItem>().ToList();
    if (entityItems == null || !entityItems.Any())
    {
        return arg;
    }

    // 3. Prepare custom properties
    var scopeIndexablePropertiesPolicy = IndexablePropertiesPolicy.GetPolicyByScope(context.CommerceContext, context.CommerceContext.Environment, argument.Policy.Name);
    if (scopeIndexablePropertiesPolicy?.ComposerProperties == null || !scopeIndexablePropertiesPolicy.ComposerProperties.Any())
    {
        return arg;
    }

    var searchViewNames = context.GetPolicy<KnownSearchViewsPolicy>();
    var childViews = arg.ChildViews.OfType<EntityView>().ToList();

    // 4. Iterate over each entity
    foreach (var si in argument.Entities.OfType<SellableItem>())
    {
        // 5. Get existing document entity view
        var documentView = childViews.First(v => v.EntityId.EqualsOrdinalIgnoreCase(si.Id)
            && v.Name.EqualsOrdinalIgnoreCase(searchViewNames.Document));

        // 6. Add custom fields
        AddComposerFields(si, documentView, scopeIndexablePropertiesPolicy);
    }

    return arg;
}

The highlighted section, 3. Prepare custom properties, is used for our AddComposerFields() method.

To add properties to the Solr document, we only need to register the field name and value to a new ViewProperty of the document EntityView and the platform will later translate and push this data into Solr. This would typically look like the following.

documentView.Properties.Add(new ViewProperty
{
    Name = "<Insert Field Name Here>",
    RawValue = "<Insert Field Value Here>"
});

In our AddComposerFields() implementation, we leverage our custom policy to identify and process fields from the composer templates.

protected void AddComposerFields(
    SellableItem si,
    EntityView documentView,
    IndexablePropertiesPolicy scopeIndexablePropertiesPolicy)
{
    // 1. Iterate over each composer template configuration
    foreach (var composerView in scopeIndexablePropertiesPolicy.ComposerProperties)
    {
        // 2. Get property value
        var composerEntityView = si.GetComposerViewFromName(composerView.Key);

        if (composerEntityView == null)
        {
            continue;
        }

        // 3. Iterate over each custom property to index
        foreach (var property in composerView.Value)
        {
            var value = composerEntityView.GetPropertyValue(property.PropertyName);

            if (value == null)
            {
                continue;
            }

            // 4. Add property to index document
            documentView.Properties.Add(new ViewProperty
            {
                Name = property.IndexFieldName,
                RawValue = value
            });
        }
    }
}

The implementation is made flexible by avoiding hard-coding any composer template or property names and instead using the custom IndexablePropertiesPolicy, which we append our configured policy to the SolrSearchPolicySet. In ComposerProperties we add our composer template name, e.g. "ManufacturedDetails", and then an array of composer property models, where the PropertyName represents the composer template property name and the IndexFieldName represents the Solr core field name.

{
  "$type": "Ajsuth.Sample.Catalog.Search.Engine.Policies.IndexablePropertiesPolicy, Ajsuth.Sample.Catalog.Search.Engine",
  "SearchScopeName": "CatalogItemsScope",
  "ComposerProperties": {
    "ManufacturedDetails": [
      {
        "PropertyName": "YearManfactured",
        "IndexFieldName": "yearmanufactured"
      }
    ]
  }
}

We register our pipeline block to both the full and incremental index minion pipelines.

.ConfigurePipeline<IIncrementalIndexMinionPipeline>(pipeline => pipeline
    .Add<Pipelines.Blocks.InitializeExtendedSellableItemIndexingViewBlock>()
        .After<InitializeSellableItemIndexingViewBlock>()
)

.ConfigurePipeline<IFullIndexMinionPipeline>(pipeline =>pipeline
    .Add<Pipelines.Blocks.InitializeExtendedSellableItemIndexingViewBlock>()
        .After<InitializeSellableItemIndexingViewBlock>()
)

By adding our InitializeExtendedSellableItemIndexingViewBlock after the InitializeSellableItemIndexingViewBlock rather than directly replacing and overriding the initial platform pipeline block, we may suffer a minor performance impact as we will need to interate over our entities another time, however we won’t have to copy platform code into our pipeline block, which will ultimately keep our code as clean as possible while preventing complexity for during upgrades.

We then follow our deployment process for our changes:

  1. Deploy our Solr managed-schemas and restart the Solr service to ingest the updated schemas.
  2. Deploying our Commerce Engine code to all instances.
  3. Bootstrap the Commerce Engine to ingest our IndexablePropertiesPolicy configuration.
  4. Restart the minions Commerce Engine instance to consume the updated policy set.
  5. Executing the Run FullIndex Minion – Catalog Items request from postman.
  6. Verify our Solr core now how our custom field indexed.
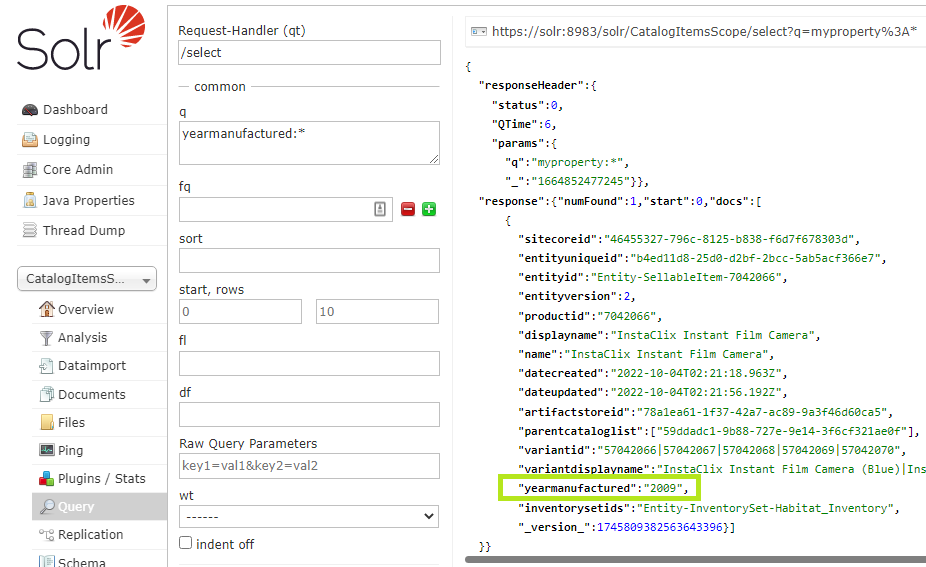
Figure 3: yearmanufactured property added to Solr core.

If you aren’t seeing the custom field for any indexed document check the *-Rebuild core as that may the current active core.

Searching Against Custom Fields in the Search Component

With the custom properties added to the indexes, we finally need to update the search component to include the new property as part of the search query.
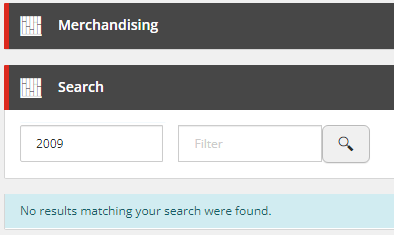
Figure 4: Search does not query against the custom yearmanufactured field by default.

Using Solr Query Syntax

With no further customisation or configuration, we could use the Solr query syntax to apply to set the Search Term with the specific field query, e.g. yearmanufactured:2009, as the search component will process this as a raw query.
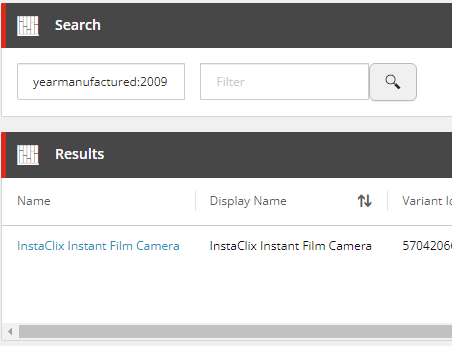
Figure 5: Search can query against the custom yearmanufactured field using Solr query syntax.

Including the Custom Field for SearchScope Queries

The search component queries against the Search Term properties appended to the _text_ field in Solr. If we wanted to add a custom field to default search query, then we can update the managed-schema of the Solr cores to include it. Below lists all of the fields that are used for the search queries as well as our custom field.

<copyField source="displayname" dest="_text_"/>
<copyField source="variantid" dest="_text_"/>
<copyField source="variantdisplayname" dest="_text_"/>
<copyField source="productid" dest="_text_"/>
<copyField  source="name" dest="_text_"/>
<copyField source="yearmanufactured" dest="_text_"/>

After deploying and restarting the Solr service, search component queries from the Business Tools will now query the custom fields as well in the default search.

Figure 6: Search queries against the custom yearmanufactured field by default with updated managed-schema.

Customising the Search Results

The last piece of the puzzle is to add our custom indexed fields to the Results entity view as seen below.

The Results entity view is populated with indexed commerce entity data and not raw commerce entity data.

First, we want to update the IndexablePolicy in the SearchPolicySet for our given search scope, with our custom field.

{
"$type": "Sitecore.Commerce.Plugin.Search.IndexablePolicy, Sitecore.Commerce.Plugin.Search",
"SearchScopeName": "CatalogItemsScope",
"Properties": {
  ...,
  "YearManufactured": {
    "TypeName": "System.String",
    "IsKey": false,
    "IsSearchable": true,
    "IsFilterable": true,
    "IsSortable": true,
    "IsFacetable": false,
    "IsRetrievable": true
  }
}

For our implementation purposes, we only need to be concerned about the IsRetrievable and IsSortable properties of the IndexableSettings object. The IsRetrievable property will allow us to provide a fallback property with an empty value, while the IsSortable property will configured the column to be sortable. Both follow the platform implementation pattern.

Next, I would like to tell you that we could extend the Results entity view simply by extending pipelines with additional pipeline blocks, but we will need to copy and replace the original pipeline blocks for the most consistent approach across commerce indexes. There is a ProcessDocumentSearchResultsBlock within the commerce plugins that will relate to the search scope, which we would copy into our solution. In this instance, we copy the pipeline block from the Sitecore.Commerce.Plugin.Catalog.dll.

Without re-writing the platform code, we will have to face a bit more rigid manual coding over a more automated, iterative approach to the IndexableSettings of our IndexablePolicy. The key area of the pipeline block we need to focus on is shown on line 5, where the results view properties are cleared. We need to copy our custom field from the properties before hand (1. Copy the field view property) and then repopulate the results view afterwards (3. Add desired indexed fields back into results view), which effectively strips the results view or the other indexed fields that we don’t want to render.

// 1. Copy the field view property 
var yearmanufactured = child.Properties.FirstOrDefault(p => p.Name.EqualsOrdinalIgnoreCase("YearManufactured"));

// 2. Clear the results view properties
child.Properties.Clear();

if (name != null)
{
    name.UiType = ViewsConstants.EntityLinkUiType;
}

// 3. Add desired indexed fields back into results view
child.AddViewPropertyToEntityViewOrDefault(name, retrievableProperties, CoreConstants.Name, typeof(string).FullName);
child.AddViewPropertyToEntityViewOrDefault(displayName, retrievableProperties, CoreConstants.DisplayName, typeof(string).FullName);
child.AddViewPropertyToEntityViewOrDefault(variantId, retrievableProperties, CatalogConstants.VariantId, typeof(string).FullName);
child.AddViewPropertyToEntityViewOrDefault(variantDisplayName, retrievableProperties, CatalogConstants.VariantDisplayName, typeof(string).FullName);
child.AddViewPropertyToEntityViewOrDefault(createdDate, retrievableProperties, CoreConstants.DateCreated, typeof(DateTimeOffset).FullName);
child.AddViewPropertyToEntityViewOrDefault(updatedDate, retrievableProperties, CoreConstants.DateUpdated, typeof(DateTimeOffset).FullName);
child.AddViewPropertyToEntityViewOrDefault(yearmanufactured, retrievableProperties, "YearManufactured", typeof(string).FullName);

We replace the platform pipeline block in SearchPipeline in our pipeline registrations.

.ConfigurePipeline<ISearchPipeline>(pipeline => pipeline
    .Replace<Sitecore.Commerce.Plugin.Catalog.ProcessDocumentSearchResultBlock, Pipelines.Blocks.ProcessDocumentSearchResultBlock>()
)

The platform pipeline block we are overriding is fully qualified here to to explicitly replace the correct pipeline block.

All that is left is to deploy the code, which is short looks requires:

  • Deploying our Commerce Engine code to all instances.
  • Bootstrap the Commerce Engine to ingest our updated IndexablePolicy configuration.
  • Restart the authoring Commerce Engine instance to consume the updated policy set.

Performing our search now, we will see that we have our custom field appended to the end of the Results entity view, which can be used to sort the results.
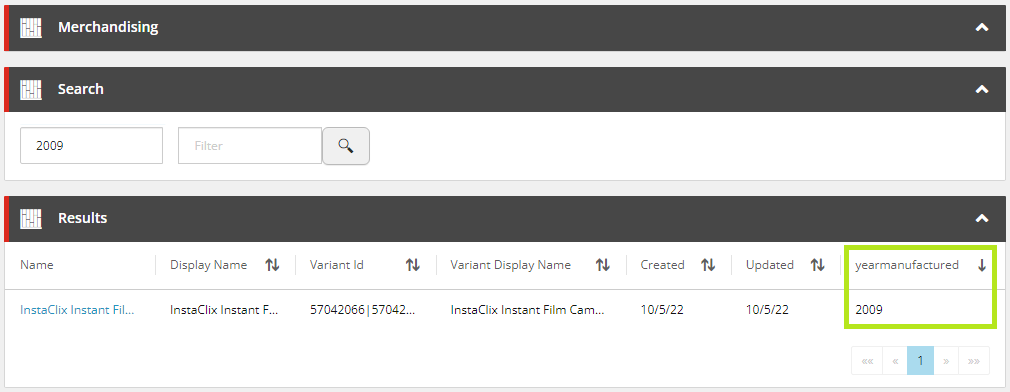
Figure 7: The Results entity view is customised with the yearmanufactured indexed field.

Summary

While the search component of BizFx was not developed with the intention of being configurable, we have identified a few ways to customise the search component, which will hopefully cover most business user scenarios and saves us from having to implement our own search component from scratch.

References

Sitecore Experience Commerce: Implementing Multi-Step Actions in the Business Tools

Reading Time: 6 minutes

In this article, we will look at multi-step actions and how we can implement them for customising the Sitecore Commerce Business Tools.

What is a Multi-Step Action?

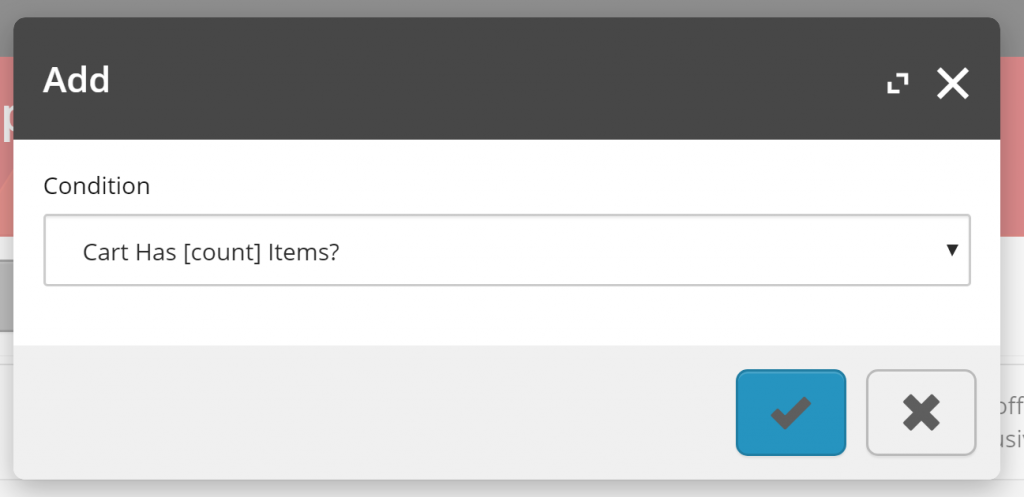
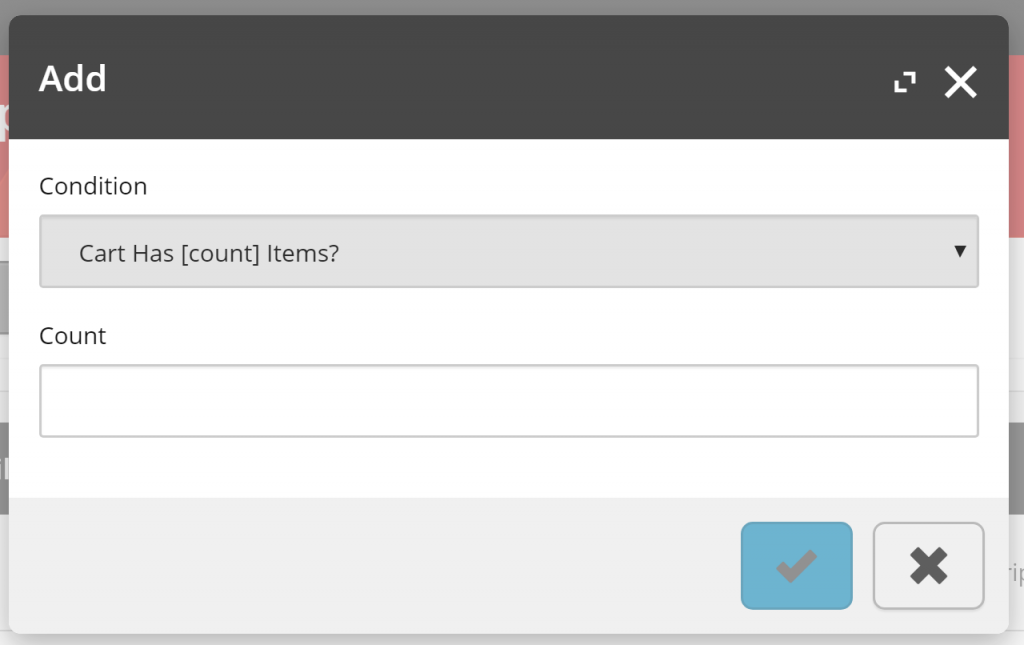
The multi-step action is the approach to building out entity view modals to act as a kind of wizard, where inputs from each step can affect the subsequent steps.

Adding a qualification/condition to a promotion – step 1.
Adding a qualification/condition to a promotion – step 2.

A Dive into the Multi-Step Action Implementation

We will take a dive into the pieces that make up the multi-step action implementation to see just how we should be building our custom multi-step modal, using the Add Qualification modal for promotions as our working example.

This section is focused on explaining what will be found in the current platform implementation, which can be useful if looking to extend the BizFx and Commerce Engine functionality, but can be skipped if you are only after Implementing Custom Multi-Step Actions as quick as possible.

MultiStepActionPolicy

The MultiStepActionPolicy houses a single property, FirstStep, which will contain the EntityActionView that will be populated in the modal entity view.

public MultiStepActionPolicy()
{
    this.FirstStep = new EntityActionView();
}

public EntityActionView FirstStep { get; set; }

In the following code snippet, we see that the MultiStepActionPolicy is added to the EntityActionView, in which the QualificationsDetails that is assigned to the EntityView will use to populate the first step of the add qualification modal.

Line 18 highlights the Name of the entity view action, which will be resolved to its localised value from the …/Commerce Terms/BusinessTools/ViewActionNames/AddQualification, and populates modal’s title.

var actionPolicy = arg.GetPolicy<ActionsPolicy>();
actionPolicy.Actions.Add(
        new EntityActionView(new List<Policy>
        {
            new MultiStepActionPolicy
            {
                FirstStep = new EntityActionView
                {
                    Name = context.GetPolicy<KnownPromotionsActionsPolicy>().SelectQualification,
                    DisplayName = "Select Qualification",
                    Description = "Selects a Qualification",
                    IsEnabled = isEnabled,
                    EntityView = context.GetPolicy<KnownPromotionsViewsPolicy>().QualificationDetails
                }
            }
        })
        {
            Name = context.GetPolicy<KnownPromotionsActionsPolicy>().AddQualification,
            DisplayName = "Add Qualification",
            Description = "Adds a Qualification",
            IsEnabled = isEnabled,
            EntityView = string.Empty,
            Icon = "add"
        });
The entity view populated in the first step, of the Add Qualification modal, is resolved from the entity view action name of the EntityActionView, assigned to the MultiStepActionPolicy’s FirstStep, which in this case is the SelectQualification action.

LocalizeEntityViewBlock

In the LocalizeEntityViewBlock, we find that the SelectQualification action name is being populated with the localised term, however as mentioned above, the modal utilises the AddQualification localised term instead, therefore we don’t need to be concerned with this.

if (!action.HasPolicy<MultiStepActionPolicy>())
{
    continue;
}

var firstStepAction = action.GetPolicy<MultiStepActionPolicy>().FirstStep;
await SetActionLocalizedTerms(firstStepAction, context).ConfigureAwait(false);

MultiStepActionModel

This model is quite simple. The NextStep represents the name of the action to be executed when the modal form is submitted.

public MultiStepActionModel(string nextStep)
{
    this.NextStep = nextStep;
}

public string NextStep { get; set; }

In the following extract of DoActionSelectQualificationBlock, I have substituted out most of the code with comments, explaining the original code logic, to reduce the noise and keep focus on the multi-step implementation functionality.

In line 11, we see that the original condition property has been made readonly as we don’t want the user to change their mind at this stage, however we don’t want to hide the property as the user still needs to have context of what was previously selected.

Updating the readonly status of submitted view properties is considered a recommended practice.

Line 15 we have a comment that tells us that this is where the next step’s view properties are added to the current entity view, building out the modal form.

This also means that the Do Action Blocks acts a pseudo Get Entity View Block as the initial modal’s entity view is populated via the GetEntityView() API, utilising the IGetEntityViewPipeline under the hood, while subsequent updates in the multi-step implementation are triggered as the DoUxAction() API calls the IDoActionPipeline to process requests.

Finally, line 17 has the original entity view action name, ‘AddQualification’, added to the MultiStepActionModel as the NextStep and applied to the commerce context.

With the knowledge that adding the MultiStepActionModel to the context effectively creates the next step in the modal, there is no limit to how many steps we can add to a multi-step modal.

public override async Task<EntityView> Run(EntityView entityView, CommercePipelineExecutionContext context)
{
    /* validate action */

    /* validate promotion */

    var selectedCondition = entityView.Properties.FirstOrDefault(p => p.Name.Equals("Condition", StringComparison.OrdinalIgnoreCase));

    /* validate condition */

    selectedCondition.IsReadOnly = true;

    /* add and/or conditional operator. hide if no qualifications have been applied to the promotion so far */

    /* add new view properties for selected condition */

    context.CommerceContext.AddModel(new MultiStepActionModel(context.GetPolicy<KnownPromotionsActionsPolicy>().AddQualification));

    return entityView;
}
DoActionSelectQualificationBlock validates the Condition selection and updates the entity view to contain the remaining view properties required for configuring the ‘Cart Has [count] Items?’ qualification as the second step of this multi-step action modal.

CheckForMultiStepActionBlock

From the following snippet from CheckForMultiStepActionBlock, we see that it updates the current entity views action, removes the MultiStepActionModel from the commerce context, and adds the entity view to the commerce context.

In short, this logic is more of a helper, and we could get the same result by omitting the registration of the MultiStepActionModel, updating the entity view action, and add the entity view directly in the Do Action Block instead.

var multiAction = context.CommerceContext.GetModels<MultiStepActionModel>().FirstOrDefault();
if (string.IsNullOrEmpty(multiAction?.NextStep))
{
    return Task.FromResult(arg);
}

entityView.Action = multiAction.NextStep;
context.CommerceContext.RemoveModel(multiAction);
context.CommerceContext.AddModel(entityView);

The DoUxAction API

The last piece of the puzzle comes with BizFx’s handling of the response of the DoUxAction API when we submit the modal dialog.

If an entity view object is returned in the API response object, BizFx will render the modal with the updated view instead of closing the modal and refreshing the current page view.

If we were to change the modal’s entity view name during any of the steps it will not be reflected in the modal’s title as there is no handling for this implemented by default in BizFx.

Summary

Let’s review what we have learnt about multi-step actions.

  1. Adding the MultiStepActionPolicy to an EntityActionView basically swaps out the intended action from being executed in the initial GetEntityView() request, however the modal’s title will reflect the initial EntityActionView‘s localised name.
  2. The LocalizeEntityViewBlock application to the EntityActionView in the MultiStepActionPolicy’s FirstStep is superfluous and does not impact the multi-step implementation.
  3. Do Action Blocks act as pseudo Get Entity View Block for updating the modal’s entity view.
  4. When updating entity views with multi-step actions, previously input view properties should be set to readonly as a recommended practice.
  5. The usage of the MultiStepActionModel is more of a helper model in CheckForMultiStepActionBlock, rather than a dependent piece of the implementation.
  6. There is no limit to how many steps we can add to a multi-step action modal.
  7. The modal title is not updated with an updated entity view.
  8. When the Commerce Engine’s DoUxAction() API returns an entity view in the response model, BizFx will render it in the current modal view.

Implementing Custom Multi-Step Actions

For implementing custom multi-step actions we will skip the details about how to build out the pre-requisites, being the initial Populate View Actions Block to create the entity view action that will trigger the modal, and the Get Entity View Block that will populate the initial entity view that is rendered in the modal, and instead focus on the Do Action Block that will allow us to add the additional steps to the modal.

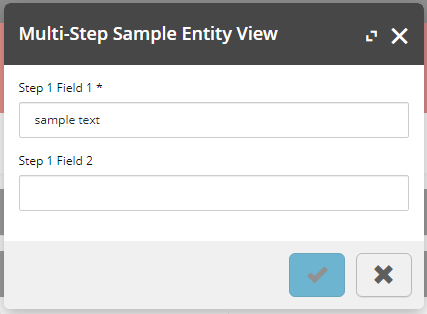
The multi-step sample show the initial entity view that we will create the second step for.

Essentially, we can implement multi-step actions without using any of the MultiStep classes, simply by adding the new entity view to the commerce context during a Do Action Block, however providing a more complete sample, the following code logic would be applied to our custom Do Action Block.

  1. Validate action
  2. Validate entity (if applicable)
  3. Validate current view properties
  4. Set current view properties to read only
  5. Add new view properties to entity view for next step
  6. Update entity view action with action to perform on the next time the modal is submitted
  7. Add entity view to the commerce context
public override async Task<EntityView> Run(EntityView entityView, CommercePipelineExecutionContext context)
{
    Condition.Requires(entityView).IsNotNull($"{Name}: The argument cannot be null");

    /* 1. Validate action */
    if (string.IsNullOrEmpty(entityView?.Action)
        || !entityView.Action.Equals("FirstAction", StringComparison.OrdinalIgnoreCase))
    {
        return await Task.FromResult(entityView).ConfigureAwait(false);
    }

    /* 2. Validate entity (if applicable) */
    // Not applicable

    /* Validate current view properties */
    // Not critical for sample implementation

    /* Set current view properties to read only */
    foreach (var property in entityView.Properties)
    {
        property.IsReadOnly = true;
    }

    /* Add new view properties to entity view for next step */
    entityView.Properties.Add(new ViewProperty
    {
        Name = "Step 2 Field 1"
    });

    entityView.Properties.Add(new ViewProperty
    {
        Name = "Step 2 Field 2",
        IsRequired = false
    });

    /* Update entity view action with action to perform on the next time the modal is submitted */
    entityView.Action = "SecondAction";

    /* Add entity view to the commerce context */
    context.CommerceContext.AddModel(entityView);

    return await Task.FromResult(entityView).ConfigureAwait(false);
}
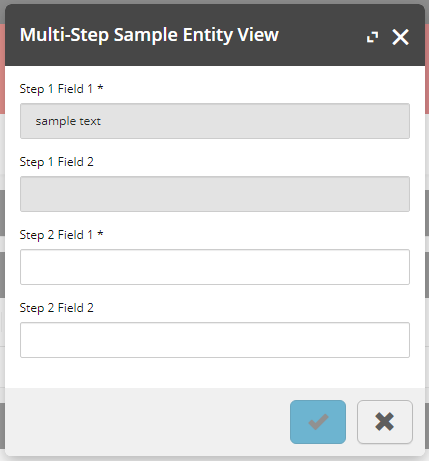
Our multi-step sample entity view after the modal has been submitted, creating the second step view for completing data input.

Sitecore Experience Commerce: Configuring and Customising the BizFx Solution with Locale Support

Reading Time: 3 minutes

In this article, we will look at how the locale can be changed in BizFx to support a desired locale type and the steps required to add support for locales that haven’t been configured in the BizFx solution.

Working in Australia, a common customisation required is to add the ‘en-AU’ locale, primarily to support date/time formatting in BizFx.

A sample date using the default ‘en’ locale configuration.
The same sample date using the ‘en-AU’ locale.

Adding Support for a Locale

To add support for a locale that has not been registered to BizFx, the process is quite simple.

If you are looking to configure BizFx with any of the following locales, then this step will not be required. Default Locales: ‘en’ (‘en-US’), ‘fr-FR’, ‘de-DE’, and ‘Ja-JP’.

In the BizFx solution, open src\app\app.module.ts , import the locale and advanced formatting options from the extra dataset and register the locale via the registerLocaleData function.

The locales are already provided with the BizFx SDK, under src\locales.

/* Locales */
import localeFr from '../locales/fr';
import localeFrExtra from '../locales/extra/fr';
import localeJa from '../locales/ja';
import localeJaExtra from '../locales/extra/ja';
import localeDe from '../locales/de';
import localeDeExtra from '../locales/extra/de';
import localeEnAu from '../locales/en-AU';
import localeEnAuExtra from '../locales/extra/en-AU';

registerLocaleData(localeFr, 'fr-FR', localeFrExtra);
registerLocaleData(localeDe, 'de-DE', localeDeExtra);
registerLocaleData(localeJa, 'Ja-JP', localeJaExtra);
registerLocaleData(localeEnAu, 'en-AU', localeEnAuExtra);

Once we have registered the locale, if we were to configure the locale at this point we would find that there is some messaging in that is not rendered quite right. This is because there are also a handful of text overrides that are stored in the internationalisation folder of BizFx (‘src\assets\i18n\’) that also need to be added to override the default messaging in BizFx.

The LanguageSelector display text has not been configured.

Copy an existing locale file fom the internationalisation folder and update the messaging accordingly.

{
    "ValidationErrors": {
        "IsRequired": "{{DisplayName}} is required.",
        "IncorrectDecimalValue": "{{DisplayName}} has an incorrect decimal value.",
        "IncorrectDateValue": "{{DisplayName}} has an incorrect date value."
    },
    "ActionExecuted": "{{DisplayName}} executed.",
    "Back": "Back",
    "Logout": "Log out",
    "LanguageSelector": "Language displayed",
    "NoSearchResults": "No results matching your search were found.",
    "Searching": "Searching..."
}
The LanguageSelector display text when configured for ‘en-AU’.

Configuring the Locale for BizFx

Now that the locale has been registered to the BizFx solution, the next step is to update the BizFx configuration to use it.

Open src\assets\config.json and set the Language to the newly registered locale.

{
  "EnvironmentName": "HabitatAuthoring",
  "EngineUri": "https://commerceauthoring.XC92.local",
  "IdentityServerUri": "https://XP0.IdentityServer",
  "BizFxUri": "https://bizfx.XC92.local",
  "Language": "en-AU",
  "Currency": "USD",
  "ShopName": "CommerceEngineDefaultStorefront",
  "LanguageCookieName": "selectedLanguage",
  "EnvironmentCookieName": "selectedEnvironment",
  "AutoCompleteTimeout_ms": 300
}

Deploy the BizFx solution as per your preferred deployment method and the locale will now be utilised throughout the BizFx tooling.

Source Code

The source code for this example of adding the ‘en-AU’ locale and other BizFx customisations can be found at Ajsuth.BizFx.

Sitecore Experience Commerce: Associating Inventory from Sellable Item and Variant Pages

Reading Time: 2 minutes

In this article, we introduce a small custom plugin for Sitecore Commerce Business Tools that enables the inventory association for sellable items and variants directly from the Merchandising Manager pages.

Establishing inventory information associations is an action hosted within the Inventory Manager. Prior to the introduction of inventory indexes in XC 9.3, locating an existing inventory information record for large catalogs via the Inventory Manager can be quite a tedious task with the pagination controls being the only form of search.

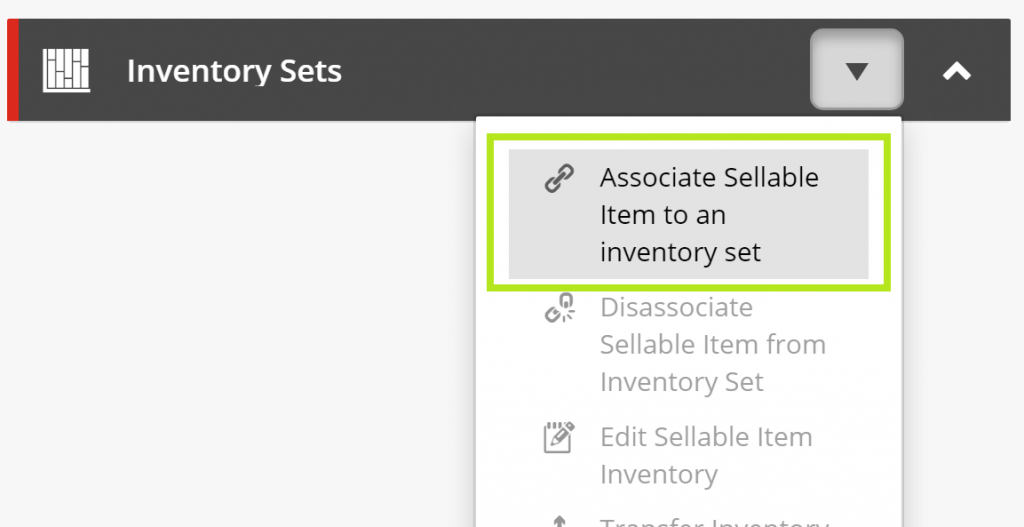
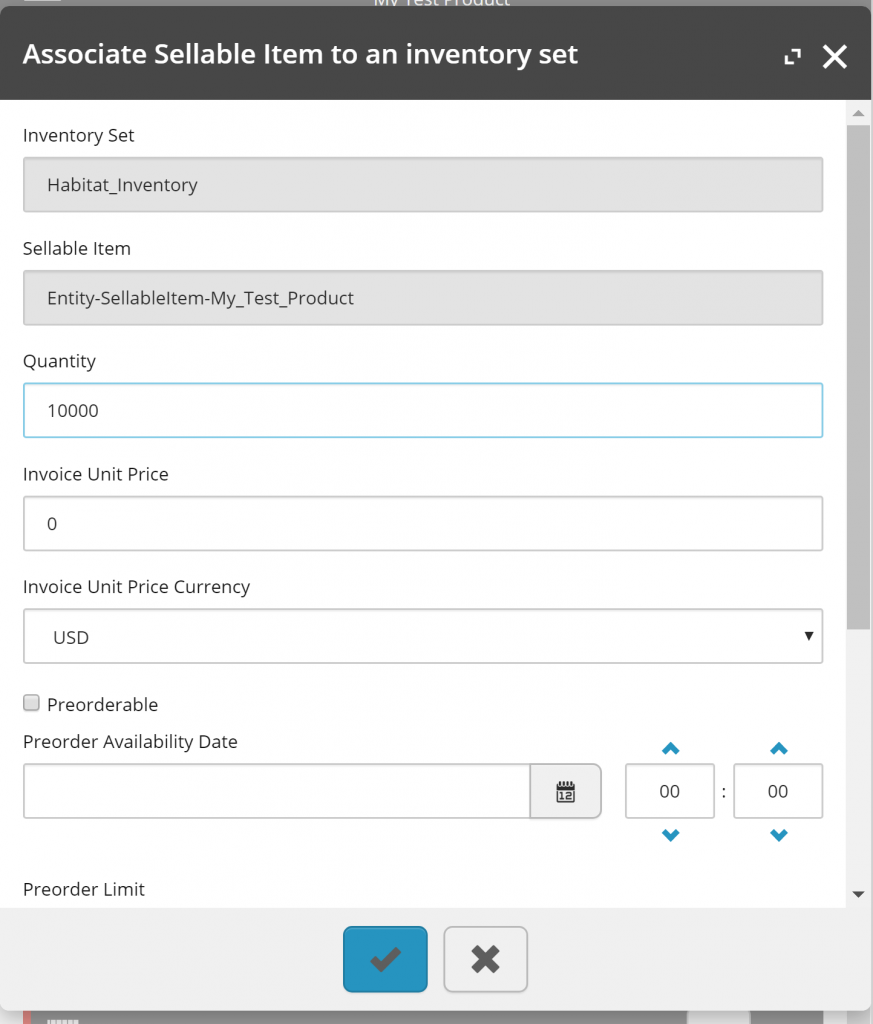
The custom plugin adds the Associate Sellable Item to an inventory set action to the Inventory Sets entity view for the Sellable Item and Variant merchanding pages.

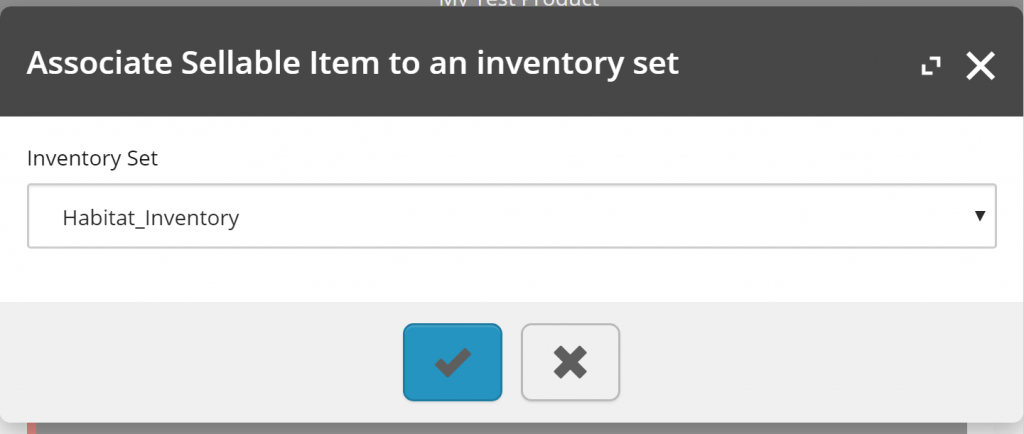
A transitional step to select the Inventory Set is added to the modal view, which in the Inventory Manager is driven by the inventory set being viewed.

The final step locks the Inventory Set and Sellable Item fields, as they have already been identified, and if the sellable item already had been associated to the selected inventory set then this would behave like an edit view, keeping the UX at the forefront of this implementation.

Managing existing inventory information records can also be more achieved via the Sellable Item and Variant pages in the Inventory Sets entity view actions, however prior to XC 9.3 a business was required to create a new entity version to enable these controls, unless the EntityVersionsActionsPolicy had been updated to allow these actions to bypass the entity version (as they should). This process was also documented in Enabling Disassociate, Edit, and Transfer Inventory Actions for Published Sellable Items and Variants.

Source Code: Extended Sitecore Commerce Inventory project repository

Working with the BizFx SDK: Preparing the Base Solution for Customisation

Reading Time: 3 minutes

In this article, we will look at preparing the BizFx project for customisation, by first aligning the default configuration of the SDK with the configuration that was deployed with the Sitecore Commerce installation, and then reviewing how to build and deploy solution.

Fair warning: I am not an expert in Angular, however the information provided is enough for getting started and performing the bare minimum to align the BizFx SDK for custom solutions.

Creating the BizFx Development Solution

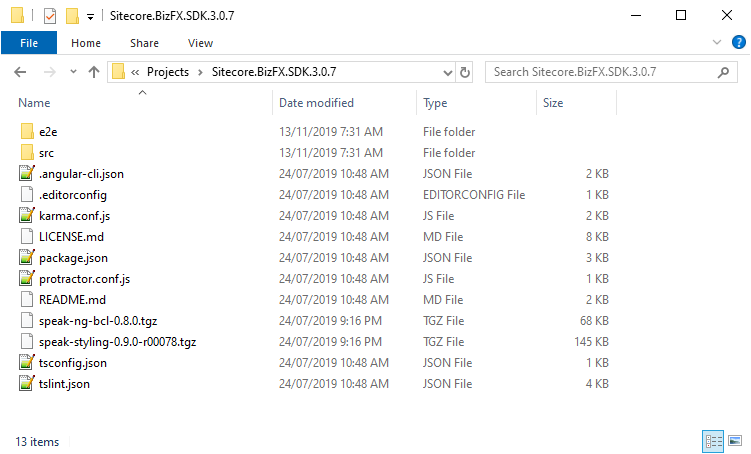
The Sitecore Commerce On Premise package contains the BizFx SDK and the speak files that will be required for the new project.

Extract the contents of the Sitecore.BizFX.SDK.*.*.*.zip into your desired folder location, e.g. C:\projects\, and copy the speak-ng-bcl-*.*.*.tgz and speak-styling-*.*.*-r*****.tgz files into the same folder as the SDK.

The BizFx SDK does come with a README.md file containing some general instructions on preparing the solution for building, however we will highlight the main aspects of these instructions and cover some addition steps for local and production deployments.

In src\assets\config.json we need to copy the values from our local BizFx installation, located by default at <web root>\<BizFx>\assets\config.json, so that when we deploy our new version the configuration isn’t corrupted. You’ll notice the values that need to be updated are named ‘PlaceholderFor<context>’.

{
  "EnvironmentName": "HabitatAuthoring",
  "EngineUri": "PlaceholderForAuthoringUrl",
  "IdentityServerUri": "PlaceholderForIdentityServerUrl",
  "BizFxUri": "PlaceholderForBizFxUrl",
  "Language": "PlaceholderForDefaultLanguage",
  "Currency": "PlaceholderForDefaultCurrency",
  "ShopName": "PlaceholderForDefaultShopName",
  "LanguageCookieName": "selectedLanguage",
  "EnvironmentCookieName": "selectedEnvironment",
  "AutoCompleteTimeout_ms": 300
}

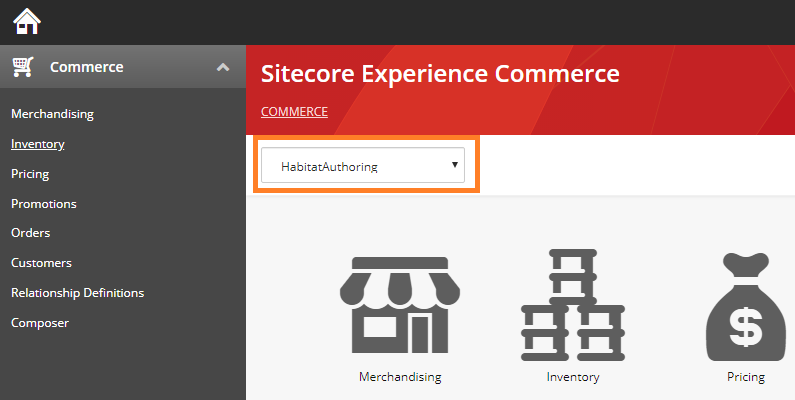
The other value that will need to be updated for projects will be the EnvironmentName, which is used to select the default environment in BizFx.

It is recommended that the LanguageCookieName and EnvironmentCookieName properties remain as their default value as they may only need to be changed for advanced customisations. We will not cover modifying these properties in this article.

Prerequisites for Building

Assuming node installed already, from the BizFx solution folder, open your preferred CLI tool and run the following commands:-

npm config set @speak:registry=https://sitecore.myget.org/F/sc-npm-packages/npm/
npm config set @sitecore:registry=https://sitecore.myget.org/F/sc-npm-packages/npm/
​​​​​​​npm install speak-ng-bcl-0.8.0.tgz
npm install speak-styling-0.9.0-r00078.tgz
npm install @sitecore/bizfx
npm install

Building and Deploying the BizFx Solution

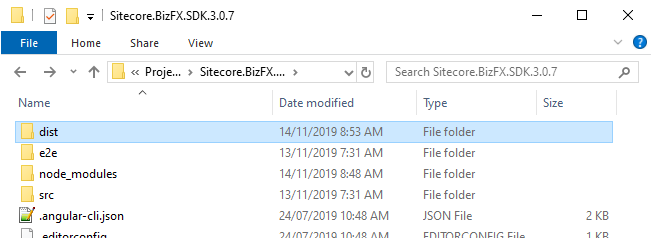
For building the BizFx Angular application, the ng build command will compile into an output folder named dist, defaulting to the workspace folder. Within the dist folder, the sdk will be the equivalent of the <BizFx> website folder in the web root.

For production builds execute the ng build --prod command, which optimises the compiled solution for production deployments.

For more information about the Angular commands see https://angular.io/cli.

To deploy the BizFx solution, copy the contents of the dist/sdk into the <web root>\<BizFx> folder.

Building and Deploying via Gulp

For building and deploying the BizFx solution, I use a gulp script to wrap the angular commands. See the Source Code link at the end of the article to download the script.

If you haven’t installed gulp, run the following command:-

​​​​​​​npm install gulp

Running the default gulp command will build the solution, clean out the BizFx folder in the web root and the deploy the solution to the BizFx folder.

As the gulp tasks will be performing operations on system restricted folders, make sure you run the gulp command under Administrator privileges.

Source Code: Ajsuth.BizFx.DeploymentScripts

Sitecore Experience Commerce: Enabling Disassociate, Edit, and Transfer Inventory Actions for Published Sellable Items and Variants

Reading Time: 2 minutes

In this article, we will look at how we can enable the Disassociate Sellable Item from Inventory Set, Edit Sellable Item Inventory and Transfer Inventory actions when viewing sellable item and variant entity views in BizFx.

For entities that have been configured to utilise entity versioning (catalogs, categories, and sellable items), via the VersioningPolicy in the VersioningPolicySet, all actions are disabled by default when the entity has been published.

The actions that are enabled are due to those actions being registered in the EntityVersionsActionsPolicy in the VersioningPolicySet, under the AllowedActions property.

There is no need to restrict the Inventory Sets actions in the Sellable Item and Variant entity views as they can be executed from within the Inventory Manager.

Note: Inventory association and disassociation actions apply to all entity versions of the sellable items as inventory records don’t have strong ties to specific entity versions as inventory is not content.

To enable the Inventory Sets actions, simply add their action names to the AllowedActions, and deploy and bootstrap.

{
    "$type": "Sitecore.Commerce.Plugin.EntityVersions.EntityVersionsActionsPolicy, Sitecore.Commerce.Plugin.EntityVersions",
    "AllowedActions": {
    "$type": "System.Collections.Generic.List`1[[System.String, mscorlib]], mscorlib",
    "$values": [
            "AddEntityVersion",
            "AddCatalog",
            "DeleteCatalog",
            "AddCategory",
            "DeleteCategory",
            "AddSellableItem",
            "DeleteSellableItem",
            "AddBundle",
            "AssociateCategoryToCategoryOrCatalog",
            "AssociateSellableItemToCatalog",
            "AssociateSellableItemToCategory",
            "DisassociateItem",
            "MakePurchasable",
            "DisassociateSellableItemFromInventorySet",
            "EditSellableItemInventory",
            "TransferInventory"
        ]
    }
}

These actions can now be performed, regardless of whether or not the entity has been published.