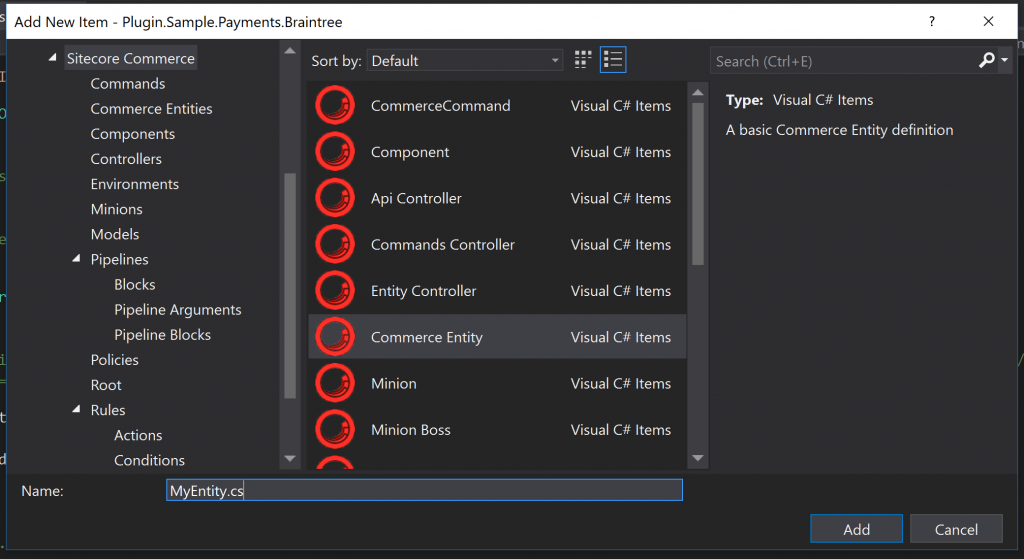
To speed up development with Commerce Engine customisations, I have created a library of templates for Visual Studio. This should remove the necessity of referencing the sample commerce engine plugin project or decompiling and cleaning code from certain DLLs just to get to a starting point for your customisations.
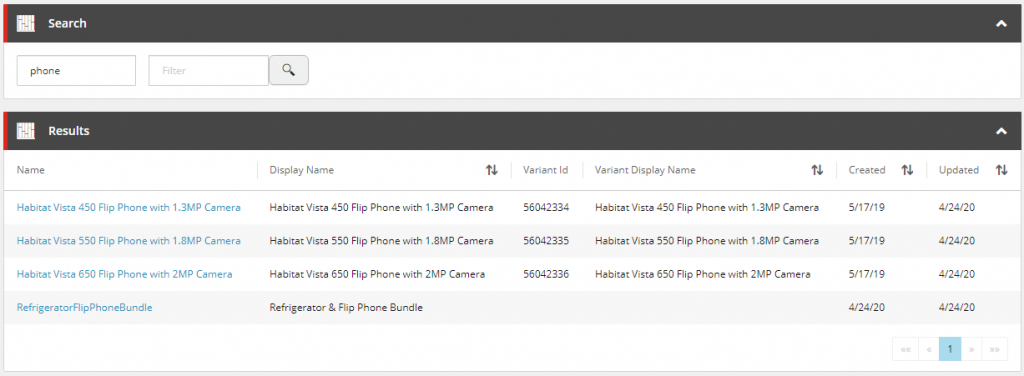
Throughout this article we will utilise the categoryComputers and Tablets > Kid’s Tablets and productMinnow Kid’s Tablet—7”, 8GB to review our progress. These examples also contain some non-alphanumeric characters to ensure we take these special characters into consideration.
How Storefront URLs are Generated
Storefront URLs are constructed using the configuration of the site’ s linkManager. The configuration is located at sitecore/linkManager/providers/add[@name=’commerce‘].
An important note about the provider configuration properties is that only 3 properties actually affect the generated URLs – includeFriendlyName, useShopLinks, and encodeNames.
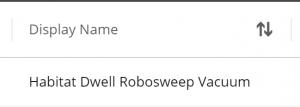
includeFriendlyName: Includes the DisplayName of the category or product in the URL segment. i.e. {category DisplayName}={category FriendlyId}and {product DisplayName}={ProductId/FriendlyId}.
useShopLinks: Constructs URL with shop/{category}/{product} if enabled, otherwise as category/{category} and product/{product}for category and product URLs respectively.
includeCatalog:Not currently supported
addAspxExtension: N/A
alwaysIncludeServerUrl: N/A
encodeNames: Encodes the DisplayName portion of the category and product segments. Only supported when useShopLinks is true.
languageEmbedding: N/A
languageLocation: N/A
lowercaseUrls: Not currently supported
shortenUrls: Not currently supported
useDisplayName: Not currently supported
URLs Generated from Various Configurations
The following decision table shows the available configurations
Rules
Conditions
1
2
3
4
5
useShopLinks
Y
Y
Y
N
N
includeFriendlyName
Y
Y
N
Y
N
encodeNames
Y
N
Y
Actions
1
2
3
4
5
Shop
X
X
X
Product/Category
X
X
Display Name prefix
X
X
X
Display Name encoding
X
X
The following table shows the URLs generated from the rules in the above table.
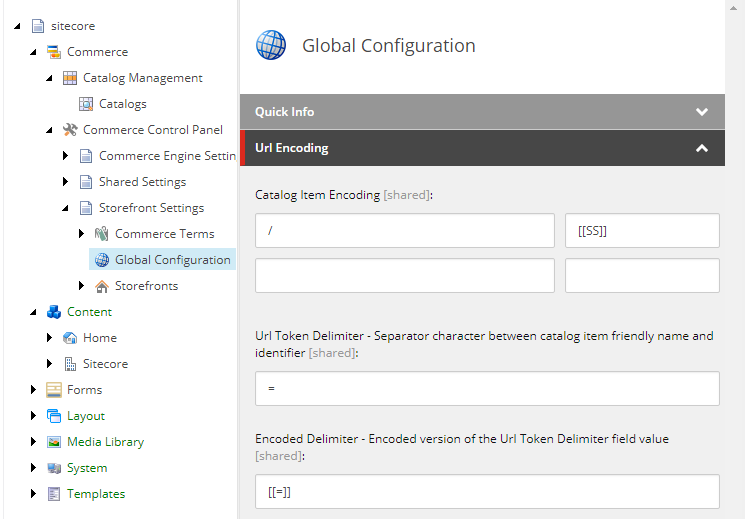
The URLs generated are looking good. We do have an issue with the URLs still containing encoded spaces. To control character encoding there is a configuration in the content editor at /sitecore/Commerce/Commerce Control Panel/Storefront Settings/Global Configuration > URL Encoding > Catalog Item Encoding.
Unfortunately there is a quirk in which it doesn’t accept space entries, so we will override the EncodeUrlToken and DecodeUrlToken methods instead. As we aren’t allowed to have hyphens in the category names, we won’t have any character conflicts where encoding or decoding.
Now that we have our category URL structure that meets our requirements, our last step is to ensure the URLs are resolving back to their correct Sitecore items.
Updating the CatalogPageItemResolver
Now we have covered the URL generation implementation, we now need to resolve these URLs back to their correct Sitecore items.
public override void Process(PipelineArgs args)
{
	if (Context.Item == null || SiteContext.CurrentCatalogItem != null)
	{
		return;
	}

	var contextItemType = GetContextItemType();
	switch (contextItemType)
	{
		case ItemTypes.Category:
		case ItemTypes.Product:
			var isProduct = contextItemType == ItemTypes.Product;
			var catalogItemIdFromUrl = GetCatalogItemIdFromUrl(isProduct);
			if (string.IsNullOrEmpty(catalogItemIdFromUrl))
			{
				break;
			}
			var catalog = StorefrontContext.CurrentStorefront.Catalog;
			var catalogItem = ResolveCatalogItem(catalogItemIdFromUrl, catalog, isProduct);
			if (catalogItem == null && !isProduct)
			{
				catalogItemIdFromUrl = GetCatalogItemIdFromUrl(true);
				if (string.IsNullOrEmpty(catalogItemIdFromUrl))
				{
					break;
				}
				catalogItem = ResolveCatalogItem(catalogItemIdFromUrl, catalog, isProduct);
			}
			if (catalogItem == null)
			{
				WebUtil.Redirect("~/");
			}

			SiteContext.CurrentCatalogItem = catalogItem;
		break;
	}
}

private string GetCatalogItemIdFromUrl(bool isProduct)
{
    var catalogItemId = string.Empty;
    var rawUrl = HttpContext.Current.Request.RawUrl;
    var urlTokens = rawUrl.Split('/');
    if (urlTokens.Any())
    {
        var item = urlTokens.Last();
        var queryStringPosition = item.IndexOf("?", StringComparison.OrdinalIgnoreCase);
        if (queryStringPosition > 0)
        {
            item = item.Substring(0, queryStringPosition);
        }

        if (isProduct && urlTokens.Length >= 4)
        {
            var parentCategoryName = urlTokens[urlTokens.Length - 2];
            item = $"{parentCategoryName}{item}";
        }
        catalogItemId = CatalogUrlManager.ExtractItemId(item);
    }

    return catalogItemId;
}
Summary
We learnt that the construction of the URL can be managed via Sitecore Configuration, the Sitecore Content Editor and via code customisations, depending on the URL requirements.
In this article, we will cover the common naming conventions found within Sitecore Experience Commerce to maintain a consistent approach in our custom plugins.
CRUD Operations
Starting with some simple CRUD operations, the following tables documents the naming conventions to utilise for the various Commerce classes
Entities
Create Entity
Naming Convention: Add<entity><context>
Commerce Reference
Example
Controller Action
AddPriceBook (CommandsController)
Command
AddPriceBookCommand
Model
PriceBookAdded
Pipeline
AddPriceBookPipeline
Pipeline Argument
AddPriceBookArgument
Pipeline Block
AddPriceBookBlock
Read Entity
Naming Convention: Get<entity><context>
Commerce Reference
Example
Controller Action
Get (<Entity>Controller)
Command
N/A. Use FindEntityCommand instead
Model
FoundEntity (handled within FindEntityCommand)
Pipeline
IFindEntityPipeline (handled within FindEntityCommand)
Pipeline Argument
FindEntityArgument (handled within FindEntityCommand)
Pipeline Block
SQL.FindEntityBlock (handled within FindEntityCommand)
Update Entity
Naming Convention: Update<entity><context>
Commerce Reference
Example
Controller Action
EditPriceBook (CommandsController)
Command
EditPriceBookCommand
Model
PriceBookEdited (No current usages)
Pipeline
EditPriceBookPipeline
Pipeline Argument
EditPriceBookArgument
Pipeline Block
EditPriceBookBlock
Delete Entity
Naming Convention: Delete<entity><context>
Commerce Reference
Example
Controller Action
DeletePriceCard. (CommandsController)
Note: When deleting entities, it is important to consider how references to these entities need to be handled, as well as any child entity dependencies that may also need to be deleted, which would otherwise be orphaned.
Command
DeletePriceBookCommand
Model
PriceCardDeleted (No current usages)
Pipeline
IDeleteEntityPipeline
Pipeline Argument
DeleteEntityArgument (handled within IDeleteEntityPipeline)
Pipeline Block
DeleteEntityBlock (handled within IDeleteEntityPipeline)
Components
Create Component
Naming Convention: Add<component><context>
Commerce Reference
Example
Controller Action
AddCartLine
Command
AddCartLineCommand
Model
LineAdded
Pipeline
AddCartLinePipeline
Pipeline Argument
CartLineArgument
Pipeline Block
AddCartLineBlock
Read Component
Naming Convention: N/A Components only exist to extend entities and therefore will not live in isolation to be queried. If a component was to be queried it would be to retrieve it in the context of an entity and therefore the entity would be retrieved instead.
Update Component
Naming Convention: Update<component><context>
Commerce Reference
Example
Controller Action
UpdateCartLine
Command
UpdateCartLineCommand
Model
LineUpdated
Pipeline
UpdateCartLinePipeline
Pipeline Argument
CartLineArgument
Pipeline Block
UpdateCartLineBlock
Delete Component
Naming Convention: Update<component><context>
Commerce Reference
Example
Controller Action
RemoveCartLine
Command
RemoveCartLineCommand
Model
LineRemoved (No current usages)
Pipeline
RemoveCartLinePipeline
Pipeline Argument
CartLineArgument
Pipeline Block
RemoveCartLineBlock
Business Tools
Pipeline Block Naming Convention
Example
Description
Get<Navigation Entity View>ViewBlock
GetInventoryNavigationViewBlock
Creates and constructs a navigation entity view
Get<Dashboard Entity View>ViewBlock
GetInventoryDashboardViewBlock
Creates and constructs a dashboard entity view
Get<Entities>ViewBlock
GetInventorySetsViewBlock
Creates and constructs an entity view for managed lists
Get<Entity>DetailsViewBlock
GetInventoryDetailsViewBlock
Creates and constructs an entity view for a specific entity
Reading Time: 2minutesIn this article, we will look at all of the configurations around currency so that we don’t run into any currency related errors when working with the Business Tools in Sitecore Experience Commerce and our storefront website.
Currency Configurations in the Sitecore Content Editor – Commerce Control Panel
In the Sitecore Content Editor,
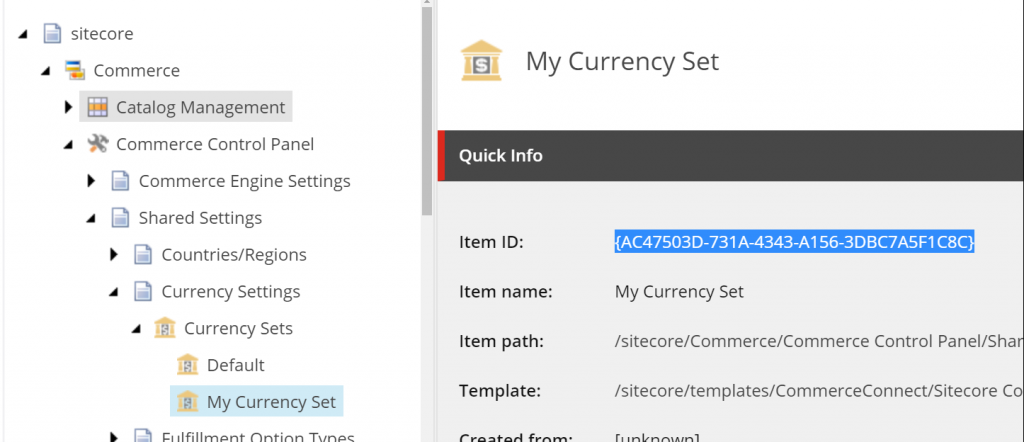
Go to /sitecore/Commerce/Commerce Control Panel/Shared Settings/Currency Settings/Currency Sets/
Create, edit or locate the currency set you wish to utilise
Note the Item ID
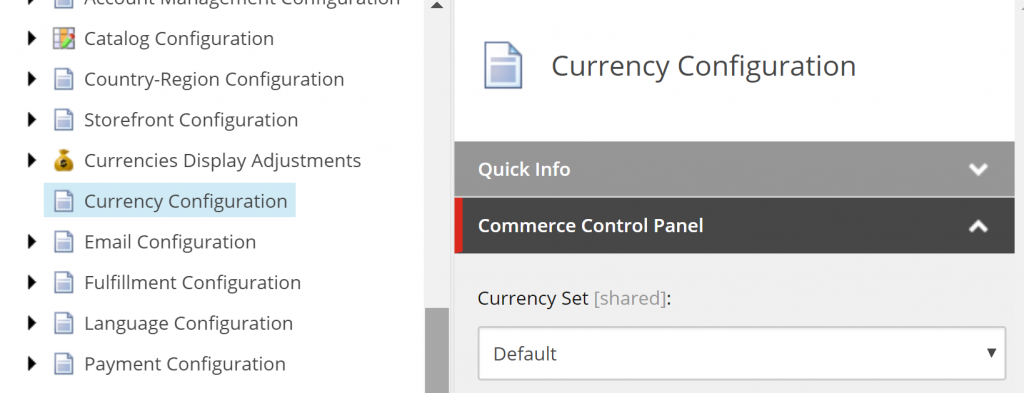
Go to /sitecore/Commerce/Commerce Control Panel/Storefront Settings/Storefronts/<Storefront>/Currency Configuration
Set the Currency Set as desired
Publish any changes made
Currency Configurations in the Commerce Engine Connect Config
In the Sitecore configuration file, <Website Root>\App_Config\Include\Y.Commerce.Engine\Sitecore.Commerce.Engine.Connect.config, the property defaultShopCurrency may need to be updated. Note: It’s best practice to patch out this value rather than updating this configuration file directly to ensure it’s deployed to each environment and that upgrades can be performed without corrupting the website.
Create or update the patch configuration file in your website’s solution with the desired currency value.
Deploy the project/solution
Currency Configurations in BizFx
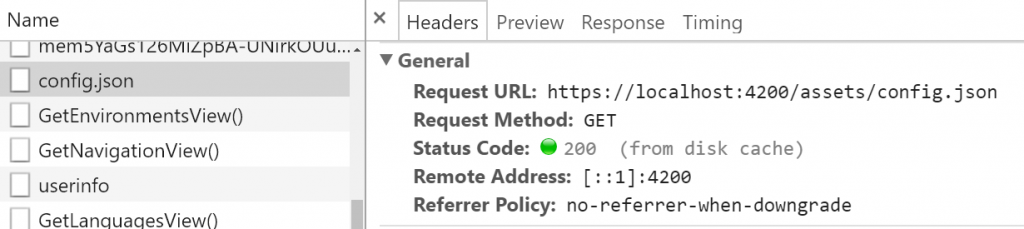
In your BizFx solution, open \assets\config.json and review and edit the Currency value as appropriate
Deploy the BizFx site
Clear the Application cache in the browser if the config.json file is still being served from disk cache.
Currency Configurations in the Commerce Engine Environment Policies
In the environment configurations, review and edit the following policy properties as appropriate:-
GlobalEnvironmentPolicy -> Default Currency
GlobalCurrencyPolicy -> DefaultCurrencySet (This will be the Sitecore Item ID that you noted from the Commerce Control Panel)
GlobalPhysicalFulfillmentPolicy ->
DefaultCartFulfillmentFees -> CurrencyCode
DefaultCartFulfillmentFee -> CurrencyCode
DefaultItemFulfillmentFees -> CurrencyCode
DefaultItemFulfillmentFee -> CurrencyCode
FulfillmentFees -> Fee -> CurrencyCode
Deploy the Commerce Engine Solution
Run Bootstrap
Currency Configurations in Postman Environment
In the environment configurations set up for the project instances, review and update the Currency value as appropriate.
In this article, we will look at what UI Hints and UI Types are and show samples is each being used within the Business Tools.
Note: This article is a work in progress.
UI Hints
The UI Hints property sets the rendering type for the properties of the entity views and entity action views.
EntityActionView
RelatedList
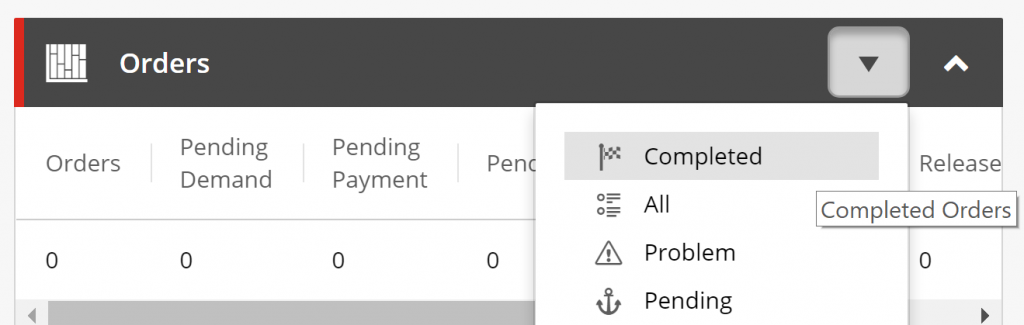
The RelatedListUI Hint is used to redirect the user to an entity view page instead of opening up a modal for user interaction. The entity view page URL is constructed from the EntityView property in the following format <domain>/entityView/<entity view>.
e.g. https://localhost:4200/entityView/OrdersList-CompletedOrders
var actions = entityView.GetPolicy<ActionsPolicy>().Actions;
var entityActionView = new EntityActionView()
{
	Name = "CompletedOrders",
	IsEnabled = true,
	UiHint = "RelatedList",
	EntityView = "OrdersList-CompletedOrders",
	Icon = "signal_flag_checkered"
}
actions.Add(entityActionView);
EntityView
The following list of UI Hints can be utilised for entity views.
The default UI Hint for entity views is Flat. The hint is used for rendering a single set of properties as plain text.
Entity View Usage
Supported
Applicable UI Types
Page
Yes
N/A (All types will render as raw string values)
Modal
Yes
Empty (string) Text
Empty (bool) Checkbox
Empty (DateTimeOffset)
AutoComplete
DownloadCsv
Multiline
RichText
SelectList
Tags
Grid
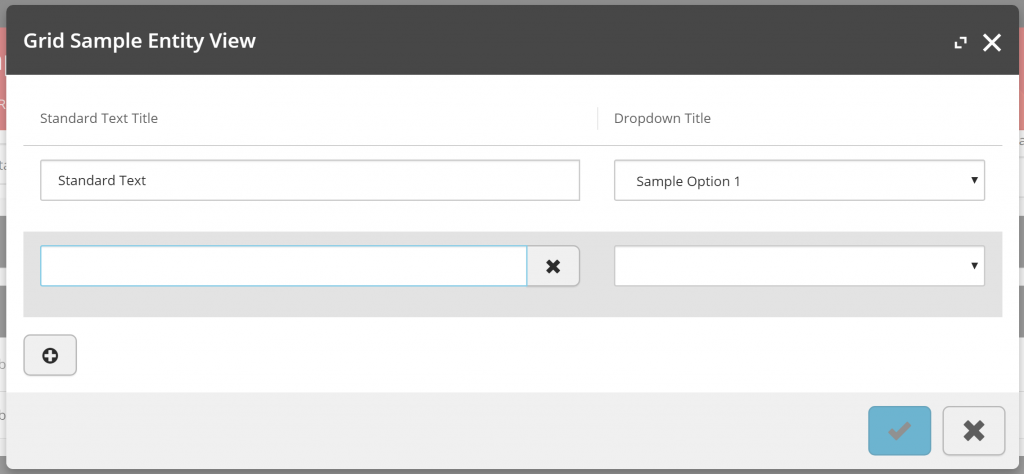
The GridUI Hint supports the rendering of child entity views in a table-row layout in the modal window, allowing additional rows to be added and removed.
Notes:
The DropdownUI Type does not apply the remove row control, therefore if all view properties of the row are set to Dropdown the row will not be able to be removed.
Only a single child entity view is supported as the UI renders a single Add Row button, which applies to the first child entity view.
Omitting the “AllowAdd”ViewProperty will exclude the Add Row button from the Grid.
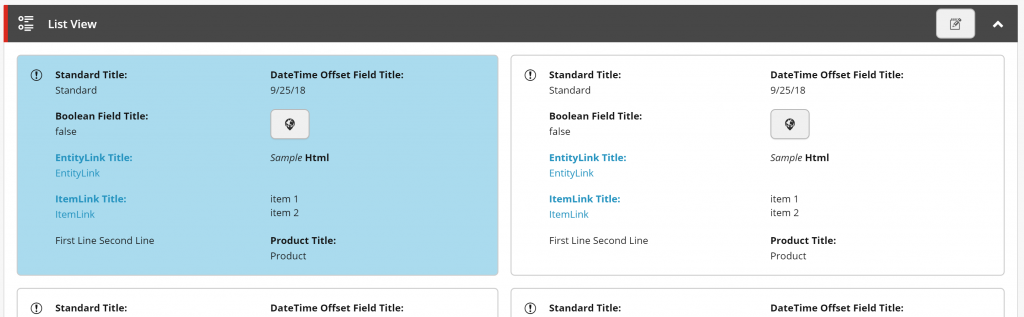
The ListUI Hint creates a card-like layout, each list item represented by a child entity view containing properties of supported UI Types.
Entity View Usage
Supported
Applicable UI Types
Page
Yes
Empty (String)
Empty (DateTimeOffset)
Empty (Decimal)
Empty (Sitecore.Commerce.Core.Money)
DownloadCsv
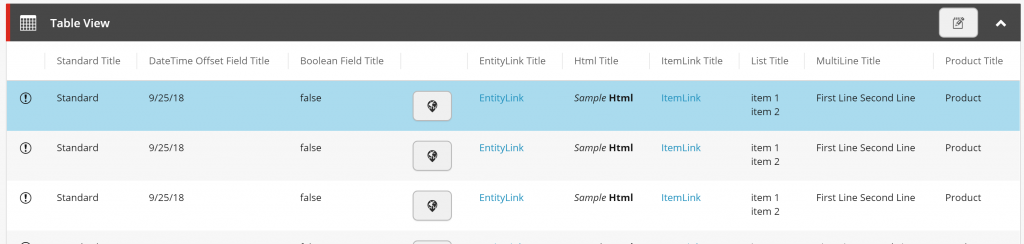
EntityLink
FullDateTime
Html
ItemLink
List
Multiline
SubItemLink
Modal
No
N/A
MediaPicker
Details to come.
Entity View Usage
Supported
Applicable UI Types
Page
No
N/A
Modal
Yes
???
Search
The Search UI Hint is an implicit implementation driven by the GetSearchViewBlock, based on the SearchViewPolicies configured for the environment.
The current request’s view name is used to retrieved the corresponding SearchViewPolicy by its ViewName property and will use the SearchScopeName to resolve the SearchScopePolicy for the search queries of the control. Where a SearchScopePolicy has been resolved, the Search entity view will be added to the page, and upon execution of the search control the Results entity view will be added without any additional configuration or implementation.
Notes:
An EntityType is also specified in the SearchViewPolicy for the InventorySet as additional validation for the generic ‘Master’ entity view name that is utilised by all entity types.
Similar to the ListUI Hint, the TableUI Hint creates a table-row layout, each list item represented by a child entity view containing properties of supported UI Types.
Entity View Usage
Supported
Applicable UI Types
Page
Yes
Empty (String)
Empty (DateTimeOffset)
Empty (Decimal)
Empty (Sitecore.Commerce.Core.Money)
DownloadCsv
EntityLink
FullDateTime
Html
ItemLink
List
Multiline
SubItemLink
Modal
No
N/A
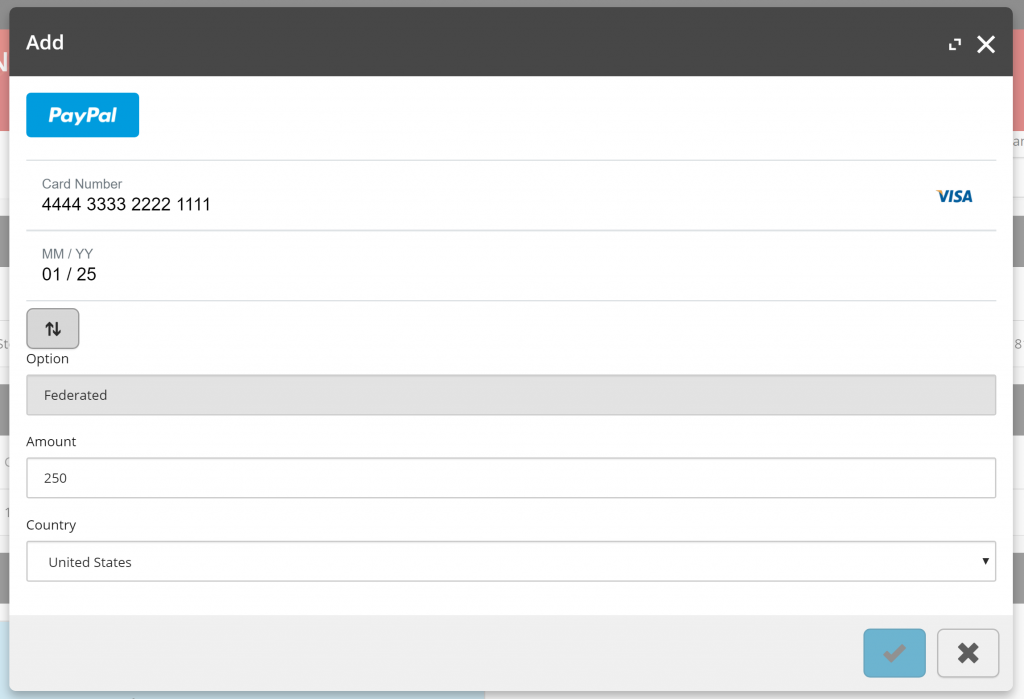
BraintreePayment
The BraintreePaymentUI Hint is utilised to handle adding braintree payments. It injects an iframe to manage payment information via the Braintree gateway, but otherwise provides similar support as the default FlatUI Hint for view property rendering.
Notes:
This UI Hint is intended for sole use with the Braintree payment integration and not for general use.
Entity View Usage
Supported
Applicable UI Types
Page
No
N/A
Modal
Yes
Empty (string) Text
Empty (bool) Checkbox
Empty (DateTimeOffset) Date Time picker
AutoComplete
DownloadCsv
Dropdown
Multiline
RichText
Tags
UI Types
The UI Types property sets the control type that will be rendered against entity views.
View Property
The following list of UI Types can be utilised for view properties.
When no UI Type is provided, the UI control rendered is based off of the data type that is set against the RawValue property of the ViewProperty. The data types that influence the controls rendered are as follows:-
String
The default data type is the String value, which will render a text field. Most data types will fallback to their raw string value when evaluated.
var viewProperty = new ViewProperty()
{
	Name = "Standard Text Title",
	RawValue = "Standard Text"
};

entityView.Add(viewProperty);
Boolean (Checkbox)
Boolean values will be rendered as checkboxes for supported UI Hints, otherwise rendering as a string value.
var viewProperty = new ViewProperty()
{
Name = "Boolean Field Title",
RawValue = false
};
entityView.Add(viewProperty);
<!-- /wp:html -->
<!-- wp:heading {"level":5} -->
<h5 id="datetimeoffset">DateTimeOffset (Date Time Picker)</h5>
<!-- /wp:heading -->
<!-- wp:paragraph -->
<p><strong>DateTimeOffset</strong> values will be rendered as jQuery Date Time pickers for supported <em>UI Hints</em>, otherwise rendering as a string value.</p>
<!-- /wp:paragraph -->
<!-- wp:paragraph -->
<p><strong>Note:</strong> <em>ReadOnly</em> mode is not supported for this control. <em>(Confirmed up to XC 9.1)</em></p>
<!-- /wp:paragraph -->
<!-- wp:image {"id":327} -->
<figure class="wp-block-image"><img src="/wp-content/uploads/2018/10/uitype-datetimepicker-1-300x71.png" alt="" class="wp-image-327"/></figure>
<!-- /wp:image -->
<!-- wp:html -->
var viewProperty = new ViewProperty()
{
Name = "Date Time Offset Field Title",
RawValue = DateTimeOffset.Now
};
entityView.Add(viewProperty);
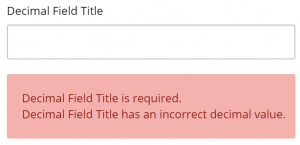
Decimal
Decimal values will render an input field with appropriate validation.
var viewProperty = new ViewProperty()
{
	Name = "Decimal Field Title",
	RawValue = (decimal)0.0
};
entityView.Add(viewProperty);
Autocomplete
Search control that auto-completes after 4 characters. Can be combined with a policy to configure what it searches for.
var searchScopePolicy = SearchScopePolicy.GetPolicyByType(context.CommerceContext, context.CommerceContext.Environment, typeof(SellableItem));
var policy = new Policy()
{
	PolicyId = "EntityType",
	Models = new List<Model>()
	{
		new Model() { Name = "SellableItem" }
	}
};
var policyList = new List<Policy>() { searchScopePolicy, policy };

var viewProperty = new ViewProperty()
{
	Name = "Autocomplete Title",
	UiType = UiTypes.Autocomplete,
	Policies = policyList
};
DownloadCsv
Used for the coupon CSV download control.
var items = new List<string>() { "item1", "item2" };
var viewProperty = new ViewProperty()
{
	Name = "DownloadCsv Title",
	UiType = UiTypes.DownloadCsv,
	RawValue = new JArray(items.Select(item => new JObject()
	{
		{
			"Code",
			item
		}
	})).ToString()
};

entityView.Add(viewProperty);
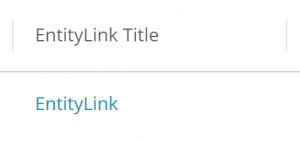
EntityLink
Allows linking directly to an entity. It will render a HTML link and build a URL to the Entity using the entity view’s ItemId property in the following format <domain>/entityView/Master/<entity version>/<item id>.
e.g. https://localhost:4200/entityView/Master/1/Entity-Catalog-Habitat_Master
var entityView = new EntityView()
{
	ItemId = "Entity-Catalog-Habitat_Master"
};

var viewProperty = new ViewProperty()
{
	Name = "EntityLink Title",
	UiType = "EntityLink",
	EntityVersion = 1
};

entityView.Add(viewProperty);
FullDateTime
Renders date and time in short format.
var viewProperty = new ViewProperty()
{
	Name = "FullDateTime Title",
	UiType = "FullDateTime",
	RawValue = DateTimeOffset.Now
};

entityView.Add(viewProperty);
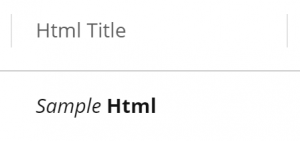
Html
Renders value as html.
var viewProperty = new ViewProperty()
{
	Name = "Html Title",
	UiType = "Html",
	RawValue = "<i>Sample</i> <b>Html</b>"
};

entityView.Add(viewProperty);
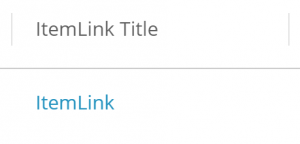
ItemLink
Creates a URL link in the format <domain>/entityView/<entity view name>/<Entity Version>/<entity id>/<item id>.
e.g. https://localhost:4200/entityView/Variant/1/Entity-SellableItem-6042567/56042567
var entityView = new EntityView()
{
	EntityId = "Entity-SellableItem-6042567",
	ItemId = "5604257",
	Name = "Variant",
	EntityVersion = 1
};

var viewProperty = new ViewProperty()
{
	Name = "ItemLink Title",
	UiType = "ItemLink"
};

entityView.Add(viewProperty);
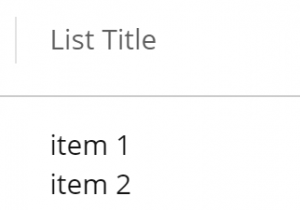
List
Typically used to render a combobox. If it has an AvailableOptionsPolicy it well render as a combo with those as options.
var viewProperty = new ViewProperty()
{
	Name = "List Title",
	UiType = "List",
	RawValue = new String[] { "item 1", "item 2" }
};

entityView.Add(viewProperty);
MultiLine
Multiline text editor.
var viewProperty = new ViewProperty()
{
	Name = "MultiLine Title",
	UiType = "MultiLine",
	RawValue = "First Line\nSecond Line"
};

entityView.Add(viewProperty);
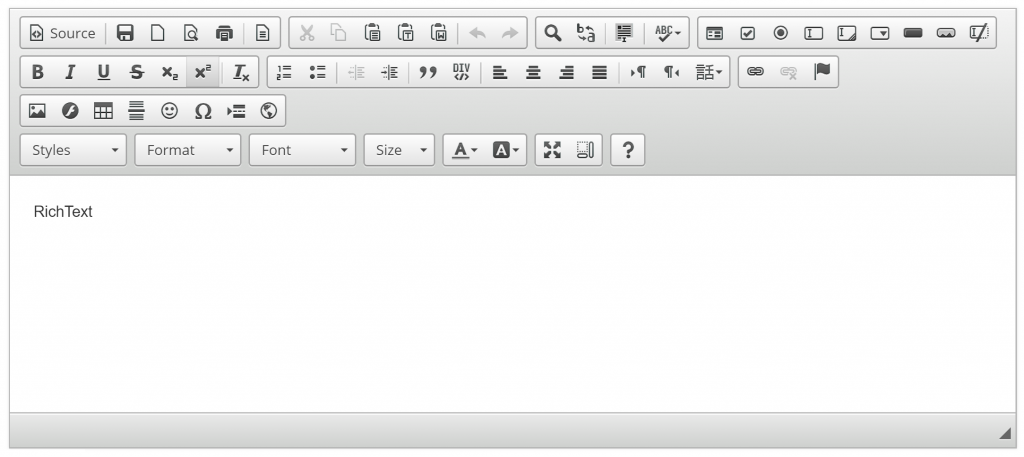
RichText
WYSISWYG Rich text editor.
var viewProperty = new ViewProperty()
{
	Name = "RichText Title",
	UiType = "RichText"
};

entityView.Add(viewProperty);
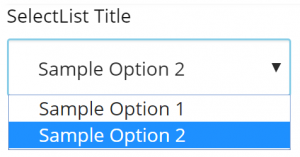
SelectList
Renders a dropdown control. The list of options must be defined via the AvailableSelectionsPolicy. This behaves the save as Dropdown and OptionsUI Types.
var viewProperty = new ViewProperty()
{
	Name = "SelectList Title",
	UiType = "SelectList"
};

var availableSelectionsPolicy = new AvailableSelectionsPolicy();
availableSelectionsPolicy.List.Add(new Selection() { DisplayName = "Sample Option 1", Name = "Option 1" });
var selection = new Selection() { DisplayName = "Sample Option 2", Name = "Option 2", IsDefault = true };
availableSelectionsPolicy.List.Add(selection);
viewProperty.Policies = new List<Policy>() { availableSelectionsPolicy };
viewProperty.RawValue = viewProperty.GetPolicy<AvailableSelectionsPolicy>().List.Where(s => s.IsDefault).FirstOrDefault()?.Name ?? string.Empty

entityView.Add(viewProperty);
Sortable
Used when rendering table headers to signify that they’re sortable.
SubItemLink
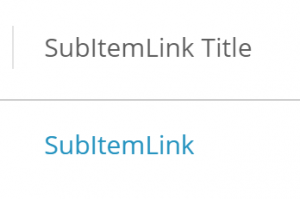
Similar to the ItemLink, the SubItemLink creates a URL link in the format <domain>/entityView/<entity view name>/<entity version>/<item id [0]>/<item id [1]>, splitting the ItemId by the pipe separator. This UI Type is used when referencing entities differing from the current entity view.
e.g. https://localhost:4200/entityView/Variant/1/Entity-SellableItem-6042567/56042567
var entityView = new EntityView()
{
	ItemId = "Entity-SellableItem-6042567|5604257",
	Name = "Variant"
};

var viewProperty = new ViewProperty()
{
	Name = "SubItemLink Title",
	UiType = "SubItemLink",
	EntityVersion = 1
};

entityView.Add(viewProperty);
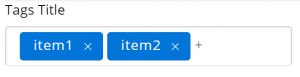
Tags
Renders jQuery tag control.
var viewProperty = new ViewProperty()
{
	Name = "Tags Title",
	UiType = UiTypes.Tags,
	RawValue = new String[] { "item1", "item2" },
	OriginalType = UiTypes.List
};

entityView.Add(viewProperty);
Summary
We have reviewed the various UI Hints and UI Types that are available to us for customising the Business Tools and the instances where they are applicable.
In this article, we review the Commerce Controller types to identify the purpose behind each controller type and assist with solution design in order to implement Commerce Controllers correctly in your Commerce Engine Plugin projects.
Commerce Controller Types
Entity Controllers
Entity Controllers, e.g. CartsController, implement Get methods and should only retrieve data, returning specific entities, lists of entities, or managed lists of entities. They should not manipulate data in the commerce databases or trigger behaviour within the Commerce Engine.
The following code snippet shows the Get Carts endpoint in the CartsController from the Carts Plugin.
public async Task<IEnumerable<Cart>> Get()
{
	CommerceList<Cart> commerceList = await Command<FindEntitiesInListCommand>()?.Process<Cart>(CurrentContext, CommerceEntity.ListName<Cart>(), 0, int.MaxValue);

	return (commerceList?.Items.ToList()) ?? new List<Cart>();
}
Api and CommerceOps Controllers
Api and CommerceOps Controllers implement methods that return non-OData entities only. The methods/endpoints of these controllers are routed via the ‘/api’ and ‘/commerceops’ URL segments, where the api routing is intended for website consumption while the commerceops routing is intended for DevOps consumption.
The following code snippet shows the GetBulkPrices endpoint in the ApiController from the Catalog plugin.
public async Task<IActionResult> GetBulkPrices([FromBody] ODataActionParameters value)
{
	if (!ModelState.IsValid)
		return new BadRequestObjectResult(ModelState);
	if (!value.ContainsKey("itemIds") || !(value["itemIds"] is JArray))
		return new BadRequestObjectResult(value);

	var jarray = (JArray)value["itemIds"];
	IEnumerable<SellableItemPricing> bulkPrices = await Command<GetBulkPricesCommand>().Process(CurrentContext, jarray?.ToObject<IEnumerable<string>>());

	return new ObjectResult(bulkPrices);
}
Commands Controllers
Commands Controllers implement OData actions for manipulating data through Commands. They should only return Command OData entities, not commerce entities like carts.
The command object contains information about the execution of the command, i.e. ResponseCode, Status, isCancelled, isCompleted, etc.
Some APIs do not wait for the command to complete and will return the command with the Status property as WaitingForActivation. These long running commands can be followed up on using the CheckCommandStatus() API with taskId parameter. See the Check Long Running Command Status API in the Sitecore DevOps postman collection.
The following code snippet shows the AddFederatedPayment endpoint in the CommandsController from the Payments plugin.
public async Task<IActionResult> AddFederatedPayment([FromBody] ODataActionParameters value)
{
	if (!ModelState.IsValid || value == null)
		return new BadRequestObjectResult(ModelState);
	if (!value.ContainsKey("cartId") || (string.IsNullOrEmpty(value["cartId"]?.ToString()) || !value.ContainsKey("payment")) || string.IsNullOrEmpty(value["payment"]?.ToString()))
		return new BadRequestObjectResult(value);

	var cartId = value["cartId"].ToString();
	var paymentComponent = JsonConvert.DeserializeObject<FederatedPaymentComponent>(value["payment"].ToString());
	var command = Command<AddPaymentsCommand>();

	await command.Process(CurrentContext, cartId, new List<PaymentComponent>() { paymentComponent });

	return new ObjectResult(command);
}
FAQ
How do I update an existing controller endpoint from any of the Commerce platform plugins?
The short answer is, you can’t modify or unregister a controller endpoint.
Whether you are looking to change the signature, the OData parameters from the request body, or any of the underlying code logic of an existing controller endpoint, you will need to create a new controller endpoint and ensure that you swap out any code that is calling the original endpoint for your custom endpoint.
Why can I call my endpoint via Postman, but it’s not available in the Service Proxy?
There are two possible reasons for this.
The first reason may be that the Service Proxy has not been regenerated since implementing the endpoint.
The second possible reason is that the endpoint has not been registered via the ConfigureServiceApiBlock or ConfigureOpsServiceApiBlock, depending on whether the endpoint should be exposed to the api or commerceops segments respectively.
Summary
While there’s nothing preventing developers from incorrectly using the Commerce Controllers, these coding standards are effectively the recommended practices that will contribute to the long term maintainability of your Sitecore Commerce solutions.
Reading Time: 3minutesIn this series of articles, we will go through the process of creating a new Sitecore Commerce Engine plugin from scratch that will eventuate into a complete end-to-end solution. We will touch most of the areas of Sitecore Experience Commerce, demonstrating the flexibility and extensibility of the platform. Our plugin will be the Sitecore Commerce Stores Plugin.
Note: This is intended to be a walk-through guide rather than production-ready, deployable code.
Each article in this series will try to isolate implementation aspects to avoid information overload. We will cover:-
Part 2 – Creating EntityViews, Actions, and Entities
Part 3 – Creating a Shard for the Stores Entities and Lists
More to come…
Creating a New Dashboard Item in the Business Tools
Creating the Navigation View
The Business Tools navigation is created from navigation blocks registered to the IBizFxNavigationPipeline. The naming convention used for navigation blocks is Get<Concept>NavigationViewBlock.
So first up, we create our GetStoresNavigationViewBlock. The structure of the Run method for these blocks is as follows:-
Ensure mandatory parameters have been provided
Create the navigation entity view to navigate to the concept dashboard
Add the navigation view as a child view of the Business Tools Navigation view
Return the updated Business Tools Navigation view
public override Task<EntityView> Run(EntityView entityView, CommercePipelineExecutionContext context)
{
	// 1. Ensure mandatory parameters have been provided
	Condition.Requires(entityView).IsNotNull($"{Name}: The argument cannot be null.");

	// 2. Create the navigation entity view to navigate to the concept dashboard
	var dashboardName = context.GetPolicy<KnownStoresViewsPolicy>().StoresDashboard;
	var storesDashboardView = new EntityView()
	{
		Name = dashboardName,
		ItemId = dashboardName,
		Icon = Views.Constants.Icons.MarketStand,
		DisplayRank = 6
	};

	// 3. Add the navigation view as a child view of the Business Tools Navigation view
	entityView.ChildViews.Add(storesDashboardView);

	// 4. Return the updated Business Tools Navigation view
	return Task.FromResult(entityView);
}
Referencing the code snippet above, the EntityView‘s Icon property can be set to any of the values for the icon font utilised. See my previous post, EntityView Icons in Sitecore Commerce Business Tools, for reviewing available icons.
The DisplayRank is also a self-explanatory property setting its position amongst the other ChildViews of the Business Tools navigation view.
Next, we register the navigation block in ConfigureSitecore.cs, in the BizFx Navigation Pipeline.
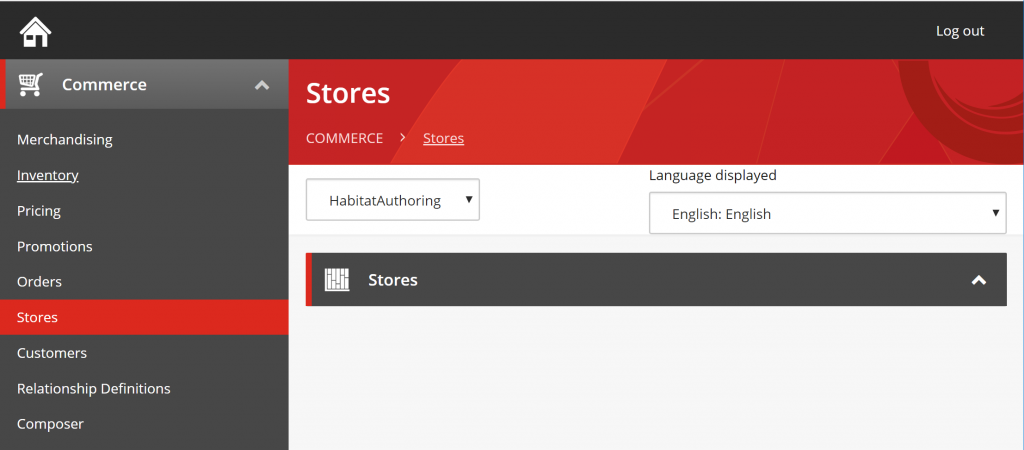
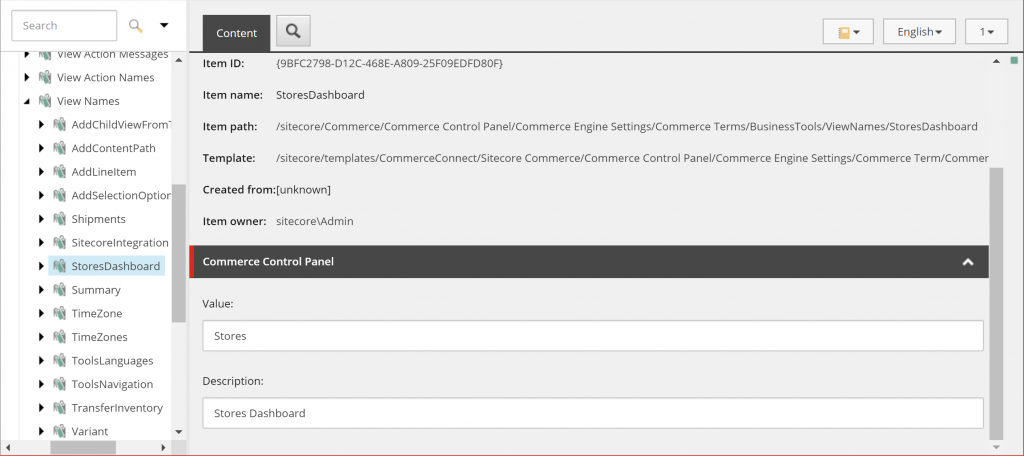
Now the Stores navigation item will actually read “StoresDashboard” at this point. We will need to add a commerce term to override the text.
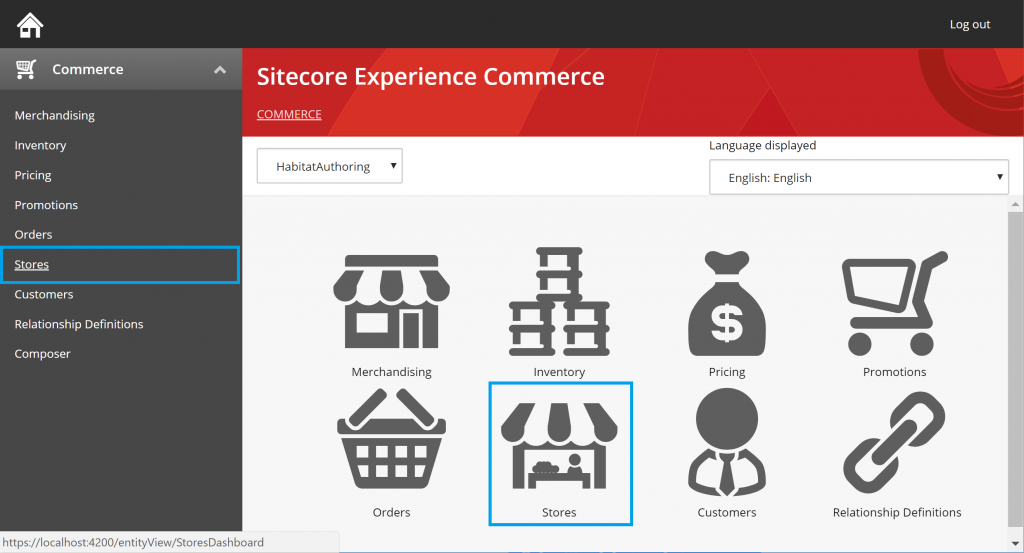
In the Sitecore Content Editor, navigate to /sitecore/Commerce/Commerce Control Panel/Commerce Engine Settings/Commerce Terms/BusinessTools/ViewNames and create a new item StoresDashboard.
In order to propagate this new data through to the Business Tools we need to run the Ensure/Sync default content paths request from Postman. This will sync the Sitecore content data into the Commerce Engine’s Shared Environments ContentEntities table.
Summary
So we added a new empty dashboard into the Business Tools. There’s nothing really to show but an icon and an empty dashboard view. Not to worry. Continue on to Part 2 – Creating EntityViews, Actions, and Entities (coming soon)
Reading Time: < 1minuteThe certificate thumbprint is configured in the website’s configuration file, located at <Website Root>/App_Config/Y.Commerce.Engine/Sitecore.Commerce.Engine.Connect.config (or in a custom patch file created for your solution) and in the Commerce Engine environments under <Commerce Engine Root>/wwwroot/config.json.
If you have configured a valid thumbprint that contains lowercase letters, for example 2700da6ab17c56a01f6d0762b76b3ca77933a68a, this will trigger the following errors in the Commerce Engine logs.
[20:13:57 ERR] ClientCertificateValidationMiddleware: Certificate with thumbprint 2700DA6AB17C56A01F6D0762B76B3CA77933A68A does not have a matching Thumbprint.
[20:13:57 INF] ClientCertificateValidationMiddleware: Certificate with thumbprint 2700DA6AB17C56A01F6D0762B76B3CA77933A68A is not valid.
This is caused by the logic used to compare the thumbprint values. The thumbprint in the Sitecore configuration file is transformed to uppercase while the thumbprint from the Commerce Engine configuration is not, so when the case-sensitive comparison is performed the result is a mismatch.
As the thumbprint is not case-sensitive, you can safely update the thumbprint values to be uppercase to resolve these errors.